2019 MASERATI LEVANTE fuse
[x] Cancel search: fusePage 76 of 436
(Continued)
a passenger vehicle or off-road vehicle
can expose you to chemicals including
such as, engine exhaust, carbon
monoxide, phthalates and lead, that
which are known to the State of
California to cause cancer and birth
defects or other reproductive harm. To
minimize exposure, avoid breathing
exhaust, do not idle the engine except
as necessary, service your vehicle in a
well-ventilated area and wear gloves
or wash your hands frequently when
servicing your vehicle. For more
information go to:
www.P65Warnings.ca.gov/passenger-
vehicle
WARNING!
• Deployed air bags and seat belt
pretensioners cannot protect you in
another collision. Have the air bags,
seat belt pretensioners, and the
front seat belt retractor assemblies
replaced by an Authorized Maserati
Dealer. Also, have the Occupant
Restraint Controller (ORC) system
serviced as well.
• Have the air bag checked, serviced
and replaced only by an Authorized Maserati Dealer.
Air Bag System Maintenance
WARNING!
• Modifications to any part of the air
bag system could cause it to fail;
thus you could be injured if the air
bag system is not there to protect
you. Do not modify the components
or wiring. Do not modify the front
bumper, vehicle body structure, or
add aftermarket side steps or
running boards.
• It is dangerous to try to repair any
part of the air bag system without
the necessary know-how.
• Do not attempt to modify any part
of your air bag system. The air bag
may inflate accidentally or may not
function properly if modifications
are made. Take your vehicle to an
Authorized Maserati Dealer for any
air bag system service. If your seat
including your trim cover and
cushion needs to be serviced in any
way (including removal or
loosening/tightening of seat
attachment bolts), take the vehicle
to an Authorized Maserati Dealer.
• Only Maserati manufacturer approved seat accessories may be
used. If it is necessary to modify the
air bag system for persons with
disabilities, contact an Authorized
Maserati Dealer.
• If the speedometer, Rev Counter, or
any engine related gauges are not
working, the Occupant Restraint
Controller (ORC) may also be
disabled. The air bags may not be
ready to inflate for your protection.
Promptly check the fuse block for
blown fuses. To identify the air bag
fuse see “Fuse Replacement” in
section "Maintenance and Care". See
an Authorized Maserati Dealer if the
fuse does not fix the problem.
Transport of persons with
disability If it is necessary to modify the
advanced air bag system of your
vehicle to accommodate a person with
disabilities, contact an Authorized
Maserati Dealer .
WARNING!
• The advanced air bag system of your
vehicle is not designed to protect
adults with disabilities that requireBefore Starting
2
72
Page 102 of 436
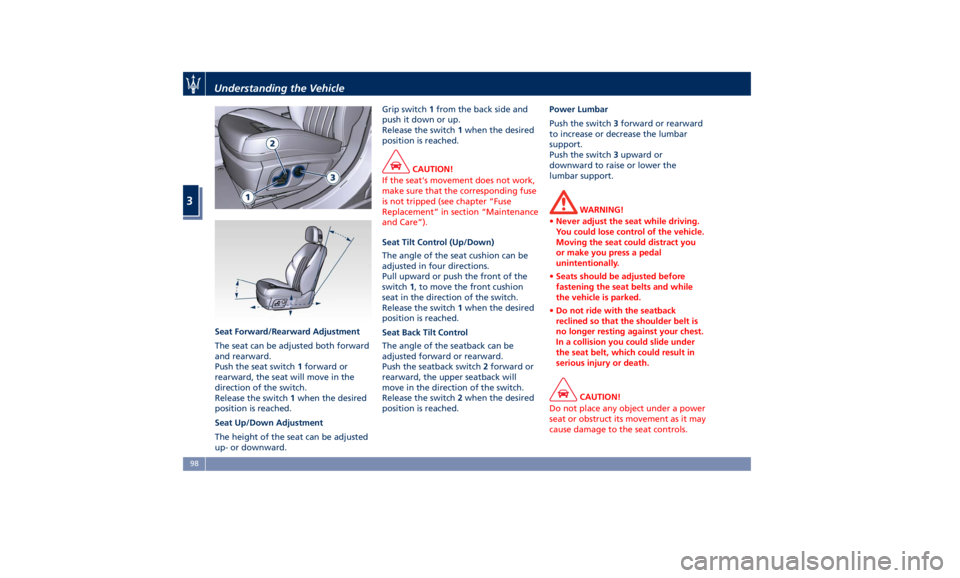
Seat Forward/Rearward Adjustment
The seat can be adjusted both forward
and rearward.
Push the seat switch 1 forward or
rearward, the seat will move in the
direction of the switch.
Release the switch 1 when the desired
position is reached.
Seat Up/Down Adjustment
The height of the seat can be adjusted
up- or downward. Grip switch 1 from the back side and
push it down or up.
Release the switch 1 when the desired
position is reached.
CAUTION!
If the seat's movement does not work,
make sure that the corresponding fuse
is not tripped (see chapter “Fuse
Replacement” in section “Maintenance
and Care”).
Seat Tilt Control (Up/Down)
The
angle of the seat cushion can be
adjusted in four directions.
Pull upward or push the front of the
switch 1 , to move the front cushion
seat in the direction of the switch.
Release the switch 1 when the desired
position is reached.
Seat Back Tilt Control
The angle of the seatback can be
adjusted forward or rearward.
Push the seatback switch 2 forward or
rearward, the upper seatback will
move in the direction of the switch.
Release the switch 2 when the desired
position is reached. Power Lumbar
Push the switch 3 forward or rearward
to increase or decrease the lumbar
support.
Push the switch 3 upward or
downward to raise or lower the
lumbar support.
WARNING!
• Never adjust the seat while driving.
You could lose control of the vehicle.
Moving the seat could distract you
or make you press a pedal
unintentionally.
• Seats should be adjusted before
fastening the seat belts and while
the vehicle is parked.
• Do not ride with the seatback
reclined so that the shoulder belt is
no longer resting against your chest.
In a collision you could slide under
the seat belt, which could result in
serious injury or death.
CAUTION!
Do not place any object under a power
seat or obstruct its movement as it may
cause damage to the seat controls.Understanding the Vehicle
3
98
Page 137 of 436

Interior Features Electric Power Outlets The vehicle is equipped with four 12
Volt (13 Amp) electric power outlets,
two available for the front seat
passengers, one for rear seat
passengers and one fitted in the trunk
compartment.
In vehicles equipped with “Smoking
Kit” the electric power outlet inside
the cupholder is replaced with a
cigarette lighter.
All power outlets are supplied only
when the engine is started or the
ignition device set to ACC or RUN .
Power outlets are protected by a fuse.
Insert a cigar lighter or accessory plug
into the power outlets to ensure
proper operation. Otherwise, check
the matching fuse integrity, see “Fuse
Replacement” in section
“Maintenance and Care” for further
information.
CAUTION!
• Do not plug in accessories that
exceed the maximum power of 160
Watts (13 Amps) at 12 Volts.
• Power outlets are designed for
accessory plugs only. Do not insert any other object in the power
outlets as this will damage the outlet
and blow the fuse. Damages caused
by improper use of the power outlet
are not covered by the New Vehicle
Limited Warranty.
WARNING!
To avoid serious injury or death:
• Only devices designed for use in this
type of outlet should be inserted
into any 12 Volt outlet.
• Replacing the fuses that protect
power outlets with others of higher
amperage, there is the risk of fire.
• Do not touch with wet hands.
• Close the lids when the plug is not
used and while driving the vehicle.
• If this outlet is mishandled, it may
cause an electric shock and failure.
Power Outlet inside the Cupholder
Compartment
To access the power outlet inside the
cupholder beside the shift lever, press
the cover as indicated to open it
completely. Remove the cigarette
lighter and use its socket as power
outlet. WARNING!
High power consumption items
plugged into this outlet for long
periods may discharge the battery
and/or prevent the engine from
starting.Understanding the Vehicle
3
133
Page 367 of 436
7 – Maintenance and Care Scheduled Maintenance Service ............................ 364
Scheduled Service Plan ................................... 365
Maintenance Procedures ................................. 371
Maintenance-Free Battery ................................ 381
Fuse Replacement ...................................... 386
Bulb Replacement ...................................... 393
A/C System Maintenance ................................. 395
Wheels Maintenance .................................... 396
Bodywork Maintenance and Care .......................... 397
Interior Maintenance and Care ............................ 400
Vehicle Stored for Long Periods ............................ 402
Restarting the Vehicle ................................... 402
Battery Statement ...................................... 403
363
Page 376 of 436
Maintenance Service
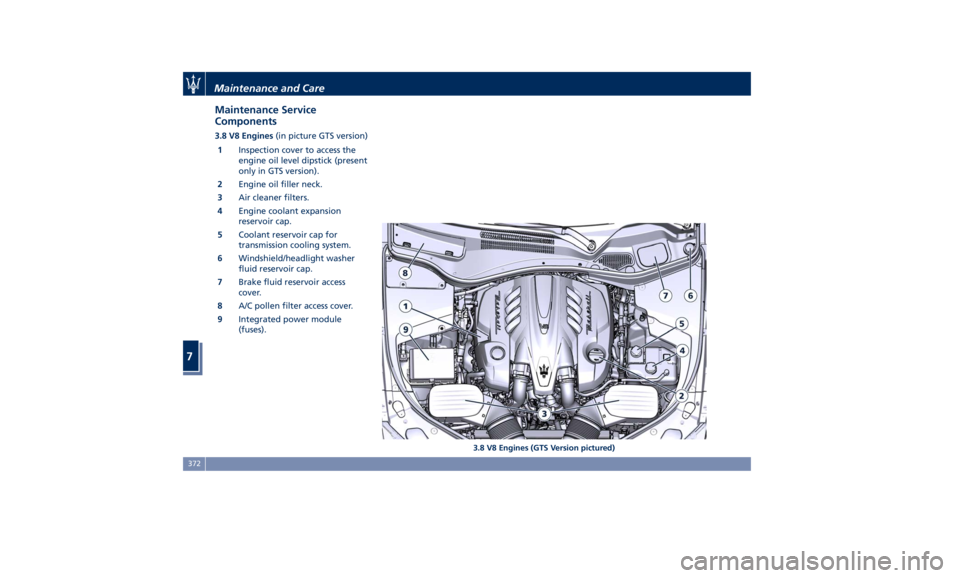
Components 3.8 V8 Engines (in picture GTS version)
1 Inspection cover to access the
engine oil level dipstick (present
only in GTS version).
2 Engine oil filler neck.
3 Air cleaner filters.
4 Engine coolant expansion
reservoir cap.
5 Coolant reservoir cap for
transmission cooling system.
6 Windshield/headlight washer
fluid reservoir cap.
7 Brake fluid reservoir access
cover.
8 A/C pollen filter access cover.
9 Integrated power module
(fuses).
3.8 V8 Engines (GTS Version pictured)Maintenance and Care
7
372
Page 377 of 436
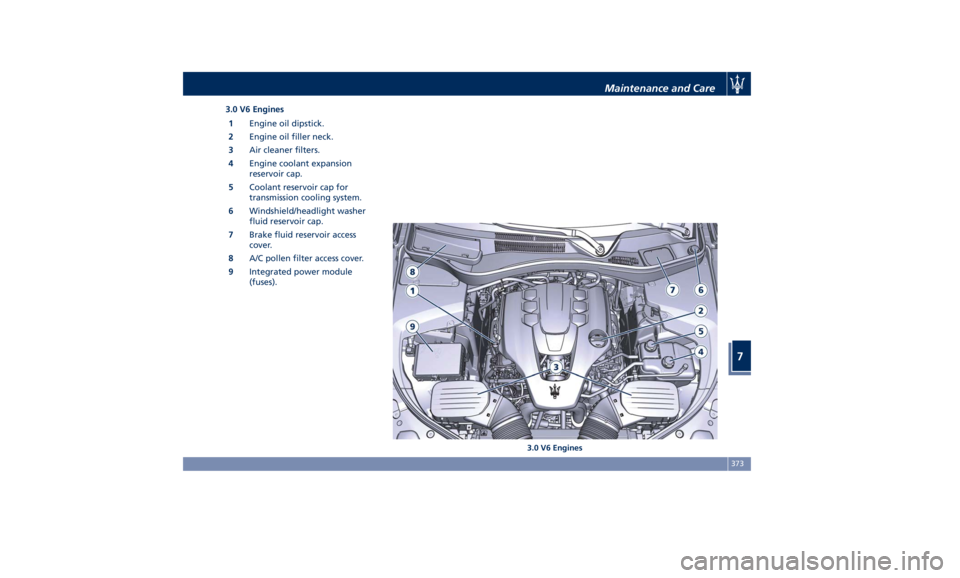
3.0 V6 Engines
1 Engine oil dipstick.
2 Engine oil filler neck.
3 Air cleaner filters.
4 Engine coolant expansion
reservoir cap.
5 Coolant reservoir cap for
transmission cooling system.
6 Windshield/headlight washer
fluid reservoir cap.
7 Brake fluid reservoir access
cover.
8 A/C pollen filter access cover.
9 Integrated power module
(fuses).
3.0 V6 EnginesMaintenance and Care
7
373
Page 390 of 436
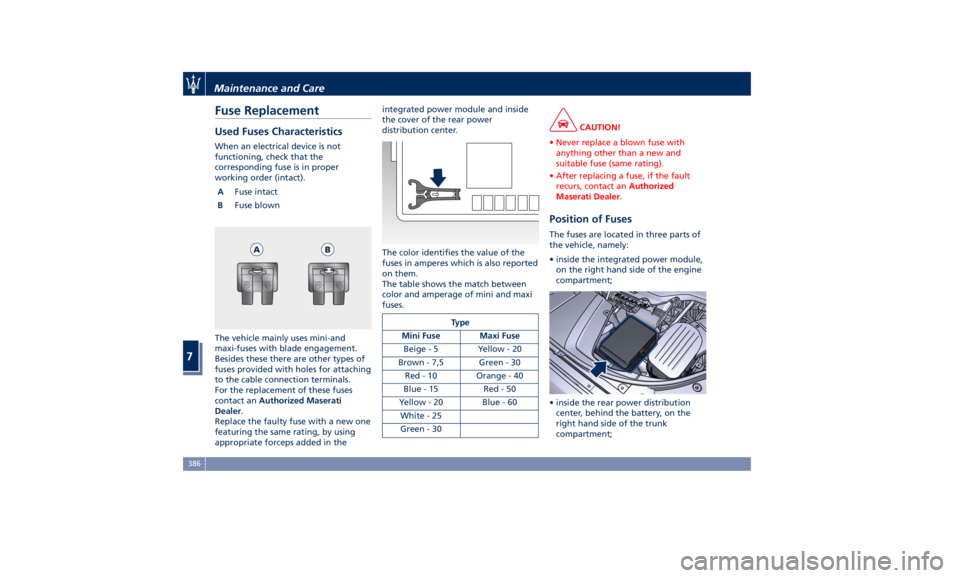
Fuse Replacement Used Fuses Characteristics When an electrical device is not
functioning, check that the
corresponding fuse is in proper
working order (intact).
A Fuse intact
B Fuse blown
The vehicle mainly uses mini-and
maxi-fuses with blade engagement.
Besides these there are other types of
fuses provided with holes for attaching
to the cable connection terminals.
For the replacement of these fuses
contact an Authorized Maserati
Dealer .
Replace the faulty fuse with a new one
featuring the same rating, by using
appropriate forceps added in the integrated power module and inside
the cover of the rear power
distribution center.
The color identifies the value of the
fuses in amperes which is also reported
on them.
The table shows the match between
color and amperage of mini and maxi
fuses.
Type
Mini Fuse Maxi Fuse
Beige - 5 Yellow - 20
Brown - 7,5 Green - 30
Red - 10 Orange - 40
Blue-15 Red-50
Yellow - 20 Blue - 60
White - 25
Green - 30 CAUTION!
• Never replace a blown fuse with
anything other than a new and
suitable fuse (same rating).
• After replacing a fuse, if the fault
recurs, contact an Authorized
Maserati Dealer .
Position of Fuses The fuses are located in three parts of
the vehicle, namely:
• inside the integrated power module,
on the right hand side of the engine
compartment;
• inside the rear power distribution
center, behind the battery, on the
right hand side of the trunk
compartment;Maintenance and Care
7
386
Page 391 of 436

• on the fuse and relay box located in
a covered area, under the dashboard
left side.
Integrated Power Module • To access the module it is necessary
to lift the hood (see “Hood
Operation” in section “Before
Starting”).
• To access the fuses remove the
module cover unhooking the lateral
locks as shown in the picture. The table points out the position as
featured in the figure, the type and
function of the fuses included in the
integrated power module.
CAUTION!
• After replacement, refit the
protective cover of the module.
• If you need to wash the engine
compartment, do not direct the
water for too long directly on the
module.
Ref. Type Function
2 Maxi – 50A Secondary air
pump relay input
(V8 engines only)
3––
4 Maxi – 30A Starter motor
relay input Ref. Type Function
5 Maxi – 40A ABS-ESP pump
feed
6 Maxi – 30A AWD module
relay input
7––
8 Maxi – 40A ABS-ESP valve
feed
9––
10 – –
11 Mini – 20A Horn relay input
12 Mini – 10A AC compressor
feed relay input
13 – –
14 Mini – 7,5A Alarm siren
15 Mini – 5A Washer heated
nozzles relay
input
16 Mini – 10A Enable cooling
fan relay input
and enable
cooling oil pump
relay input
18 – –
19 Maxi – 30A Headlamp
washer relay
inputMaintenance and Care
7
387