2019 MASERATI LEVANTE run flat
[x] Cancel search: run flatPage 356 of 436

(Continued)
go back to normal operation.
NOTE:
The compact spare wheel is supplied in
aluminum or steel: the pictures show
the one in aluminum.
The compact spare wheel is stored in
the trunk and is supplied deflated in
order to limit the amount of space
occupied. An electric compressor is also
provided for inflating. In the event of
a tire puncture, proceed as follows.
• Stop the vehicle in a place that does
not constitute a danger to traffic and
where the wheel can be changed
safely. The vehicle must be level and
on firm ground.
• Select the P (Park) mode and then
engage manually the electric parking
brake and move the ignition switch
to OFF position.
• If necessary, turn the hazard warning
flashers on and place the warning
triangle (if equipped) at the required
distance.
WARNING!
• The jack should be used on level firm
ground wherever possible. • It is recommended that the wheels
of the vehicle be chocked, and that
no person should remain in a vehicle
that is being jacked.
• If the vehicle has been stopped on a
slope or an uneven surface, place
chocks or other suitable items in
front of or behind the wheels to
stop the vehicle from moving.
• Never start or run the engine with
the vehicle on a jack.
• No person should place any portion
of their body under a vehicle that is
supported by a jack.
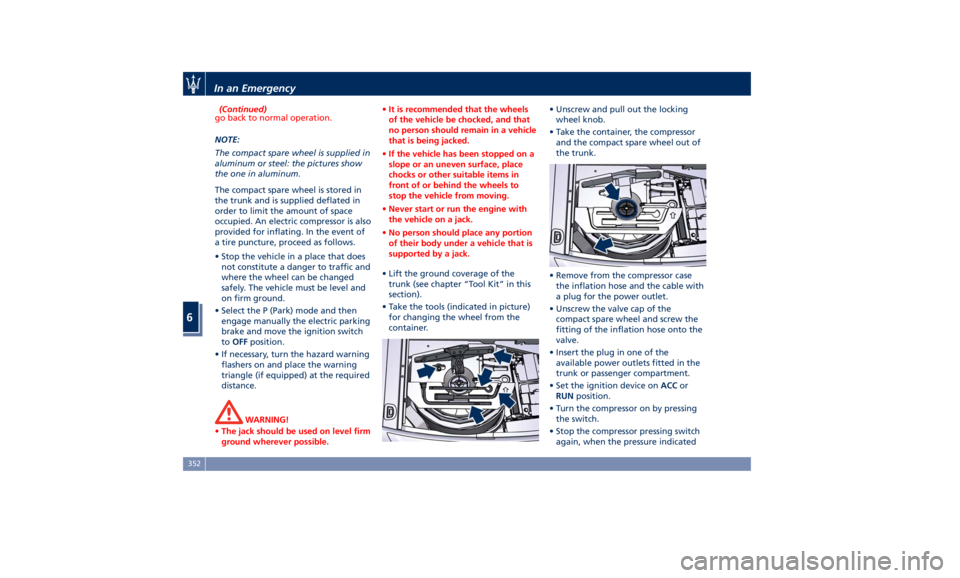
• Lift the ground coverage of the
trunk
(see chapter “T ool Kit” in this
section).
• Take the tools (indicated in picture)
for changing the wheel from the
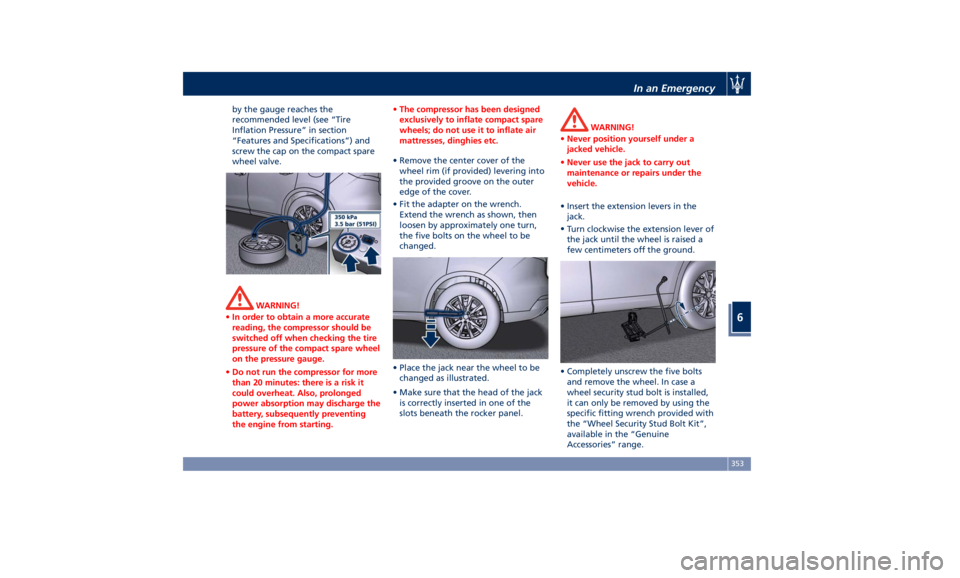
container. • Unscrew and pull out the locking
wheel knob.
• Take the container, the compressor
and the compact spare wheel out of
the trunk.
• Remove from the compressor case
the inflation hose and the cable with
a plug for the power outlet.
• Unscrew the valve cap of the
compact spare wheel and screw the
fitting of the inflation hose onto the
valve.
• Insert the plug in one of the
available power outlets fitted in the
trunk or passenger compartment.
• Set the ignition device on ACC or
RUN position.
• Turn the compressor on by pressing
the switch.
• Stop the compressor pressing switch
again, when the pressure indicatedIn an Emergency
6
352
Page 357 of 436

by the gauge reaches the
recommended level (see “Tire
Inflation Pressure” in section
“Features and Specifications”) and
screw the cap on the compact spare
wheel valve.
WARNING!
• In order to obtain a more accurate
reading, the compressor should be
switched off when checking the tire
pressure of the compact spare wheel
on the pressure gauge.
• Do not run the compressor for more
than 20 minutes: there is a risk it
could overheat. Also, prolonged
power absorption may discharge the
battery, subsequently preventing
the engine from starting. • The compressor has been designed
exclusively to inflate compact spare
wheels; do not use it to inflate air
mattresses, dinghies etc.
• Remove the center cover of the
wheel
rim (if provided) levering into
the provided groove on the outer
edge of the cover.
• Fit the adapter on the wrench.
Extend the wrench as shown, then
loosen by approximately one turn,
the five bolts on the wheel to be
changed.
• Place the jack near the wheel to be
changed as illustrated.
• Make sure that the head of the jack
is correctly inserted in one of the
slots beneath the rocker panel. WARNING!
• Never position yourself under a
jacked vehicle.
• Never use the jack to carry out
maintenance or repairs under the
vehicle.
• Insert the extension levers in the
jack.
•
Turn clockwise
the extension lever of
the jack until the wheel is raised a
few centimeters off the ground.
• Completely unscrew the five bolts
and remove the wheel. In case a
wheel security stud bolt is installed,
it can only be removed by using the
specific fitting wrench provided with
the “Wheel Security Stud Bolt Kit”,
available in the “Genuine
Accessories” range.In an Emergency
6
353
Page 359 of 436

will be compromised. Avoid
accelerating to full speed, heavy
braking and fast cornering.
• The compact spare wheel must be
inflated to the recommended tire
pressure (see “Tire Inflation
Pressure” in section “Features and
Specifications”).
• For safety reasons, it is absolutely
forbidden to drive with more than
one compact spare wheel fitted on
the vehicle.
• Snow chains cannot be fitted on the
compact spare wheel.
• The spare wheel can travel a
maximum of 1,800 mi (3.000 km).
To Refit the Standard Wheel with
Repair
ed or Replaced Tire
• Following the procedure and the
caution described above, raise the
vehicle and remove the compact
spare wheel reusing the supplied
wrench with adapter, suitably
extended.
• Fit the standard wheel with repaired
or replaced tire.
• Tighten the original bolts on the
wheel.
• Lower the vehicle and remove the
jack. • Fully tighten the bolts, alternately
tightening diametrically opposite.
WARNING!
Observe the tightening torque for the
bolts securing the wheels (72 ± 7 lbf·ft
/ 98 ± 10 Nm).
• Reassemble the center cover (if
provided)
on the wheel
rim.
Once finished:
• completely deflate the compact
spare wheel by pressing on the valve
with the overhang of the valve cap;
• wrap the power cable and the
inflation hose inside the compressor
case and place it in the trunk seat;
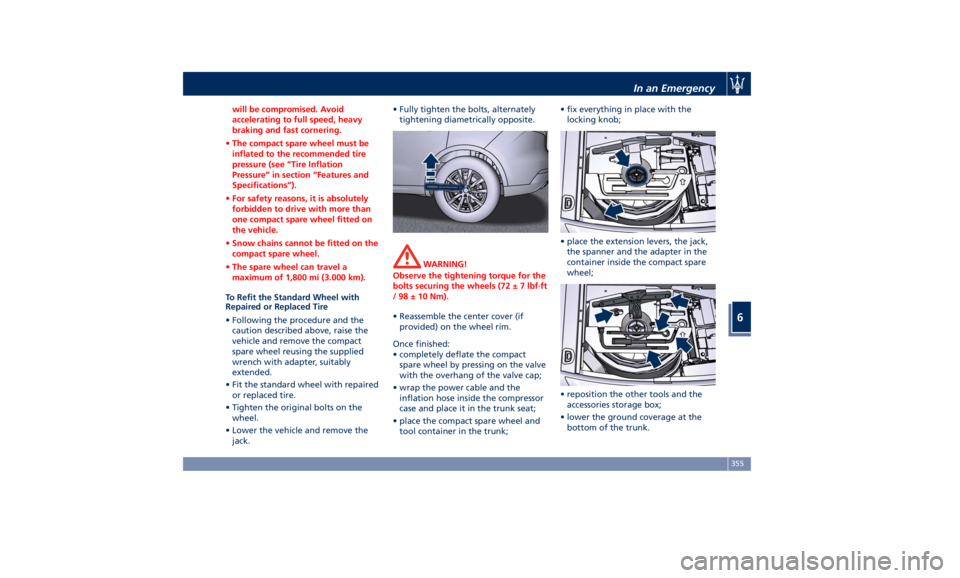
• place the compact spare wheel and
tool container in the trunk; • fix everything in place with the
locking knob;
• place the extension levers, the jack,
the spanner and the adapter in the
container inside the compact spare
wheel;
• reposition the other tools and the
accessories storage box;
• lower the ground coverage at the
bottom of the trunk.In an Emergency
6
355
Page 371 of 436

Interval running coupons: every 12,500 mi (20,000 km)
or 1 year
Service coupons 1° 2° 3° 4°
5° 6°
Main operations Available Pre-Paid Maintenance
Program
Correct operation and reliability of the seats and seat belts IIIIII
Pollen filter RRR
Windshield fluid level - Windshield washer and headlight
cleaner IIIIII
Headlight leveling IIIIII
Controls and adjustment systems in general, hinges, doors,
engine compartment lid and luggage compartment III
Condition of leather interiors III
(1) In case of heavy-duty use of the vehicle, highlighted by the presence of mud and dust in the engine compartment,
proceed to the preventive replacement of the alternator belt.
I = Inspect and carry out any other necessary operation.
R = Replace.
Periodic Maintenance Every 600 mi (1,000 km) or before
long journeys
Check:
• engine coolant;
• brake fluid;
• windshield washer fluid level;
• tire inflation pressure and condition; • operation of lighting system
(headlights, direction indicators,
hazard warning flashers, etc.);
• operation of windshield
washer/wiper system and wear of
windshield wiper blades.
Every 1,900 mi (3,000 km)
Check and top up, if required, the
engine oil level. WARNING!
California Proposition 65
Operating, servicing and maintaining
a passenger vehicle or off-road vehicle
can expose you to chemicals including
such as, engine exhaust, carbon
monoxide, phthalates and lead, that
which are known to the State of
California to cause cancer and birth
(Continued)Maintenance and Care
7
367
Page 428 of 436

Abbreviations .................9
Accessories
Aftermarket Parts and Accessories
Statement .................13
Active Blind Spot Assist - ABSA . . . .310
Adaptive Cruise Control (ACC) . . . .286
Activation/Deactivation ...... .289
Display Warnings and
Maintenance ............. .294
Precautions while Driving with
ACC ................... .295
Setting the Following Distance . .291
Setting the Speed .......... .290
Airbag.....................65
Advanced Front Air Bag
Properties .................66
Air Bag Deployment Result .....71
Air Bag Deployment Sensors and
Controls ..................15
Air Bag System Components .....66
Front Air Bag Inflator Units .....70
Passenger Air bag Labels .......20
Supplemental Restraint System
(SRS) .....................65
Supplemental Seat-mounted Side
Air Bags (SAB) ..............68
Supplemental Side Air Bag Inflatable
Curtain (SABIC) ..............68
Transport of persons with
disability ..................72
Air Conditioning (A/C) System . . . .214
A/C Distribution ........... .154
Dual-zone Climate Controls . . . .214 Four-zone Climate Controls . . . .221
Alarm, Vehicle Security ..........27
ALR (Automatic Locking Retractor) . .63
Anti-Lock Braking System (ABS) and
Electronic Brake-force Distribution
(EBD) ................... .274
Assistance ...................11
Assistance, if you need ..........11
ATC (Automatic Temperature
Control) ................. .220
Audio Controls .............. .192
Audio Controls on Central
Console ................. .192
Steering Wheel Audio Controls . .192
Audio, setting .............. .207
Audio System ............... .193
Automatic Transmission
Manual Release of Transmission .360
AUX, USB and SD Memory Card
Ports .................... .135
AWD, All-Wheel Drive ......... .243
BAS (Brake Assist System) ...... .275
Battery ................... .381
Battery Recharge .......... .384
Battery Remote Posts Position. . .358
Maintaining Battery Charge . . . .403
To Disconnect the Battery .... .382
To Reconnect the Battery
..... .383
Blind
Spot Alert ............. .305
Blind
Spot Alert (BSA)
BSA System .............. .305
RCP - Rear Cross Path ........ .308 Bluetooth, Customer settings .... .208
Bodywork Maintenance and Care . .397
Pre-Short Drop Function ..... .400
Protection from Atmospheric
Agents ................. .397
Useful Advice to Keep the Bodywork
in Good Condition ......... .398
Brakes
Brake and Stability Control System
(ESC) ................... .273
Brake Overheating ......... .280
Brake System ............. .273
Manual Release of Parking
Brake .................. .356
Parking Brake ............. .268
Using the Brakes ........... .280
Capacity/Refillings ........... .406
Cargo Area ................ .139
Accessories Compartment .... .142
Cargo Area Extension ....... .143
Installing the Cargo Net ...... .144
Loading with Rear Seatbacks Folded
Down .................. .141
Luggage Fasteners and
Retainers ................ .140
Ski and Snowboard Bag
Compartment ............. .141
Trunk Compartment Cover .... .142
Vehicle Load Carrying Capacity . .139
Child Restraint Systems ..........74
Children too large for Booster
Seats .....................75Index
9 424