2019 MASERATI LEVANTE power steering
[x] Cancel search: power steeringPage 106 of 436
• Move the seat and/or the other
adjustable devices in the position
that you wish to memorize, or recall
a previously memorized profile,
pressing the corresponding memory
button “1” or “2”.
• Cycle the ignition device to the OFF
position.
• Press and release the “S” button.
• Within 5 seconds, press and release
the memory button “1” or “2”.
• Press and release the
button on
key fob RKE transmitter.
• Within 3 seconds, press and release
the
button on the key fob RKE
transmitter.
To check if the system has memorized
the correct profile, you can move the
seat and press the
button: the seat
will move to the memorized position.
NOTE:
Your key fobs RKE transmitter can be
unlinked to your memory settings by
pressing the “S” button followed by
the
button on the key fob RKE
transmitter. Memory Position Recall NOTE:
The vehicle must be in P (Park) to recall
memory positions. If a recall is
attempted when the vehicle is not in P
(Park), a message will display in the
instrument cluster.
To recall the memory settings for
driver, press memory button number
“1” or “2” on the driver's door trim
panel or the
button on the RKE
transmitter linked to memory position
“1” or “2” with ignition device in the
RUN position.
A recall can be canceled by pressing
any of the buttons (“S”, “1”, or “2”)
during a recall. When a recall is
canceled, the driver seat, external side
mirrors, adjustable pedals (optional),
and power tilt and telescopic steering
column stop moving.
A delay of at least one second will
occur before selecting a new recall. Easy Entry/Exit Driver Seat This feature provides automatic driver
seat positioning to enhance driver
mobility when entering and exiting
the vehicle.
The distance the driver seat moves
depends on where you have the driver
seat positioned when you place the
ignition device to the OFF position.
• When you cycle the ignition device
to the OFF position the driver seat:
• will move about 2.36 in (60 mm)
rearward if the driver seat position
is greater than or equal to ca. 5.51
in (140 mm) forward of the rear
stop;
• will move to a position of ca. 3.15
in (80 mm) rearward of the rear
stop if the driver seat position is
between 5.51 in (140 mm) and 3.15
in (80 mm) forward of the rear
stop.
• The seat will return to its previously
set position when you place the
ignition device into the ACC or RUN
position.
• The Easy Entry/Exit feature is
disabled when the driver seat
position is less than 3.15 in (80 mm)
forward of the rear stop. In this
position, there would be no benefitUnderstanding the Vehicle
3
102
Page 112 of 436
• Tilt the seat back to the upright
position (see “CArgo Area” in this
section).
• Reposition the head restraint to the
appropriate height for the passenger.
WARNING!
• A loose head restraint thrown
forward in a collision or hard stop
could cause serious injury or death
to occupants of the vehicle. Always
securely stow removed head
restraints in a location outside the
occupant compartment.
• ALL the head restraints MUST be
reinstalled in the vehicle to properly
protect the occupants. Follow the
re-installation instructions above
prior to operating the vehicle or
occupying a seat. Steering Wheel
Adjustment This feature allows you to tilt the
steering column upward or downward
or to lengthen or shorten it in order to
adjust the steering wheel to an
optimized position.
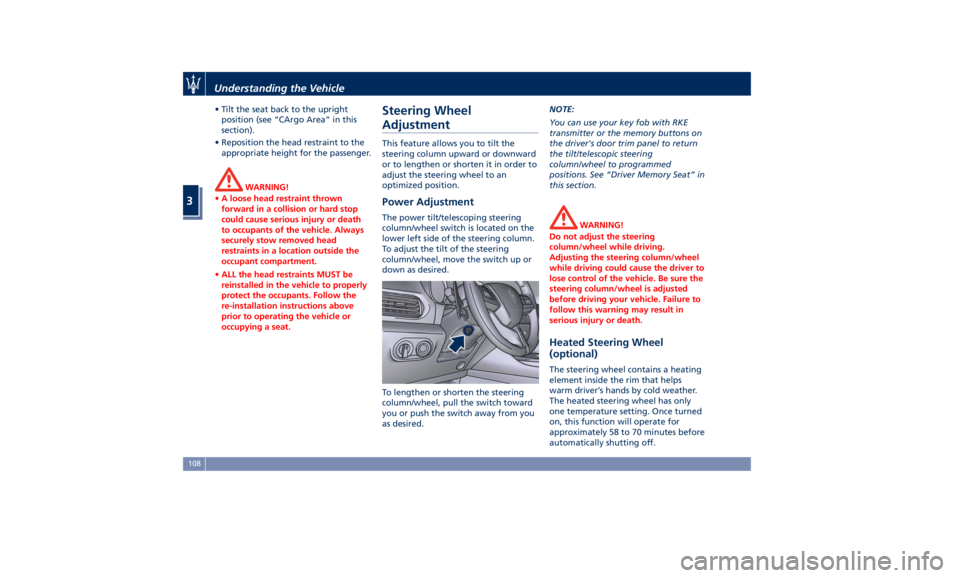
Power Adjustment The power tilt/telescoping steering
column/wheel switch is located on the
lower left side of the steering column.
To adjust the tilt of the steering
column/wheel, move the switch up or
down as desired.
To lengthen or shorten the steering
column/wheel, pull the switch toward
you or push the switch away from you
as desired. NOTE:
You can use your key fob with RKE
transmitter or the memory buttons on
the driver's door trim panel to return
the tilt/telescopic steering
column/wheel to programmed
positions. See “Driver Memory Seat” in
this section.
WARNING!
Do not adjust the steering
column/wheel while driving.
Adjusting the steering column/wheel
while driving could cause the driver to
lose control of the vehicle. Be sure the
steering column/wheel is adjusted
before driving your vehicle. Failure to
follow this warning may result in
serious injury or death.
Heated Steering Wheel
(optional) The steering wheel contains a heating
element inside the rim that helps
warm driver’s hands by cold weather.
The heated steering wheel has only
one temperature setting. Once turned
on, this function will operate for
approximately 58 to 70 minutes before
automatically shutting off.Understanding the Vehicle
3
108
Page 130 of 436

A check mark will remain next to the
previously-selected item until a new
selection is made.
Press and release the switch (
)to
select the option. A selection notice
pops up for 2 seconds and then the
display reverts to the last modified
parameter.
The dimmable lights are the following:
• instrument cluster dials and display;
• dome light (front/rear); • LED in correspondence of the
internal door handle;
• doors and steering wheel backlight
controls LED;
• front footrest light;
• front seats night lighting.
Automatic Headlights Leveling A correct headlights leveling is crucial
for the safety of the vehicle’s
occupants and of people in the street.
Moreover it is included in the road
regulation law.
In order to obtain the best visibility
conditions while driving with
headlights on, the headlight beam
must be properly leveled, under any
vehicle load condition.
The vehicle is equipped with a system
that automatically adjusts headlight
leveling according to ground clearance
and vehicle load conditions. Dome Lights The dome lights integrated into the
front dome console, include a central
and two reading lights.
The central light automatically turns
on when one of the doors is opened
and turns off when the door is closed
(timed switching off). The light may be
switched on manually by pressing the
central button.
The reading lights are controlled by
the respective side buttons.
If they are turned on by pressing the
button, both central and reading lights
will stay on for about 10 minutes after
turning the engine off, and will then
turn off gradually.
When the exterior lights are switched
on, the two night LEDs fitted on the
side of the power buttons on the
overhead console will light up toUnderstanding the Vehicle
3
126
Page 151 of 436
Front to Back Roof Rails
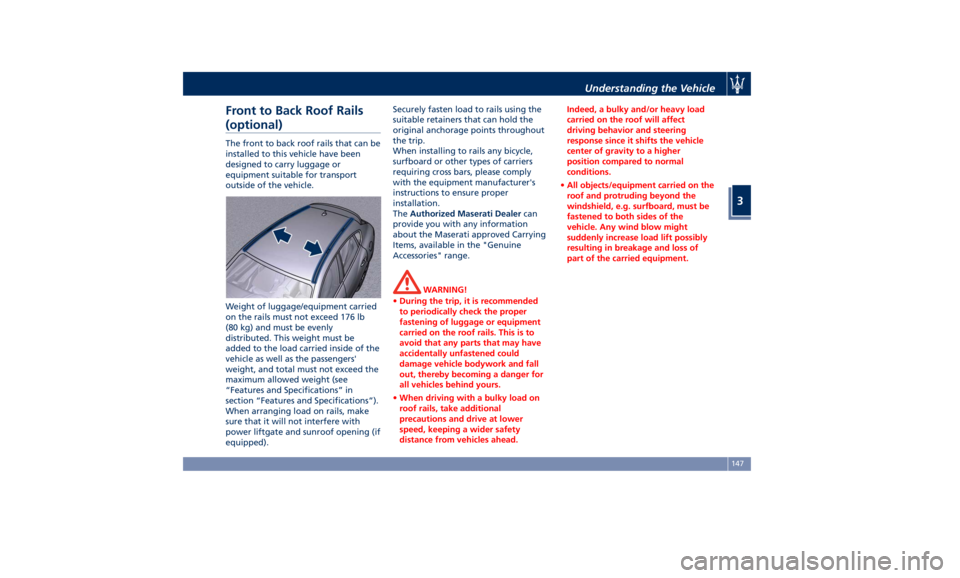
(optional) The front to back roof rails that can be
installed to this vehicle have been
designed to carry luggage or
equipment suitable for transport
outside of the vehicle.
Weight of luggage/equipment carried
on the rails must not exceed 176 lb
(80 kg) and must be evenly
distributed. This weight must be
added to the load carried inside of the
vehicle as well as the passengers'
weight, and total must not exceed the
maximum allowed weight (see
“Features and Specifications” in
section “Features and Specifications”).
When arranging load on rails, make
sure that it will not interfere with
power liftgate and sunroof opening (if
equipped). Securely fasten load to rails using the
suitable retainers that can hold the
original anchorage points throughout
the trip.
When installing to rails any bicycle,
surfboard or other types of carriers
requiring cross bars, please comply
with the equipment manufacturer's
instructions to ensure proper
installation.
The Authorized Maserati Dealer can
provide you with any information
about the Maserati approved Carrying
Items, available in the "Genuine
Accessories" range.
WARNING!
• During the trip, it is recommended
to periodically check the proper
fastening of luggage or equipment
carried on the roof rails. This is to
avoid that any parts that may have
accidentally unfastened could
damage vehicle bodywork and fall
out, thereby becoming a danger for
all vehicles behind yours.
• When driving with a bulky load on
roof rails, take additional
precautions and drive at lower
speed, keeping a wider safety
distance from vehicles ahead. Indeed, a bulky and/or heavy load
carried on the roof will affect
driving behavior and steering
response since it shifts the vehicle
center of gravity to a higher
position compared to normal
conditions.
• All objects/equipment carried on the
roof and protruding beyond the
windshield, e.g. surfboard, must be
fastened to both sides of the
vehicle. Any wind blow might
suddenly increase load lift possibly
resulting in breakage and loss of
part of the carried equipment.Understanding the Vehicle
3
147
Page 165 of 436

Warning and Indicator Lights
on Analog Instruments Telltales on Speedometer
The following telltales are displayed
on the speedometer, and related
messages are visible for 5 seconds on
the central sector of the display, unless
otherwise indicated (see “TFT Display:
Warning/Indicator Lights of Set
Modes/Functions” paragraph in this
chapter).
Malfunction Indicator Light (MIL)
The Malfunction Indicator
Light (MIL) is part of an
onboard diagnostic system
that monitors engine and
automatic transmission control
systems.
Under normal conditions, this
indicator light should switch on when
the ignition switch is in RUN position and switch off soon after the engine is
started (the MIL does not shut off
immediately).
This is a sign of the indicator light
working properly. If the indicator
remains illuminated or switches on
while driving, there is a failure in the
fuel supply/ignition and emission
control systems.
The failure could cause high exhaust
emissions, loss of performance, poor
vehicle handling and high
consumption levels.
Should this occur, proceed with
caution to your Authorized Maserati
Dealer without heavy throttle
application or driving at high speeds.
Obey all applicable local traffic
regulations.
The indicator light will go out if the
problem is no longer present.
The error will be registered by the
system in any case.
CAUTION!
• When the ignition switch is in the
RUN position and if the indicator
light does not switch on or if it
switches on while driving, contact an
Authorized Maserati Dealer as soon
as possible. • Prolonged driving with the MIL on
could cause damage to the engine
control system. It also could affect
fuel economy and drivability. If the
MIL is flashing, severe catalytic
converter damage and power loss
will soon occur. Immediate service is
required. In addition, the OBDII
system incorporates a diagnostic
connector that can be interfaced
using diagnostic equipment. This
makes it possible to read the error
codes stored in the control unit,
together with a set of specific
parameters for the engine operation
diagnostic cycle, for compliance with
CARB & EPA OBDII regulations.
Left Turn Signal Indicator Light
The
indicator lights up when
the left turn signals or the
hazard flashers are turned on.
The indicator light will flash at
the same frequency of the turn signals
and is controlled by the multifunction
lever behind the steering wheel.
If the vehicle electronics sense that the
vehicle drives for more than 1 mile
(1.6 km) with either turn signal on, a
continuous sound will alert the driver
to turn the signal off.Dashboard Instruments and Controls
4
161
Page 184 of 436

the hood (see “Maintenance
Procedures” in section “Maintenance
and Care”).
Electric Power Steering Failure
Warning Light
This warning light, and the
related message, illuminate
when the electric power
steering is not operating and
needs service.
If the warning light is on, steering
assistance may be not available.
WARNING!
After battery disconnection event, the
warning light may be on. In this case,
start the engine and perform a
steering wheel stroke end to end.
If the problem persists, contact an
Authorized
Maserati Dealer .
Catalyst Over Temperature Warning
Light
This warning light, and the
related message, light up if
the engine runs irregularly
with consequent high
temperature in the exhaust system. WARNING!
• If the warning light is accompanied
by the message “Catalyst Temp
Getting Hot Reduce Speed”: the
temperature of the catalytic
converters is too high. The driver
must slow down immediately until
the warning light turns off.
• If the message “Catalyst Temp Hot
Stop Safely Wait To Cool” appears
after decelerating: the temperature
in the catalytic converters has
reached a dangerous level and the
catalytic converters could be
damaged. Drive slowly to the
nearest Authorized Maserati Dealer.
• Maserati declines all responsibility
for whatever damage deriving from
non-compliance with the above
mentioned warnings.
Door Ajar Indicator
This
indicator illuminates
when one
or more doors are
ajar. The indicator will show
which door is ajar. When one
or more doors are open, a related
message will be displayed if the vehicle
is running at a speed of 5 mph (8
km/h) or faster. Liftgate and Hood Ajar Indicators
These light indicators will
illuminate to indicate that the
liftgate and/or the hood are
ajar.
When the liftgate or the hood
is open, a related message will
be displayed besides the light
if the vehicle is running at a speed of
5 mph (8 km/h) or faster.
Electronic Throttle Control (ETC)
Indicator
This indicator light indicates a
failure of the Electronic
Throttle Control (ETC) system.
If the indicator turns on while
driving (a torque decrease is possible),
have the system checked by an
Authorized Maserati Dealer .
When detecting a failure, the light
indicator will illuminate while the
engine is running.
If the indicator remains lit with the
engine running, you can still drive your
vehicle. However, contact an
Authorized Maserati Dealer as soon as
possible.
If the indicator is flashing while the
engine is running, immediate service is
required. You may experience reduced
performance, an elevated/rough idleDashboard Instruments and Controls
4
180
Page 200 of 436
Mode”, to lock your settings for
listening and guidance.
See "Dashboard Compartments" in
this section for further details.
• Start & Stop Off
This feature allows you to disable
the Start & Stop when frequent
stops and restarts of the engine may
become annoying.
See "Automatic Start&Stop System"
in section "Driving" for further
details.
• Auto High Beam Assist
By selecting this feature, when the
forward digital camera detects a
vehicle that precedes in the
direction of travel or in the opposite
direction, adjust the high beam in
an automatic way not to dazzle.
See "Lights" in section
"Understanding the Vehicle" for
further details.
• Screen OFF
This feature allows you to switch off
the MTC+ screen backlight if it
becomes annoying when driving.
See "Infotainment System" in this
section for further details.
• Settings
Touch this soft-key you enter the
“Settings” page that displays all user - customizable features: see “MTC+
Settings” in this section.
Features Specific for Vehicle
without ADAS • Blind Spot Assist
Activating this feature the BSA and
RCP systems assist the driver when
changing lanes, overtaking and
when parking, by detecting the
arrival of other vehicles from a side
or rear blind spot. When this
happens, a light signal appears in
the external rear-view mirror.
When the Blind Spot Assist (BSA) is
selected, feature can be set to
“Off”, “Lights” or “Lights + Chime”
(default mode). When this feature is
activated in “Lights” mode, the
system will only show a warning
light in the outside mirrors.
When “Lights + Chime” mode is
activated, the system will show a
warning light in the outside mirrors
as well as give an audible alert when
the turn signal is on. When “Off” is
selected, the system is deactivated.
For description of this system, see
chapter “Blind Spot Assist - BSA” in
section “Driving”. Features Specific for Vehicles
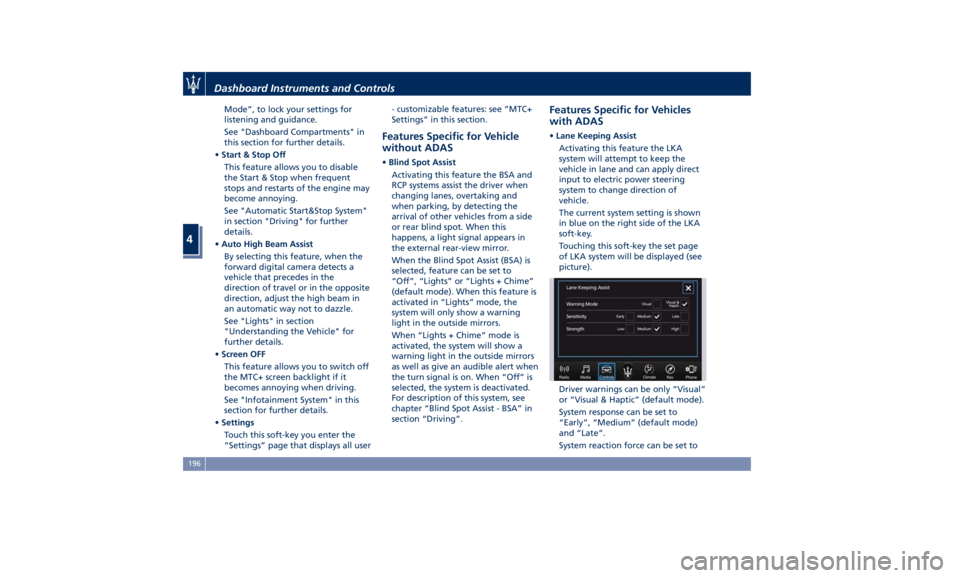
with ADAS • Lane Keeping Assist
Activating this feature the LKA
system will attempt to keep the
vehicle in lane and can apply direct
input to electric power steering
system to change direction of
vehicle.
The current system setting is shown
in blue on the right side of the LKA
soft-key.
Touching this soft-key the set page
of LKA system will be displayed (see
picture).
Driver warnings can be only “Visual”
or “Visual & Haptic” (default mode).
System response can be set to
“Early”, “Medium” (default mode)
and “Late”.
System reaction force can be set toDashboard Instruments and Controls
4
196
Page 201 of 436
“Low”, “Medium” (default mode)
and “High”.
See “Lane Keeping Assist - LKA” in
section “Driving” for more details.
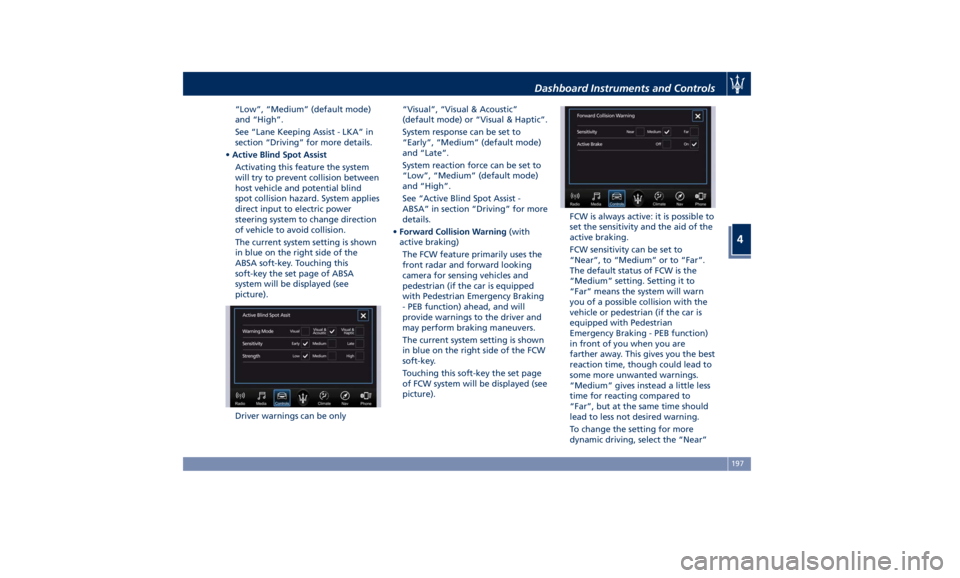
• Active Blind Spot Assist
Activating this feature the system
will try to prevent collision between
host vehicle and potential blind
spot collision hazard. System applies
direct input to electric power
steering system to change direction
of vehicle to avoid collision.
The current system setting is shown
in blue on the right side of the
ABSA soft-key. Touching this
soft-key the set page of ABSA
system will be displayed (see
picture).
Driver warnings can be only “Visual”, “Visual & Acoustic”
(default mode) or “Visual & Haptic”.
System response can be set to
“Early”, “Medium” (default mode)
and “Late”.
System reaction force can be set to
“Low”, “Medium” (default mode)
and “High”.
See “Active Blind Spot Assist -
ABSA” in section “Driving” for more
details.
• Forward Collision Warning (with
active braking)
The FCW feature primarily uses the
front radar and forward looking
camera for sensing vehicles and
pedestrian (if the car is equipped
with Pedestrian Emergency Braking
- PEB function) ahead, and will
provide warnings to the driver and
may perform braking maneuvers.
The current system setting is shown
in blue on the right side of the FCW
soft-key.
Touching this soft-key the set page
of FCW system will be displayed (see
picture). FCW is always active: it is possible to
set the sensitivity and the aid of the
active braking.
FCW sensitivity can be set to
“Near”, to “Medium” or to “Far”.
The default status of FCW is the
“Medium” setting. Setting it to
“Far” means the system will warn
you of a possible collision with the
vehicle or pedestrian (if the car is
equipped with Pedestrian
Emergency Braking - PEB function)
in front of you when you are
farther away. This gives you the best
reaction time, though could lead to
some more unwanted warnings.
“Medium” gives instead a little less
time for reacting compared to
“Far”, but at the same time should
lead to less not desired warning.
To change the setting for more
dynamic driving, select the “Near”Dashboard Instruments and Controls
4
197