2019 MASERATI LEVANTE parking brake
[x] Cancel search: parking brakePage 171 of 436

sector 23, only the main menu number
and the scroll arrows remain displayed
in the sector 3 , left side.
Within a submenu, press and release
the switch in the
and arrow
directions to scroll the menu.
Press the
button to return to the
main menu from an item of interest or
from an information screen.
Main Menu & Submenu Content
Overview
1. MAIN MENU
• View speed in mph or km/h
2. VEHICLE INFO
• Tire Pressure
• Transmission Temperature
• Oil Temperature
• Oil Pressure
• Battery Voltage
• Maintenance 3. DRIVE MODE
• Drive Mode - Ride Height - Torque
Distribution - Powertrain status - ESC
status - Suspension stiffness status
4. Driver Assist (if equipped)
• Shows the status of any active driver
assist systems: CC, ACC, LKA and
HAS. Graphics in the main area of
TFT display only refer to ACC, LKA
and HAS systems
• LKA (LaneSense) status
5. FUEL ECONOMY
• Average, Range, Current gage
6. TRIP
• Trip A: Average, Avg. speed, Elapsed
time, Distance
• Trip B: Average, Avg. speed, Elapsed
time, Distance
7. START&STOP
• Messages relating to the Start&Stop
function
8. AUDIO
• Information concerning audio status
according to current media source,
track and station.
• Information on phone incoming call.
9. STORED MESSAGES
10. VEHICLE SETTINGS • Speed Warning: enables, disables or
sets the speed limit represented in
the dynamic icon on the TFT display
• Auto apply Off/On of the Electric
Parking Brake
• Interior Lighting
– Backlighting
– Ambient Lighting
• SCREEN SETUP
– Upper Left
– Upper Right
– Main Menu: Line 1
– Main Menu: Line 2
– Main Menu: Line 3
– MPH km/h Display On/Off
– Main Menu Navigation
– Outline Coloring
– Key-On Display
– Key-Off Display
– Defaults
Messages on Main Display Area
The main display area also displays
"pop up" messages. These pop up
messages fall into several categories:
• Five-Second Stored Messages
When the appropriate conditions
occur, this type of message appears
on the main display area for five
seconds and then returns to the
previous screen. Most of the
messages of this type are thenDashboard Instruments and Controls
4
167
Page 178 of 436
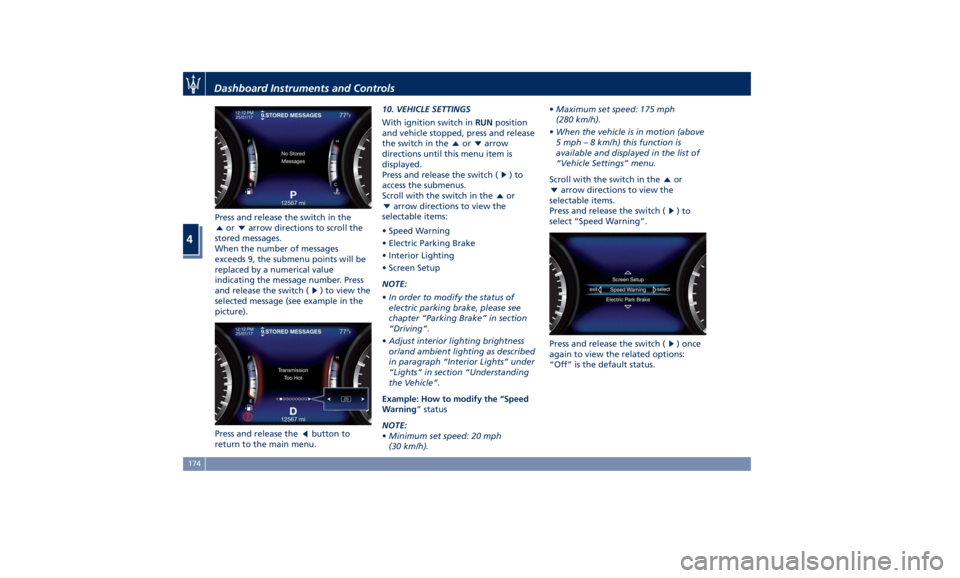
Press and release the switch in the
or arrow directions to scroll the
stored messages.
When the number of messages
exceeds 9, the submenu points will be
replaced by a numerical value
indicating the message number. Press
and release the switch (
) to view the
selected message (see example in the
picture).
Press and release the
button to
return to the main menu. 10. VEHICLE SETTINGS
With ignition switch in RUN position
and vehicle stopped, press and release
the switch in the
or arrow
directions until this menu item is
displayed.
Press and release the switch (
)to
access the submenus.
Scroll with the switch in the
or
arrow directions to view the
selectable items:
• Speed Warning
• Electric Parking Brake
• Interior Lighting
• Screen Setup
NOTE:
• In order to modify the status of
electric parking brake, please see
chapter “Parking Brake” in section
“Driving”.
• Adjust interior lighting brightness
or/and ambient lighting as described
in paragraph “Interior Lights” under
“Lights” in section “Understanding
the Vehicle”.
Example: How to modify the “Speed
Warning ” status
NOTE:
• Minimum set speed: 20 mph
(30 km/h). • Maximum set speed: 175 mph
(280 km/h).
• When the vehicle is in motion (above
5 mph – 8 km/h) this function is
available and displayed in the list of
“Vehicle Settings” menu.
Scroll with the switch in the
or
arrow directions to view the
selectable items.
Press and release the switch (
)to
select “Speed Warning”.
Press and release the switch (
) once
again to view the related options:
“Off” is the default status.Dashboard Instruments and Controls
4
174
Page 186 of 436

WARNING!
Do not drive with this warning light
on. Check that the fuel filler cap is
tightened correctly.
Electric Parking Brake Failure Warning
Light
This
warning light and
related
message illuminate when
there is an EPB system failure.
The failure could also
completely or partially block the
vehicle because the parking brake
could remain on even after it has been
automatically or manually disengaged
though its controls.
If it is still possible to use the vehicle
(parking brake not engaged) drive to
the nearest Authorized Maserati
Dealer and remember to performing
each operation/command that the
electric parking brake is not
functioning.
Start&Stop Disable Indicator
This indicator illuminates
when Start&Stop is turned off
through the controls located
on the right side of the
steering wheel or through the relevant
soft-key of the MTC+. See chapter “Automatic Start&Stop System” of
section “Driving” for further
information.
Start&Stop Failure Warning Light
This warning light illuminates
when there is a failure in the
Start&Stop system. Switch the
engine on or off using the
normal procedure with the ignition
device START/STOP and have the
vehicle checked at an Authorized
Maserati Dealer .
Scheduled Maintenance (Service)
Indicator
This indicator illuminates and
a message flashes on the
display for approximately 5
seconds after an acoustic
signal to indicate that the next
scheduled maintenance is due or is
already overdue.
Unless reset, the message will continue
to display each time you cycle the
ignition to the RUN position.
To turn off the message temporarily,
press and release the
button on the
steering wheel. To reset the service
indicator system, please visit an
Authorized Maserati Dealer . ADAS Status Indicators (If equipped)
When you are not viewing the
“Drive Assist” page, the
indicators at the top left-hand
side of the display indicate
status of individual ADAS system or
the combination of them (see
examples).
For further details, refer to
“Adaptive Cruise Control -
ACC”, “Lane Keeping Assist -
LKA” and “Highway Assist - HAS” in
section “Driving”.
Forward Collision Warning (FCW) Off
(If equipped)
This warning light informs the
driver that Forward Collision
Warning (FCW) is disabled. If
this light occurs together with
other specific messages, take your
vehicle to an Authorized Maserati
Dealer for service. This warning light
will light even when the activation of
another driver assistance feature or
drive mode (such as “
-ESC OFF”)
disables the FCW.
Forward Collision Warning (FCW) Fault
(If equipped)
This warning light informs that
FCW is in fault state. If this
occurred together with other
specific messages, could meanDashboard Instruments and Controls
4
182
Page 207 of 436
D (Drive), front parking sensors are
NOT activated.
• Front ParkSense Volume
When this feature is selected, the
chime volume of front park assist
sensors can be set to “Low”,
“Medium” or “High” level.
“Medium” is the default setting.
The system will retain its last known
configuration state through ignition
cycles.
• Rear ParkSense Volume
When this feature is selected, the
chime volume of rear park assist
sensors can be set to “Low”,
“Medium” or “High” level.
“Medium” is the default setting.
The system will retain its last known
configuration state through ignition
cycles.
• Tilt Side Mirrors In Reverse
By selecting this feature the outside
side-view mirrors will tilt downward
when the ignition is in RUN position
and the transmission shift lever is in
R (Reverse) position. The mirrors will
move back to their previous
position when the transmission is
shifted out of R (Reverse). The
feature can be set to “On” or “Off”. • Auto Folding Side Mirrors
By selecting this feature the
rear-view mirrors automatically fold
when the vehicle is locked by the
key fob and when the power
liftgate (if equipped) is closed and
locked by pressing the
button on
the outer ledge of the left boot
compartment lining. When the
vehicle and the liftgate will be
unlocked and the ignition device is
set in RUN position, the rear-view
mirrors will automatically open in
the position they had before the
lock.
If the mirrors were manually folded
by the switch on the driver's door
panel, before a lock action, they will
need to be manually unfold to
reactivate the automatic behave.
• ParkView Backup Camera Delay
By selecting this feature, when the
shift lever is moved out of R
(Reverse), the rear view image with
dynamic grid lines will be displayed
for up to 10 seconds after shifting
unless the forward vehicle speed
exceeds 8 mph (12 km/h), or the
transmission is shifted into P (Park)
or the ignition device is switched to
the OFF position. The feature can be
set to “On” or “Off”. • Rain Sensing Auto Wipers
By selecting this feature, the system
will automatically activate the
windshield wipers if the rain sensor
senses moisture on the windshield.
The feature can be set to “On” or
“Off”.
• Hill Start Assist
This feature allows you to disable
the HSA system. The feature can be
set to “On” or “Off”. See “Brake
and Stability Control System” in
section “Driving” for further details.
Lights Press the “Lights” soft-key to set the
following modes.
• Headlight Off Delay
By selecting this feature, the driver
can choose to have the headlight
off or lit for 30, 60, or 90 seconds
when the engine is shut off. To
change the current headlight off
delay status, touch and release the
“0”, “30”, “60” or “90” soft-key to
select the desired time range.Dashboard Instruments and Controls
4
203
Page 231 of 436
5 – Driving Normal Starting of the Engine ............................. 228
Automatic Start&Stop System ............................. 230
Automatic Transmission .................................. 234
All-Wheel Drive ........................................ 243
Drive Mode ........................................... 244
Active Alternator ....................................... 264
Off-Road Drive ......................................... 264
Parking Brake ......................................... 268
Parking .............................................. 271
Brake and Stability Control System ......................... 273
Using the Brakes ....................................... 280
Use of the Engine ...................................... 281
Electronic Cruise Control ................................. 282
Adaptive Cruise Control - ACC (optional) ..................... 286
Forward Collision Warning – FCW .......................... 297
Lane Keeping Assist - LKA (optional, with ACC only) ............ 301
Blind Spot Assist – BSA (without ACC) ....................... 305
Active Blind Spot Assist - ABSA (optional, with ACC only) ........ 310
Highway Assist – HAS (optional, with ACC only) ................ 313
Traffic Sign Assist – TSA (optional) .......................... 319
Tires - General Information ............................... 321
Tire Pressure Monitoring System (TPMS) ..................... 329
Fuel Requirements ...................................... 334
Refueling ............................................. 336
Driving Conditions ...................................... 338
Trailer Towing ......................................... 341 227
Page 236 of 436
Automatic Restarting of the
Engine The engine may automatically restart,
before the brake pedal has been
released, when one of the following
conditions occurs:
• The SPORT drive mode or
(ESC
OFF) drive mode is being activated.
• If the Start&Stop function has been
disabled through the main menu
voice “Start & Stop” (see chapter
“Instrument cluster” in section
“Dashboard Instruments and
Controls”) or via MTC+ in the
“Controls” page (see “MTC+
“Controls “Screen” in the section
“Dashboard Instruments and
Controls”).
• If shift lever is moved to R (Reverse).
• If the steering wheel is moved to
steer the wheels.
• When the temperature conditions
inside the vehicle do not correspond
to the air conditioning setting.
• When changing the temperature
setting on the air conditioning.
• When the defroster function is being
activated.
• When the battery charge is below
safety value. • When the accelerator pedal is being
pressed (together with the brake
pedal).
• If a long time has passed since the
last automatic stop of the engine.
Occupants Safety Function To enhance occupants safety, the
Start&Stop system monitors if the
driver is present and does not allow
automatic restarting of the engine if
one of the following maneuvers is
being performed while in “AutoStop”
condition:
• The driver unbuckles his/her seat belt
and releases the brake pedal.
• The driver opens the door and
releases the brake pedal.
• The driver unbuckles the seat belt
and opens the door.
• The driver opens the hood.
All the above-mentioned conditions
deactive the Start&Stop function (the
“AutoStart” is deactivated and the
engine remains off) and the
transmission shift automatically in P
(Park).
The
telltale will flash to indicate
the Start&Stop function disabling. To
restart the engine it is necessary to
press the brake pedal and push the
START/STOP button. Move the shift lever to D (Drive) to
drive away.
WARNING!
• Even when the vehicle is stopped in
the “Stop (AutoStop)” phase, the
driver is responsible for the vehicle
and the occupants and shall take
care of what happens inside and
outside the vehicle.
• Even when the vehicle is stopped
within the “Stop (AutoStop)” phase,
the vehicle driver is responsible for
the vehicle, the vehicle’s occupants
and the vehicle’s surrounding area.
Never leave the vehicle unattended
with the engine running; doing so
poses a risk of danger. It is a good
practice to always ensure to set the
parking brake and place the
transmission gear selector lever into
the P (Park) position, thereby
ensuring the vehicle will not move,
when performing any vehicle checks,
maintenance and/or service
procedures on the vehicle.
Start&Stop Function Disabling Under certain driving conditions, when
frequent stops and restarts of the
engine may become annoying, it isDriving
5
232
Page 239 of 436
gearshift behaviour could become
perfect as expected after few
hundreds of km.
CAUTION!
In order to properly use the automatic
transmission, it is essential that you
read through the whole chapter, so
that you can understand right from
the start what the correct and granted
operations are.
Damage to the transmission may occur
if the following precautions are not
observed:
• Shift into P (Park) only after the
vehicle has come to a complete stop:
this is the default position of the
lever. After engaged P (Park) it is
possible set the ignition switch to
OFF .
• Shift into or out of R (Reverse) only
after the vehicle has come to a
complete stop and the engine is at
idle speed.
• Do not shift between P (Park), R
(Reverse), N (Neutral) or D (Drive)
when the engine is above idle speed
• To effect any change from vehicle
stop to R (Reverse), D (Drive), 1 st
or 2 nd
gear, it is necessary to keep the
brake pedal fully depressed.
WARNING!
• It is dangerous to move the shift
lever out of P (Park) or N (Neutral) if
the engine speed is higher than idle
speed. Only shift into gear when the
engine is idling normally and when
your foot is firmly pressing on the
brake pedal.
• As with all vehicles, you should
never exit a vehicle while the engine
is running. Before exiting a vehicle,
always apply the electronic parking
brake, shift the transmission into P
(Park), and turn the engine off.
• When leaving the vehicle, always
remove the key fob and lock your
vehicle.
• Do not leave the key fob in or near
the vehicle.
This vehicle is equipped with a feature
which
requires the transmission to be
placed in P (Park) before the engine
can be turned off. This prevents the
driver from inadvertently leaving the
vehicle without having placed the
transmission in P (Park). This system
also locks the transmission in P (Park) whenever the ignition switch is in the
OFF position.
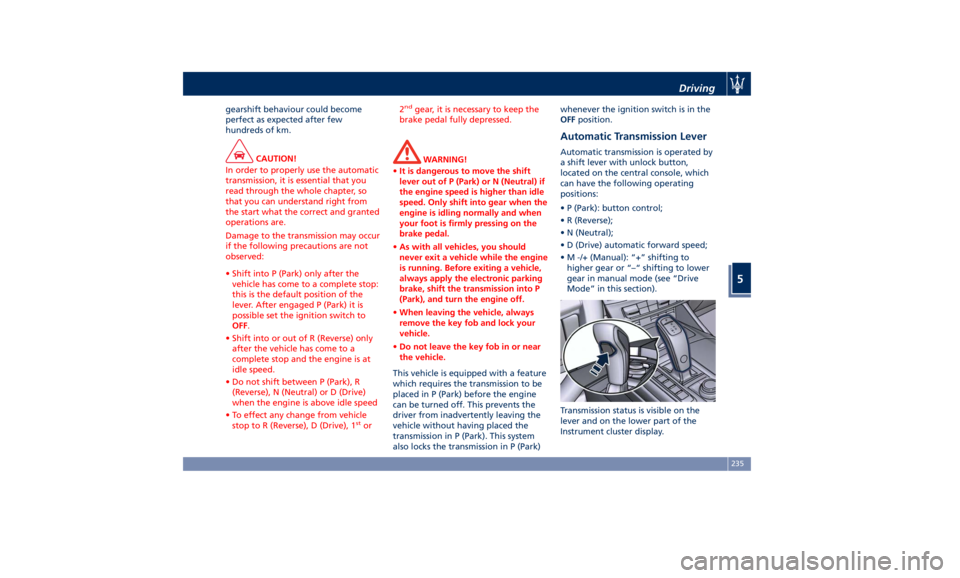
Automatic Transmission Lever Automatic transmission is operated by
a shift lever with unlock button,
located on the central console, which
can have the following operating
positions:
• P (Park): button control;
• R (Reverse);
• N (Neutral);
• D (Drive) automatic forward speed;
• M -/+ (Manual): “+” shifting to
higher gear or “–“ shifting to lower
gear in manual mode (see “Drive
Mode” in this section).
Transmission status is visible on the
lever and on the lower part of the
Instrument cluster display.Driving
5
235
Page 242 of 436
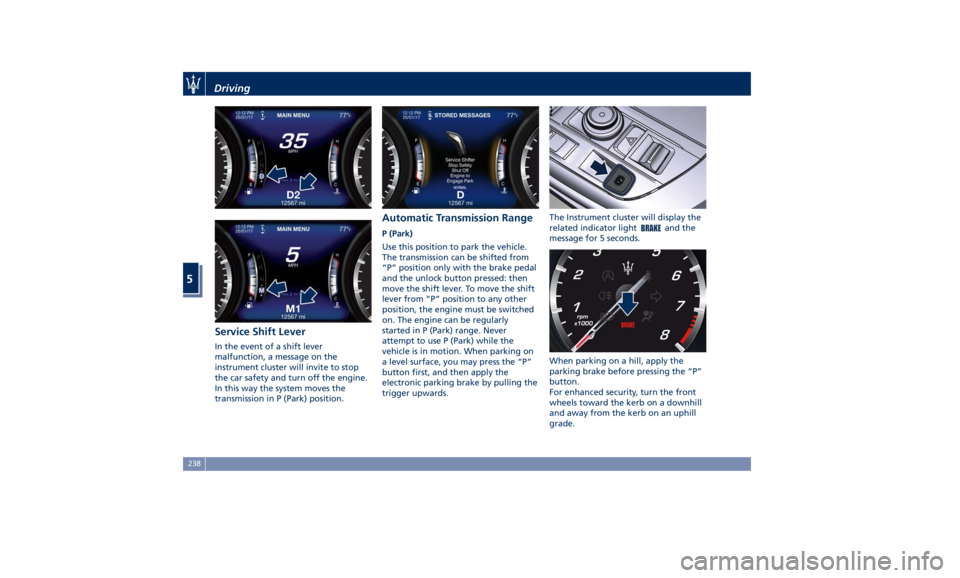
Service Shift Lever In the event of a shift lever
malfunction, a message on the
instrument cluster will invite to stop
the car safety and turn off the engine.
In this way the system moves the
transmission in P (Park) position. Automatic Transmission Range P (Park)
Use this position to park the vehicle.
The transmission can be shifted from
“P” position only with the brake pedal
and the unlock button pressed: then
move the shift lever. To move the shift
lever from “P” position to any other
position, the engine must be switched
on. The engine can be regularly
started in P (Park) range. Never
attempt to use P (Park) while the
vehicle is in motion. When parking on
a level surface, you may press the “P”
button first, and then apply the
electronic parking brake by pulling the
trigger upwards. The Instrument cluster will display the
related indicator light
and the
message for 5 seconds.
When parking on a hill, apply the
parking brake before pressing the “P”
button.
For enhanced security, turn the front
wheels toward the kerb on a downhill
and away from the kerb on an uphill
grade.Driving
5
238