2019 MASERATI LEVANTE low beam
[x] Cancel search: low beamPage 125 of 436

NOTE:
• The function is enabled only if the
brightness sensor detects the right
lighting conditions and them switch
to low beam on.
• Broken, muddy, or obstructed
headlights and taillights of vehicles
in the field of view will cause
headlights to remain on longer
(closer to the vehicle). Also, dirt,
film, and other obstructions on the
windshield or camera lens will cause
the system to function improperly.
Automatic High Beam Failure
In the event of an automatic high
beam system failure, the related
amber warning light will light up on
the TFT display.
Take your vehicle to the nearest
Authorized Maserati Dealer as soon as
possible avoiding to use this system. High Beam with “Glare Free”
Feature (for “Full-LED”
headlight with AFS) The "Glare Free" feature associated
with "Full-LED" headlamps assists the
driver during traveling on an off-city
road with not sufficient environmental
illumination allowing the high beam
use also with other traffic participants
without glaring disturbance.
The no glaring effect is obtained
through matrixes of LED that are
dynamically switched on and off in
order to create a shadow zone in
correspondence of each other traffic
participants lights (motor vehicles and
bicycles, as well), according to the
information about other vehicles’
lights coming from the forward-facing
digital camera located on the
windshield , behind the internal
rear-view mirror.
The no glaring system is a
multi-shadow system, since it’s able to
create up to four light tunnels
simultaneously , each tunnel zone is as
large as the obstacle that should not
be glared.
The figure represents an example of
the car that is travelling in the
following scenarios: 1. two vehicles ahead in the same
direction;
2. another vehicle that is
overtaking;
3. another vehicle proceeding in the
opposite direction.
The system is able to detect and react
to an oncoming vehicle starting from
a distance of about 400 yd (400 m), in
a couple of seconds. Instead, in case of
the preceding vehicles, the system is
able to detect and react in few
seconds starting from a distance of
about 100 yd (100 m).
Activation Mode
The digital camera is the same used
for the automatic high beam, and like
automatic high beam also for "Glare
Free" feature it needs to be activated
by MTC+ “Controls” screen, touchingUnderstanding the Vehicle
3
121
Page 126 of 436

the “Auto High Beam Assist” soft-key,
as shown in the previous paragraph
"Automatic High Beams".
The “Glare Free” feature will be
engaged after the following actions:
• Engine run.
• Feature enabled by MTC+.
• Low beam on.
• Interior light switch in position
“Auto”.
• Multifunction lever in “High beam”
activated position.
The “Glare Free” feature will work if:
• The vehicle speed is equal or greater
than 21.7 mph (35 km/h) in the
engagement phase of the feature.
• Environmental brightness is not
sufficient for a safe and comfortable
drive.
• Traffic scenario out of urban context.
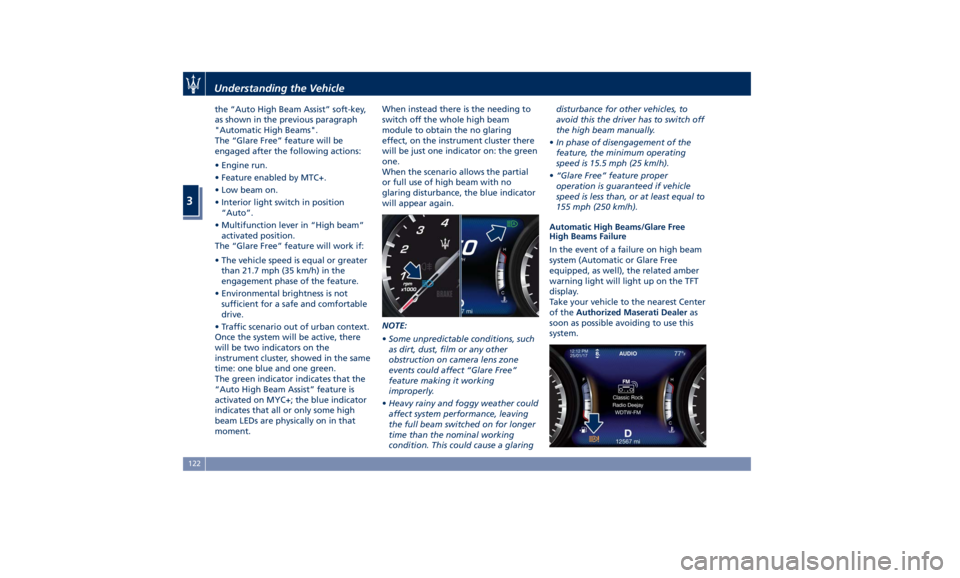
Once the system will be active, there
will be two indicators on the
instrument cluster, showed in the same
time: one blue and one green.
The green indicator indicates that the
“Auto High Beam Assist” feature is
activated on MYC+; the blue indicator
indicates that all or only some high
beam LEDs are physically on in that
moment. When instead there is the needing to
switch off the whole high beam
module to obtain the no glaring
effect, on the instrument cluster there
will be just one indicator on: the green
one.
When the scenario allows the partial
or full use of high beam with no
glaring disturbance, the blue indicator
will appear again.
NOTE:
• Some unpredictable conditions, such
as dirt, dust, film or any other
obstruction on camera lens zone
events could affect “Glare Free”
feature making it working
improperly.
• Heavy rainy and foggy weather could
affect system performance, leaving
the full beam switched on for longer
time than the nominal working
condition. This could cause a glaring disturbance for other vehicles, to
avoid this the driver has to switch off
the high beam manually.
• In phase of disengagement of the
feature, the minimum operating
speed is 15.5 mph (25 km/h).
• “Glare Free” feature proper
operation is guaranteed if vehicle
speed is less than, or at least equal to
155 mph (250 km/h).
Automatic High Beams/Glare Free
High Beams Failure
In the event of a failure on high beam
system (Automatic or Glare Free
equipped, as well), the related amber
warning light will light up on the TFT
display.
Take your vehicle to the nearest Center
of the Authorized Maserati Dealer as
soon as possible avoiding to use this
system.Understanding the Vehicle
3
122
Page 127 of 436

Fog Lights NOTE:
The front fog lights can only be
switched on if the position lights
are switched on. It is possible to
turn on the rear fog lights only if the
low beam lights
or the front fog
lights are on.
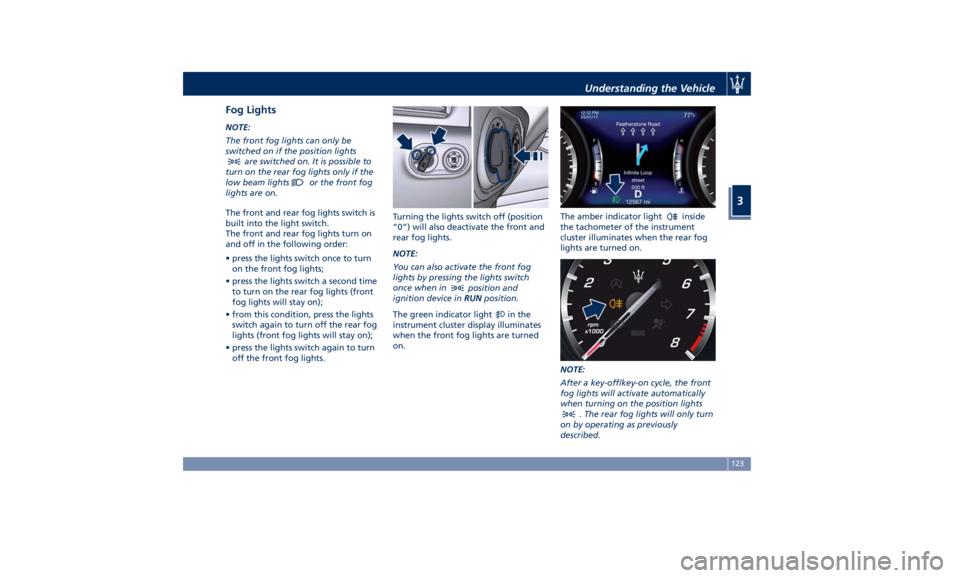
The front and rear fog lights switch is
built into the light switch.
The front and rear fog lights turn on
and off in the following order:
• press the lights switch once to turn
on the front fog lights;
• press the lights switch a second time
to turn on the rear fog lights (front
fog lights will stay on);
• from this condition, press the lights
switch again to turn off the rear fog
lights (front fog lights will stay on);
• press the lights switch again to turn
off the front fog lights. Turning the lights switch off (position
“0”) will also deactivate the front and
rear fog lights.
NOTE:
You can also activate the front fog
lights by pressing the lights switch
once when in
position and
ignition device in RUN position.
The green indicator light
in the
instrument cluster display illuminates
when the front fog lights are turned
on. The amber indicator light
inside
the tachometer of the instrument
cluster illuminates when the rear fog
lights are turned on.
NOTE:
After a key-off/key-on cycle, the front
fog lights will activate automatically
when turning on the position lights
. The rear fog lights will only turn
on by operating as previously
described.Understanding the Vehicle
3
123
Page 129 of 436

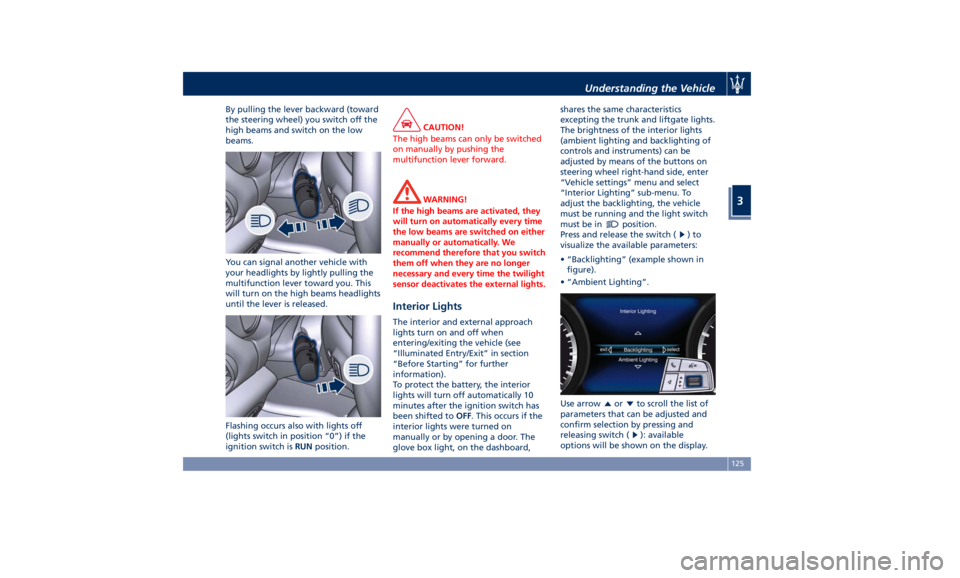
By pulling the lever backward (toward
the steering wheel) you switch off the
high beams and switch on the low
beams.
You can signal another vehicle with
your headlights by lightly pulling the
multifunction lever toward you. This
will turn on the high beams headlights
until the lever is released.
Flashing occurs also with lights off
(lights switch in position “0”) if the
ignition switch is RUN position. CAUTION!
The high beams can only be switched
on manually by pushing the
multifunction lever forward.
WARNING!
If the high beams are activated, they
will turn on automatically every time
the low beams are switched on either
manually or automatically. We
recommend therefore that you switch
them off when they are no longer
necessary and every time the twilight
sensor deactivates the external lights.
Interior Lights The interior and external approach
lights turn on and off when
entering/exiting the vehicle (see
“Illuminated Entry/Exit” in section
“Before Starting” for further
information).
To protect the battery, the interior
lights will turn off automatically 10
minutes after the ignition switch has
been shifted to OFF . This occurs if the
interior lights were turned on
manually or by opening a door. The
glove box light, on the dashboard, shares the same characteristics
excepting the trunk and liftgate lights.
The brightness of the interior lights
(ambient lighting and backlighting of
controls and instruments) can be
adjusted by means of the buttons on
steering wheel right-hand side, enter
“Vehicle settings” menu and select
“Interior Lighting” sub-menu. To
adjust the backlighting, the vehicle
must be running and the light switch
must be in
position.
Press and release the switch (
)to
visualize the available parameters:
• “Backlighting” (example shown in
figure).
• “Ambient Lighting”.
Use arrow
or to scroll the list of
parameters that can be adjusted and
confirm selection by pressing and
releasing switch (
): available
options will be shown on the display.Understanding the Vehicle
3
125
Page 130 of 436

A check mark will remain next to the
previously-selected item until a new
selection is made.
Press and release the switch (
)to
select the option. A selection notice
pops up for 2 seconds and then the
display reverts to the last modified
parameter.
The dimmable lights are the following:
• instrument cluster dials and display;
• dome light (front/rear); • LED in correspondence of the
internal door handle;
• doors and steering wheel backlight
controls LED;
• front footrest light;
• front seats night lighting.
Automatic Headlights Leveling A correct headlights leveling is crucial
for the safety of the vehicle’s
occupants and of people in the street.
Moreover it is included in the road
regulation law.
In order to obtain the best visibility
conditions while driving with
headlights on, the headlight beam
must be properly leveled, under any
vehicle load condition.
The vehicle is equipped with a system
that automatically adjusts headlight
leveling according to ground clearance
and vehicle load conditions. Dome Lights The dome lights integrated into the
front dome console, include a central
and two reading lights.
The central light automatically turns
on when one of the doors is opened
and turns off when the door is closed
(timed switching off). The light may be
switched on manually by pressing the
central button.
The reading lights are controlled by
the respective side buttons.
If they are turned on by pressing the
button, both central and reading lights
will stay on for about 10 minutes after
turning the engine off, and will then
turn off gradually.
When the exterior lights are switched
on, the two night LEDs fitted on the
side of the power buttons on the
overhead console will light up toUnderstanding the Vehicle
3
126
Page 167 of 436

Telltales on Tachometer
Following telltales are displayed on
the tachometer and related messages
are visible for 5 seconds on the central
sector of the display, unless otherwise
indicated (see “TFT Display:
Warning/Indicator Lights of Set
Modes/Functions” in this chapter).
Start&Stop Active Indicator
This telltale indicates that the
engine has been switched off
automatically by the
Start&Stop system.
When the engine starts again, the
telltale will switch off.
If the telltale during an automatic
engine shutdown (AutoStop) phase
starts flashing, it will be necessary to
restart the engine normally with the
ignition device while holding down
the brake pedal. See chapter “Automatic Start&Stop
System” in section “Driving” for
further information.
Rear Fog Light Indicator
This indicator lights up when
the rear fog lights are
switched on.
High Beam Indicator
This indicator lights up when
the high beams are switched
on or when blinking.
Brake Indicator Light
This light monitors various
brake functions, including
brake fluid level, brake pads
wear and parking brake
engagement.
If the brake light illuminates the
parking brake may be engaged, the
brake pads have reached wear limit,
the brake fluid level may be low or a
problem with the anti-lock brake
system (ABS) reservoir may have
occurred.
In all the above situations, a related
message will be displayed.
If the light still illuminates when the
parking brake has been disengaged,
and the fluid level is at the full mark
on the master cylinder reservoir, there
could be a brake hydraulic system malfunction or a problem with the
brake booster detected by the
ABS/ESC system. If this occurs, the light
will remain lit until the problem has
been solved.
If the problem concerns the brake
booster, the ABS master cylinder will
run when engaging the brake and a
brake pedal pulsation may be felt
during each stop of the vehicle.
Inefficiency of one of the dual brake
system cycles is indicated by the brake
indicator light, which will turn on
when the brake fluid level in the
master cylinder has dropped below a
certain level.
The light will remain lit until the
problem has been solved.
If a brake failure occurs, visit an
Authorized Maserati Dealer as soon as
possible in order to check up the
brake system.
In the event of an Electronic Brake
Force Distribution (EBD) failure, both
the brake indicator light and the ABS
light illuminate.
Immediate repair of the ABS system is
required.
Functioning of the brake indicator
light can be checked by turning the
ignition switch from OFF to RUN
position.Dashboard Instruments and Controls
4
163
Page 169 of 436

WARNING!
Maserati urges you to use the seat
belts correctly fastened and adjusted
at all times. Correct use of the seat
belts can help reduce the risk of
serious injury in the event of an
accident. Do not pass seat belts over
sharp edges: they could tear. Do not
pin anything to the seat belts. This
could reduce their initial strength and
cause them to tear in the event of a
crash.
Refer to “Occupants Restraint
Systems”
in section “Before
Starting”
for further information.
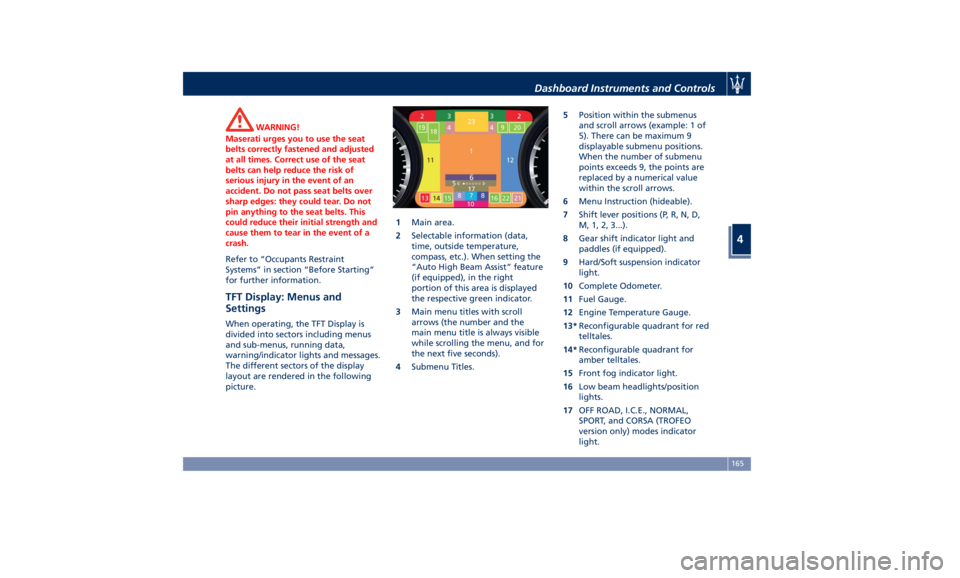
TFT Display: Menus and
Settings When operating, the TFT Display is
divided into sectors including menus
and sub-menus, running data,
warning/indicator lights and messages.
The different sectors of the display
layout are rendered in the following
picture. 1 Main area.
2 Selectable information (data,
time, outside temperature,
compass, etc.). When setting the
“Auto High Beam Assist” feature
(if equipped), in the right
portion of this area is displayed
the respective green indicator.
3 Main menu titles with scroll
arrows (the number and the
main menu title is always visible
while scrolling the menu, and for
the next five seconds).
4 Submenu Titles. 5 Position within the submenus
and scroll arrows (example: 1 of
5). There can be maximum 9
displayable submenu positions.
When the number of submenu
points exceeds 9, the points are
replaced by a numerical value
within the scroll arrows.
6 Menu Instruction (hideable).
7 Shift lever positions (P, R, N, D,
M, 1, 2, 3...).
8 Gear shift indicator light and
paddles (if equipped).
9 Hard/Soft suspension indicator
light.
10 Complete Odometer.
11 Fuel Gauge.
12 Engine Temperature Gauge.
13* Reconfigurable quadrant for red
telltales.
14* Reconfigurable quadrant for
amber telltales.
15 Front fog indicator light.
16 Low beam headlights/position
lights.
17 OFF ROAD, I.C.E., NORMAL,
SPORT, and CORSA (TROFEO
version only) modes indicator
light.Dashboard Instruments and Controls
4
165
Page 185 of 436

or engine stall and your vehicle may
require towing.
Low Fuel Indicator
When the fuel level reaches
approximately 4.2 Gallons (16
liters) this light under the fuel
gauge indicator will turn on,
and remain on until fuel is added
together with the related message. In
this condition the color indicating the
quantity of fuel in the tank, inside the
indicator on display, will go from
white to amber.
Refer to “Refueling” in section
“Driving” for fuel filling.
Windshield and Headlights Washer
Low Fluid Indicator
This indicator will illuminate
for 5 seconds to indicate a low
level of the windshield and
headlights washer fluid. A
related message will be displayed.
See “Maintenance Procedures” in
section “Maintenance and Care” for
fluid filling.
Headlight Aiming System Failure
Warning Light
This warning light and the
related message indicate a
failure of the automatic
headlight aiming system (horizontal leveling, electromechanical
swiveling) or of the Advanced
Frontlighting System (AFS).
Please contact an Authorized Maserati
Dealer to check the system.
Advanced Frontlighting System (AFS)
Failure Warning Light
This warning light and the
related message light up to
report a failure of the AFS
system.
Contact an Authorized Maserati
Dealer as soon as possible.
Automatic High Beam Failure Warning
Light
This warning light and the
related message illuminate to
report a failure of the
automatic high beam
headlights.
Contact an Authorized Maserati
Dealer as soon as possible.
Suspensions Failure Warning Light
This warning light and the
related message turn on while
driving if there is a failure of
the suspension system.
Please contact an Authorized Maserati
Dealer to check the system. Ice Hazard Indicator
When the external
temperature falls below 38°F
(3°C), the temperature value
blinks for a few seconds, the
indicator light turns on, a message is
displayed and an acoustic signal is
triggered to warn the driver of the
risk of icy roadbed.
Under such conditions, we recommend
using the I.C.E. drive mode (see
“Automatic Transmission” in section
“Driving”) drive carefully and slow
down as the grip of the tires may be
significantly reduced.
The indicator light flashes for 5
seconds and switches off when the
temperature reaches 43°F (6°C) or
higher.
Fuel Filler Cap (Gas cap) Open
Warning Light
After refueling the car
performs a check of the fuel
filler cap and this warning
light comes on if it is not
correctly closed, after approximately
10 minutes also depending on driving
conditions.
See “Refueling” in section “Driving”
for more details.Dashboard Instruments and Controls
4
181