2019 MASERATI LEVANTE flat tire
[x] Cancel search: flat tirePage 333 of 436
• Avoid holes in the road, do not drive
over steps or sidewalks and do not
drive on long stretches without
snow. This will prevent damage to
the vehicle and the roadbed.
NOTE:
The Authorized Maserati Dealer can
provide you
with all information
about the Maserati Snow Chains,
available in the "Genuine Accessories"
range.
Pneumatic Suspension Mode
for Wheel Change The pneumatic suspension system is
equipped with a specific mode to be
used when vehicle must be lifted to
change one or several wheels/tires.
This mode temporarily disables
pneumatic suspension automatic
leveling.
To activate this mode, scroll user
settings on MTC+ and select “Wheel
Replacement Mode” in submenu
“Suspension”. The tick next to
selected item will indicate that this
mode is active and system is disabled
(for further details, refer to chapter
“MTC+ Settings” in section
“Dashboard Instruments and
Controls”). After servicing, restore original
conditions and eliminate the tick next
to selected mode: in this way the
pneumatic suspension system will go
back to normal operation.
Compact Spare Tire The limited-use spare tire, or compact
spare tire, is for temporary emergency
use only.
This tire is identified by a label
indicating the driving speed
limitations to comply with when using
the spare tire.
Inflate the spare tire to the cold
inflation pressure listed on the table
“Tire Inflation Pressure” in section
“Features and Specifications”.
Mounting the spare tire affects vehicle
handling. Replace (or repair) as soon
as possible the original equipment tire
and reinstall it on the vehicle. Do not
install more than one compact spare
tire and wheel on the vehicle at a
time.
WARNING!
With these compact spare tires, do not
drive more than 50 mph (80 km/h).
Temporary use spares have limited
tread life.Tire Pressure Monitoring
System (TPMS) The Tire Pressure Monitoring System
(TPMS) will warn the driver of a low
tire pressure according to the vehicle
recommended cold pressure indicated
on the table “Tire Inflation Pressure”
in section “Features and
Specifications” and on the label
applied on the driver's side rear door
pillar.
Tire pressure should always be set
based on cold inflation tire pressure.
The cold tire inflation pressure must
not exceed the maximum inflation
pressure molded into the tire sidewall.
Check “Tires – General Information” in
section “Driving” for information on
how to properly inflate the tires.
The tire pressure will also increase as
the vehicle is driven - this is normal
and there is no adjustment required
when this occurs.
The TPMS will warn the driver of a low
tire pressure if the tire pressure falls
below the low-pressure warning limit
for any reason, including low
temperature effects and natural
pressure loss of the tire.
The TPMS will continue to warn the
driver of low tire pressure as long as
the condition persists and will not turnDriving
5
329
Page 334 of 436

off until the tire pressure is equal or
above the recommended cold inflation
pressure. Once the low tire pressure
warning light
illuminates, you must
increase the tire pressure to the
recommended cold inflation pressure
in order for the TPMS light
to turn
off. The system will automatically
update and the TPMS light
will turn
off once the system acquires the
correct tire pressure.
The vehicle may need to be driven for
up to 20 minutes above 15 mph
(24 km/h) in order for the TPMS to
acquire and process the updated
setting. WARNING!
The TPMS warns the driver that the
tire pressure has decreased. This
warning does not exempt the driver
from periodically checking the tires
and from complying with the
prescribed tire pressure levels.
CAUTION!
• The TPMS has been optimized for the
original equipment tires and wheels.
TPMS pressures and warning have
been established for the tire size
equipped on your vehicle.
Undesirable system operation or
sensor damage may occur when
using replacement equipment that is
not of the same size, type, and/or
style. Aftermarket wheels can cause
sensor damage. Do not use aftermarket tire sealants or balance
beads if your vehicle is equipped
with a TPMS, as damage to the
sensors may result.
• The system can temporarily
experience radio-electric
interference emitted by devices
using similar frequencies.
• After inspecting or adjusting the tire
pressure, always reinstall the valve
stem cap. This will prevent moisture
and dirt from entering the valve
stem and damage the TPMS internal
sensor.
NOTE:
• Driving
on a significantly
underinflated
tire causes the tire to
overheat and may lead to tire failure.
Under-inflation also reduces fuel
efficiency and tire tread life, and may
affect the vehicle’s handling and
stopping ability.
• The TPMS is not a substitute for
proper tire maintenance, and it is the
driver’s responsibility to maintain
correct tire pressure using an
accurate tire pressure gage, even if
under-inflation has not reached the
level to trigger illumination of the
TPMS light
.
• Seasonal temperature changes will
affect tire pressure, and the TPMSDriving
5
330
Page 335 of 436

will monitor the actual tire pressure
in the tire.
Premium System The TPMS system uses wireless
technology with wheel rim mounted
electronic sensors to monitor tire
pressure levels. Sensors mounted to
each wheel as part of the valve stem
transmit tire pressure readings to the
receiver module.
The TPMS consists of the following
components:
• receiver module;
• four TPMS sensors;
• various TPMS messages, which
display on the instrument cluster;
• warning light
.
Tire Pressure Low Warning
The TPMS light will illuminate in
the instrument cluster and an acoustic
signal will notify that tire pressure is
low in one or more of the four tires. The instrument cluster will also display
a screenshot reporting the pressure
values of each tire with flashing low
pressure value.
Should this occur, you should stop as
soon as possible and inflate the tire/s
with the low pressure (the one/s
flashing in the instrument cluster
graphic) to the recommended cold
pressure inflation value. Once the
system receives the updated tire
pressure value, the system will automatically update, the graphic
display in the instrument cluster will
stop flashing, and the TPMS light
will turn off. The vehicle may need
to be driven for up to 20 minutes
above 15 mph (24 km/h) in order for
the TPMS to acquire and process the
updated information.
Tire Pressure System Fault
If a system fault is detected, the TPMS
light
will flash for 75 seconds and
then remain lit followed by a beeping
sound. Therewith, the instrument
cluster will display a "Service Tire
Pressure System" message for a
minimum of five seconds and then
display dashes (--) in place of the
pressure value to indicate which
sensor is ineffective.
If the ignition switch is cycled, the
sequence will repeat, in case the
system fault still persists. If the system
fault no longer exists, the TPMS light
will no longer flash, and the
"Service Tire Pressure System"
message will no longer be displayed,
and a pressure value will be displayed
in place of the dashes.
A system fault can occur due to any of
the following:
• Signal interference due to electronic
devices or driving next to facilitiesDriving
5
331
Page 345 of 436
Trailer Towing In this section you will find safety tips
and information on limits to the type
of towing you can reasonably do with
your vehicle.
NOTE:
• On the TROFEO version you can not
install the trailer tongue.
• Using original Maserati equipment
offers an advantage, compared to
aftermarket one, in terms of driving
safety and utilizing the vehicle
potential under all conditions,
especially considering that ESC and
AWD systems feature specific
settings for trailer towing. Further to
this, if vehicle use conditions so
allow, the original trailer tongue
allows use of the driver assist systems
present on-board.
• To maintain the new vehicle limited
warranty coverage, follow the
requirements and recommendations
in this chapter. Trailer Tongue Weight Maximum load of tow vehicle is
reduced by the trailer tongue weight
and the load on the same due to the
trailer. Trailer tongue weight increases
vehicle weight.
Do not exceed the maximum GVWR of
the tow vehicle, the one for each axle
(GAWR) and the mass that the vehicle
is rated to tow (GTW) specified on the
nameplate located on the rear of the
drivers door opening.
WARNING!
It is important that you do not exceed
the maximum allowed overall GVWR
and GTW. A dangerous driving
condition can result if either rating is
exceeded.
If you use aftermarket Kit for towing,
the maximum trailer load must not
exceed 6000 lb (2700 kg).
Arranging Load on Trailer Arrange load at the bottom and as
close as possible to trailer wheel axle.
In this way the trailer center of gravity
will be lower, thereby increasing the
driving safety of the vehicle-trailer
assembly. Always load a trailer with 60% of the
weight in the front of the trailer.
Loads bearing more on wheel axle, or
heavier in the rear of the trailer, can
cause the trailer to sway severely
side-to-side which could cause loss of
control of vehicle and trailer.
WARNING!
Failure to load trailers heavier in front
is the cause of many trailer accidents.
Never exceed the maximum tongue
weight stamped on your trailer hitch.
Tire Pressure Adjustment Proper tire inflation pressures of your
vehicle and trailer are essential to the
safe and satisfactory operation of your
vehicle while driving and in
maneuvers.
Check for signs of tire wear or visible
tire damage on trailer and vehicle
before towing a trailer.
For more information on vehicle tires,
see “Tires – General Information” in
this section.
When a trailer must be towed, inflate
vehicle tires to full load recommended
pressure (FLC) indicated in chapter
“Tire pressure” in section “Features
and Specifications”.Driving
5
341
Page 356 of 436
(Continued)
go back to normal operation.
NOTE:
The compact spare wheel is supplied in
aluminum or steel: the pictures show
the one in aluminum.
The compact spare wheel is stored in
the trunk and is supplied deflated in
order to limit the amount of space
occupied. An electric compressor is also
provided for inflating. In the event of
a tire puncture, proceed as follows.
• Stop the vehicle in a place that does
not constitute a danger to traffic and
where the wheel can be changed
safely. The vehicle must be level and
on firm ground.
• Select the P (Park) mode and then
engage manually the electric parking
brake and move the ignition switch
to OFF position.
• If necessary, turn the hazard warning
flashers on and place the warning
triangle (if equipped) at the required
distance.
WARNING!
• The jack should be used on level firm
ground wherever possible. • It is recommended that the wheels
of the vehicle be chocked, and that
no person should remain in a vehicle
that is being jacked.
• If the vehicle has been stopped on a
slope or an uneven surface, place
chocks or other suitable items in
front of or behind the wheels to
stop the vehicle from moving.
• Never start or run the engine with
the vehicle on a jack.
• No person should place any portion
of their body under a vehicle that is
supported by a jack.
• Lift the ground coverage of the
trunk
(see chapter “T ool Kit” in this
section).
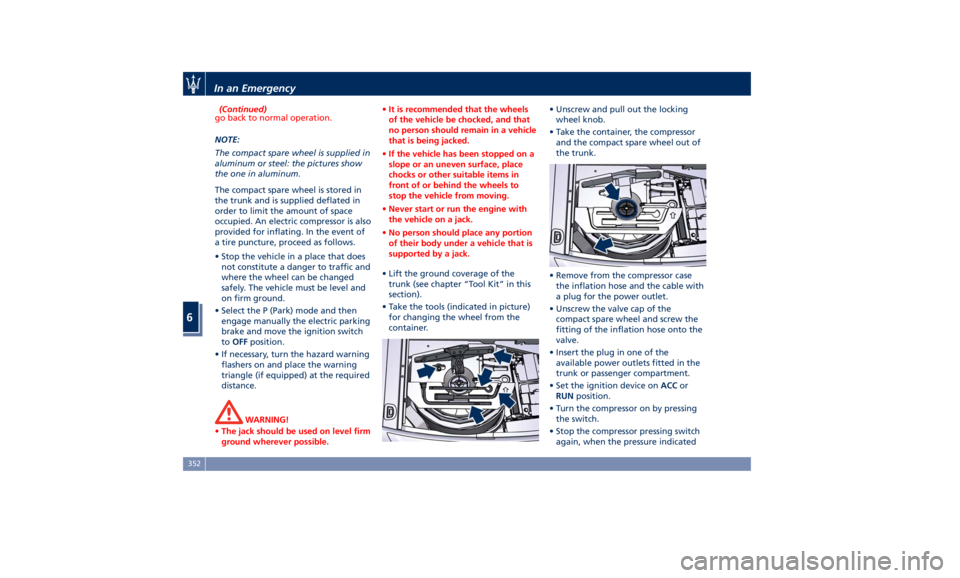
• Take the tools (indicated in picture)
for changing the wheel from the
container. • Unscrew and pull out the locking
wheel knob.
• Take the container, the compressor
and the compact spare wheel out of
the trunk.
• Remove from the compressor case
the inflation hose and the cable with
a plug for the power outlet.
• Unscrew the valve cap of the
compact spare wheel and screw the
fitting of the inflation hose onto the
valve.
• Insert the plug in one of the
available power outlets fitted in the
trunk or passenger compartment.
• Set the ignition device on ACC or
RUN position.
• Turn the compressor on by pressing
the switch.
• Stop the compressor pressing switch
again, when the pressure indicatedIn an Emergency
6
352
Page 357 of 436
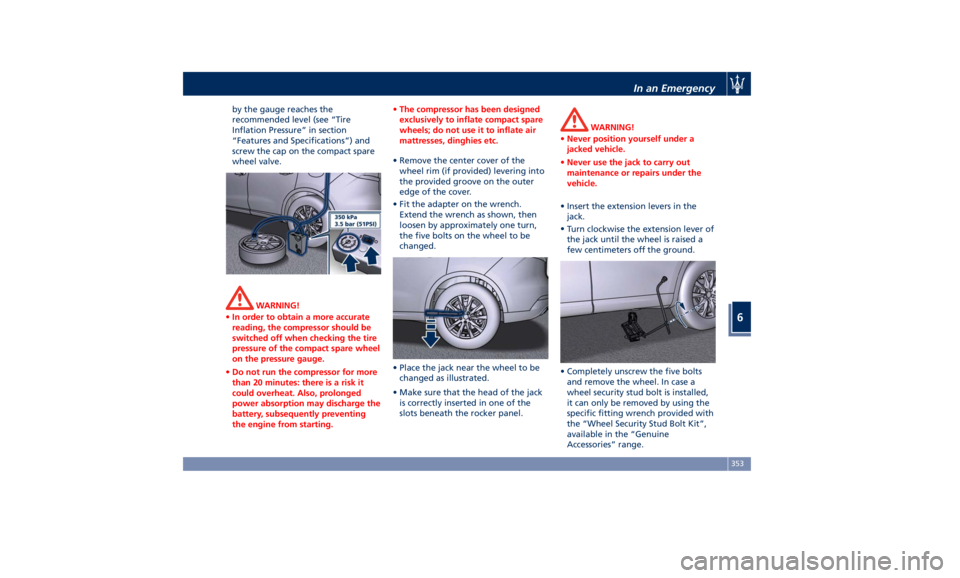
by the gauge reaches the
recommended level (see “Tire
Inflation Pressure” in section
“Features and Specifications”) and
screw the cap on the compact spare
wheel valve.
WARNING!
• In order to obtain a more accurate
reading, the compressor should be
switched off when checking the tire
pressure of the compact spare wheel
on the pressure gauge.
• Do not run the compressor for more
than 20 minutes: there is a risk it
could overheat. Also, prolonged
power absorption may discharge the
battery, subsequently preventing
the engine from starting. • The compressor has been designed
exclusively to inflate compact spare
wheels; do not use it to inflate air
mattresses, dinghies etc.
• Remove the center cover of the
wheel
rim (if provided) levering into
the provided groove on the outer
edge of the cover.
• Fit the adapter on the wrench.
Extend the wrench as shown, then
loosen by approximately one turn,
the five bolts on the wheel to be
changed.
• Place the jack near the wheel to be
changed as illustrated.
• Make sure that the head of the jack
is correctly inserted in one of the
slots beneath the rocker panel. WARNING!
• Never position yourself under a
jacked vehicle.
• Never use the jack to carry out
maintenance or repairs under the
vehicle.
• Insert the extension levers in the
jack.
•
Turn clockwise
the extension lever of
the jack until the wheel is raised a
few centimeters off the ground.
• Completely unscrew the five bolts
and remove the wheel. In case a
wheel security stud bolt is installed,
it can only be removed by using the
specific fitting wrench provided with
the “Wheel Security Stud Bolt Kit”,
available in the “Genuine
Accessories” range.In an Emergency
6
353
Page 359 of 436
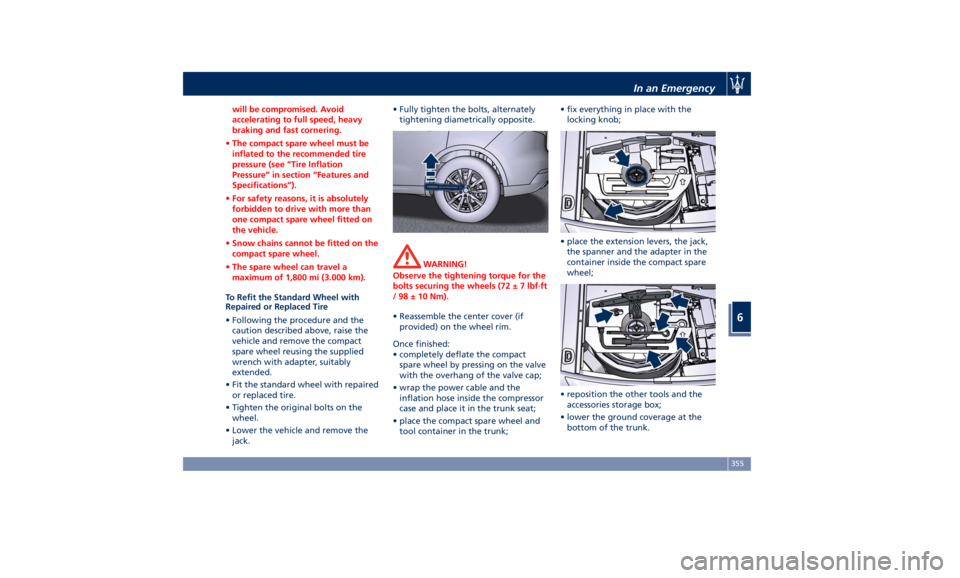
will be compromised. Avoid
accelerating to full speed, heavy
braking and fast cornering.
• The compact spare wheel must be
inflated to the recommended tire
pressure (see “Tire Inflation
Pressure” in section “Features and
Specifications”).
• For safety reasons, it is absolutely
forbidden to drive with more than
one compact spare wheel fitted on
the vehicle.
• Snow chains cannot be fitted on the
compact spare wheel.
• The spare wheel can travel a
maximum of 1,800 mi (3.000 km).
To Refit the Standard Wheel with
Repair
ed or Replaced Tire
• Following the procedure and the
caution described above, raise the
vehicle and remove the compact
spare wheel reusing the supplied
wrench with adapter, suitably
extended.
• Fit the standard wheel with repaired
or replaced tire.
• Tighten the original bolts on the
wheel.
• Lower the vehicle and remove the
jack. • Fully tighten the bolts, alternately
tightening diametrically opposite.
WARNING!
Observe the tightening torque for the
bolts securing the wheels (72 ± 7 lbf·ft
/ 98 ± 10 Nm).
• Reassemble the center cover (if
provided)
on the wheel
rim.
Once finished:
• completely deflate the compact
spare wheel by pressing on the valve
with the overhang of the valve cap;
• wrap the power cable and the
inflation hose inside the compressor
case and place it in the trunk seat;
• place the compact spare wheel and
tool container in the trunk; • fix everything in place with the
locking knob;
• place the extension levers, the jack,
the spanner and the adapter in the
container inside the compact spare
wheel;
• reposition the other tools and the
accessories storage box;
• lower the ground coverage at the
bottom of the trunk.In an Emergency
6
355
Page 371 of 436

Interval running coupons: every 12,500 mi (20,000 km)
or 1 year
Service coupons 1° 2° 3° 4°
5° 6°
Main operations Available Pre-Paid Maintenance
Program
Correct operation and reliability of the seats and seat belts IIIIII
Pollen filter RRR
Windshield fluid level - Windshield washer and headlight
cleaner IIIIII
Headlight leveling IIIIII
Controls and adjustment systems in general, hinges, doors,
engine compartment lid and luggage compartment III
Condition of leather interiors III
(1) In case of heavy-duty use of the vehicle, highlighted by the presence of mud and dust in the engine compartment,
proceed to the preventive replacement of the alternator belt.
I = Inspect and carry out any other necessary operation.
R = Replace.
Periodic Maintenance Every 600 mi (1,000 km) or before
long journeys
Check:
• engine coolant;
• brake fluid;
• windshield washer fluid level;
• tire inflation pressure and condition; • operation of lighting system
(headlights, direction indicators,
hazard warning flashers, etc.);
• operation of windshield
washer/wiper system and wear of
windshield wiper blades.
Every 1,900 mi (3,000 km)
Check and top up, if required, the
engine oil level. WARNING!
California Proposition 65
Operating, servicing and maintaining
a passenger vehicle or off-road vehicle
can expose you to chemicals including
such as, engine exhaust, carbon
monoxide, phthalates and lead, that
which are known to the State of
California to cause cancer and birth
(Continued)Maintenance and Care
7
367