2019 MASERATI LEVANTE Instrument cluster lights
[x] Cancel search: Instrument cluster lightsPage 128 of 436

Multifunction Lever The multifunction lever controls the
operation of the turn signals,
headlight beam selection and
overtaking lights, wipers and washers
acting on the windshield and on the
liftgate (for this content see the
chapter “Wipers and Washers” of this
section).
The multifunction lever is fitted on the
left side of the steering column.
Turn Signals
Move the multifunction lever all the
way up or down until the stop
triggers.
The left or right arrow on the
speedometer and tachometer
instrument cluster respectively, flashes
to show proper operation of the front
and rear turn signal lights. To activate lane change function, tap
the lever up or down once, without
moving beyond the detent. The turn
signals (right or left) will flash three
times then automatically turn off.
This function is useful when
overtaking or changing lanes. NOTE:
• If either light remains on and does
not flash, or flashes at a fast rate,
check for a defective outside light. If
an indicator on the instrument
cluster fails while moving the lever,
then the turn indicator is probably
defective.
• The message that a turn signal is on
will appear in the instrument cluster
and a continuous chime will sound if
the vehicle is driven more than 1 mile
(1.6 km) with either turn signal on.
High Beams and Flashing
To switch on the high beams with the
light switch in headlamp
or
“AUTO” position, shift the
multifunction lever onward.
The blue telltale
will illuminate on
the tachometer.Understanding the Vehicle
3
124
Page 130 of 436

A check mark will remain next to the
previously-selected item until a new
selection is made.
Press and release the switch (
)to
select the option. A selection notice
pops up for 2 seconds and then the
display reverts to the last modified
parameter.
The dimmable lights are the following:
• instrument cluster dials and display;
• dome light (front/rear); • LED in correspondence of the
internal door handle;
• doors and steering wheel backlight
controls LED;
• front footrest light;
• front seats night lighting.
Automatic Headlights Leveling A correct headlights leveling is crucial
for the safety of the vehicle’s
occupants and of people in the street.
Moreover it is included in the road
regulation law.
In order to obtain the best visibility
conditions while driving with
headlights on, the headlight beam
must be properly leveled, under any
vehicle load condition.
The vehicle is equipped with a system
that automatically adjusts headlight
leveling according to ground clearance
and vehicle load conditions. Dome Lights The dome lights integrated into the
front dome console, include a central
and two reading lights.
The central light automatically turns
on when one of the doors is opened
and turns off when the door is closed
(timed switching off). The light may be
switched on manually by pressing the
central button.
The reading lights are controlled by
the respective side buttons.
If they are turned on by pressing the
button, both central and reading lights
will stay on for about 10 minutes after
turning the engine off, and will then
turn off gradually.
When the exterior lights are switched
on, the two night LEDs fitted on the
side of the power buttons on the
overhead console will light up toUnderstanding the Vehicle
3
126
Page 132 of 436

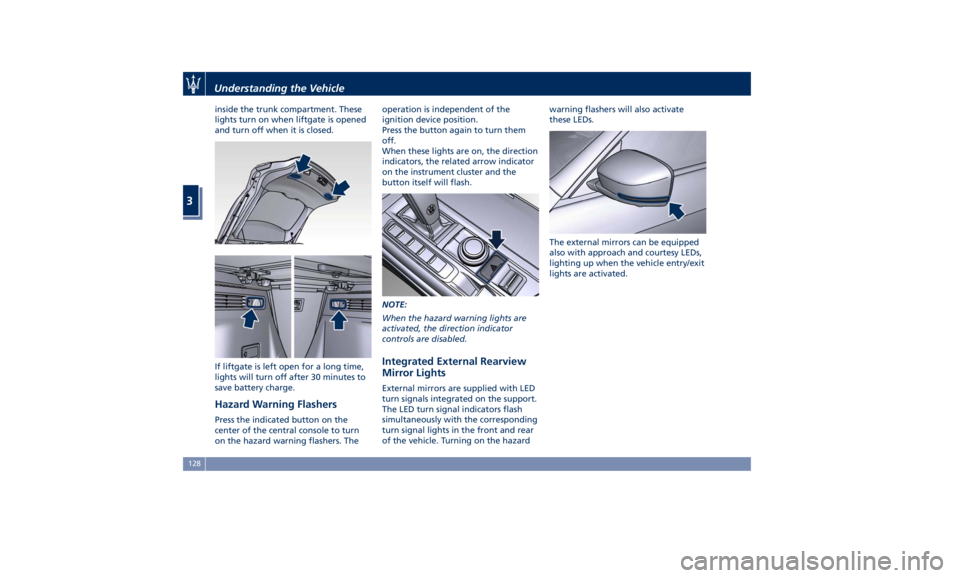
inside the trunk compartment. These
lights turn on when liftgate is opened
and turn off when it is closed.
If liftgate is left open for a long time,
lights will turn off after 30 minutes to
save battery charge.
Hazard Warning Flashers Press the indicated button on the
center of the central console to turn
on the hazard warning flashers. The operation is independent of the
ignition device position.
Press the button again to turn them
off.
When these lights are on, the direction
indicators, the related arrow indicator
on the instrument cluster and the
button itself will flash.
NOTE:
When the hazard warning lights are
activated, the direction indicator
controls are disabled.
Integrated External Rearview
Mirror Lights External mirrors are supplied with LED
turn signals integrated on the support.
The LED turn signal indicators flash
simultaneously with the corresponding
turn signal lights in the front and rear
of the vehicle. Turning on the hazard warning flashers will also activate
these LEDs.
The external mirrors can be equipped
also with approach and courtesy LEDs,
lighting up when the vehicle entry/exit
lights are activated.Understanding the Vehicle
3
128
Page 164 of 436

Instrument Cluster The instrument cluster is divided into
three main areas displaying
information, signs and text and/or icon
messages.
A Analogue speedometer. It
indicates the vehicle speed.
B Rev Counter.
C TFT display. In this area the
odometer display shows the
total distance covered by the
vehicle.
U.S. Federal Regulations requires that
upon transfer of vehicle ownership,
the seller certify to the purchaser the
correct mileage that the vehicle has
been driven.
If your odometer needs to be repaired
or serviced, the repair technician
should leave the odometer reading the
same as it was before the repair or
service. This repair should be
performed by an Authorized Maserati
Dealer .
The odometer setting should be
maintained following the repair or
service.
Keep a record of the odometer
mileage before any repair or service to ensure that the odometer is properly
reset.
Speedometer and Rev Counter display
the main warning lights (see “Warning
and Indicator Lights on Analogue
Instruments” in this chapter).
The other warning and indicator lights
are displayed on the TFT display
together with mode and drive
function indicators (see “TFT Display: Warning/Indicator Lights of Set
Modes/Functions” in this chapter).
NOTE:
The image shows the instrument
cluster before starting the engine.
V8 Engine (in example GTS version)
V6 EngineDashboard Instruments and Controls
4
160
Page 166 of 436

If the indicator flashes at a rapid rate,
check for a defective exterior light
bulb.
Tire Pressure Monitoring Light
This warning light is connected
to the Tire Pressure
Monitoring System (TPMS).
Under normal conditions, the
warning light should illuminate when
the ignition switch is in RUN and
should go off once the engine is
started.
If the warning light remains lit or
illuminates while driving, the pressure
of one or more tires is too low and a
message will be displayed.
The TPMS malfunction warning light is
connected to the low tire pressure
monitoring light.
When the system detects a
malfunction, the monitoring light and
the related message will flash for
approximately one minute and then
remain lit.
This sequence will continue upon
subsequent vehicle startups as long as
the malfunction lasts.
When the malfunction warning lights
up, the system may not be able to
detect or signal low tire pressure
correctly. Please refer to “Tire Pressure
Monitoring System (TPMS)” in section
“Driving” for further information.
Anti-Lock Braking System (ABS)
Malfunction Warning Light
This light, and its related
message, indicate possible
malfunctions of the Anti-Lock
Brake System (ABS).
The light will turn on when the
ignition switch is in RUN position and
may stay on for 4 seconds. If the ABS
light remains lit or turns on while
driving, the Anti-Lock portion of the
brake system is not functioning and
requires service. However, the
conventional brake system will
continue to operate normally if the
warning light is switched off. If
the ABS light turns on while driving, or
if it does not switch on when the
ignition switch is in RUN position,
please visit an Authorized Maserati
Dealer as soon as possible to restore
the Anti-Lock brake function.
Electronic Stability Control (ESC)
Activation/Malfunction Indicator Light
The ESC activation/malfunction
indicator light on the
instrument cluster will display
when the ignition switch is in
RUN position. It should switch off by starting the
engine.
If the light stays on with the engine
running, there is a malfunction in the
ESC system.
If the light still stays on after several
ignition cycles, and the vehicle has
been driven for several miles at more
than 30 mph (48 km/h) speed, visit an
Authorized Maserati Dealer as soon as
possible to have the problem
diagnosed and serviced.
NOTE:
Each time the ignition switch is in RUN :
• The ESC OFF indicator light
and
the ESC activation/malfunction
indicator light illuminates
temporarily.
• When the ESC is functioning, the
system will make buzzing or clicking
sounds. This is normal. The sounds
will stop once ESC becomes inactive
and the road conditions that caused
the ESC activation no longer persist.
Electronic Stability Control (ESC) OFF
Indicator Light
This indicator notifies that the
Electronic Stability Control
(ESC) is disabled (OFF); the
linked message will be
displayed.Dashboard Instruments and Controls
4
162
Page 170 of 436

18* Combined telltale of ACC, LKA
and HAS status. They are
displayed in the cluster when
one (or more) of these systems is
enabled and a different menu
from “Drive Assist” is displayed
in the main area.
19* CC, ACC, HDC status function.
20 Ride height indicator.
21 Electric Parking Brake failure
warning light.
22 Speed Warning indicator
(dynamic text).
23* Traffic Sign Assist icons:
conditioned and unconditioned
speed limit and/or
supplementary signs (time
restriction, etc..). See "Traffic
Sign Assist - TSA" in section
"Driving" for further details.
(*) See “TFT Display: Warning/
Indicator Lights of Set Modes/
Functions” in this chapter.
The display background may change
according to the type of message
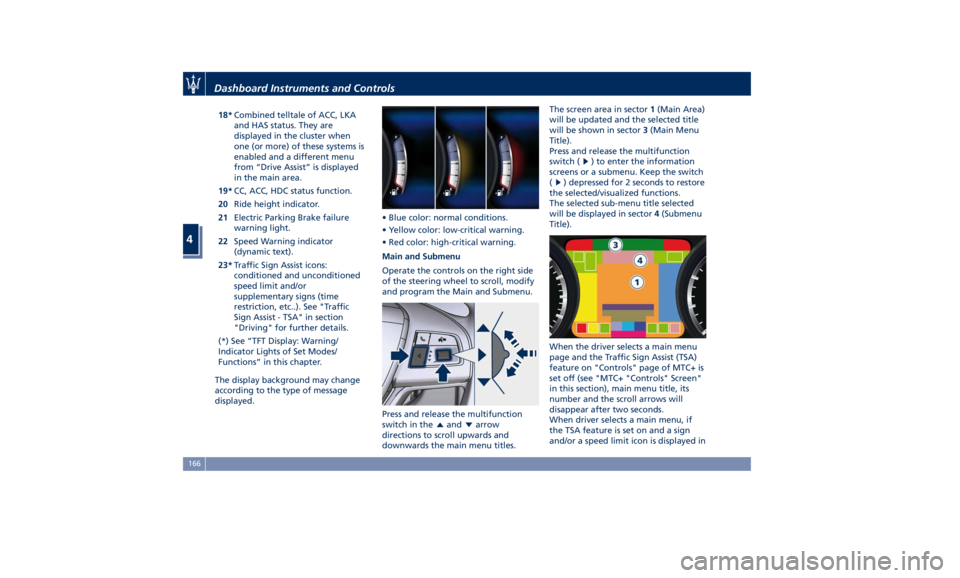
displayed. • Blue color: normal conditions.
• Yellow color: low-critical warning.
• Red color: high-critical warning.
Main and Submenu
Operate the controls on the right side
of the steering wheel to scroll, modify
and program the Main and Submenu.
Press and release the multifunction
switch in the
and arrow
directions to scroll upwards and
downwards the main menu titles. The screen area in sector 1 (Main Area)
will be updated and the selected title
will be shown in sector 3 (Main Menu
Title).
Press and release the multifunction
switch (
) to enter the information
screens or a submenu. Keep the switch
(
) depressed for 2 seconds to restore
the selected/visualized functions.
The selected sub-menu title selected
will be displayed in sector 4 (Submenu
Title).
When the driver selects a main menu
page and the Traffic Sign Assist (TSA)
feature on "Controls" page of MTC+ is
set off (see "MTC+ "Controls" Screen"
in this section), main menu title, its
number and the scroll arrows will
disappear after two seconds.
When driver selects a main menu, if
the TSA feature is set on and a sign
and/or a speed limit icon is displayed inDashboard Instruments and Controls
4
166
Page 204 of 436

Once the procedure is completed (for
example, Display mode) touch the
back arrow soft-key to return to
the previous menu or touch the upper
right “X” soft-key, to close the settings
screen. Touching the
or soft keys
and the cursor on the right side of the
screen will allow you to scroll up or
down through the available settings. Display After pressing the “Display” soft-key
the following mode settings will be
available.
• Display Mode
When in this display you can select
one of the auto display settings. To
change mode status, checkmark
"Night", “Day” or “Auto”.
• Display Brightness with Headlights
On (Night)
When in this display, you can select
the brightness with the headlights
on. Adjust the brightness from level
0 to 10 with the “+” and “–” setting
soft-keys or by selecting any point
on the scale between the “+” and
“–” soft-keys.
• Display Brightness with Headlights
Off (Day)
When in this display, you can select
the brightness with the headlights
off. Adjust the brightness as
previously explained for "Night"
setting.
• Set Language
When in this display, you can select
one language for all display
descriptions, including the trip
functions and the navigation system. The available languages are specific
to the target markets.
• Touchscreen Beep
When in this display, you can turn
on or shut off the sound activated
by pressure of a touchscreen
soft-key.
• Controls Screen Time-Out
When this mode is selected, the
“Controls” screen will remain
displayed for 5 seconds. If this mode
is not selected, the screen will
remain displayed until closed
manually.
• Nav Next Turn Pop-ups in Cluster
By selecting this feature, the next
turn direction will appear on the
instrument cluster along a
programmed route until the desired
destination is reached (see picture).Dashboard Instruments and Controls
4
200
Page 218 of 436

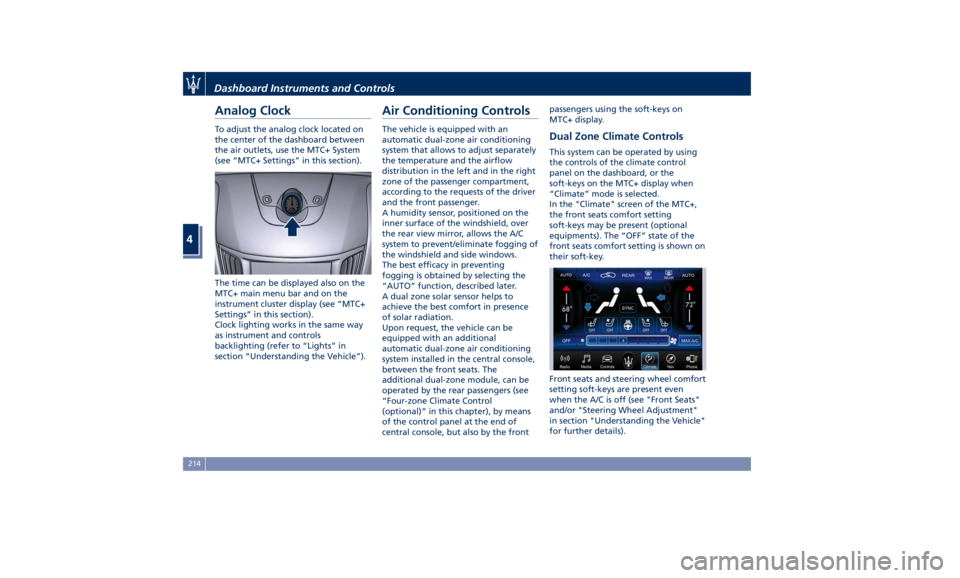
Analog Clock To adjust the analog clock located on
the center of the dashboard between
the air outlets, use the MTC+ System
(see “MTC+ Settings” in this section).
The time can be displayed also on the
MTC+ main menu bar and on the
instrument cluster display (see “MTC+
Settings” in this section).
Clock lighting works in the same way
as instrument and controls
backlighting (refer to “Lights” in
section “Understanding the Vehicle”). Air Conditioning Controls The vehicle is equipped with an
automatic dual-zone air conditioning
system that allows to adjust separately
the temperature and the airflow
distribution in the left and in the right
zone of the passenger compartment,
according to the requests of the driver
and the front passenger.
A humidity sensor, positioned on the
inner surface of the windshield, over
the rear view mirror, allows the A/C
system to prevent/eliminate fogging of
the windshield and side windows.
The best efficacy in preventing
fogging is obtained by selecting the
“AUTO” function, described later.
A dual zone solar sensor helps to
achieve the best comfort in presence
of solar radiation.
Upon request, the vehicle can be
equipped with an additional
automatic dual-zone air conditioning
system installed in the central console,
between the front seats. The
additional dual-zone module, can be
operated by the rear passengers (see
“Four-zone Climate Control
(optional)” in this chapter), by means
of the control panel at the end of
central console, but also by the front passengers using the soft-keys on
MTC+ display.
Dual Zone Climate Controls This system can be operated by using
the controls of the climate control
panel on the dashboard, or the
soft-keys on the MTC+ display when
“Climate” mode is selected.
In the "Climate" screen of the MTC+,
the front seats comfort setting
soft-keys may be present (optional
equipments). The “OFF” state of the
front seats comfort setting is shown on
their soft-key.
Front seats and steering wheel comfort
setting soft-keys are present even
when the A/C is off (see "Front Seats"
and/or "Steering Wheel Adjustment"
in section "Understanding the Vehicle"
for further details).Dashboard Instruments and Controls
4
214