2019 MASERATI LEVANTE Fuel
[x] Cancel search: FuelPage 75 of 436

inflates. This especially applies to
children.
Supplemental Side Air Bag Inflatable
Curtain (SABIC) Inflator Units
During collisions where the impact is
confined to a particular area of the
side of the vehicle, the ORC may
deploy the SABIC air bags, depending
on the severity and type of collision. In
these events, the ORC will deploy the
SABIC only on the impact side of the
vehicle. A quantity of non-toxic gas is
generated to inflate the side curtain
air bag.
The inflating side curtain air bag
pushes the head/s of the occupant/s
seating in the outside seats from the
edge of the headliner out of the way
and covers the window. The air bag
inflates with enough force to possibly
injure you if you are not belted and
seated properly, or if items are
positioned in the area where the side
curtain air bag inflates. This especially
applies to children.
The SABICs may also help reduce the
risk of partial or complete ejection of
vehicle occupants through side
windows in certain rollover events
(because equipped with rollover
sensing). Front and Side Impact Sensors
In front and side impacts, impact
sensors can aid the ORC in
determining appropriate response to
impact events.
Enhanced Accident Response System
In the event of an impact causing air
bag deployment, if the
communication network and the
power remains intact, depending on
the nature of the accident, the ORC
will determine whether the enhanced
accident response system will have to
perform the following functions:
• cut off fuel to the engine;
• turn hazard lights and interior lights
on as long as the battery has power
or until the ignition switch is turned
off;
• unlock the doors automatically;
• disconnect the battery with a
pyrotechnic charge.
Air Bag Deployment Result
The advanced front air bags are
designed to deflate immediately after
deployment.
If you do have a collision which
deploys the air bags, any or all of the
following may occur: • The nylon air bag material may
sometimes cause abrasions and/or
skin reddening to the driver and
front passenger as the air bags
deploy and unfold.
• As the air bags deflate, you may see
some smoke-like particles. The
particles are a normal by-product of
the process that generates the
non-toxic gas used for air bag
inflation. These airborne particles
may irritate the skin, eyes, nose, or
throat. If these particles settle on
your clothing, follow the garment
manufacturer's instructions for
cleaning. Do not drive your vehicle
after an air bag has deployed. If you
are involved in another collision, the
air bags will not be in place to
protect you.
ENVIRONMENTAL!
Air bag inflation releases a small
amount of powder. This powder is not
harmful to the environment.
WARNING!
California Proposition 65
Operating, servicing and maintaining
(Continued)Before Starting
2
71
Page 96 of 436

• Check the tires (see “Tire Inflation
Pressure” chapter in section
“Features and Specifications”) for
proper cold inflation pressure.
Lights and Indicator Lights
• Have someone observe the operation
of exterior lights while you operate
the controls (see “Lights” chapter in
section “Understanding the
Vehicle”).
• Check turn signal and high beam
indicator lights on the instrument
cluster (see “Instrument Cluster”
chapter in section “Dashboard
Instruments and Controls”).
Door Latches
• Check for positive closing, latching,
and locking of doors and liftgate (see
“Unlock the Vehicle with Key fob”
chapter in this section).
Fluid Leaks
• Check area under vehicle after
overnight parking for recent fluid
leaks (oil, fuel, etc.).
• If gasoline fumes are detected or
fluid leaks are suspected, contact the
Authorized Maserati Dealer . WARNING!
California Proposition 65
Operating, servicing and maintaining
a passenger vehicle or off-road vehicle
can expose you to chemicals including
such as, engine exhaust, carbon
monoxide, phthalates and lead, that
which are known to the State of
California to cause cancer and birth
defects or other reproductive harm. To
minimize exposure, avoid breathing
exhaust, do not idle the engine except
as necessary, service your vehicle in a
well-ventilated area and wear gloves
or wash your hands frequently when
servicing your vehicle. For more
information go to:
www.P65Warnings.ca.gov/passenger-
vehicleBefore Starting
2
92
Page 122 of 436

NOTE:
• Each time the adaptive headlight
system is turned on, the headlights
will perform a self-regulation cycle.
• All AFS features are available only if
the vehicle is moving forward.
• “Adaptive Front Light” function can
be turned on or off using the MTC+
System, refer to “MTC+ Settings” in
section “Dashboard Instrument and
Controls” for further information. “Full-LED” Headlight with AFS
(optional) These headlights combines the
“Full-LED” technology to the AFS
(Advanced Frontlighting System)
adaptive features, using a
forward-facing camera located on the
windshield behind the internal
rear-view mirror.
“Full-LED” Technology
This technology allows having
headlights with a simpler construction
and a more compact size compared to
those equipped with traditional or
Xenon light bulbs.
Other advantages are:
• a clearer light beam, with a cool
white tone that allows a better
perception of the contrasts thus
making the night vision more
efficient and less tiring;
• a longer duration equivalent at least
to that of the vehicle;
• a reduced current consumption. These features positively affect some
vehicle management economy aspects
by eliminating/reducing the light bulb
replacements and the fuel
consumption.
AFS Features
The system is able to process signals of
onboard systems and subsequently
start up five strategic steps in the
following situations:
• “motorway beam”;
• “country beam”;
• “town beam”;
• “adverse weather beam”;
• “tourist beam” (for example in
countries with circulation on the
opposite side). In this case this
function must be activated via the
menu of MTC+ (refer to “MTC+
Settings” in section “Dashboard
Instruments and Controls”).
The advantages offered by the AFS
system are perceived especially in case
of bad weather, fog and/or insufficient
road indications providing broader
illumination of the side zones, which
are normally left in the dark, and for
motorway driving.
This surely increases driving safety as it
offers less eye stress and increased
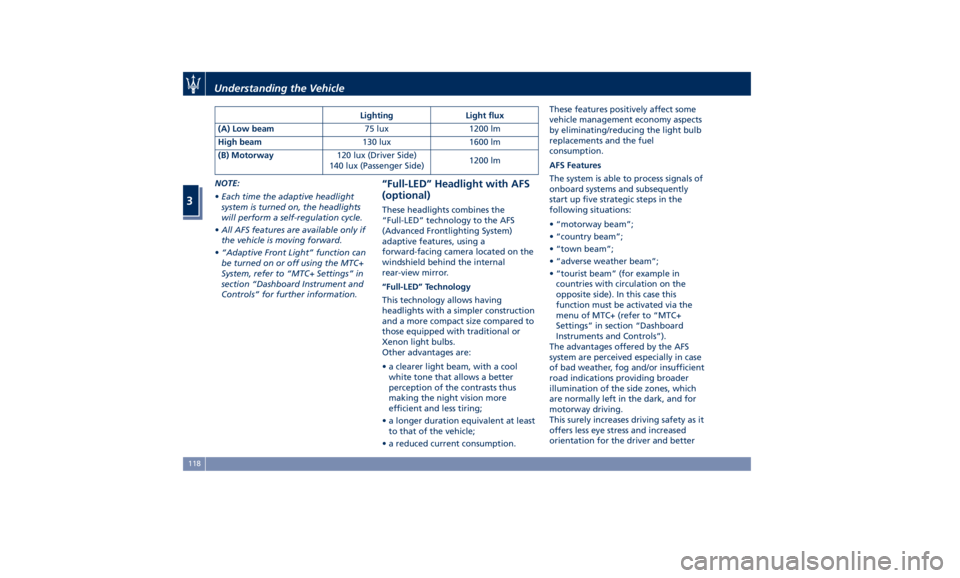
orientation for the driver and betterLighting Light flux
(A) Low beam 75 lux 1200 lm
High beam 130 lux 1600 lm
(B) Motorway 120 lux (Driver Side)
140 lux (Passenger Side) 1200 lm
Understanding the Vehicle
3
118
Page 131 of 436

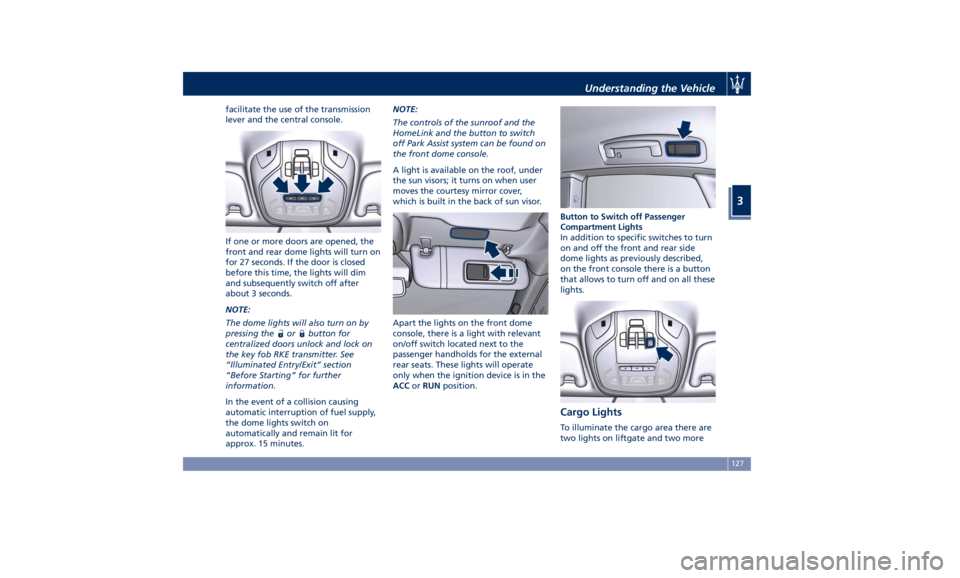
facilitate the use of the transmission
lever and the central console.
If one or more doors are opened, the
front and rear dome lights will turn on
for 27 seconds. If the door is closed
before this time, the lights will dim
and subsequently switch off after
about 3 seconds.
NOTE:
The dome lights will also turn on by
pressing the
or button for
centralized doors unlock and lock on
the key fob RKE transmitter. See
“Illuminated Entry/Exit” section
“Before Starting” for further
information.
In the event of a collision causing
automatic interruption of fuel supply,
the dome lights switch on
automatically and remain lit for
approx. 15 minutes. NOTE:
The controls of the sunroof and the
HomeLink and the button to switch
off Park Assist system can be found on
the front dome console.
A light is available on the roof, under
the sun visors; it turns on when user
moves the courtesy mirror cover,
which is built in the back of sun visor.
Apart the lights on the front dome
console, there is a light with relevant
on/off switch located next to the
passenger handholds for the external
rear seats. These lights will operate
only when the ignition device is in the
ACC or RUN position. Button to Switch off Passenger
Compartment Lights
In addition to specific switches to turn
on and off the front and rear side
dome lights as previously described,
on the front console there is a button
that allows to turn off and on all these
lights.
Cargo Lights To illuminate the cargo area there are
two lights on liftgate and two moreUnderstanding the Vehicle
3
127
Page 165 of 436

Warning and Indicator Lights
on Analog Instruments Telltales on Speedometer
The following telltales are displayed
on the speedometer, and related
messages are visible for 5 seconds on
the central sector of the display, unless
otherwise indicated (see “TFT Display:
Warning/Indicator Lights of Set
Modes/Functions” paragraph in this
chapter).
Malfunction Indicator Light (MIL)
The Malfunction Indicator
Light (MIL) is part of an
onboard diagnostic system
that monitors engine and
automatic transmission control
systems.
Under normal conditions, this
indicator light should switch on when
the ignition switch is in RUN position and switch off soon after the engine is
started (the MIL does not shut off
immediately).
This is a sign of the indicator light
working properly. If the indicator
remains illuminated or switches on
while driving, there is a failure in the
fuel supply/ignition and emission
control systems.
The failure could cause high exhaust
emissions, loss of performance, poor
vehicle handling and high
consumption levels.
Should this occur, proceed with
caution to your Authorized Maserati
Dealer without heavy throttle
application or driving at high speeds.
Obey all applicable local traffic
regulations.
The indicator light will go out if the
problem is no longer present.
The error will be registered by the
system in any case.
CAUTION!
• When the ignition switch is in the
RUN position and if the indicator
light does not switch on or if it
switches on while driving, contact an
Authorized Maserati Dealer as soon
as possible. • Prolonged driving with the MIL on
could cause damage to the engine
control system. It also could affect
fuel economy and drivability. If the
MIL is flashing, severe catalytic
converter damage and power loss
will soon occur. Immediate service is
required. In addition, the OBDII
system incorporates a diagnostic
connector that can be interfaced
using diagnostic equipment. This
makes it possible to read the error
codes stored in the control unit,
together with a set of specific
parameters for the engine operation
diagnostic cycle, for compliance with
CARB & EPA OBDII regulations.
Left Turn Signal Indicator Light
The
indicator lights up when
the left turn signals or the
hazard flashers are turned on.
The indicator light will flash at
the same frequency of the turn signals
and is controlled by the multifunction
lever behind the steering wheel.
If the vehicle electronics sense that the
vehicle drives for more than 1 mile
(1.6 km) with either turn signal on, a
continuous sound will alert the driver
to turn the signal off.Dashboard Instruments and Controls
4
161
Page 169 of 436

WARNING!
Maserati urges you to use the seat
belts correctly fastened and adjusted
at all times. Correct use of the seat
belts can help reduce the risk of
serious injury in the event of an
accident. Do not pass seat belts over
sharp edges: they could tear. Do not
pin anything to the seat belts. This
could reduce their initial strength and
cause them to tear in the event of a
crash.
Refer to “Occupants Restraint
Systems”
in section “Before
Starting”
for further information.
TFT Display: Menus and
Settings When operating, the TFT Display is
divided into sectors including menus
and sub-menus, running data,
warning/indicator lights and messages.
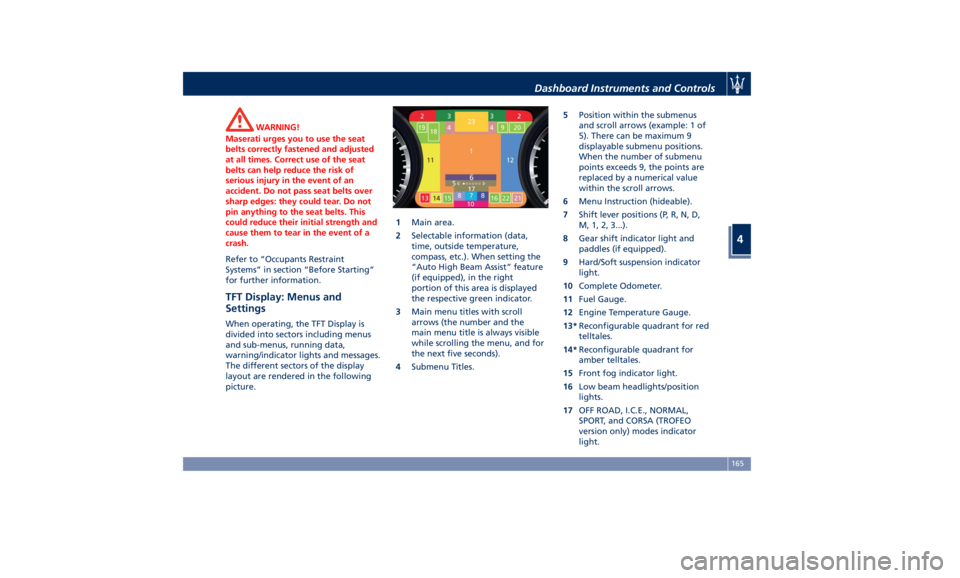
The different sectors of the display
layout are rendered in the following
picture. 1 Main area.
2 Selectable information (data,
time, outside temperature,
compass, etc.). When setting the
“Auto High Beam Assist” feature
(if equipped), in the right
portion of this area is displayed
the respective green indicator.
3 Main menu titles with scroll
arrows (the number and the
main menu title is always visible
while scrolling the menu, and for
the next five seconds).
4 Submenu Titles. 5 Position within the submenus
and scroll arrows (example: 1 of
5). There can be maximum 9
displayable submenu positions.
When the number of submenu
points exceeds 9, the points are
replaced by a numerical value
within the scroll arrows.
6 Menu Instruction (hideable).
7 Shift lever positions (P, R, N, D,
M, 1, 2, 3...).
8 Gear shift indicator light and
paddles (if equipped).
9 Hard/Soft suspension indicator
light.
10 Complete Odometer.
11 Fuel Gauge.
12 Engine Temperature Gauge.
13* Reconfigurable quadrant for red
telltales.
14* Reconfigurable quadrant for
amber telltales.
15 Front fog indicator light.
16 Low beam headlights/position
lights.
17 OFF ROAD, I.C.E., NORMAL,
SPORT, and CORSA (TROFEO
version only) modes indicator
light.Dashboard Instruments and Controls
4
165
Page 171 of 436

sector 23, only the main menu number
and the scroll arrows remain displayed
in the sector 3 , left side.
Within a submenu, press and release
the switch in the
and arrow
directions to scroll the menu.
Press the
button to return to the
main menu from an item of interest or
from an information screen.
Main Menu & Submenu Content
Overview
1. MAIN MENU
• View speed in mph or km/h
2. VEHICLE INFO
• Tire Pressure
• Transmission Temperature
• Oil Temperature
• Oil Pressure
• Battery Voltage
• Maintenance 3. DRIVE MODE
• Drive Mode - Ride Height - Torque
Distribution - Powertrain status - ESC
status - Suspension stiffness status
4. Driver Assist (if equipped)
• Shows the status of any active driver
assist systems: CC, ACC, LKA and
HAS. Graphics in the main area of
TFT display only refer to ACC, LKA
and HAS systems
• LKA (LaneSense) status
5. FUEL ECONOMY
• Average, Range, Current gage
6. TRIP
• Trip A: Average, Avg. speed, Elapsed
time, Distance
• Trip B: Average, Avg. speed, Elapsed
time, Distance
7. START&STOP
• Messages relating to the Start&Stop
function
8. AUDIO
• Information concerning audio status
according to current media source,
track and station.
• Information on phone incoming call.
9. STORED MESSAGES
10. VEHICLE SETTINGS • Speed Warning: enables, disables or
sets the speed limit represented in
the dynamic icon on the TFT display
• Auto apply Off/On of the Electric
Parking Brake
• Interior Lighting
– Backlighting
– Ambient Lighting
• SCREEN SETUP
– Upper Left
– Upper Right
– Main Menu: Line 1
– Main Menu: Line 2
– Main Menu: Line 3
– MPH km/h Display On/Off
– Main Menu Navigation
– Outline Coloring
– Key-On Display
– Key-Off Display
– Defaults
Messages on Main Display Area
The main display area also displays
"pop up" messages. These pop up
messages fall into several categories:
• Five-Second Stored Messages
When the appropriate conditions
occur, this type of message appears
on the main display area for five
seconds and then returns to the
previous screen. Most of the
messages of this type are thenDashboard Instruments and Controls
4
167
Page 175 of 436

4. DRIVER ASSIST (if equipped)
Press and release the switch in the
or arrow directions until this
menu item is displayed.
• Active Driver Assist System
The screen graphically shows
current status of driver assist
systems: the figure shows an
example with ACC engaged and
HAS set.
• LKA (LaneSense) Status
Vehicle is delivered with LKA in off
state set on MTC+ system, page
“Controls”.
You can enable LKA in the “Visual”
only or “Visual & Haptic” mode by
turning on the function via MTC+
system soft-key and by changing
your selection in the dedicated
submenu. The setting chosen will
latch over key cycles. NOTE:
To set these systems, see chapters
“Adaptive Cruise Control - ACC”,
“Highway Assist - HAS” and “Lane
Keeping Assist - LKA” in section
“Driving”.
Press and release the
button to
return to the main menu.
5. FUEL ECONOMY
Press and release the switch in the
or arrow directions until this
menu item is displayed.
The screen will display the following:
• Current Fuel Economy in MPG (US),
MPG (UK) or L/100km
Shows the current fuel economy.
During AutoStop stage performed
by the Start&Stop system (see
“Normal Starting of the Engine” in
section “Driving”), a dash will be
displayed instead of the value. • Range in miles or km
Shows the range since the last fuel
average reset.
When the fuel economy is reset, the
display will read “Reset” or show
dashes for two seconds.
Then, the history information will
be erased, and the averaging will
continue from the last fuel average
reading before the reset.
• Fuel Economy Average in MPG (US),
MPG (UK) or L/100km
Shows the average fuel economy
since the last reset.
Press the multifunction switch (
)
for 1 second and release it to reset
the fuel economy average.
When the fuel economy is reset, the
display will read “Reset” or show
dashes for two seconds.
Then, the history information will
be erased, and the averaging will
continue from the last fuel average
reading before the reset.Dashboard Instruments and Controls
4
171