2019 MASERATI LEVANTE light
[x] Cancel search: lightPage 260 of 436

A Ride height
B Powertrain
C ESC
D Torque distribution E Suspension stiffness
Press “ ” (Suspension) button, the
icon with "S" beside will light up on
the upper right side of the TFT display. The table below specifies the default,
ride height and relevant commands
that can be set, for each drive mode.
Drive Mode Default Condition Possible Ride Height / Command
ESC Off Road • OffRoad1/Via dedicated drive height
selector according to current speed.
• OffRoad2/Via dedicated drive height
selector according to current speed.Off Road
Off Road 1Driving
5
256
Page 263 of 436
the selector and in the dedicated area
at top right of the display.
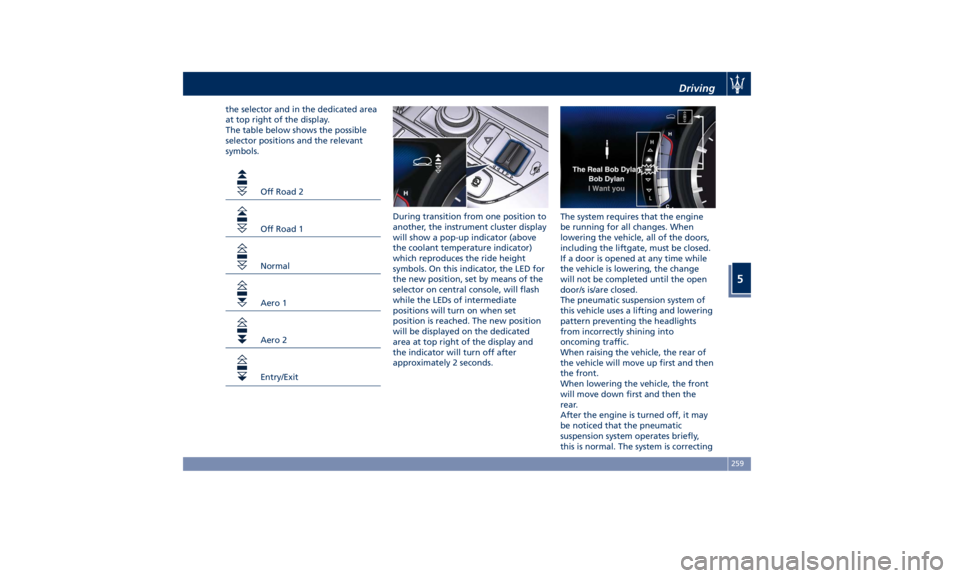
The table below shows the possible
selector positions and the relevant
symbols.
Off Road 2
Off Road 1
Normal
Aero 1
Aero 2
Entry/Exit During transition from one position to
another, the instrument cluster display
will show a pop-up indicator (above
the coolant temperature indicator)
which reproduces the ride height
symbols. On this indicator, the LED for
the new position, set by means of the
selector on central console, will flash
while the LEDs of intermediate
positions will turn on when set
position is reached. The new position
will be displayed on the dedicated
area at top right of the display and
the indicator will turn off after
approximately 2 seconds. The system requires that the engine
be running for all changes. When
lowering the vehicle, all of the doors,
including the liftgate, must be closed.
If a door is opened at any time while
the vehicle is lowering, the change
will not be completed until the open
door/s is/are closed.
The pneumatic suspension system of
this vehicle uses a lifting and lowering
pattern preventing the headlights
from incorrectly shining into
oncoming traffic.
When raising the vehicle, the rear of
the vehicle will move up first and then
the front.
When lowering the vehicle, the front
will move down first and then the
rear.
After the engine is turned off, it may
be noticed that the pneumatic
suspension system operates briefly,
this is normal. The system is correctingDriving
5
259
Page 270 of 436
controlled speed lower than 5 mph
(8 km/h) while in water to minimize
wave effects that might cause serious
damage to all components, especially
the engine.
WARNING!
Avoid driving through flowing or
standing water. Doing so can be
highly dangerous and can be very
difficult to determine the depth of the
water you are driving through. If
driving through water cannot be
avoided, and after driving through it,
apply the brakes lightly to ensure the
brakes are operating correctly.
Flowing Water
If
the water is
swift flowing and rising
(as in storm run-off), avoid crossing
until the water level recedes and/or
the flow rate is reduced. If you must
cross flowing water avoid depths in
excess of 9 in (25 cm).
Standing Water
Do not drive in standing water deeper
than 19 in (50 cm), and reduce speed
appropriately to minimize wave
effects. Maintenance
After driving through water, have your
vehicle fluids and lubricants inspected
at an Authorized Maserati Dealer to
assure the fluids have not been
contaminated.
Driving in Snow and Wet Grass In heavy snow, when pulling a load, or
for additional control at slower speeds,
set “I.C.E.” drive mode with
transmission in M +/- (Manual) and
shift the transmission to a low gear.
See “Drive Mode” in this section for
further details. Do not shift to a lower
gear than necessary to maintain
forward motion. Over-revving the
engine can spin the wheels and
traction will be lost.
Avoid abrupt downshifts on icy or
slippery roads, because engine braking
may cause skidding and loss of control.
Follow these instructions even when
driving through a path section covered
with wet grass.
Driving in Mud and Sand In general, when driving in mud and
sand, if your wheels spin, always
reduce the throttle in order to slow
the tires and regain traction. • When driving in mud, avoid using
low gear that could cause wheel
spin. Follow the tire and vehicle
manufacturer’s advice on tire
pressure.
• When driving in sand, adopt lowest
gear possible.
Hill Climbing Before climbing a hill, determine the
conditions at the crest and/or on the
other side and shift the transmission to
a lower gear.
The vehicle is equipped with Hill Start
Assist (HSA) that helps the driver to
manage the brake intervention in
acceleration when driving uphill (for
further details, refer to “Brake and
Stability Control System” in this
section).
WARNING!
If you lose forward motion, or cannot
make it to the top of a hill or grade,
never attempt to turn around. Always
back carefully straight down a hill in R
(Reverse) gear. Never back down a hill
in N (Neutral) using only the brake.
Remember, never drive diagonally
across
a hill; always
drive straight up or
down.Driving
5
266
Page 272 of 436
Parking Brake The vehicle is equipped with an
electric automatic parking brake, also
called EPB (Electric Parking Brake).
The braking action is ensured by a
power actuator directly working on
the brake pad inside each caliper of
the rear brake system.
It can be automatically engaged when
the engine is turned off and
disengaged with engine running,
driver seatbelt latched and driver door
closed, while pressing the brake pedal
and operating the shift lever.
Furthermore, EPB can be automatically
engaged above a slope threshold with
gearshift in park to avoid damage to
the vehicle. EPB can be disengaged
before turning off the vehicle.
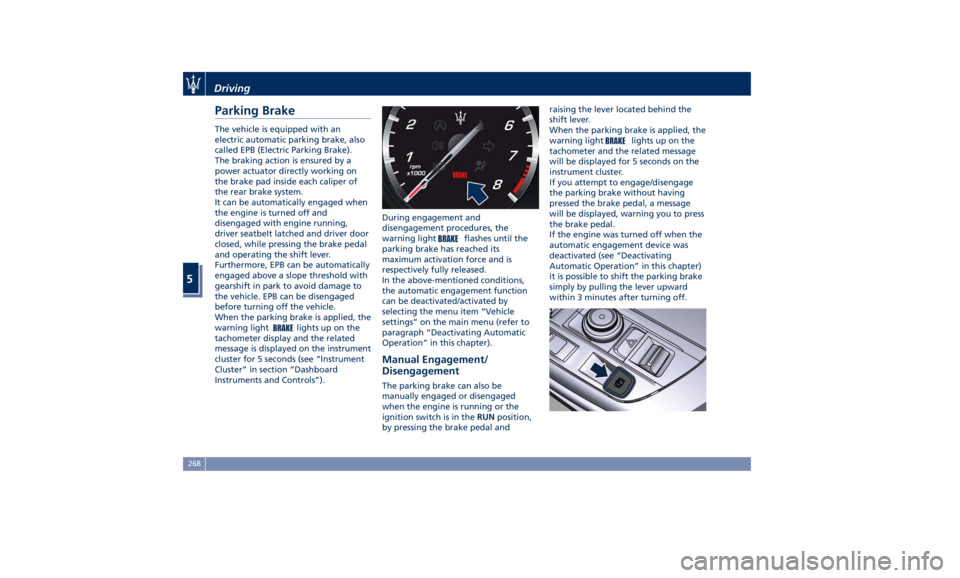
When the parking brake is applied, the
warning light
lights up on the
tachometer display and the related
message is displayed on the instrument
cluster for 5 seconds (see “Instrument
Cluster” in section “Dashboard
Instruments and Controls”). During engagement and
disengagement procedures, the
warning light
flashes until the
parking brake has reached its
maximum activation force and is
respectively fully released.
In the above-mentioned conditions,
the automatic engagement function
can be deactivated/activated by
selecting the menu item “Vehicle
settings” on the main menu (refer to
paragraph “Deactivating Automatic
Operation” in this chapter).
Manual Engagement/
Disengagement The parking brake can also be
manually engaged or disengaged
when the engine is running or the
ignition switch is in the RUN position,
by pressing the brake pedal and raising the lever located behind the
shift lever.
When the parking brake is applied, the
warning light
lights up on the
tachometer and the related message
will be displayed for 5 seconds on the
instrument cluster.
If you attempt to engage/disengage
the parking brake without having
pressed the brake pedal, a message
will be displayed, warning you to press
the brake pedal.
If the engine was turned off when the
automatic engagement device was
deactivated (see “Deactivating
Automatic Operation” in this chapter)
it is possible to shift the parking brake
simply by pulling the lever upward
within 3 minutes after turning off.Driving
5
268
Page 274 of 436
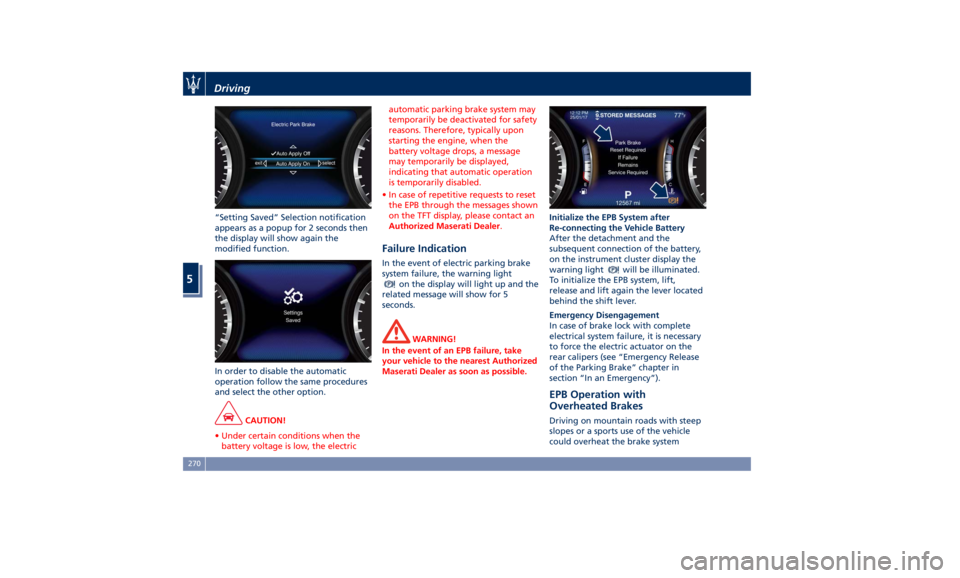
“Setting Saved” Selection notification
appears as a popup for 2 seconds then
the display will show again the
modified function.
In order to disable the automatic
operation follow the same procedures
and select the other option.
CAUTION!
• Under certain conditions when the
battery voltage is low, the electric automatic parking brake system may
temporarily be deactivated for safety
reasons. Therefore, typically upon
starting the engine, when the
battery voltage drops, a message
may temporarily be displayed,
indicating that automatic operation
is temporarily disabled.
• In case of repetitive requests to reset
the EPB through the messages shown
on the TFT display, please contact an
Authorized Maserati Dealer .
Failure Indication In the event of electric parking brake
system failure, the warning light
on the display will light up and the
related message will show for 5
seconds.
WARNING!
In the event of an EPB failure, take
your vehicle to the nearest Authorized
Maserati Dealer as soon as possible. Initialize the EPB System after
Re-connecting
the V ehicle Battery
After the detachment and the
subsequent connection of the battery,
on the instrument cluster display the
warning light
will be illuminated.
To initialize the EPB system, lift,
release and lift again the lever located
behind the shift lever.
Emergency Disengagement
In case of brake lock with complete
electrical system failure, it is necessary
to force the electric actuator on the
rear calipers (see “Emergency Release
of the Parking Brake” chapter in
section “In an Emergency”).
EPB Operation with
Overheated Brakes Driving on mountain roads with steep
slopes or a sports use of the vehicle
could overheat the brake systemDriving
5
270
Page 275 of 436
components. In these conditions the
parking brake must not be used since
the push of the power actuator might
not be sufficient to ensure vehicle
braking, especially on a slope.
Drive normally without braking to
allow the brakes to cool down a few
minutes before stopping. In this way,
the automatic or manual activation of
the parking brake will ensure vehicle
braking.
Parking Before leaving the vehicle, make sure
that the parking brake is fully applied
and place the transmission lever in the
P (Park) position by pressing the “P”
button.
WARNING!
• Always check that the vehicle is
locked before leaving it.
• Never leave children unattended in
the vehicle.
• Do not park the vehicle on paper,
grass, dry leaves or other flammable
materials.
• Do not leave the engine running
while the vehicle is unattended.
CAUTION!
• When you need to park the vehicle
on a steep slope, both with the
engine on or off, it is recommended
not only to engage the parking
brake, but also to shift the
transmission lever to P (Park) before
leaving the vehicle.
• When parking on uneven surfaces
(rocks, sidewalks, etc..) do not activate the Entry/Exit ride height to
avoid any contact of the bottom of
the car with the protrusions of the
ground.
When parking on hill roads, it is
important
to turn the
front wheels
toward the curb on a downhill grade
and away from the curb on an uphill
grade.
Apply the parking brake before
placing the shift lever in P (Park),
otherwise the load on the
transmission locking mechanism may
make it difficult to move the shift
lever out of P (Park).
In certain conditions, it is however
advisable to disengage the parking
brake manually and slightly apply the
service brake for starting off. This is
advisable when there are obstacles
very close to the vehicle in the
direction in which you intend to move.Driving
5
271
Page 278 of 436
threshold for ESC activation, allowing
higher wheel spin than normally
granted by the ESC system. The
(ESC
OFF) button is fitted beside the gear
shift lever: to deactivate the system see
“Drive Mode” in this section.
WARNING!
In SPORT mode the ESC control
thresholds are higher for maximum
performance on dry road surface. To
ensure maximum security of the ESC,
it is recommended not to activate
SPORT mode on surfaces with
medium- and low-grip (e.g., wet,
snow, dirt, etc..) with ESC system
active (
(ESC OFF) button not
pressed).
NOTE:
• When in “ESC of f” mode, the TCS
functionality of ESC is deactivated
(except for the limited slip feature
described in the TCS paragraph of
this chapter). All other stability
features of ESC function regularly.
• To improve the vehicle's traction
when driving with snow chains, or
when starting off in deep snow,
sand, or gravel, it may be desirable
to switch to the “ESC off” mode by pressing the
(ESC OFF) button and
remain in this operational mode no
longer than needed. Once the
situation requiring “ESC off” mode is
overcome, turn the ESC on again by
pressing the
(ESC OFF) button. This
may also be performed while in
motion.
Anti-Lock Braking System (ABS)
and Electronic Brake-force
Distribution (EBD) The Anti-Lock Braking System (ABS)
provides increased vehicle stability and
brake performance under most
braking conditions. The system
automatically “pumps” the brakes
during severe braking to prevent
wheel lock-up.
The Electronic Brake-force Distribution
(EBD) prevents the rear wheels from
over-braking and provides greater
control of available braking forces
applied to the rear axle.
WARNING!
The ABS helps prevent the wheels
from locking, but it does not increase
the physical grip limits between the
tires and the road. Therefore, always
keep a safe distance from the vehicle in front of yours and reduce your
speed when entering a curve.
NOTE:
• When
the vehicle's speed is higher
than 7 mph (11 km/h), you may hear
a slight clicking sound as well as
other motor noises. The system is
performing a self-check cycle to
ensure that the ABS is working
properly.
• This self-check occurs each time the
vehicle is started and accelerated
past 7 mph (11 km/h).
ABS is activated during braking under
certain road or stopping conditions.
ABS-inducing conditions can include
ice, snow, gravel, bumps, railroad
tracks, loose debris.
You may also experience the following
when the brake system goes into Anti-
Lock:
• The ABS motor running (it may
continue to run for a short time after
the vehicle stops).
• The clicking sound of solenoid valves.
• Brake pedal pulsations.
• A slight drop or fall away of the
brake pedal at the end of the stop.
These are all normal characteristics of
ABS functioning.Driving
5
274
Page 279 of 436
WARNING!
• The ABS contains sophisticated
electronic equipment that may be
susceptible to interference caused
by improperly installed or high
output radio transmitting
equipment. This interference can
cause possible loss of anti-lock
braking capability. Installation of
such equipment should be
performed by qualified Maserati
personnel.
• Pumping the Anti-Lock Brakes will
diminish their effectiveness.
Pumping brakes makes the stopping
distance longer. Just press firmly on
your brake pedal when you need to
slow down or stop.
• The ABS installed to this vehicle
does not control trailer braking
system. Pay utmost attention when
driving on slippery ground since the
trailer traction might get poorer.
• Do not modify the vehicle braking
system to control the trailer brakes.
The hydraulic system controlling
vehicle braking must remain
independent from trailer braking
system. Traction Control System (TCS) The current device is an integral part
of the ESC system. It operates
automatically by reducing the power
transmitted by the engine in case of
slipping, loss of grip on wet floor
(aquaplaning), acceleration on
slippery snow-covered or frozen
surfaces, etc.
Activating under slip conditions
different control systems:
• if slippage affects both drive wheels,
it reduces the power transmitted by
the engine;
• if slippage only affects one drive
wheel, it brakes the slipping wheel
automatically.
Brake Assist System (BAS) This system completes the ABS system
by optimizing the vehicle braking
capacity during emergency brake
maneuvers. The system detects an
emergency braking situation by
sensing the rate and amount of brake
application and then applies optimum
pressure to the brakes in order to help
reduce braking distances.
The quick brake coupling is optimal
for BAS performances. In order to fully
exploit the system, apply continuous
brake pedal pressure during the entire vehicle stop sequence. Do not reduce
brake pedal pressure earlier than
required. Once the brake pedal is
released, the BAS is deactivated.
Brake Throttle Override (BTO) To complete the range of systems that
assist braking, the vehicle is equipped
with BTO, which is designed to stop
the vehicle even when it is during
acceleration. If the brake pedal is
depressed together with the
accelerator, the system does not
consider as “conflict” the sequence
“brake-first-then-accelerator” of pedal
application and it will not engage the
BTO. When the system recognizes that
the accelerator pedal is stuck pressed
and the sequence “accelerator-first-
then-brake-pressed” (this sequence is
recognized as a “conflict”), the engine
power will be automatically reduced
and, if the driver continues to depress
the accelerator and the brake pedal,
the system can make the vehicle come
to a complete stop.
Additionally, if the brake pedal is
released when the accelerator is still
stuck pressed, the corresponding
engine torque increase gradually to a
safe value.
During this event, the ETC light
indicator will illuminate. The systemDriving
5
275