2019 MASERATI LEVANTE ESP
[x] Cancel search: ESPPage 348 of 436
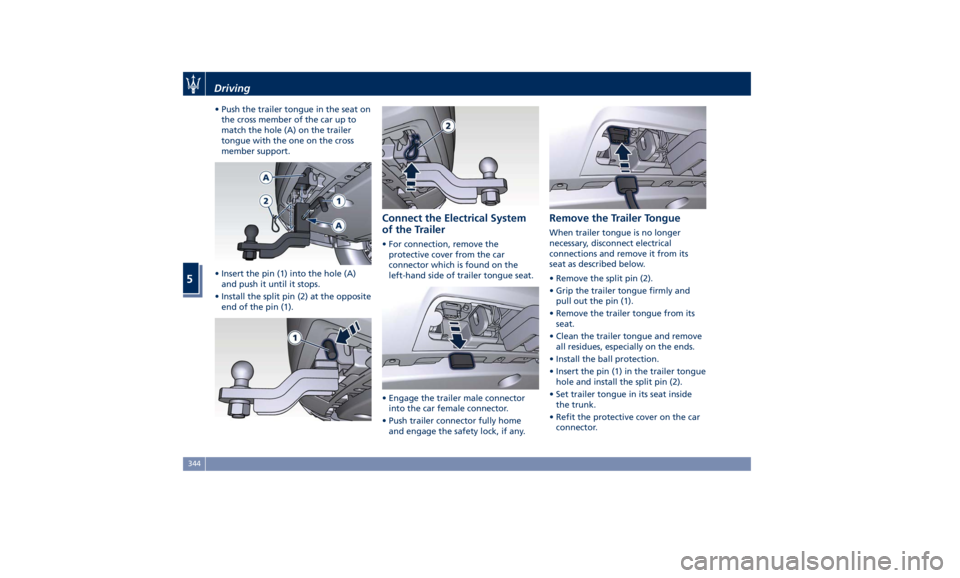
• Push the trailer tongue in the seat on
the cross member of the car up to
match the hole (A) on the trailer
tongue with the one on the cross
member support.
• Insert the pin (1) into the hole (A)
and push it until it stops.
• Install the split pin (2) at the opposite
end of the pin (1). Connect the Electrical System
of the Trailer • For connection, remove the
protective cover from the car
connector which is found on the
left-hand side of trailer tongue seat.
• Engage the trailer male connector
into the car female connector.
• Push trailer connector fully home
and engage the safety lock, if any. Remove the Trailer Tongue When trailer tongue is no longer
necessary, disconnect electrical
connections and remove it from its
seat as described below.
• Remove the split pin (2).
• Grip the trailer tongue firmly and
pull out the pin (1).
• Remove the trailer tongue from its
seat.
• Clean the trailer tongue and remove
all residues, especially on the ends.
• Install the ball protection.
• Insert the pin (1) in the trailer tongue
hole and install the split pin (2).
• Set trailer tongue in its seat inside
the trunk.
• Refit the protective cover on the car
connector.Driving
5
344
Page 354 of 436
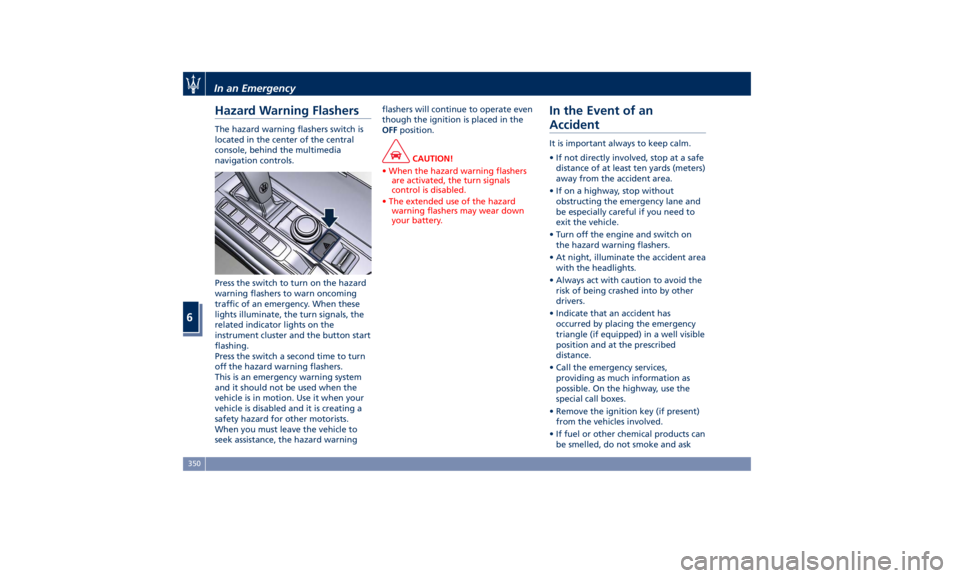
Hazard Warning Flashers The hazard warning flashers switch is
located in the center of the central
console, behind the multimedia
navigation controls.
Press the switch to turn on the hazard
warning flashers to warn oncoming
traffic of an emergency. When these
lights illuminate, the turn signals, the
related indicator lights on the
instrument cluster and the button start
flashing.
Press the switch a second time to turn
off the hazard warning flashers.
This is an emergency warning system
and it should not be used when the
vehicle is in motion. Use it when your
vehicle is disabled and it is creating a
safety hazard for other motorists.
When you must leave the vehicle to
seek assistance, the hazard warning flashers will continue to operate even
though the ignition is placed in the
OFF position.
CAUTION!
• When the hazard warning flashers
are activated, the turn signals
control is disabled.
• The extended use of the hazard
warning flashers may wear down
your battery.
In the Event of an
Accident It is important always to keep calm.
• If not directly involved, stop at a safe
distance of at least ten yards (meters)
away from the accident area.
• If on a highway, stop without
obstructing the emergency lane and
be especially careful if you need to
exit the vehicle.
• Turn off the engine and switch on
the hazard warning flashers.
• At night, illuminate the accident area
with the headlights.
• Always act with caution to avoid the
risk of being crashed into by other
drivers.
• Indicate that an accident has
occurred by placing the emergency
triangle (if equipped) in a well visible
position and at the prescribed
distance.
• Call the emergency services,
providing as much information as
possible. On the highway, use the
special call boxes.
• Remove the ignition key (if present)
from the vehicles involved.
• If fuel or other chemical products can
be smelled, do not smoke and askIn an Emergency
6
350
Page 368 of 436

Scheduled Maintenance
Service Correct maintenance is clearly the best
way to guarantee vehicle performance
and safety features, ensure respect for
the environment and low operating
costs.
NOTE:
Also remember that the observance of
the maintenance procedures is
essential for keeping your vehicle
operating properly. Not adhering to
the “Scheduled Service Plan” can
impact your vehicle’s warranty.
Interval Running Coupons Maserati has therefore provided for a
series of checks and maintenance
operations involving the 1 st
service and
subsequent when the vehicle reaches
mileage/years reported on the
“Scheduled Service Plan” in this
section.
After the last service, maintenance
must be restarted with the operations
scheduled for the 1 st
,2 nd
and 3 rd
service. CAUTION!
The Scheduled Maintenance services
are prescribed by the Manufacturer.
Failure to have the services carried out
can affect your warranty.
The Scheduled Maintenance service is
provided
by an Authorized Maserati
Dealer . In the event that, when a
service is performed, further
replacements or repairs are found to
be necessary in addition to the
scheduled operations, these can be
carried out only with the specific
consent of the Customer.
CAUTION!
You are advised to notify the
Authorized Maserati Dealer of any
minor operating problem, without
waiting for the next scheduled service. NOTE:
• Change
your engine oil more often if
you drive your vehicle off-road for an
extended period of time or short
trips without reaching operating
temperatures. Even the use of the
vehicle with extremely hot or cold
ambient temperatures and with
trailer tow may make more frequent
engine oil changes necessary.
• Under no circumstances should oil
change intervals exceed
mileage/years reported on the
“Scheduled Service Plan” in this
section.
CAUTION!
Failure to perform the required
maintenance items may result in
damage to the vehicle.
Scheduled Maintenance
(Service) Indicator The service indicator system will
remind you the deadline for the
maintenance program.
The indicator light
on the
instrument cluster flashes for approx. 5
seconds displaying the message backed
by a beeping sound, indicating thatMaintenance and Care
7
364
Page 378 of 436
Level Checks ENVIRONMENTAL!
• The engine oils and fluids used
contain substances that are
dangerous to the environment. For
replacement you are advised to
contact the Authorized Maserati
Dealer, where all the necessary
equipment is available to dispose of
the used oil and fluids in compliance
with the regulations in force and in
an environment-friendly manner.
• All equipment used for fluids
replacement (gloves, cloths,
containers, etc) must be disposed of
in compliance with the regulations in
force.
Engine Coolant Level Check
Your vehicle has been equipped with
an improved engine coolant
(antifreeze) that offers high protection
against corrosion, freezing and allows
extended maintenance intervals. To
prevent reducing extended
maintenance periods, it is important to
use original engine coolant
(antifreeze) when adding coolant
throughout the life of your vehicle. When adding engine coolant
(antifreeze) use pure water only, such
as distilled or deionized water when
mixing the water/engine coolant
(antifreeze) solution. The use of
impure water will reduce the amount
of corrosion protection in the engine
cooling system.
• Mix a minimum solution of 50%
engine coolant (antifreeze) and
distilled water. Use higher
concentrations (do not exceed 70%)
if temperatures below −35°F (−37°C)
are forecast.
Please note that it is the owner's
responsibility to maintain the proper
level of protection against freezing
according to the temperatures
occurring in the circulation area of the
vehicle.
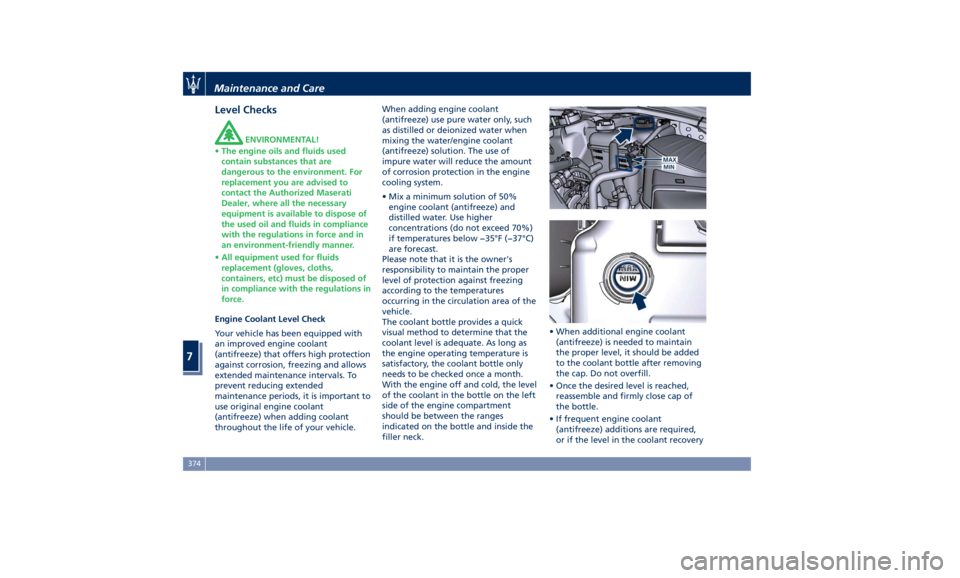
The coolant bottle provides a quick
visual method to determine that the
coolant level is adequate. As long as
the engine operating temperature is
satisfactory, the coolant bottle only
needs to be checked once a month.
With the engine off and cold, the level
of the coolant in the bottle on the left
side of the engine compartment
should be between the ranges
indicated on the bottle and inside the
filler neck. • When additional engine coolant
(antifreeze) is needed to maintain
the proper level, it should be added
to the coolant bottle after removing
the cap. Do not overfill.
• Once the desired level is reached,
reassemble and firmly close cap of
the bottle.
• If frequent engine coolant
(antifreeze) additions are required,
or if the level in the coolant recoveryMaintenance and Care
7
374
Page 390 of 436
Fuse Replacement Used Fuses Characteristics When an electrical device is not
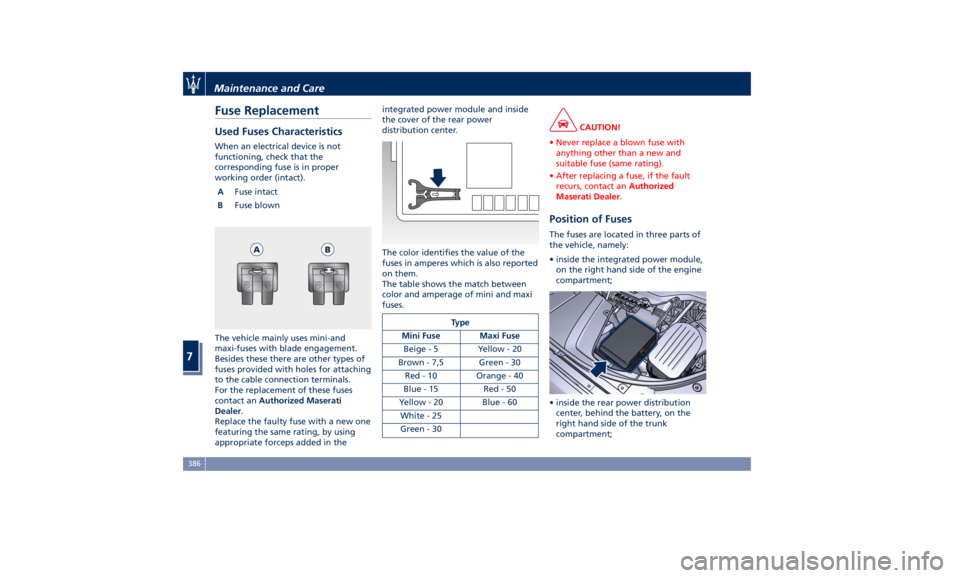
functioning, check that the
corresponding fuse is in proper
working order (intact).
A Fuse intact
B Fuse blown
The vehicle mainly uses mini-and
maxi-fuses with blade engagement.
Besides these there are other types of
fuses provided with holes for attaching
to the cable connection terminals.
For the replacement of these fuses
contact an Authorized Maserati
Dealer .
Replace the faulty fuse with a new one
featuring the same rating, by using
appropriate forceps added in the integrated power module and inside
the cover of the rear power
distribution center.
The color identifies the value of the
fuses in amperes which is also reported
on them.
The table shows the match between
color and amperage of mini and maxi
fuses.
Type
Mini Fuse Maxi Fuse
Beige - 5 Yellow - 20
Brown - 7,5 Green - 30
Red - 10 Orange - 40
Blue-15 Red-50
Yellow - 20 Blue - 60
White - 25
Green - 30 CAUTION!
• Never replace a blown fuse with
anything other than a new and
suitable fuse (same rating).
• After replacing a fuse, if the fault
recurs, contact an Authorized
Maserati Dealer .
Position of Fuses The fuses are located in three parts of
the vehicle, namely:
• inside the integrated power module,
on the right hand side of the engine
compartment;
• inside the rear power distribution
center, behind the battery, on the
right hand side of the trunk
compartment;Maintenance and Care
7
386
Page 391 of 436

• on the fuse and relay box located in
a covered area, under the dashboard
left side.
Integrated Power Module • To access the module it is necessary
to lift the hood (see “Hood
Operation” in section “Before
Starting”).
• To access the fuses remove the
module cover unhooking the lateral
locks as shown in the picture. The table points out the position as
featured in the figure, the type and
function of the fuses included in the
integrated power module.
CAUTION!
• After replacement, refit the
protective cover of the module.
• If you need to wash the engine
compartment, do not direct the
water for too long directly on the
module.
Ref. Type Function
2 Maxi – 50A Secondary air
pump relay input
(V8 engines only)
3––
4 Maxi – 30A Starter motor
relay input Ref. Type Function
5 Maxi – 40A ABS-ESP pump
feed
6 Maxi – 30A AWD module
relay input
7––
8 Maxi – 40A ABS-ESP valve
feed
9––
10 – –
11 Mini – 20A Horn relay input
12 Mini – 10A AC compressor
feed relay input
13 – –
14 Mini – 7,5A Alarm siren
15 Mini – 5A Washer heated
nozzles relay
input
16 Mini – 10A Enable cooling
fan relay input
and enable
cooling oil pump
relay input
18 – –
19 Maxi – 30A Headlamp
washer relay
inputMaintenance and Care
7
387
Page 392 of 436

Ref. Type Function
20 Maxi – 30A Wiper motor
relay output
21 Maxi – 20A LH low beam
relay input (with
Bi-Xenon
headlight) Ref. Type Function
22 Maxi – 20A RH low beam
relay input (with
Bi-Xenon
headlight)
23 – –
24 – – Ref. Type Function
28 Mini – 7,5A Drive Assist
System Module
(DASM)
29 Mini – 10A PCM module -
Starter solenoid
relay coil
30 Mini – 5A ORC- Air bag
module
31 Mini – 5A ABS-ESP module
32 Mini – 5A AWD module,
EPS and AQS
33 Mini – 10A HDLP Headlights
- AFLS
34 Mini – 15A Primary load to
engine harness
LH side
35 Mini – 15A Primary load to
engine harness
RH side
36 Mini – 30A PCM module
primary load
37 Mini – 15A Engine
secondary load
38 Mini – 15A Lambda sensorMaintenance and Care
7
388
Page 400 of 436
Wheels Maintenance Tires Maintenance CAUTION!
To obtain the best performances and
the longest mileage from the tires,
take the following precautions during
the first 310 mi (500 km):
• do not drive at the vehicle’s
maximum speed;
• drive at low speed on curves;
• avoid sudden steering;
• avoid sudden braking;
• avoid sudden acceleration;
• do not drive at high speeds for too
long.
The tires inflation pressure must
correspond
to the prescribed values
(see the chapter “Tire Inflation
Pressure” in section “Features and
Specifications”) and should be checked
only when the tires have cooled down.
In fact, the pressure increases as the
tire temperature progressively
increases.
Never reduce the pressure if tires are
hot (see “Tires – General Information”
chapter in section “Driving”). Insufficient tire inflating pressure can
cause tire overheating and possible
internal damage.
CAUTION!
After inspecting or adjusting the tire
pressure, always reinstall the valve
stem cap. This will prevent moisture
and dirt from entering the valve stem,
which could damage it.
Impacts with curbs, holes, and
obstacles
in the road, and prolonged
trips on rough roads or off-road trails
can cause tire damage which may not
be visible to the naked eye.
Check your tires regularly for any signs
of damage (e.g. scratches, cuts, cracks,
bulges, etc.). If sharp objects penetrate
the tires, they can cause structural
damage which is only visible when the
tire is removed.
In any case, any possible damage must
be inspected by an experienced
technician, as it may seriously reduce
the tire life.
Remember that tires deteriorate with
time, even if used little or not at all.
Cracks in the tire tread and sides,
alongside possible bulging, are a sign
of deterioration. WARNING!
• Check the inflating pressure of the
tires when cold, at least every two
weeks and before long trips.
• Have old tires inspected by an
experienced technician, to make sure
they can still be used safely. If the
same tire has been on your vehicle
for 4 or 5 years, have it inspected
anyway by an experienced
technician.
• Never fit tires of uncertain origin.
• “Directional” tires have an arrow on
their side showing the rolling
direction. To keep the best
performance when replacing a tire,
make sure that the rolling direction
corresponds to the one shown by
the arrow.
• During the tire life, the rolling
direction used for the first fitting
should always be observed, also in
case of “nondirectional” tires.
• Check the depth of the tire tread at
regular intervals. The minimum
allowed value is 0.06 in (1.6 mm) at
that point the wear indicators on the
tire will be visible (see “Tires –
General Information” in sectionMaintenance and Care
7
396