2019 MASERATI GRANTURISMO CONVERTIBLE ESP
[x] Cancel search: ESPPage 143 of 296
NOTE:
“SiriusXM Satellite Radio” is the US
service only available in the 48
Continental United States and
Canadian markets. Subscription is
required. For further details refer to
the Maserati Touch Controls Plus
(MTC+) guide.
On Rear Side of Steering Wheel
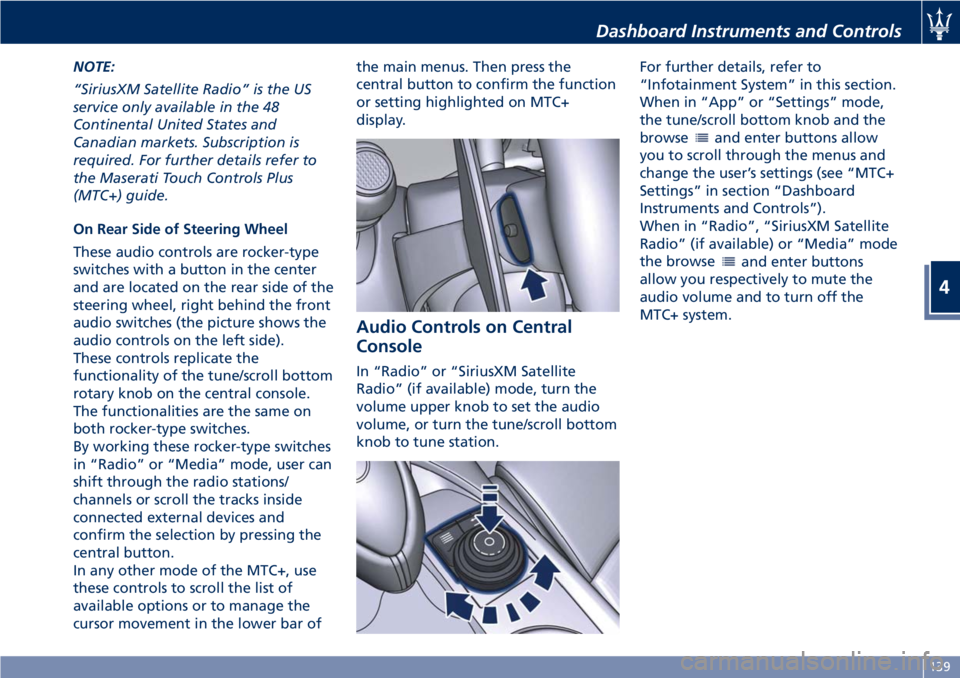
These audio controls are rocker-type
switches with a button in the center
and are located on the rear side of the
steering wheel, right behind the front
audio switches (the picture shows the
audio controls on the left side).
These controls replicate the
functionality of the tune/scroll bottom
rotary knob on the central console.
The functionalities are the same on
both rocker-type switches.
By working these rocker-type switches
in “Radio” or “Media” mode, user can
shift through the radio stations/
channels or scroll the tracks inside
connected external devices and
confirm the selection by pressing the
central button.
In any other mode of the MTC+, use
these controls to scroll the list of
available options or to manage the
cursor movement in the lower bar of the main menus. Then press the
central button to confirm the function
or setting highlighted on MTC+
display.
Audio Controls on Central
Console In “Radio” or “SiriusXM Satellite
Radio” (if available) mode, turn the
volume upper knob to set the audio
volume, or turn the tune/scroll bottom
knob to tune station. For further details, refer to
“Infotainment System” in this section.
When in “App” or “Settings” mode,
the tune/scroll bottom knob and the
browse
and enter buttons allow
you to scroll through the menus and
change the user’s settings (see “MTC+
Settings” in section “Dashboard
Instruments and Controls”).
When in “Radio”, “SiriusXM Satellite
Radio” (if available) or “Media” mode
the browse
and enter buttons
allow you respectively to mute the
audio volume and to turn off the
MTC+ system.Dashboard Instruments and Controls
4
139
Page 146 of 296

NOTE:
• For further details refer to the
“Maserati Touch Control Plus
(MTC+)” guide.
• All settings must be edited with key
in the ignition switch in MAR (ON)
position.
To display the programmable features
menu on MTC+ touch the “Settings”
softkey on “Controls” screen.
In this mode the MTC+ System allows
you to access the following
programmable features (some of them
are optional and may not be available
on your vehicle): Display, Units, Voice
Commands, Clock, Safety & Driving
Assistant, Lights, Doors & Locks, Audio,
Phone/Bluetooth, SiriusXM Setup,
Restore Settings, Clear Personal Data
and System Information. NOTE:
• Only one touchscreen area/softkey
may be selected at a time.
• Menu navigation indications refer to
the use of softkeys on MTC+ display:
the same operations can be
performed using the manual controls
on central console.
To make a selection, and enter the
desired feature, touch the
corresponding softkey on the menu
(the picture shown is “Clock”).
To scroll through the features, move
the cursor up or down, or touch the
arrow ▼ or ▲ . Once the desired mode
is entered, press and release the
touchscreen area of the setting that
you wish to modify. The new setting
will be highlighted with one or more
boxes to indicate status or possible
variants of the feature status. A check mark in a box indicates the current
status of the feature. Touch the check
mark to cancel, or the empty box to
insert the check mark, and change the
status of the feature.
Once the procedure is completed (for
example, Display mode) touch the
back arrow softkey to return to the
previous menu or touch the upper
right “X” softkey, to close the settings
screen. Touching the ▲ or ▼ softkeys
and the cursor on the right side of the
screen will allow you to scroll up or
down through the available settings.Dashboard Instruments and Controls
4
142
Page 148 of 296

• AutoShow Smartphone Display
Upon Connection
This feature allows to use the MTC+
display as a projection device
connected via USB port in order to
browse the Apple CarPlay and
Android Auto apps. By setting this
feature, automatic switch from
native screen to projection device
will happen every time you connect
your smartphone. For further details
refer to the “Maserati Touch Control
Plus (MTC+)” guide.
Units After pressing the “Units” and then
“Custom” softkey on the touch screen
you may select between Metric and
Imperial units of measure. Each unit of
measure can be independently
displayed in the TFT Display and in the
navigation system. The following
selectable units of measure are listed
below:
• Speed unit :
select from: “mph” or “km/h”.
• Consumption unit :
select from: “mpg US”, “mpg UK”,
“l/100km” and “km/l”.
• Distance unit :
select from: “mi or km”. • Pressure unit :
select from: “PSI” or “BAR”.
• Temperature unit :
select from: “°F” or “°C”.
Voice Commands After pressing “Voice” softkey the
following modes will be available.
• Voice Response Length
When in this display, you can change
the voice response length settings.
To change the voice response
length, touch the “Brief” or
“Detailed” softkey.
• Show Command List
When this feature is selected, it is
possible to select options during a
voice control session. Options for
available controls are: “Always”,
“w/Help” or “Never”.
Clock Time is always visible on the dashboard
analog clock (see “Analog Clock” in
this section) and in digital format on
the instrument cluster and on the
MTC+ display. With this feature it is possible to view
and set the following modes.
• Sync with GPS Time
Time is normally automatically
synchronized with the radio signal.
It is also possible to set automatic
synchronization mode using GPS
signal instead.Dashboard Instruments and Controls
4
144
Page 168 of 296
on the lever and brake pedal: N
(Neutral) is reached only by pressing
the unlock button on the lever.
• Vehicle moving: the driver can switch from R (Reverse) to N (Neutral), or
vice versa, by pressing the unlock
button on the shift lever.
When the transmission shift lever is in
R (Reverse) position, the system emits
an acoustic signal for a few seconds.
You can also shift the transmission
shift lever to R (Reverse) position when
the vehicle is not completely
stationary, however, this does not
mean that reverse gear is actually
engaged, since there is a limit speed
above which the gear may not be
engaged. When the speed goes below
this limit, reverse gear is engaged.
CAUTION!
To prevent accidental engagement,
the transmission shift lever can only be
moved from R (Reverse) to any other
position when the unlock button is
pressed. It is advisable to also depress
the brake pedal when shifting to this
position.
N (Neutral)
This
range should be used when you
need to move the vehicle. • Vehicle halted and engine started:
switching from N (Neutral) to R
(Reverse), P (Park) and/or D (Drive)
requires brake pedal and unlock
button pressed.
• Vehicle moving: switching from N (Neutral) to R (Reverse) and/or D
(Drive) requires pressing the unlock
button. Switching to R (Reverse)
starting from N (Neutral) is only
possible if the vehicle is moving
backward, while switching to D
(Drive) starting from N (Neutral) is
only possible if the vehicle is moving
forward.
Set the parking brake and shift the
transmission into P (Park) if you must
leave the vehicle.
WARNING!
Do not switch to N (Neutral) and/or
never turn off the ignition to coast
downhill. These are unsafe practices
that limit driver’s response to
changing traffic or road conditions. It
is possible to lose control of the
vehicle and have a collision.
CAUTION!
Towing the vehicle, coasting, or driving for any other reason with the
transmission in N (Neutral) can result
in transmission damage. See “Towing a
Disabled Vehicle” in section “In an
Emergency” for further information.
D (Drive)
This
range should be used for most city
and highway driving. It provides the
smoothest upshifts and downshifts and
the best fuel economy. The
transmission automatically shifts up
and down through all gears.
When this automatic forward gear is
set, the letter “D” illuminates on the
gear display and on the instrument
cluster.
The D (Drive) position provides
optimum driving characteristics under
all normal operating conditions of the
vehicle.
• Vehicle stationary: switching from D (Drive) to R (Reverse) and/or to P
(Park) requires brake pedal and
unlock button pressed: reaching N
(Neutral) starting from D (Drive) is
allowed by only pressing the unlock
button on the shift lever.
• To enable special operations while the car is moving at a low speed,
such as getting out of marsh or snow,
it is possible to run quickly from D
Driving
5
164
Page 173 of 296
Drive Mode
Controls Preview
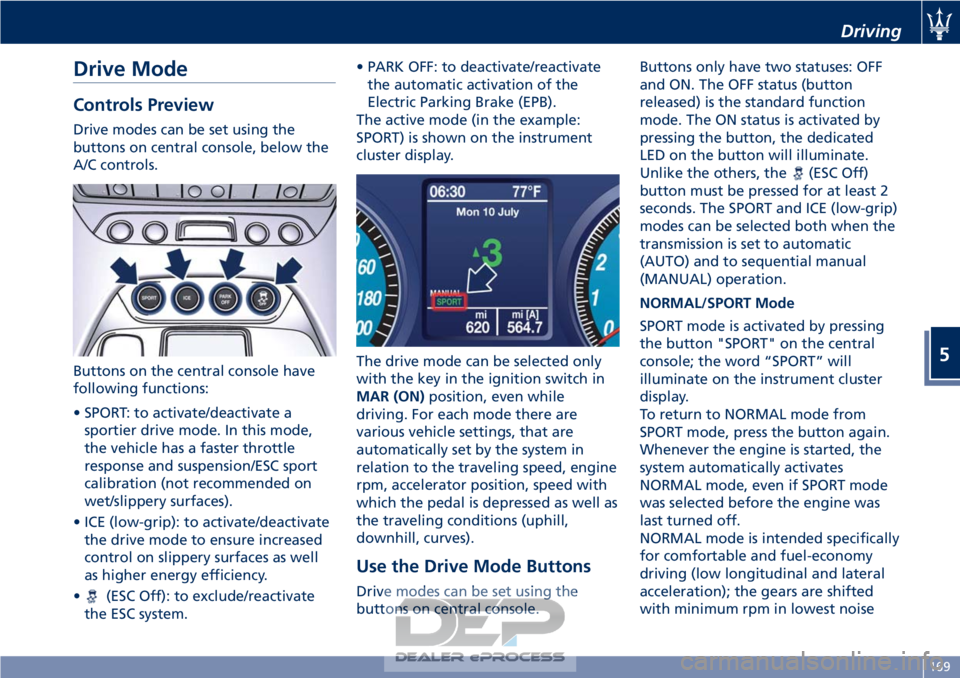
Drive modes can be set using the
buttons on central console, below the
A/C controls.
Buttons on the central console have
following functions:
• SPORT: to activate/deactivate asportier drive mode. In this mode,
the vehicle has a faster throttle
response and suspension/ESC sport
calibration (not recommended on
wet/slippery surfaces).
• ICE (low-grip): to activate/deactivate the drive mode to ensure increased
control on slippery surfaces as well
as higher energy efficiency.
•
(ESC Off): to exclude/reactivate
the ESC system. • PARK OFF: to deactivate/reactivate
the automatic activation of the
Electric Parking Brake (EPB).
The active mode (in the example:
SPORT) is shown on the instrument
cluster display.
The drive mode can be selected only
with the key in the ignition switch in
MAR (ON) position, even while
driving. For each mode there are
various vehicle settings, that are
automatically set by the system in
relation to the traveling speed, engine
rpm, accelerator position, speed with
which the pedal is depressed as well as
the traveling conditions (uphill,
downhill, curves).
Use the Drive Mode Buttons
Drive modes can be set using the
buttons on central console. Buttons only have two statuses: OFF
and ON. The OFF status (button
released) is the standard function
mode. The ON status is activated by
pressing the button, the dedicated
LED on the button will illuminate.
Unlike the others, the
(ESC Off)
button must be pressed for at least 2
seconds. The SPORT and ICE (low-grip)
modes can be selected both when the
transmission is set to automatic
(AUTO) and to sequential manual
(MANUAL) operation.
NORMAL/SPORT Mode
SPORT mode is activated by pressing
the button "SPORT" on the central
console; the word “SPORT” will
illuminate on the instrument cluster
display.
To return to NORMAL mode from
SPORT mode, press the button again.
Whenever the engine is started, the
system automatically activates
NORMAL mode, even if SPORT mode
was selected before the engine was
last turned off.
NORMAL mode is intended specifically
for comfortable and fuel-economy
driving (low longitudinal and lateral
acceleration); the gears are shifted
with minimum rpm in lowest noise
Driving
5
169
Page 178 of 296
Parking Brake
The vehicle is equipped with an
electric automatic parking brake, also
called EPB (Electric Parking Brake).
It can be automatically engaged when
the engine is turned off and it is
disengaged when, with the engine
running, the accelerator pedal is
depressed.
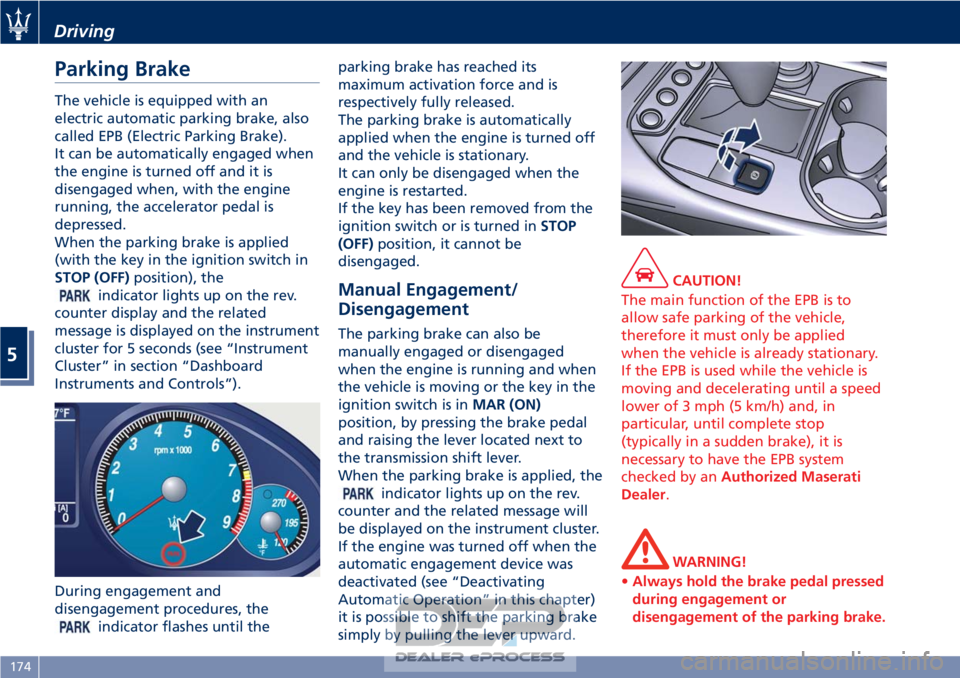
When the parking brake is applied
(with the key in the ignition switch in
STOP (OFF)position), the
indicator lights up on the rev.
counter display and the related
message is displayed on the instrument
cluster for 5 seconds (see “Instrument
Cluster” in section “Dashboard
Instruments and Controls”).
During engagement and
disengagement procedures, the
indicator flashes until the parking brake has reached its
maximum activation force and is
respectively fully released.
The parking brake is automatically
applied when the engine is turned off
and the vehicle is stationary.
It can only be disengaged when the
engine is restarted.
If the key has been removed from the
ignition switch or is turned in
STOP
(OFF) position, it cannot be
disengaged.
Manual Engagement/
Disengagement
The parking brake can also be
manually engaged or disengaged
when the engine is running and when
the vehicle is moving or the key in the
ignition switch is in MAR (ON)
position, by pressing the brake pedal
and raising the lever located next to
the transmission shift lever.
When the parking brake is applied, the
indicator lights up on the rev.
counter and the related message will
be displayed on the instrument cluster.
If the engine was turned off when the
automatic engagement device was
deactivated (see “Deactivating
Automatic Operation” in this chapter)
it is possible to shift the parking brake
simply by pulling the lever upward.
CAUTION!
The main function of the EPB is to
allow safe parking of the vehicle,
therefore it must only be applied
when the vehicle is already stationary.
If the EPB is used while the vehicle is
moving and decelerating until a speed
lower of 3 mph (5 km/h) and, in
particular, until complete stop
(typically in a sudden brake), it is
necessary to have the EPB system
checked by an Authorized Maserati
Dealer.
WARNING!
• Always hold the brake pedal pressed
during engagement or
disengagement of the parking brake.
Driving
5
174
Page 180 of 296

Parking Brake” in section “In an
Emergency”).
• “Parking Brake system revision: go to dealer”
The EPB system requires
maintenance, therefore contact an
Authorized Maserati Dealer to have
the system corrected.
WARNING!
In the event of an EPB failure, take
your vehicle to the nearest Authorized
Maserati Dealer as soon as possible.
Initialize the EPB System after a
Battery
Disconnecting
After the detachment and the
subsequent connection of the battery,
on the instrument cluster display the
warning light will light up.
To initialize the EPB system lift, release
and lift again the lever located next to
the transmission shift lever.
Emergency Disengagement
In case of brake lock with complete
electrical system failure, it is necessary
to act on the electric actuator using
the special tool provided in the tool kit
to release the pressure of the parking
brake shoes (see “Emergency Release of the Parking Brake” chapter in
section “In an Emergency”).
EPB Operation with
Overheated Brakes
Driving on mountain roads with steep
slopes or a sports use of the vehicle
could overheat the brake system
components. In these conditions,
parking brake must not be used since
the push of the power actuator might
not be sufficient to ensure vehicle
braking, especially on a slope.
Drive normally without braking to
allow the brakes to cool down a few
minutes before stopping. In this way,
the automatic or manual activation of
the parking brake will ensure vehicle
braking.
Parking
Straighten the wheels and turn off the
engine.
Before leaving the vehicle, make sure
that the parking brake is fully applied
in automatic or manual mode and
place the transmission lever in the P
(Park) position.
Remove the key from the ignition
switch.
WARNING!
• Always check that the vehicle is
locked before leaving it.
• Never leave children unattended in
the vehicle.
• Do not park the vehicle on paper,
grass, dry leaves or other flammable
materials. They could catch fire if
they come into contact with hot
parts of the exhaust system.
• Do not leave the engine running
while the vehicle is unattended.
CAUTION!
When you need to park the vehicle on
a steep slope, both with the engine on
and off, it is recommended not only to
Driving
5
176
Page 182 of 296
ESC system brakes the appropriate
wheel to counteract over or under
steering.
• Oversteer - when the vehicle isturning more than appropriate for
the steering wheel position.
• Understeer - when the vehicle is turning less than appropriate for the
steering wheel position.
The ESC system has two available
operating modes:
ESC On
This is the normal ESC operating mode.
At each start-up of the vehicle, the ESC
system is set in this mode and should
be used for most driving conditions.
The ESC should only be turned off for
specific reasons as pointed out in the
following paragraphs.
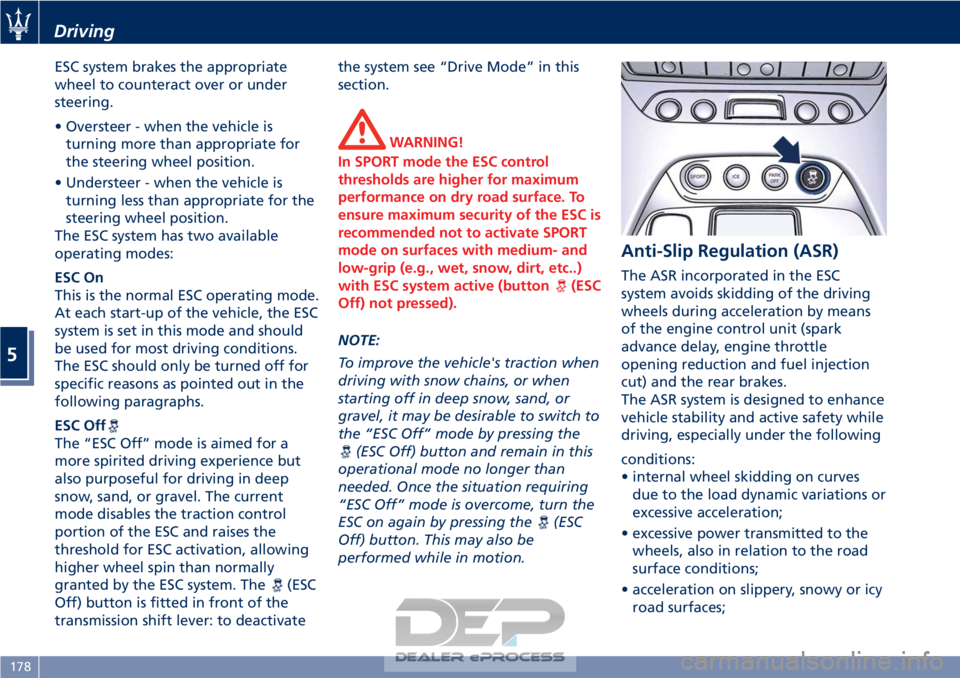
ESC Off
The “ESC Off” mode is aimed for a
more spirited driving experience but
also purposeful for driving in deep
snow, sand, or gravel. The current
mode disables the traction control
portion of the ESC and raises the
threshold for ESC activation, allowing
higher wheel spin than normally
granted by the ESC system. The
(ESC
Off) button is fitted in front of the
transmission shift lever: to deactivate the system see “Drive Mode” in this
section.
WARNING!
In SPORT mode the ESC control
thresholds are higher for maximum
performance on dry road surface. To
ensure maximum security of the ESC is
recommended not to activate SPORT
mode on surfaces with medium- and
low-grip (e.g., wet, snow, dirt, etc..)
with ESC system active (button
(ESC
Off) not pressed).
NOTE:
T
o improve the vehicle's traction when
driving with snow chains, or when
starting off in deep snow, sand, or
gravel, it may be desirable to switch to
the “ESC Off” mode by pressing the
(ESC Off) button and remain in this
operational mode no longer than
needed. Once the situation requiring
“ESC Off” mode is overcome, turn the
ESC on again by pressing the
(ESC
Off) button. This may also be
performed while in motion.
Anti-Slip Regulation (ASR)
The ASR incorporated in the ESC
system avoids skidding of the driving
wheels during acceleration by means
of the engine control unit (spark
advance delay, engine throttle
opening reduction and fuel injection
cut) and the rear brakes.
The ASR system is designed to enhance
vehicle stability and active safety while
driving, especially under the following
conditions:
• internal wheel skidding on curves due to the load dynamic variations or
excessive acceleration;
• excessive power transmitted to the wheels, also in relation to the road
surface conditions;
• acceleration on slippery, snowy or icy road surfaces;
Driving
5
178