2019 MASERATI GRANTURISMO CONVERTIBLE key battery
[x] Cancel search: key batteryPage 97 of 296
this problem let more air into the
passenger compartment.
• It is advisable to close the soft top
when parking the vehicle. This not
only protects the passenger
compartment against weather
agents, but is also a safeguard
against theft.
• If possible, park in the shade as
prolonged exposure to the sun will
alter the canvas fiber and color.
• Before disconnecting the battery,
lower the side windows by about 1.6
- 2 in (4 - 5 cm) to prevent damaging
the soft top strip when the doors are
opened and closed. When the
battery is connected and fully
charged, this operation is performed
automatically whenever the doors
are opened or closed. The windows
must remain lowered until the
recharged battery is reconnected. If
the battery is dead and the windows
are fully up, only open the doors
when strictly necessary and being
extremely careful: do not close them
again until the windows can be
lowered.
• Cover the soft top with a protective
cloth when it is going to be parked
outdoor for a long period of time. • To avoid damaging the soft top, the
vehicle must not be washed with
high-pressure water jet systems, be it
a manual nozzle or an automatic car
wash with turning rollers.
• Organic residues must be
immediately removed, as they may
damage both the soft top fabric and
its strips.
• Do not use solvents, alcohol, petrol
or other generic detergents to clean
the soft top.
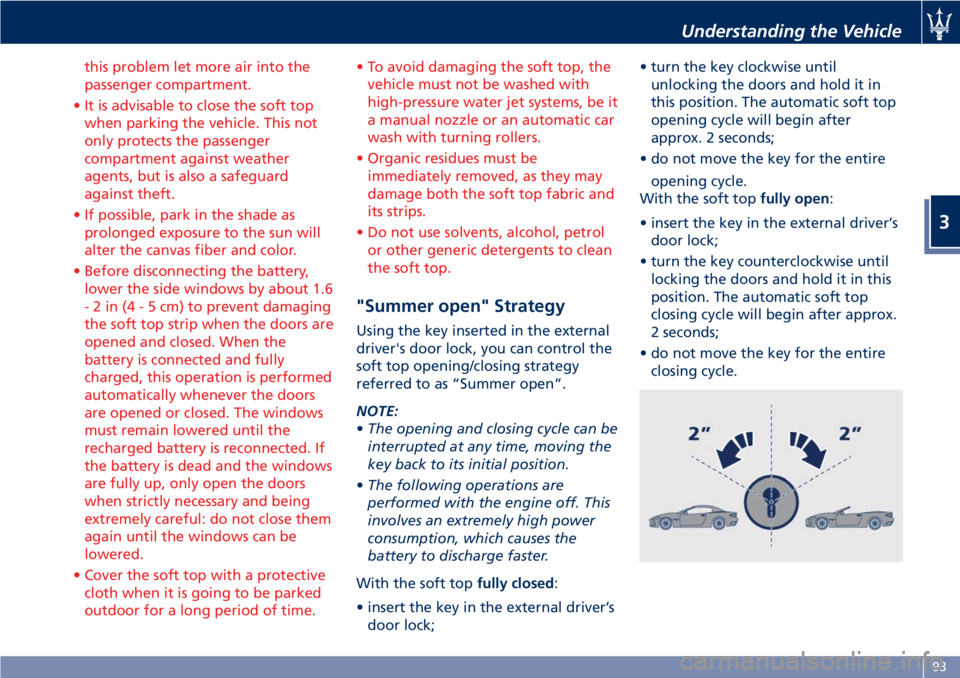
"Summer open" Strategy Using the key inserted in the external
driver's door lock, you can control the
soft top opening/closing strategy
referred to as “Summer open”.
NOTE:
• The opening and closing cycle can be
interrupted at any time, moving the
key back to its initial position.
• The following operations are
performed with the engine off. This
involves an extremely high power
consumption, which causes the
battery to discharge faster.
With the soft top fully closed :
• insert the key in the external driver’s
door lock; • turn the key clockwise until
unlocking the doors and hold it in
this position. The automatic soft top
opening cycle will begin after
approx. 2 seconds;
• do not move the key for the entire
opening cycle.
With the soft top fully open :
• insert the key in the external driver’s
door lock;
• turn the key counterclockwise until
locking the doors and hold it in this
position. The automatic soft top
closing cycle will begin after approx.
2 seconds;
• do not move the key for the entire
closing cycle.Understanding the Vehicle
3
93
Page 98 of 296
Soft Top Operation The soft top must be opened and
closed with the vehicle stationary and,
as a rule, with the engine running at
idle speed.
If necessary (e.g. in closed places) the
operation can be performed with the
engine off and the key in the ignition
switch in MAR (ON) position. This
operation involves an extremely high
power consumption, which causes the
battery to discharge faster.
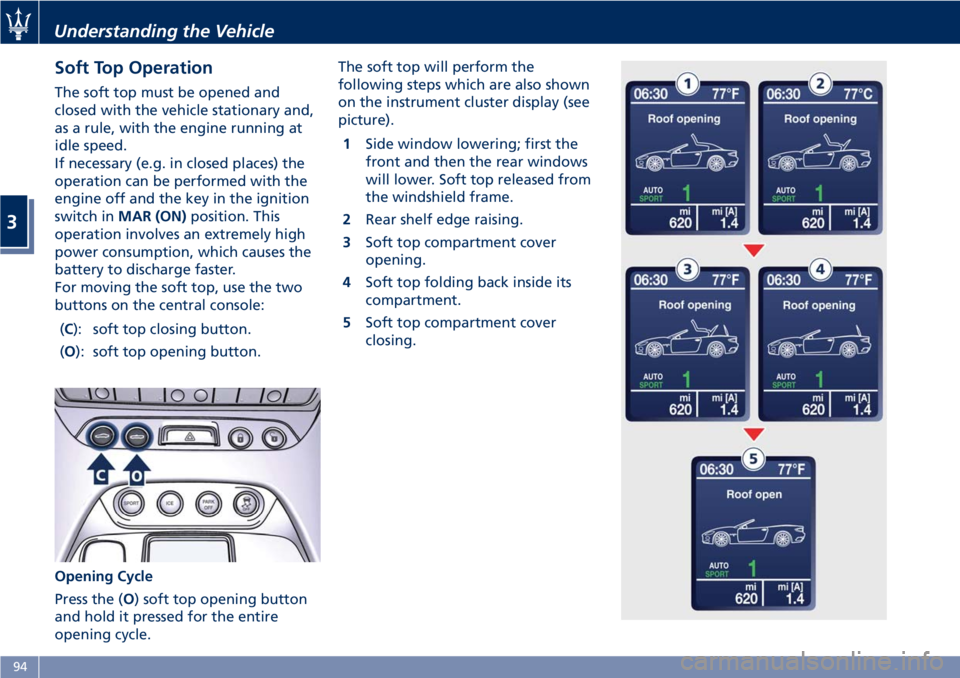
For moving the soft top, use the two
buttons on the central console:
( C ): soft top closing button.
( O ): soft top opening button.
Opening Cycle
Press the ( O ) soft top opening button
and hold it pressed for the entire
opening cycle. The soft top will perform the
following steps which are also shown
on the instrument cluster display (see
picture).
1 Side window lowering; first the
front and then the rear windows
will lower. Soft top released from
the windshield frame.
2 Rear shelf edge raising.
3 Soft top compartment cover
opening.
4 Soft top folding back inside its
compartment.
5 Soft top compartment cover
closing.Understanding the Vehicle
3
94
Page 163 of 296
Engine Start Failure
CAUTION!
• Do not attempt to push or tow your vehicle to get it started. Vehicles
equipped with an automatic
transmission cannot be started this
way.
• If the vehicle battery is dead, booster cables may be used to obtain a start
from a booster battery or the
battery in another vehicle. This type
of start can be dangerous if done
improperly. See “Auxiliary Jump
Start Procedure” in section “In an
Emergency” for further information.
Starting by cold engine
Start-of
f slowly, avoiding sudden
acceleration and rev the engine up at
low medium speeds. High-
performance driving should be
avoided until the engine temperature
reaches 149-158°F (65-70°C).
Engine Turn-Off
• Place the shift lever in P (Park) (see “Automatic Transmission” in this
section).
• With the engine at idle, turn the key in the ignition switch to STOP (OFF)position. A burst on the accelerator
pedal before turning off the engine
has no purpose and increases fuel
consumption.
WARNING!
Never leave a vehicle out of the P
(Park) position, as it could move.
The key can only be removed from the
ignition
switch when the transmission
is in P (Park) position and within 30
seconds after turning the key to STOP
(OFF) position. If you do not remove
the key within 30 seconds, you will
need to turn it back to MAR (ON)and
then to STOP (OFF) position to have a
further 30 seconds within which to
remove the key from the ignition
switch.
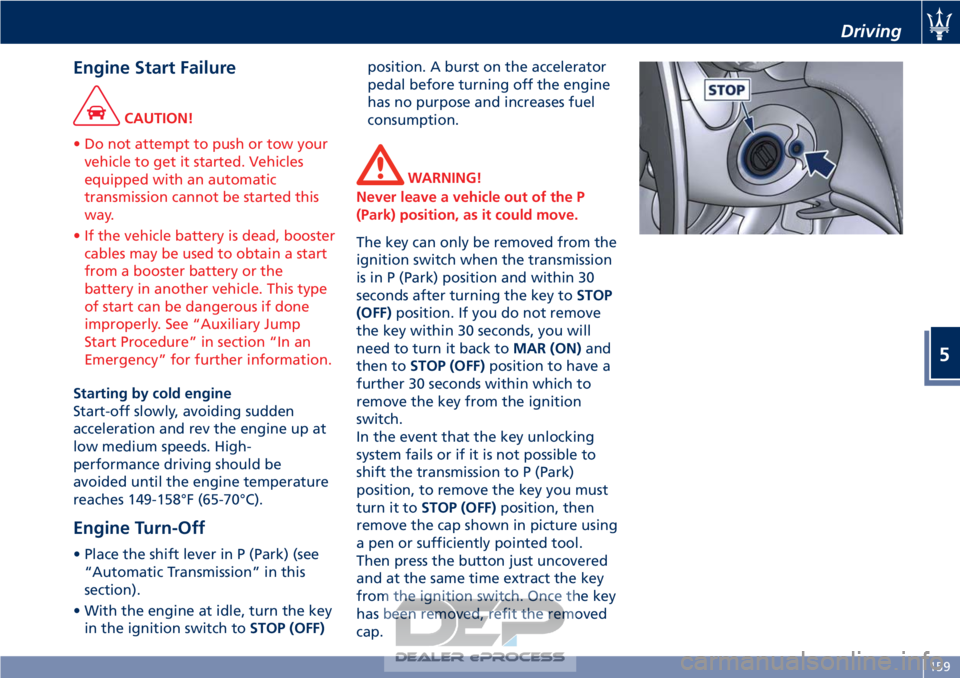
In the event that the key unlocking
system fails or if it is not possible to
shift the transmission to P (Park)
position, to remove the key you must
turn it to STOP (OFF) position, then
remove the cap shown in picture using
a pen or sufficiently pointed tool.
Then press the button just uncovered
and at the same time extract the key
from the ignition switch. Once the key
has been removed, refit the removed
cap.
Driving
5
159
Page 179 of 296

If you attempt to disengage the
parking brake without having
depressed the service brake pedal, a
message will be displayed to warn
you to do so.
• The EPB command activation while
running, generates a deceleration of
the vehicle with strong deceleration
(Dynamic Braking). It is therefore
recommended to use of this feature
only in case of emergency. The
stability of the car is guaranteed by
the action of the activated ESC
system.
Deactivating Automatic
Operation
To deactivate automatic operation of
the parking brake, with the engine
on, press the "PARK OFF" button on
the central console. The words “PARK OFF” appear on the
display for 5 seconds, after which they
remain displayed but in smaller size.
To reactivate automatic operation,
press the "PARK OFF" button once
again, the words “PARK ON” appear
on the display for 5 seconds.
CAUTION!
• In certain conditions when the battery voltage is low, the electric
parking brake system may
temporarily be deactivated for safety
reasons. Therefore, typically upon
starting the engine, when the
battery voltage drops, the message
“PARK OFF” may temporarily be
displayed on the instrument cluster,
indicating that automatic operation
is temporarily disabled. • In the case of performance starting,
check that the parking brake is
disengaged.
Failure Indication
In the event of electric parking brake
system failure, the
warning light
on the display will light up.
Depending on the message displayed,
it signals the following failures of the
EPB system:
• “Parking brake failure: go to dealer” If the message warning you to go to
the nearest Authorized Maserati
Dealer is displayed, drive slowly and
remember that the electric parking
brake device is not functioning.
• “EPB is overheated” If the vehicle has been stationary
(key in the ignition switch to STOP
(OFF) position) for about 15 minutes
without using the parking brake,
and the warning light illuminates
again after restarting the engine,
slowly drive to the nearest
Authorized Maserati Dealer .
• “EPB failure only manual unlock allowed: see handbook”
In this case, follow the manual
emergency deactivation procedure
in order to release the parking brake
(see “Emergency Release of the
Driving
5
175
Page 180 of 296

Parking Brake” in section “In an
Emergency”).
• “Parking Brake system revision: go to dealer”
The EPB system requires
maintenance, therefore contact an
Authorized Maserati Dealer to have
the system corrected.
WARNING!
In the event of an EPB failure, take
your vehicle to the nearest Authorized
Maserati Dealer as soon as possible.
Initialize the EPB System after a
Battery
Disconnecting
After the detachment and the
subsequent connection of the battery,
on the instrument cluster display the
warning light will light up.
To initialize the EPB system lift, release
and lift again the lever located next to
the transmission shift lever.
Emergency Disengagement
In case of brake lock with complete
electrical system failure, it is necessary
to act on the electric actuator using
the special tool provided in the tool kit
to release the pressure of the parking
brake shoes (see “Emergency Release of the Parking Brake” chapter in
section “In an Emergency”).
EPB Operation with
Overheated Brakes
Driving on mountain roads with steep
slopes or a sports use of the vehicle
could overheat the brake system
components. In these conditions,
parking brake must not be used since
the push of the power actuator might
not be sufficient to ensure vehicle
braking, especially on a slope.
Drive normally without braking to
allow the brakes to cool down a few
minutes before stopping. In this way,
the automatic or manual activation of
the parking brake will ensure vehicle
braking.
Parking
Straighten the wheels and turn off the
engine.
Before leaving the vehicle, make sure
that the parking brake is fully applied
in automatic or manual mode and
place the transmission lever in the P
(Park) position.
Remove the key from the ignition
switch.
WARNING!
• Always check that the vehicle is
locked before leaving it.
• Never leave children unattended in
the vehicle.
• Do not park the vehicle on paper,
grass, dry leaves or other flammable
materials. They could catch fire if
they come into contact with hot
parts of the exhaust system.
• Do not leave the engine running
while the vehicle is unattended.
CAUTION!
When you need to park the vehicle on
a steep slope, both with the engine on
and off, it is recommended not only to
Driving
5
176
Page 216 of 296
Tool Kit
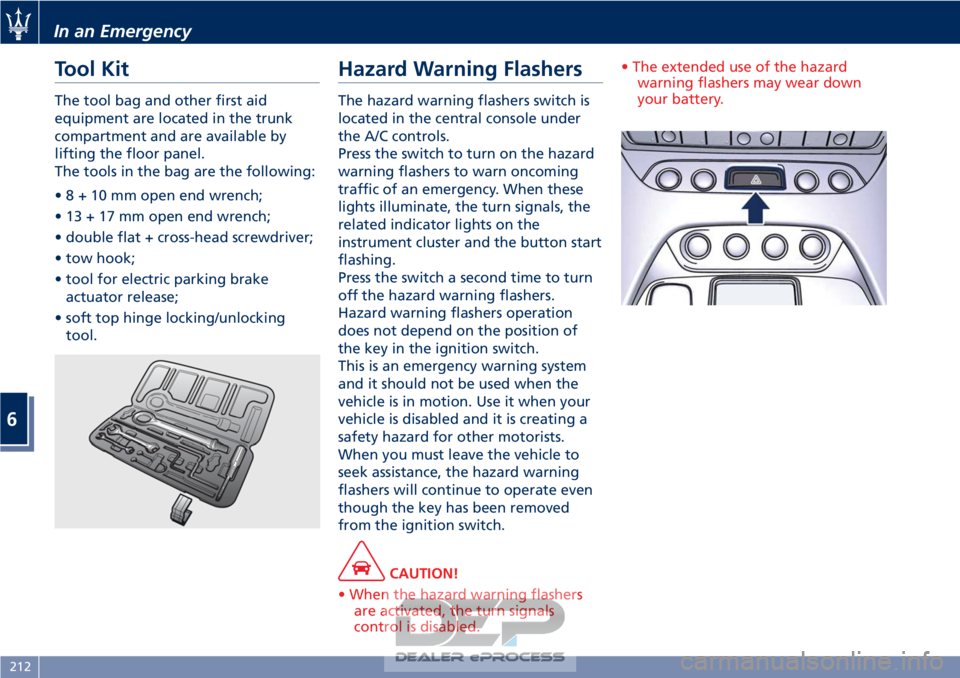
The tool bag and other first aid
equipment are located in the trunk
compartment and are available by
lifting the floor panel.
The tools in the bag are the following:
•8+10mmopen end wrench;
• 13 + 17 mm open end wrench;
• double flat + cross-head screwdriver;
• tow hook;
• tool for electric parking brakeactuator release;
• soft top hinge locking/unlocking tool.
Hazard Warning Flashers
The hazard warning flashers switch is
located in the central console under
the A/C controls.
Press the switch to turn on the hazard
warning flashers to warn oncoming
traffic of an emergency. When these
lights illuminate, the turn signals, the
related indicator lights on the
instrument cluster and the button start
flashing.
Press the switch a second time to turn
off the hazard warning flashers.
Hazard warning flashers operation
does not depend on the position of
the key in the ignition switch.
This is an emergency warning system
and it should not be used when the
vehicle is in motion. Use it when your
vehicle is disabled and it is creating a
safety hazard for other motorists.
When you must leave the vehicle to
seek assistance, the hazard warning
flashers will continue to operate even
though the key has been removed
from the ignition switch.
CAUTION!
• When the hazard warning flashers are activated, the turn signals
control is disabled. • The extended use of the hazard
warning flashers may wear down
your battery.
In an Emergency
6
212
Page 221 of 296

• Remove from the compressor casethe inflation hose and the cable with
a plug for the power outlet.
• Unscrew the valve cap of the compact spare wheel and screw the
fitting of the inflation hose onto the
valve.
• Insert the plug in one of the available power outlets fitted in the
trunk or passenger compartment.
• Turn the key in the ignition switch in MAR (ON) position.
• Turn the compressor on by pressing the switch.
• Stop the compressor pressing switch again, when the pressure indicated
by the gage reaches the
recommended level (see “Tire
Inflation Pressure” in section
“Features and Specifications”) and
screw the cap on the compact spare
wheel valve.
CAUTION!
• In order to obtain a more accurate reading, the compressor should be
switched off when checking the tire
pressure of the compact spare wheel
on the pressure gage.
• Do not run the compressor for more than 20 minutes: there is a risk it
could overheat. Also, prolonged
power absorption may discharge the
battery, subsequently preventing the
engine from starting.
• The compressor has been designed exclusively to inflate compact spare
wheels; do not use it to inflate air
mattresses, dinghies etc.
• Fit the adapter on the wrench. Extend
the wrench as shown, then
loosen by approximately one turn, the five bolts on the wheel to be
changed.
• Open the jack partially, releasing and turning the control lever clockwise.
• Place the jack near the wheel to be changed in one of the indicated
positions.
• Make sure that the head of the jack is correctly inserted in one of the
slots beneath the sole bar.
In an Emergency
6
217
Page 230 of 296
WARNING!
• Using booster packs that have not
been checked, which could therefore
release a too high charging voltage
(higher than 14 V), in extreme
environmental conditions (for
example: closed areas or without
proper ventilation and temperatures
higher than 122°F/50°C or lower
than -4°F/-20°C) create the right
conditions for ignition which could
then cause the battery to explode.
Therefore you shall always perform
jump-starting operations using the
adequate tools and in the best
environmental conditions, taking all
necessary precautions.
• Do not attempt jump-starting if the
discharged battery is frozen. It could
rupture or explode during jump start
and cause personal injury.
• Do not carry out this procedure if
you have not done it before:
incorrect maneuvers can originate
high electrical discharges and even
cause the battery to explode.
• To avoid the risk of explosion or fire,
do not approach the battery with open flames or cigarettes that could
generate sparks.
NOTE:
If
you need to disconnect the battery
from the vehicle electrical system, see
“Maintenance - Free Battery” in
section “Maintenance and Care”).
Access the Battery
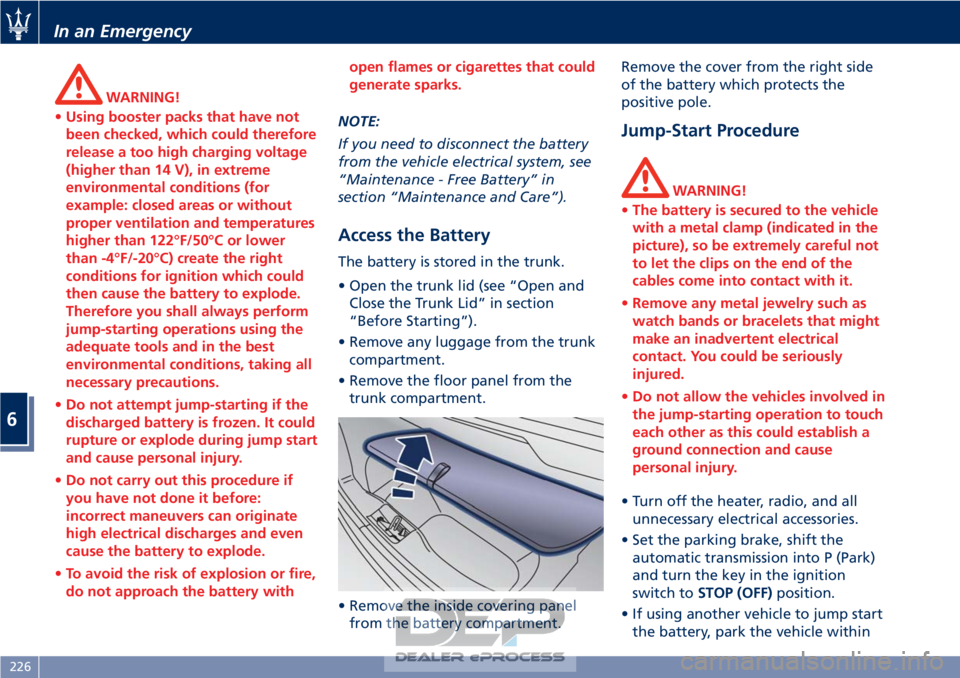
The battery is stored in the trunk.
• Open the trunk lid (see “Open and Close the Trunk Lid” in section
“Before Starting”).
• Remove any luggage from the trunk compartment.
• Remove the floor panel from the trunk compartment.
• Remove the inside covering panel from the battery compartment. Remove the cover from the right side
of the battery which protects the
positive pole.
Jump-Start Procedure
WARNING!
• The battery is secured to the vehicle
with a metal clamp (indicated in the
picture), so be extremely careful not
to let the clips on the end of the
cables come into contact with it.
• Remove any metal jewelry such as
watch bands or bracelets that might
make an inadvertent electrical
contact. You could be seriously
injured.
• Do not allow the vehicles involved in
the jump-starting operation to touch
each other as this could establish a
ground connection and cause
personal injury.
• Turn off the heater, radio, and all unnecessary
electrical accessories.
• Set the parking brake, shift the automatic transmission into P (Park)
and turn the key in the ignition
switch to STOP (OFF) position.
• If using another vehicle to jump start the battery, park the vehicle within
In an Emergency
6
226