2019 MASERATI GRANTURISMO CONVERTIBLE buttons
[x] Cancel search: buttonsPage 91 of 296

You can signal another vehicle with
your headlights by lightly pulling the
left-hand multifunction lever toward
you. This will turn on the high beams
headlights until the lever is released.
Flashing occurs also with lights off
(light switch in position “0”) if the key
in the ignition switch is in MAR (ON)
position. CAUTION!
The high beams can only be switched
on manually by pushing the left-hand
multifunction lever forward.
WARNING!
If the high beams are activated, they
will turn on automatically every time
the low beams are switched on either
manually or automatically. We
recommend therefore that you switch
them off when they are no longer
necessary and every time the twilight
sensor deactivates the external lights.
“Follow me Home” Function
This
function allows you to set a
timing for activation of the position
lights and low beams, so that they
may remain on for a set time after
turning off the vehicle.
This function is activated by pushing
the left-hand multifunction lever on
the steering column, used to flash the
headlights.
The position lights and low beams
turn on for 30 seconds, the message
“Follow me” appears on the
instrument cluster display for 20 seconds, and the light activation time
is displayed.
When this function is active, every
time the left-hand multifunction lever
for flashing the headlights is
operated, the time the lights remain
on is increased by 30 seconds, with a
maximum total time of 210 seconds.
The display will show the time set.
If the left-hand multifunction lever for
flashing the headlights is operated for
more than 2 seconds, the function is
deactivated, and the indicator on the
instrument cluster display goes off.
When the function is active, turning
the key in the ignition switch back to
MAR (ON) position deactivates the
system.
Front Domelights The front domelight includes a central
and two reading lights.
The central light automatically turns
on together with the two lights on the
sides of the rear seats (see "Rear Side
Interior Lights" in this chapter) when
one of the doors is opened and turns
off when the door is closed (timed
switching off). These lights may be
switched on manually by pressing the
central button
The reading lights are controlled by
the respective side buttons.Understanding the Vehicle
3
87
Page 92 of 296
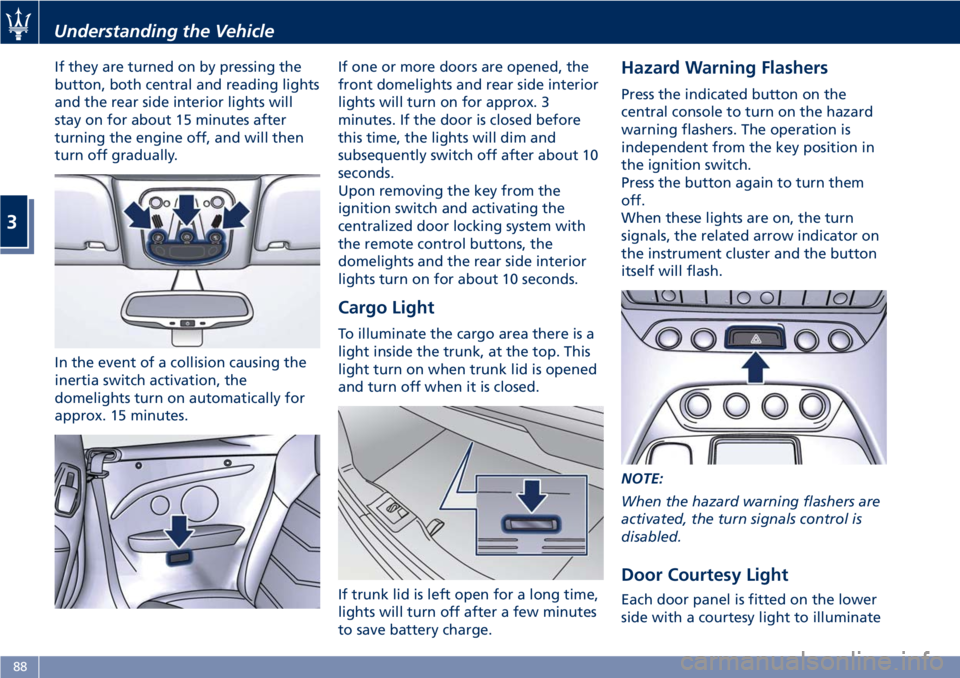
If they are turned on by pressing the
button, both central and reading lights
and the rear side interior lights will
stay on for about 15 minutes after
turning the engine off, and will then
turn off gradually.
In the event of a collision causing the
inertia switch activation, the
domelights turn on automatically for
approx. 15 minutes. If one or more doors are opened, the
front domelights and rear side interior
lights will turn on for approx. 3
minutes. If the door is closed before
this time, the lights will dim and
subsequently switch off after about 10
seconds.
Upon removing the key from the
ignition switch and activating the
centralized door locking system with
the remote control buttons, the
domelights and the rear side interior
lights turn on for about 10 seconds.
Cargo Light To illuminate the cargo area there is a
light inside the trunk, at the top. This
light turn on when trunk lid is opened
and turn off when it is closed.
If trunk lid is left open for a long time,
lights will turn off after a few minutes
to save battery charge. Hazard Warning Flashers Press the indicated button on the
central console to turn on the hazard
warning flashers. The operation is
independent from the key position in
the ignition switch.
Press the button again to turn them
off.
When these lights are on, the turn
signals, the related arrow indicator on
the instrument cluster and the button
itself will flash.
NOTE:
When the hazard warning flashers are
activated, the turn signals control is
disabled.
Door Courtesy Light
Each door panel is fitted on the lower
side with a courtesy light to illuminateUnderstanding the Vehicle
3
88
Page 98 of 296
Soft Top Operation The soft top must be opened and
closed with the vehicle stationary and,
as a rule, with the engine running at
idle speed.
If necessary (e.g. in closed places) the
operation can be performed with the
engine off and the key in the ignition
switch in MAR (ON) position. This
operation involves an extremely high
power consumption, which causes the
battery to discharge faster.
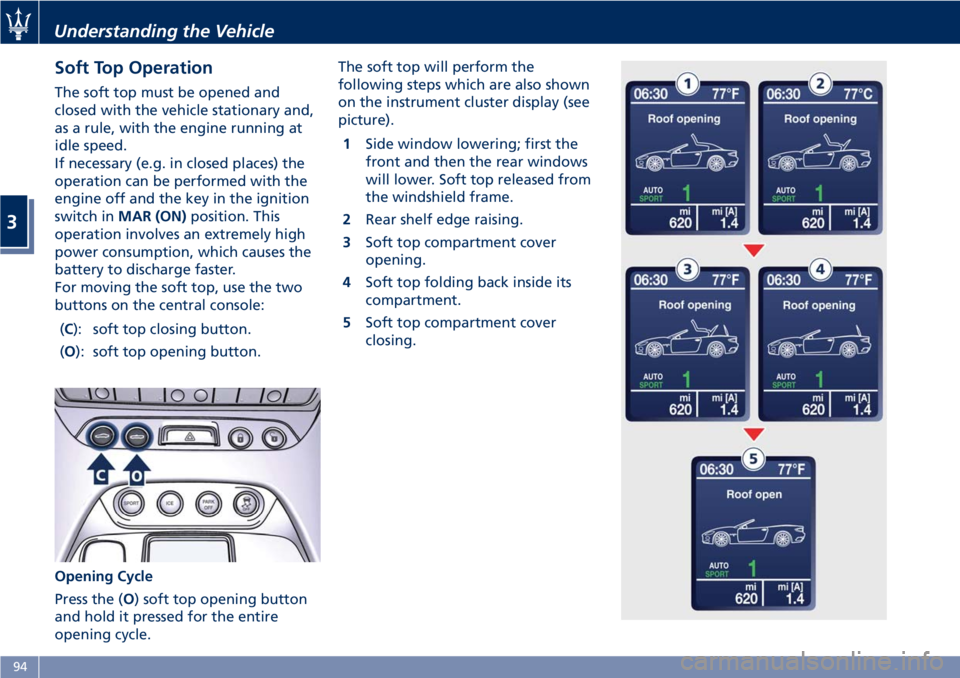
For moving the soft top, use the two
buttons on the central console:
( C ): soft top closing button.
( O ): soft top opening button.
Opening Cycle
Press the ( O ) soft top opening button
and hold it pressed for the entire
opening cycle. The soft top will perform the
following steps which are also shown
on the instrument cluster display (see
picture).
1 Side window lowering; first the
front and then the rear windows
will lower. Soft top released from
the windshield frame.
2 Rear shelf edge raising.
3 Soft top compartment cover
opening.
4 Soft top folding back inside its
compartment.
5 Soft top compartment cover
closing.Understanding the Vehicle
3
94
Page 101 of 296
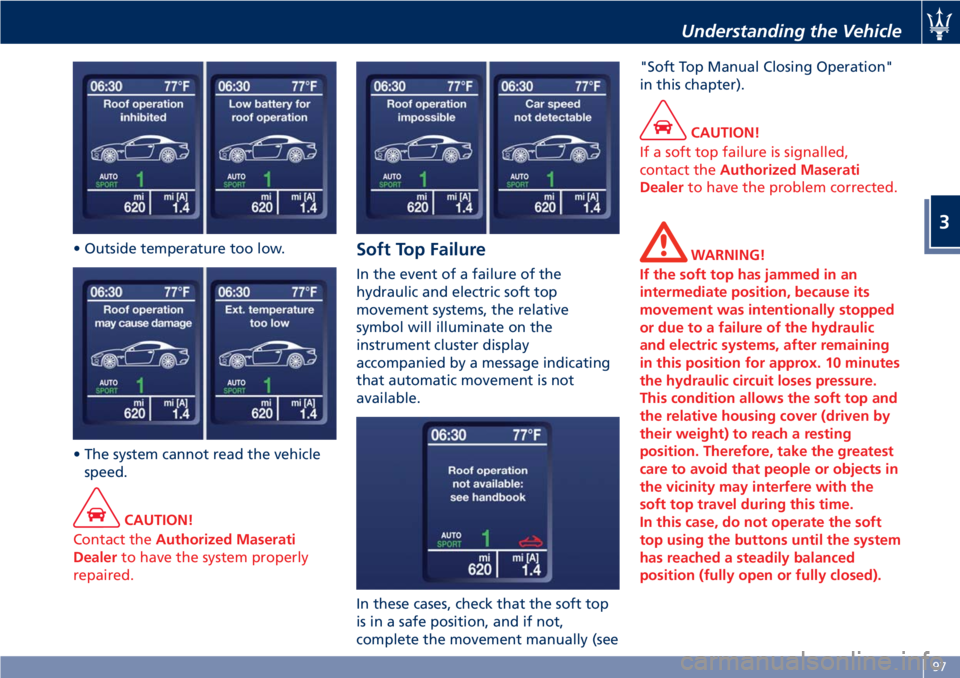
• Outside temperature too low.
• The system cannot read the vehicle
speed.
CAUTION!
Contact the Authorized Maserati
Dealer to have the system properly
repaired. Soft Top Failure In the event of a failure of the
hydraulic and electric soft top
movement systems, the relative
symbol will illuminate on the
instrument cluster display
accompanied by a message indicating
that automatic movement is not
available.
In these cases, check that the soft top
is in a safe position, and if not,
complete the movement manually (see "Soft Top Manual Closing Operation"
in this chapter).
CAUTION!
If a soft top failure is signalled,
contact the Authorized Maserati
Dealer to have the problem corrected.
WARNING!
If the soft top has jammed in an
intermediate position, because its
movement was intentionally stopped
or due to a failure of the hydraulic
and electric systems, after remaining
in this position for approx. 10 minutes
the hydraulic circuit loses pressure.
This condition allows the soft top and
the relative housing cover (driven by
their weight) to reach a resting
position. Therefore, take the greatest
care to avoid that people or objects in
the vicinity may interfere with the
soft top travel during this time.
In this case, do not operate the soft
top using the buttons until the system
has reached a steadily balanced
position (fully open or fully closed).Understanding the Vehicle
3
97
Page 112 of 296

• Lay provisionally the tether vertically
on the backrest and on the headrest.
• Place the suitcase on the cushion.
• Secure the suitcase with the tether,
which must be wound all around the
suitcase and passed through its
handles.
• Fasten the other end of the tether to
the "U" metal ring located
underneath the covering at the base
of the seat. • Using the buckle tension the tether
until the suitcase if firmly secured on
the seat.
HomeLink ®
(for
versions/markets, where
provided) HomeLink ®
replaces up to three
hand-held transmitters operating the
automatic devices that open garage
doors and gates, enable/disable the
lighting or security systems. The
HomeLink ®
unit is powered by your
vehicle's 12 Volt battery. The
HomeLink ®
buttons that are located in
the control panel behind the driver's
side sun visor designate the three
different HomeLink ®
channels.
The HomeLink ®
LED is located above
the central button.
HomeLink ®
is disabled when the
vehicle security alarm is active (see
“Vehicle security alarm” in section
“Before Starting”).Understanding the Vehicle
3
108
Page 113 of 296
WARNING!
Vehicle exhaust contains carbon
monoxide, a dangerous gas. Do not
run your vehicle in the garage while
programming the transceiver. Exhaust
gas can cause serious injury or death.
Customer Service If you have problems with training the
HomeLink Universal Transceiver, or
would like information on home
products that can be operated by the
transmitter, call (800) 355-3515. On the
Internet, go to www.Homelink.com.
Safety Precautions Always refer to the operating
instructions and safety information
that came with your garage door
opener or other equipment you
intend to operate with the HomeLink
Universal Transceiver. If you do not
have this information, you should
contact the manufacturer of the
equipment.
While training or using HomeLink,
make sure you have a clear view of
the garage door or gate, and that no
one will be injured by its movement. General Information While programming HomeLink ®
,itis
advisable to disconnect the drive
motor of the gate/door to be remote
controlled, since the numerous driving
pulses launched for this operation
might damage it.
If the battery fails or is disconnected,
the stored settings are not deleted.
If the gate/door was manufactured
prior to April 1982 (not equipped with
safety systems or automatic stop in the
event of an obstacle in the range of
action), the gate/door cannot be
controlled by HomeLink ®
.
If you have questions, call (800)
355-3515.
WARNING!
California Proposition 65
Operating, servicing and maintaining
a passenger vehicle or off-road vehicle
can expose you to chemicals including
such as, engine exhaust, carbon
monoxide, phthalates and lead, that
which are know to the State of
California to cause cancer and birth
defects or other reproductive harm. To
minimize exposure, avoid breathing
exhaust, do not idle the engine except
as necessary, service your vehicle in a well-ventilated area and wear gloves
or wash your hands frequently when
servicing your vehicle. For more
information go to:
www.P65Warnings.ca.gov/passenger-
vehicle
Programming • Press and hold buttons "1" and "3".
• After about 20 seconds, the LED
starts flashing.
• Release the buttons.
• Hold the remote control for the
device to be controlled close to the
HomeLink ®
control panel (0-30 cm/
0-12 in).
• Simultaneously press and hold the
button on the hand-held remote
control and one of the three
HomeLink ®
buttons "1", "2" or "3".
• Successful programming is signaled
by the LED flashing faster.
• Release the buttons.
To program the other buttons, repeat
the operations skipping the first three
steps.Understanding the Vehicle
3
109
Page 114 of 296
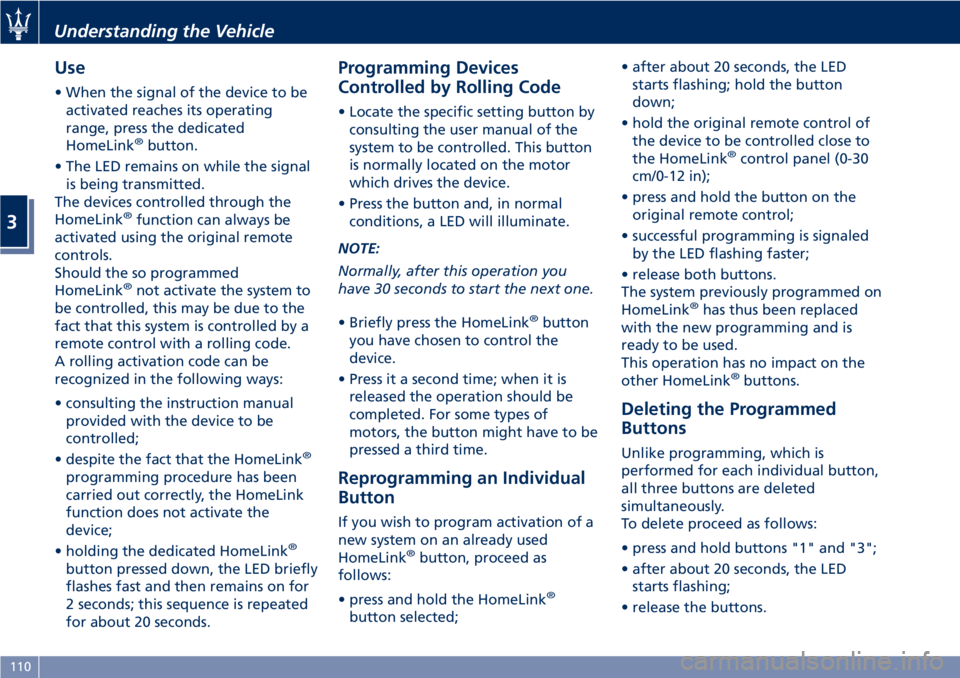
Use • When the signal of the device to be
activated reaches its operating
range, press the dedicated
HomeLink ®
button.
• The LED remains on while the signal
is being transmitted.
The devices controlled through the
HomeLink ®
function can always be
activated using the original remote
controls.
Should the so programmed
HomeLink ®
not activate the system to
be controlled, this may be due to the
fact that this system is controlled by a
remote control with a rolling code.
A rolling activation code can be
recognized in the following ways:
• consulting the instruction manual
provided with the device to be
controlled;
• despite the fact that the HomeLink ®
programming procedure has been
carried out correctly, the HomeLink
function does not activate the
device;
• holding the dedicated HomeLink ®
button pressed down, the LED briefly
flashes fast and then remains on for
2 seconds; this sequence is repeated
for about 20 seconds. Programming Devices
Controlled by Rolling Code • Locate the specific setting button by
consulting the user manual of the
system to be controlled. This button
is normally located on the motor
which drives the device.
• Press the button and, in normal
conditions, a LED will illuminate.
NOTE:
Normally, after this operation you
have 30 seconds to start the next one.
• Briefly press the HomeLink ®
button
you have chosen to control the
device.
• Press it a second time; when it is
released the operation should be
completed. For some types of
motors, the button might have to be
pressed a third time.
Reprogramming an Individual
Button If you wish to program activation of a
new system on an already used
HomeLink ®
button, proceed as
follows:
• press and hold the HomeLink ®
button selected; • after about 20 seconds, the LED
starts flashing; hold the button
down;
• hold the original remote control of
the device to be controlled close to
the HomeLink ®
control panel (0-30
cm/0-12 in);
• press and hold the button on the
original remote control;
• successful programming is signaled
by the LED flashing faster;
• release both buttons.
The system previously programmed on
HomeLink ®
has thus been replaced
with the new programming and is
ready to be used.
This operation has no impact on the
other HomeLink ®
buttons.
Deleting the Programmed
Buttons Unlike programming, which is
performed for each individual button,
all three buttons are deleted
simultaneously.
To delete proceed as follows:
• press and hold buttons "1" and "3";
• after about 20 seconds, the LED
starts flashing;
• release the buttons.Understanding the Vehicle
3
110
Page 128 of 296
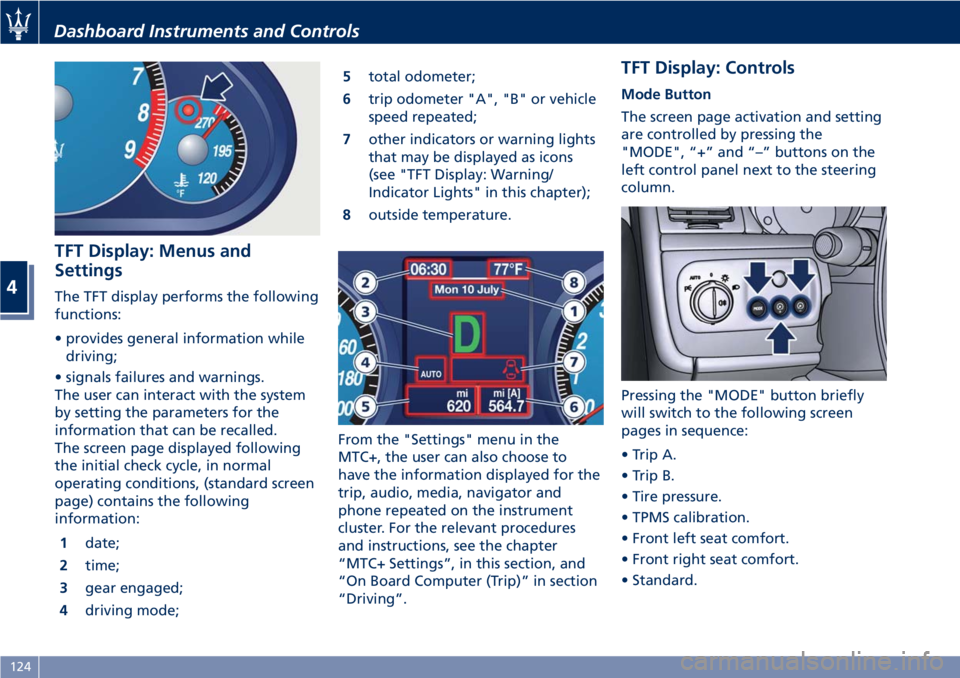
TFT Display: Menus and
Settings The TFT display performs the following
functions:
• provides general information while
driving;
• signals failures and warnings.
The user can interact with the system
by setting the parameters for the
information that can be recalled.
The screen page displayed following
the initial check cycle, in normal
operating conditions, (standard screen
page) contains the following
information:
1 date;
2 time;
3 gear engaged;
4 driving mode; 5 total odometer;
6 trip odometer "A", "B" or vehicle
speed repeated;
7 other indicators or warning lights
that may be displayed as icons
(see "TFT Display: Warning/
Indicator Lights" in this chapter);
8 outside temperature.
From the "Settings" menu in the
MTC+, the user can also choose to
have the information displayed for the
trip, audio, media, navigator and
phone repeated on the instrument
cluster. For the relevant procedures
and instructions, see the chapter
“MTC+ Settings”, in this section, and
“On Board Computer (Trip)” in section
“Driving”. TFT Display: Controls Mode Button
The screen page activation and setting
are controlled by pressing the
"MODE", “+” and “–” buttons on the
left control panel next to the steering
column.
Pressing the "MODE" button briefly
will switch to the following screen
pages in sequence:
• Trip A.
• Trip B.
• Tire pressure.
• TPMS calibration.
• Front left seat comfort.
• Front right seat comfort.
• Standard.Dashboard Instruments and Controls
4
124