2019 MASERATI GHIBLI window
[x] Cancel search: windowPage 334 of 384

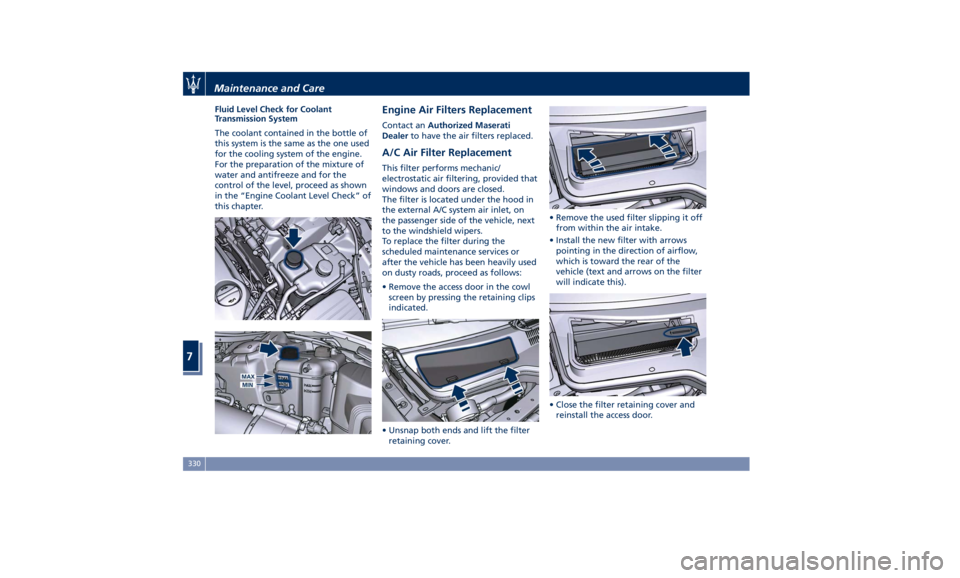
Fluid Level Check for Coolant
Transmission System
The coolant contained in the bottle of
this system is the same as the one used
for the cooling system of the engine.
For the preparation of the mixture of
water and antifreeze and for the
control of the level, proceed as shown
in the “Engine Coolant Level Check” of
this chapter. Engine Air Filters Replacement Contact an Authorized Maserati
Dealer to have the air filters replaced.
A/C Air Filter Replacement This filter performs mechanic/
electrostatic air filtering, provided that
windows and doors are closed.
The filter is located under the hood in
the external A/C system air inlet, on
the passenger side of the vehicle, next
to the windshield wipers.
To replace the filter during the
scheduled maintenance services or
after the vehicle has been heavily used
on dusty roads, proceed as follows:
• Remove the access door in the cowl
screen by pressing the retaining clips
indicated.
• Unsnap both ends and lift the filter
retaining cover. • Remove the used filter slipping it off
from within the air intake.
• Install the new filter with arrows
pointing in the direction of airflow,
which is toward the rear of the
vehicle (text and arrows on the filter
will indicate this).
• Close the filter retaining cover and
reinstall the access door.Maintenance and Care
7
330
Page 335 of 384

CAUTION!
Failure to replace the filter may
considerably reduce the air
conditioning and heating system
efficiency.
Wiper Maintenance and Blades
Replacement Windshield Wiper Arms Lifting
When the windshield wiper arms are
in rest position it is not possible to
check or replace the blades as they
remain under the engine hood.
To service the blades it is necessary to
move the wiper arms in “Service”
position (see chapter “Wipers and
Washers” in section “Understanding
the Vehicle”). In this way it is possible
to lift the arms for cleaning or
replacing the wiper blades.
WARNING!
It is dangerous to operate or service
the wiper blades with the windshield
wipers in an active position (any
position different from “OFF”) and
with the ignition switch in the RUN
position. The rain sensors may
suddenly activate the wipers. Always use the “Service” position for any
intervention on the windshield wiper
blades.
Windshield Wiper Maintenance
Life
expectancy of
wiper blades varies
depending on the geographical area’s
weather conditions where the car is
used and frequency of use. Poor
performance of blades may be present
with chattering, marks on the glass,
water lines or wet spots. If any of
these conditions are present, clean the
wiper blades or replace if necessary.
Clean the rubber edges of the wiper
blades and the windshield/rear
window glasses periodically with a
sponge or soft cloth and a mild
nonabrasive cleaner. This will remove
accumulations of salt or road film.
Operation of the wipers on dry glass
for long periods may cause
deterioration of the wiper blades.
Always use washer fluid when using
the wipers to remove salt or dirt from
a dry windshield.
Avoid using the wiper blades to
remove frost or ice from the
windshield. Keep the blade rubber out
of contact with petroleum products
such as engine oil, gasoline, etc. Spray nozzles
If the jet does not work, first check
that there is fluid in the tank (see
paragraph “Level checks” in this
section) then check that the nozzles
are not clogged.
Windshield Wiper Blades Replacement
• Move the wiper arms into “Service”
position, (see chapter “Windshield
Wipers and Washers” in section
“Understanding the Vehicle”) and
lift them.
• Press the indicated button, slip off
the blade support from the arm and
replace it.
• Return the blade to its original
position on the windshield.
• Turn the multifunction lever to one
of the automatic settings (see
chapter “Windshield Wipers and
Washers” in section “UnderstandingMaintenance and Care
7
331
Page 337 of 384

WARNING!
California Proposition 65
Operating, servicing and maintaining
a passenger vehicle or off-road vehicle
can expose you to chemicals including
such as, engine exhaust, carbon
monoxide, phthalates and lead, that
which are known to the State of
California to cause cancer and birth
defects or other reproductive harm. To
minimize exposure, avoid breathing
exhaust, do not idle the engine except
as necessary, service your vehicle in a
well-ventilated area and wear gloves
or wash your hands frequently when
servicing your vehicle. For more
information go to:
www.P65Warnings.ca.gov/passenger-
vehicle CAUTION!
• Before disconnecting the battery,
open the trunk and lower the
windows a few centimeters, to avoid
damaging the seal when opening
and closing the door. When the
battery is connected, the lowering of
the window is performed
automatically when the door is
opened and closed. The trunk lid
must remain open and the windows
lowered until the charged battery is
reconnected.
• Never disconnect the battery from
the electrical system when the
engine is running.
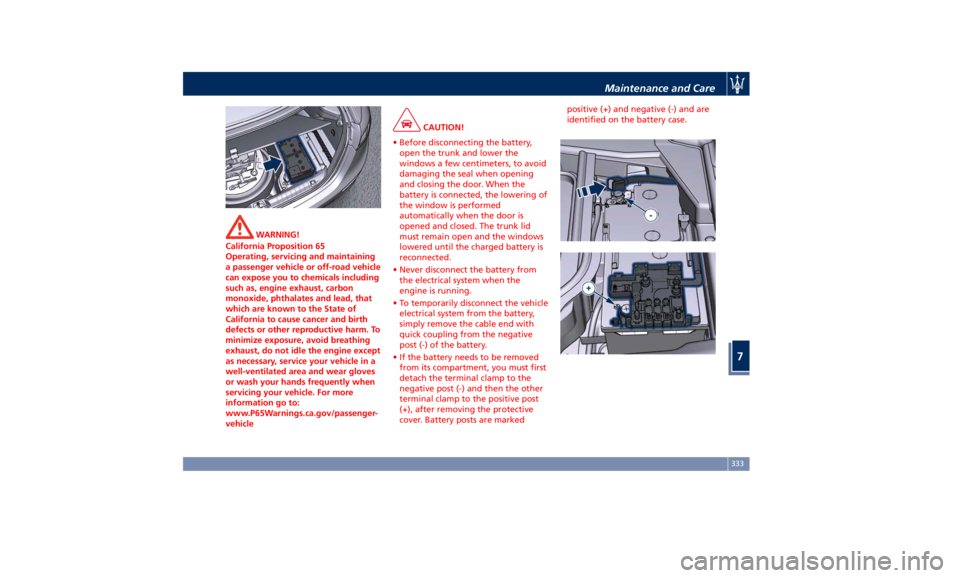
• To temporarily disconnect the vehicle
electrical system from the battery,
simply remove the cable end with
quick coupling from the negative
post (-) of the battery.
• If the battery needs to be removed
from its compartment, you must first
detach the terminal clamp to the
negative post (-) and then the other
terminal clamp to the positive post
(+), after removing the protective
cover. Battery posts are marked positive (+) and negative (-) and are
identified on the battery case.
Maintenance and Care
7
333
Page 345 of 384

Ref. Type Function
10 Maxi – 40A Start&Stop:
voltage stabilizer,
body Ref. Type Function
11 Maxi – 40A “High Premium”
stereo amplifier
unit
Maxi – 20A “Premium”
stereo amplifier
unit (1)
15 Maxi – 40A HVAC front
blower relay coil Ref. Type Function
16 Maxi – 40A Rear window
defrost relay coil
(HVAC module)
17 Maxi – 30A Rear LH door
module
18 Maxi – 30A Rear RH door
module
19 – –
20 Maxi – 20A “Premium”
stereo amplifier
unit (2)
21 – –
22 – –
23 Mini – 10A Fuel door relay
and RF Hub
module
24 Mini – 10A ITM module,
ceiling light units
(front and rear),
rain/lights sensor
25 – –
26 – –
27 – –
31 Mini – 25A LH front seat
movement
32 – –
33 – –Maintenance and Care
7
341
Page 356 of 384

External plastic parts must be cleaned
with the same procedure followed for
the normal washing of the bodywork.
Avoid, as far as possible, parking the
vehicle under trees; the resinous
substances that very often drop from
the trees give the paint a dull
appearance and increase the possibility
of originating corrosive processes.
It is important that the drain holes in
the lower sides of the doors, rocker
panels, and trunk bottom be kept clear
and open.
CAUTION!
• Bird droppings must be washed off
immediately and thoroughly, since
their acidity is particularly corrosive.
• To provide better protection for the
paint, polish the vehicle at intervals
with a suitable product leaving a
protective film on the paint.
• If the vehicle is washed using
high-pressure water jets or cleaners,
it is important that the nozzle of the
jet be kept at a distance of at least
16 in (40 cm) from the bodywork to
avoid damaging it. Glass Surfaces
All
glass surfaces
should be cleaned on
a regular basis with any commercial
household-type glass cleaner.
Never use an abrasive type cleaner.
Use caution when cleaning the inside
rear window equipped with electric
defrosters. Do not use scrapers or
other sharp instrument that may
scratch the elements.
When cleaning the rearview mirror,
spray cleaner on the towel or rag that
you are using. Do not spray cleaner
directly on the mirror.
Labels can be peeled off after soaking
with warm water.
When cleaning is performed, keep all
metal objects at a safe distance from
the window.
Cleaning Headlights
Your vehicle has plastic headlights that
are lighter and less susceptible to
stone breakage than glass headlights.
Plastic is not as scratch-resistant as
glass and therefore different lens
cleaning procedures must be followed.
To minimize the possibility of
scratching the lenses and reducing
light output, avoid wiping with a dry
cloth. To remove road dirt, wash with
a mild soap solution followed by
rinsing. Do not use abrasive cleaning
components, solvents, steel wool or
other aggressive material to clean the
lenses.
Condensation and Fogging on the
Light Clusters
With cold or humid climates, after a
driving rain or after cleaning the car,
the surface of the front and rear light
clusters could fog and/or form
condensate drops on the inside. This is
a natural phenomenon due to the
temperature and humidity differences
between the lens internal and external
surface, which nevertheless does not
indicate a fault and does not
compromise the regular operation of
the lights. The fogging/condensate
disappears when switching on the
lights, starting from the centre of the
diffuser and gradually going to the
edges.
Moldings and Aluminum Trims
• For cleaning moldings and aluminum
trims, avoid the use of acidic or
alkaline cleaning agents that can
destroy the protecting surface
treatment.
• After washing aluminum trim with
warm water, apply the cleaning
agent with a clean tissue or a soft
sponge on the surface. Do not useMaintenance and Care
7
352
Page 357 of 384

any other equipment such as
brushes, steel wool, abrasives or any
other equipment for cleaning.
• After cleaning, please rinse the
aluminum trim with a lot of clear
water.
• While cleaning in the car, please
make sure that the moldings and
aluminum trims only get in contact
with soft brushes or textiles.
Engine Compartment
At the end of each winter season,
carefully wash the engine
compartment, remembering to avoid
directing the jet of water for too long
on the electric parts.
To perform this operation, you must
contact an Authorized Maserati
Dealer .
Pre-Short Drop Function When in a car wash, if the driver keeps
the RKE Transmitter in his/her pocket,
or in any place outside the vehicle
within 3.3 ft (1 m) distance, the front
windows will perform a pre-short
drop. This is a shorter drop compared
to the normal short drop performed
by the “Passive Entry” function when
you grab the door handle to enter the
vehicle. In order to prevent water from
entering the vehicle between the
upper edge of the glass window and
the door outline on the bodywork,
while the car is being washed, it is
advisable to disable the “Passive
Entry” from the MTC+ System, for
further information refer to chapter
“MTC+ Settings” in section
“Dashboard Instruments and
controls”. When deactivating the
“Passive Entry”, also the “Pre-Short
Drop” function will be disabled.
Interior Maintenance and
Care Interior trim should be cleaned
starting with a damp cloth. Do not use
harsh cleaners.
The leather upholstery can be best
preserved by regular cleaning with a
damp soft cloth. Small particles of dirt
can act as an abrasive and damage the
leather upholstery and should be
removed promptly with a damp cloth.
Stubborn soils stains can be removed
easily with a soft cloth and
appropriate products. Avoid soaking
the leather upholstery with any liquid.
Please do not use polishes, oils,
cleaning fluids, solvents, detergents,
or ammonia-based cleaners to clean
your leather upholstery.
Application of a leather conditioner is
not required to maintain the original
condition.
Check at regular intervals that there is
no water trapped under the mats (due
to drips off shoes, umbrellas etc.)
which may cause the metal parts to
oxidize.
CAUTION!
Do not use alcohol, petrol or solvents
(Continued)Maintenance and Care
7
353
Page 381 of 384

Warranty ...................10
Accessories ................10
Warranty Information .........12
Wheels ................... .349
Wheels Maintenance ....... .349
Windows ...................45
Auto Down/Auto Up Feature ....46
Defroster .................47
Open the Windows with RKE
Transmitter and Ignition Off ....47
Rear Window ..............47
Reset Auto-Up/Down .........47
Window and Sunshade Lockout
Button ...................47
Wipers and Washers .......... .122
Headlight On with Windshield
Wipers ................. .124
Rain Sensing Windshield Wipers .123
Windshield Washers ........ .125
Windshield Wipers ......... .122
Wipers Blades Maintenance . . . .124 Index
9 377