2019 MASERATI GHIBLI child lock
[x] Cancel search: child lockPage 50 of 384

NOTE:
• The power window switches will
remain active for up to 10 minutes
after the ignition switch is turned to
the OFF position. Opening either
front door will cancel this feature.
The time lapse can be set. See “MTC+
Settings” in section “Dashboard
Instruments and Controls” for
further information.
• Frequent activations of the power
windows could result in a temporary
lock out of the motors. In this case,
wait a moment before a new
activation.
WARNING!
Improper use of the power windows
and the sunroof (if equipped) can
however be dangerous, even with the
anti-pinch prevention system. Before
and during activation of the power
window, always check that the
passengers are not exposed to the risk
of injury both by the moving window
and by personal objects that could be
dragged or hit by it. Do not leave
unattended children in a vehicle with
a key fob RKE transmitter inside.
When getting out the vehicle, always
remove the key fob RKE transmitter to prevent the windows being
accidentally activated, posing a risk to
passengers remaining onboard.
Auto-Down Feature The driver door power window switch
and some model passenger door
power window switches have an
auto-down feature.
Press the window switch to the second
detent, release, and the window will
go completely down automatically.
To open the window part way, press
the window switch to the first detent
and release it when you want the
window to stop.
To stop the window from going all the
way down during the auto-down
operation, pull up on the switch
briefly.
Auto-Up Feature with
Anti-Pinch Protection Lift the window switch to the second
detent, release, and the window will
go all the way up automatically.
To stop the window from going all the
way up during the auto-up operation,
push down on the switch briefly.
To close the window part way, lift the
window switch to the first detent and release it when you want the window
to stop.
NOTE:
• If the window runs into any obstacle
during auto-closure, it will reverse
direction and then go back down.
Remove the obstacle and use the
window switch again to close the
window.
• Any impact due to rough road
conditions may trigger the auto
reverse function unexpectedly during
auto-closure. If this happens, pull the
switch lightly to the first detent and
hold to close the window manually.
• Frequent activations of the
anti-pinch function could disable the
auto-down and auto-up function of
the windows. In order to re-activate
this function proceed with a reset
cycle as described in the next
paragraph.
WARNING!
There is no anti-pinch protection when
the window is almost closed. Be sure
to clear all objects from the area
before closing the window.Before Starting
2
46
Page 64 of 384

(Continued)
• Always make all seat belt height
adjustments when the vehicle is
stationary.
The vehicle has a shoulder belt height
adjuster
for the driver and front
passenger seating positions.
Adjust the guide so that the shoulder
portion of the belt is on the shoulder
and not falling off of it. The belt
should be close to, but not contacting,
the neck.
Push the indicated button above the
shoulder belt guide to release the
anchorage, then move the belt slider
up or down to the fixed position that
fits you best.
WARNING!
After the adjustment, always check
that the slider to which the oscillating
ring is fixed, is locked into one of the
positions provided. With the handgrip
released, push again downward to
allow the anchoring device to click
into place, in the event that it has not
been released in one of the positions
provided. When you release the anchorage try to
move
the belt slider up and down to
make sure that it is locked in position.
Three-Point Seat Belt
Untwisting Procedure Use the following procedure to
untwist a twisted three point belt.
• Position the latch plate as close as
possible to the anchor point.
• At about 0.5 to 1 ft (15 to 30 cm)
above the latch plate, grasp and
twist the belt 180 degrees to create a
fold that begins immediately above
the latch plate.
• Slide the latch plate upward over the
folded belt. The folded belt must
enter the slot at the top of the latch
plate.
• Continue to slide the latch plate up
until it clears the folded belt. Passengers Seat Belts All passengers seat belts are equipped
with Automatic Locking Retractors
(ALR) and can be used to secure a child
restraint system. For additional
information, see “Installing Child
Restraint Systems using the Vehicle
Seat Belt equipped with ALR” under
“Child Restraint Systems” in this
section.
If the passenger seat position should
not be used to accommodate a child
restraint system, only pull the belt out
far enough to comfortably wrap
around the occupant so as to not
activate the ALR. If the ALR is
activated, you will hear a ratcheting
sound as the belt retracts. In this case,
allow the belt to retract completely
and then carefully pull out only the
amount of belt necessary to
comfortably wrap around the seat
occupant.
Slide the latch plate into the buckle
until you hear a "click".
WARNING!
• Remember that, in the event of a
violent impact, the passengers in the
rear seats who are not wearing the
seat belts are not only subject toBefore Starting
2
60
Page 65 of 384
personal injury but also represent a
danger for passengers sitting in the
front seats.
• Always fasten the seat belts.
• Traveling without the seat belts
fastened significantly increases the
risk of serious injury in the event of
a collision, even with the air bags.
• In the event of a collision, the seat
belts help reduce the possibility of
the vehicle’s occupants being
thrown against the structures of the
passenger compartment or out of
the vehicle.
• The air bags are designed to work
together with the seat belts, not to
substitute them. The front air bags
only deploy in the event of certain
head-on collisions of sufficient
intensity. They may not be activated
if the vehicle rolls over, or in the
event of rear bumps or minor frontal
collisions, or non-frontal collisions.
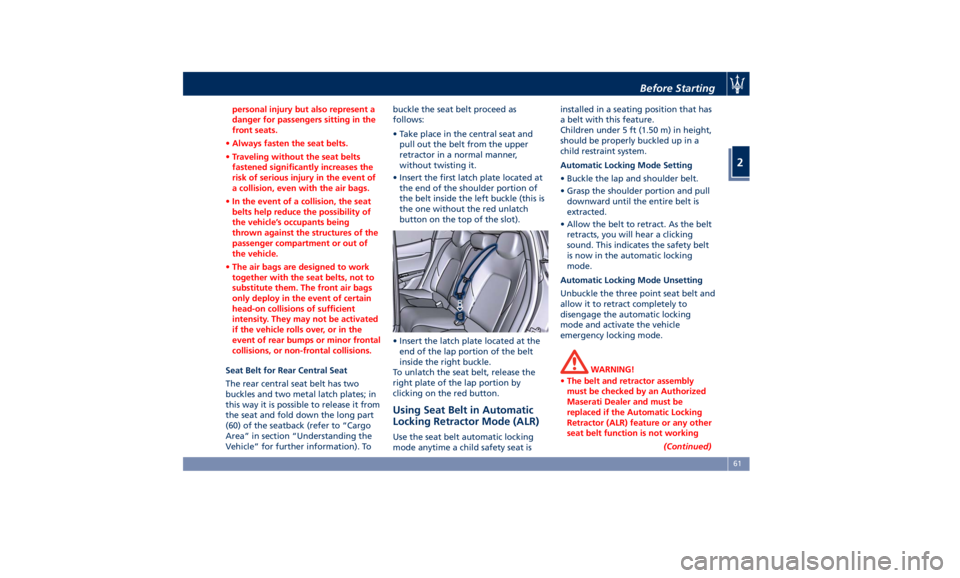
Seat Belt for Rear Central Seat
The
rear central
seat belt has two
buckles and two metal latch plates; in
this way it is possible to release it from
the seat and fold down the long part
(60) of the seatback (refer to “Cargo
Area” in section “Understanding the
Vehicle” for further information). To buckle the seat belt proceed as
follows:
• Take place in the central seat and
pull out the belt from the upper
retractor in a normal manner,
without twisting it.
• Insert the first latch plate located at
the end of the shoulder portion of
the belt inside the left buckle (this is
the one without the red unlatch
button on the top of the slot).
• Insert the latch plate located at the
end of the lap portion of the belt
inside the right buckle.
To unlatch the seat belt, release the
right plate of the lap portion by
clicking on the red button.
Using Seat Belt in Automatic
Locking Retractor Mode (ALR) Use the seat belt automatic locking
mode anytime a child safety seat is installed in a seating position that has
a belt with this feature.
Children under 5 ft (1.50 m) in height,
should be properly buckled up in a
child restraint system.
Automatic Locking Mode Setting
• Buckle the lap and shoulder belt.
• Grasp the shoulder portion and pull
downward until the entire belt is
extracted.
• Allow the belt to retract. As the belt
retracts, you will hear a clicking
sound. This indicates the safety belt
is now in the automatic locking
mode.
Automatic Locking Mode Unsetting
Unbuckle the three point seat belt and
allow it to retract completely to
disengage the automatic locking
mode and activate the vehicle
emergency locking mode.
WARNING!
• The belt and retractor assembly
must be checked by an Authorized
Maserati Dealer and must be
replaced if the Automatic Locking
Retractor (ALR) feature or any other
seat belt function is not working
(Continued)Before Starting
2
61
Page 73 of 384

quantity of nontoxic gas is generated
to inflate the advanced front air bags.
The steering wheel hub trim cover and
the upper right side of the dashboard
separate and fold out of the way as
the air bags inflate to their full size.
The air bags then quickly deflate while
helping to restrain the driver and
front passenger. The advanced front
air bag gas is vented through the vent
holes in the sides of the air bag. In this
way, the air bags do not interfere with
your control of the vehicle.
Supplemental Driver Side Knee Air
Bag Inflator Unit
The supplemental driver side knee air
bag unit is located in the dashboard
trim beneath the steering column.
When the ORC detects a collision
requiring the air bag, it signals the
inflator units. A large quantity of
non-toxic gas is generated to inflate
the supplemental driver side knee air
bag. The trim cover separates and
folds out of the way allowing the air
bag to inflate to the full size.
Supplemental Seat-Mounted Side Air
Bag (SAB) Inflator Units
The ORC unit determines if a side
collision requires the side air bags to
inflate, based on the severity and type
of collision. Based on the severity and type of collision, the side air bag
inflator on the crash side of the
vehicle may be triggered, releasing a
quantity of nontoxic gas.
The inflating SAB exits through the
seat seam into the space between the
occupant and the door. The side air
bag moves at a very high speed and
with such a high force that it could
injure you if you are not seated
properly, or if items are positioned in
the area where the side air bag
inflates. This especially applies to
children.
Supplemental Side Air Bag Inflatable
Curtain (SABIC) Inflator Units
During collisions where the impact is
confined to a particular area of the
side of the vehicle, the ORC may
deploy the SABIC air bags, depending
on the severity and type of collision. In
these events, the ORC will deploy the
SABIC only on the impact side of the
vehicle. A quantity of non-toxic gas is
generated to inflate the side curtain
air bag.
The inflating side curtain air bag
pushes the head/s of the occupant/s
seating in the outside seats from the
edge of the headliner out of the way
and covers the window. The air bag
inflates with enough force to possibly injure you if you are not belted and
seated properly, or if items are
positioned in the area where the side
curtain air bag inflates. This especially
applies to children.
The SABICs may also help reduce the
risk of partial or complete ejection of
vehicle occupants through side
windows in certain rollover events
(because equipped with rollover
sensing).
Front and Side Impact Sensors
In front and side impacts, impact
sensors can aid the ORC in
determining appropriate response to
impact events.
Enhanced Accident Response System
In the event of an impact causing air
bag deployment, if the
communication network and the
power remains intact, depending on
the nature of the accident, the ORC
will determine whether the enhanced
accident response system will have to
perform the following functions:
• cut off fuel to the engine;
• turn hazard lights and interior lights
on as long as the battery has power
or until the ignition switch is turned
off;
• unlock the doors automatically;Before Starting
2
69
Page 78 of 384

NOTE:
For additional information, refer to
"http://www.safercar.gov/parents/
index.htm"
www.safercar.gov/parents/index.htm
or call 1-888-327-4236.
Canadian residents should refer to
Transport Canada’s website for
additional information:
http://www.tc.gc.ca/eng/motorvehicle
safety/safedrivers-childsafety-index-
53.htm
WARNING!
• Improper installation can lead to
failure of an infant or child restraint.
It could come loose in a collision. The
child could be badly injured or killed.
Follow the restraint manufacturer’s
directions exactly when installing an
infant or child restraint.
• A rearward-facing child restraint
should only be used in a rear seat. A
rearward-facing child restraint in the
front seat may be struck by a
deploying passenger air bag, which
may cause severe or fatal injury to
the infant. Here are some tips on getting
the most out of your child
restraint • Before buying any restraint system,
make sure that it has a label
certifying that it meets all applicable
Safety Standards. Maserati also
recommends that you make sure that
you can install the child restraint in
the vehicle where you will use it
before you buy it.
• The restraint system must be
appropriate for your child’s weight
and height.
• Check the label on the restraint
system for weight and height limits.
• Carefully follow the instructions that
come with the restraint system.
• If installed improperly, it may not
work when needed.
• Fit the child into the seat according
to the child restraint manufacturer’s
directions.
WARNING!
When your child restraint system is
not in use, secure it in the vehicle with
the seat belt or remove it from the
vehicle. Do not leave it loose in the
vehicle. In a sudden stop or accident, it could strike the occupants or
seatbacks and cause serious personal
injury.
Installing Child Restraint
Systems using the Vehicle Seat
Belt equipped with ALR Child restraint systems are designed to
be secured in vehicle seats by lap belts
or the lap belt portion of a
lap/shoulder belt.
All the passenger seat belts are
equipped with an Automatic Locking
Retractor (ALR) to secure child
protection through a Child Restraint
System (CRS). These types of seat belts
are designed to keep the lap portion
of the seat belt tight around the child
restraint seat avoiding to use a locking
clip.
The ALR will make a ratcheting noise if
the entire belt is pulled out of the
retractor in order to enable the belt to
retract subsequently. For additional
information on ALR, see “Using Seat
Belt in Automatic Locking Retractor
(ALR) Mode” in “Occupants Restraint
Systems” in this section.
To install a Child Restraint System with
ALR, pull enough of the belt out of the
retractor leading it through the belt
path of the protection device. Slide theBefore Starting
2
74
Page 79 of 384

latch into the buckle until it clicks,
then remove the entire safety belt
from the retractor in order to
rewound. While rewinding a click will
indicate the safety belt is now in
Automatic Locking mode.
Exert then a traction on the exceeded
lap section of the belt in order to
tighten it around the child restraint
seat. All seat belts will loosen over
time, it is therefore necessary to check
them periodically and set them
properly.
Lower Anchors and Tether for
Children (LATCH) Your vehicle's rear outboard seats are
all equipped with the child restraint
anchorage system called LATCH.
The LATCH system allows the child
restraint systems to be fixed without
using the vehicle's seat belts, instead
fixing the child restraint system to the
vehicle structure, using lower
anchorages A and upper tether strap
B . LATCH-Compatible child restraint
systems are now available. You should
never install LATCH child seats so that
two seats share a common lower
anchorage.
If your child restraints are not
LATCH-Compatible, install the
restraints using the vehicle's seat belts. Installing a LATCH- Compatible Child
Restraint System
The lower LATCH anchorages are
“U-shaped” metal rings located on the
rear seat where the cushion meets the
seatback just below the symbol shown
in the picture, but are not visible. You
will find them if you run your finger
along the intersection of the seatback
and seat cushion surfaces.
In addition, there are tether strap
anchorages behind each rear seat.
NOTE:
The top tether strap anchorage
behind the central rear seat should be
used to secure a child restraint system
with the vehicle's seat belts.Before Starting
2
75
Page 99 of 384

Components between the Rear
Seats
1 Armrest cupholder covers
unlock button (some versions
can have the cupholder visible,
without access cover).
2 Armrest compartment unlock
button with power outlet and
USB port (optional). Rear Dome Console
Components
1 Reading lights control button.
2 Central light control button.
3 Reading light LED.
4 Central light LEDs. Rear Doors Components
1 Internal rear door handle.
2 Grip.
3 Loudspeaker.
4 Door storage pockets.
5 Power window switch.
6 Power doors lock/unlock
buttons.
7 “Child protection” door lock
system.
8 Inside door lock/unlock knob.
9 Reflex reflector.
10 External door handle.Understanding the Vehicle
3
95
Page 135 of 384
Removable Ashtray and Lighter
(optional) The removable ashtray with cover for
front seats passengers can be inserted
inside the front cupholder.
The rear seat passengers can use the
removable ashtray by inserting it into
the rear door pocket.
Cigarette Lighter Use
Pressing the central button activates
the cigarette lighter. After about 20
seconds the button returns
automatically to the initial position
and stops the heating: now the
cigarette lighter is ready for use.
CAUTION!
After use, always make sure that the
cigarette lighter is switched off.
WARNING!
• The cigarette lighter reaches high
temperatures. Handle it carefully
and do not allow children to use it.
• The cigarette lighter may not be
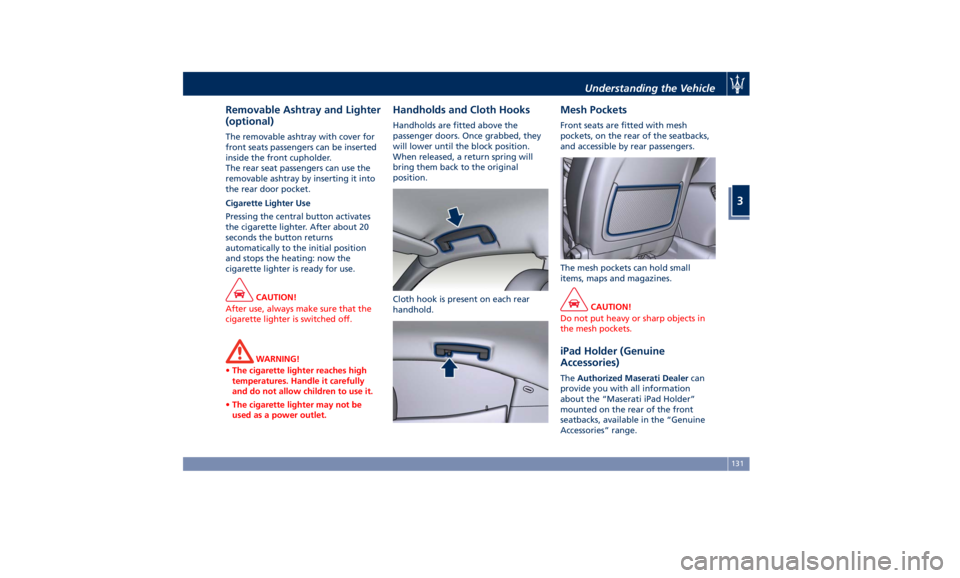
used as a power outlet. Handholds and Cloth Hooks Handholds are fitted above the
passenger doors. Once grabbed, they
will lower until the block position.
When released, a return spring will
bring them back to the original
position.
Cloth hook is present on each rear
handhold. Mesh Pockets Front seats are fitted with mesh
pockets, on the rear of the seatbacks,
and accessible by rear passengers.
The mesh pockets can hold small
items, maps and magazines.
CAUTION!
Do not put heavy or sharp objects in
the mesh pockets.
iPad Holder (Genuine
Accessories) The Authorized Maserati Dealer can
provide you with all information
about the “Maserati iPad Holder”
mounted on the rear of the front
seatbacks, available in the “Genuine
Accessories” range.Understanding the Vehicle
3
131