2019 LINCOLN CONTINENTAL hood open
[x] Cancel search: hood openPage 7 of 627

Cruise Control
Principle of Operation
................................234
Using Adaptive Cruise Control ................
234
Driving Aids
Driver Alert ....................................................
243
Lane Keeping System ................................
244
Blind Spot Information System ................
250
Cross Traffic Alert ........................................
252
Steering .........................................................
256
Pre-Collision Assist .....................................
257
Drive Control .................................................
261
Load Carrying
Load Limit ......................................................
263
Towing
Towing a Trailer ...........................................
268
Recommended Towing Weights .............
269
Essential Towing Checks ..........................
270
Towing the Vehicle on Four Wheels ......
272Driving Hints
Breaking-In
....................................................
273
Economical Driving .....................................
273
Driving Through Water ...............................
273
Floor Mats ......................................................
274
Roadside Emergencies
Roadside Assistance ..................................
276
Hazard Flashers ...........................................
277
Fuel Shutoff ...................................................
277
Jump Starting the Vehicle .........................
278
Post-Crash Alert System ............................
281
Transporting the Vehicle ...........................
282
Customer Assistance
Getting the Services You Need ...............
283
In California (U.S. Only) ..............................
284
The Better Business Bureau (BBB) Auto Line Program (U.S. Only) .......................
285
Utilizing the Mediation/Arbitration Program (Canada Only) ..........................................
286
Getting Assistance Outside the U.S. and Canada ......................................................
287Ordering Additional Owner's Literature
......................................................................
289
Reporting Safety Defects (U.S. Only) ......
290
Reporting Safety Defects (Canada Only) ......................................................................
290
Fuses
Fuse Specification Chart ...........................
292
Changing a Fuse .........................................
307
Maintenance
General Information ....................................
310
Opening and Closing the Hood ...............
310
Under Hood Overview - 2.7L/3.0L ...........
312
Under Hood Overview - 3.7L .....................
314
Engine Oil Dipstick - 2.7L/3.0L ..................
316
Engine Oil Dipstick - 3.7L ...........................
316
Engine Oil Check .........................................
316
Oil Change Indicator Reset ........................
317
Engine Coolant Check ................................
318
Automatic Transmission Fluid Check ......
323
Brake Fluid Check .......................................
323
Power Steering Fluid Check .....................
324
4
Continental (CPL) Canada/United States of America, enUSA, Edition date: 201807, Second-Printing Table of Contents
Page 69 of 627

5. Reinstall the battery cover and the key
blade.
Car Finder Press the button twice within three
seconds. A tone sounds and the
direction indicators will flash. We
recommend you use this method to locate
your vehicle, rather than using the panic
alarm.
Sounding the Panic Alarm
Note: The panic alarm only operates when
the ignition is off. Press the button to sound the
panic alarm. Press the button
again or switch the ignition on to
turn it off. Remote Start WARNING: To avoid exhaust fumes,
do not use remote start if your vehicle is
parked indoors or in areas that are not well
ventilated.
Note: Do not use remote start if your fuel
level is low. The remote start button is on the
transmitter.
This feature allows you to start your vehicle
from the outside. The transmitter has an
extended operating range.
You can configure your automatic climate
control to operate when you remote start
your vehicle.
See Climate Control (page
143).
Many states and provinces have restrictions
for the use of remote start. Check your local
and state or provincial laws for specific
requirements regarding remote start
systems. The remote start system does not work if any
of the following occur:
•
The ignition is on.
• The anti-theft alarm triggers.
• You switch the feature off in the
information display.
• The hood is open.
• The transmission is not in park (P).
• The battery voltage is below the
minimum operating voltage.
Remote Control Feedback (If Equipped)
An LED on the remote control provides status
feedback of remote start or stop commands. Status
LED
Remote startsuccessful
Solid green
Remote stopsuccessful
Solid red
Request failed or
status not received
Blinking red
Status incomplete
Blinking green
66
Continental (CPL) Canada/United States of America, enUSA, Edition date: 201807, Second-Printing Keys and Remote ControlsE138623 E138624 E138625
Page 73 of 627

At the Luggage Compartment
Press the exterior release button. Remote Control
You can use the remote control at any time.
When you press the lock button on the
remote control, all exterior door handle
switches do not release the doors. When you
press the unlock button, all exterior door
handle switches release the doors.
Unlocking the Doors
Press the button. The direction
indicators flash. You can then use
the exterior door handle switch to
unlock the door.
Press and hold both the lock and unlock
buttons on the remote control for three
seconds to change between driver door or
all doors unlock mode. The direction
indicators flash twice to confirm the change.
Driver door mode only unlocks the driver
door when you press the unlock button
once. All door mode unlocks all doors when you press the unlock button once. The
unlocking mode applies to the remote
control, keyless entry keypad and intelligent
access. You can also change between the
unlocking modes using the information
display. See General Information (page 112).
Locking the Doors Press the button. The direction
indicators flash. You can no longer
use the exterior door handle switch
to release the door.
Press the button again within three seconds
to confirm that all the doors are closed. A
tone sounds and the direction indicators
flash if all the doors and the luggage
compartment are closed.
Mislock
If any door is open, or if the luggage
compartment or hood is open, a tone sounds
and the direction indicators do not flash. The
exterior lock status display also flashes if any
door does not lock. You can switch this
feature on or off in the information display.
See
General Information (page 112).
70
Continental (CPL) Canada/United States of America, enUSA, Edition date: 201807, Second-Printing Doors and LocksE222426 E138629 E138623
Page 88 of 627

ANTI-THEFT ALARM
The system will warn you of an unauthorized
entry to your vehicle. It will be triggered if
any door, the luggage compartment or the
hood is opened without using the key,
remote control or keyless entry keypad.
The direction indicators will flash and the
horn will sound if unauthorized entry is
attempted while the alarm is armed.
Take all remote controls to an authorized
dealer if there is any potential alarm problem
with your vehicle.
Arming the Alarm
The alarm is ready to arm when there is not
a key in your vehicle. Electronically lock your
vehicle to arm the alarm.
Disarming the Alarm
Disarm the alarm by any of the following
actions:
•
Unlock the doors or luggage
compartment with the remote control or
keyless entry keypad.
• Switch your vehicle on or start your
vehicle.
• Use a key in the driver door to unlock
your vehicle, then switch your vehicle on
within 12 seconds.
Note: Pressing the panic button on the
remote control will stop the horn and signal
indicators, but will not disarm the system.
85
Continental (CPL) Canada/United States of America, enUSA, Edition date: 201807, Second-Printing Security
Page 129 of 627

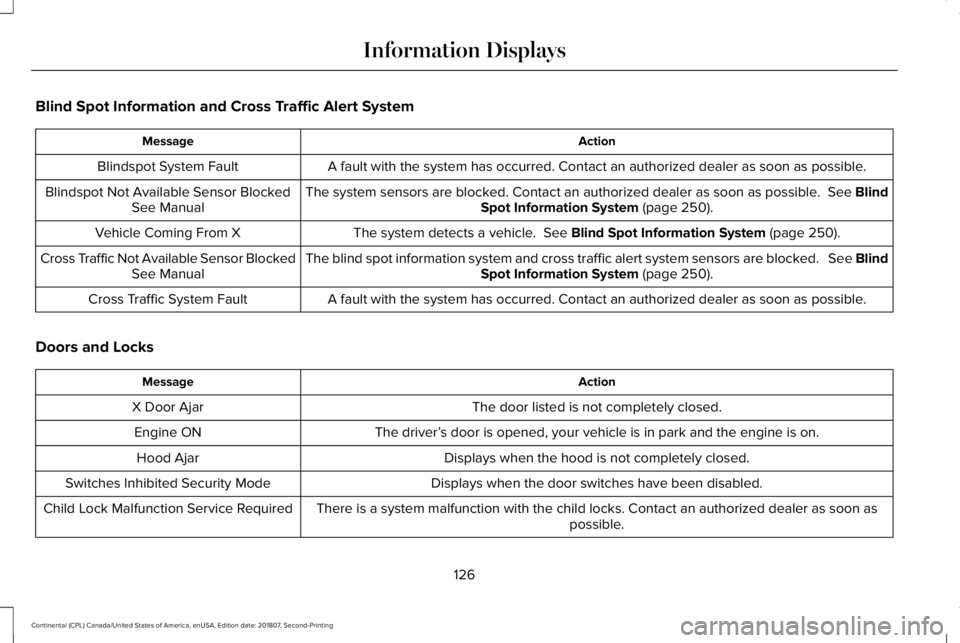
Blind Spot Information and Cross Traffic Alert System
Action
Message
A fault with the system has occurred. Contact an authorized dealer as so\
on as possible.
Blindspot System Fault
The system sensors are blocked. Contact an authorized dealer as soon as possible. See Blind
Spot Information System (page 250).
Blindspot Not Available Sensor Blocked
See Manual
The system detects a vehicle.
See Blind Spot Information System (page 250).
Vehicle Coming From X
The blind spot information system and cross traffic alert system sensors\
are blocked. See BlindSpot Information System
(page 250).
Cross Traffic Not Available Sensor Blocked
See Manual
A fault with the system has occurred. Contact an authorized dealer as so\
on as possible.
Cross Traffic System Fault
Doors and Locks Action
Message
The door listed is not completely closed.
X Door Ajar
The driver’s door is opened, your vehicle is in park and the engine is on.
Engine ON
Displays when the hood is not completely closed.
Hood Ajar
Displays when the door switches have been disabled.
Switches Inhibited Security Mode
There is a system malfunction with the child locks. Contact an authorize\
d dealer as soon as possible.
Child Lock Malfunction Service Required
126
Continental (CPL) Canada/United States of America, enUSA, Edition date: 201807, Second-Printing Information Displays
Page 313 of 627

GENERAL INFORMATION
Have your vehicle serviced regularly to help
maintain its roadworthiness and resale value.
There is a large network of authorized
dealers that are there to help you with their
professional servicing expertise. We believe
that their specially trained technicians are
best qualified to service your vehicle properly
and expertly. They are supported by a wide
range of highly specialized tools developed
specifically for servicing your vehicle.
If your vehicle requires professional service,
an authorized dealer can provide the
necessary parts and service. Check your
warranty information to find out which parts
and services are covered.
Use only recommended fuels, lubricants,
fluids and service parts conforming to
specifications. Motorcraft® parts are
designed and built to provide the best
performance in your vehicle.
Precautions
•
Do not work on a hot engine.
• Make sure that nothing gets caught in
moving parts.
• Do not work on a vehicle with the engine
running in an enclosed space, unless you
are sure you have enough ventilation.
• Keep all open flames and other burning
material (such as cigarettes) away from
the battery and all fuel related parts.
Working with the Engine Off
1. Set the parking brake and shift the transmission to park (P).
2. Switch off the engine.
3. Block the wheels.
Working with the Engine On WARNING: To reduce the risk of
vehicle damage and personal burn injuries,
do not start your engine with the air
cleaner removed and do not remove it
while the engine is running. 1. Set the parking brake and shift the
transmission to park (P).
2. Block the wheels.
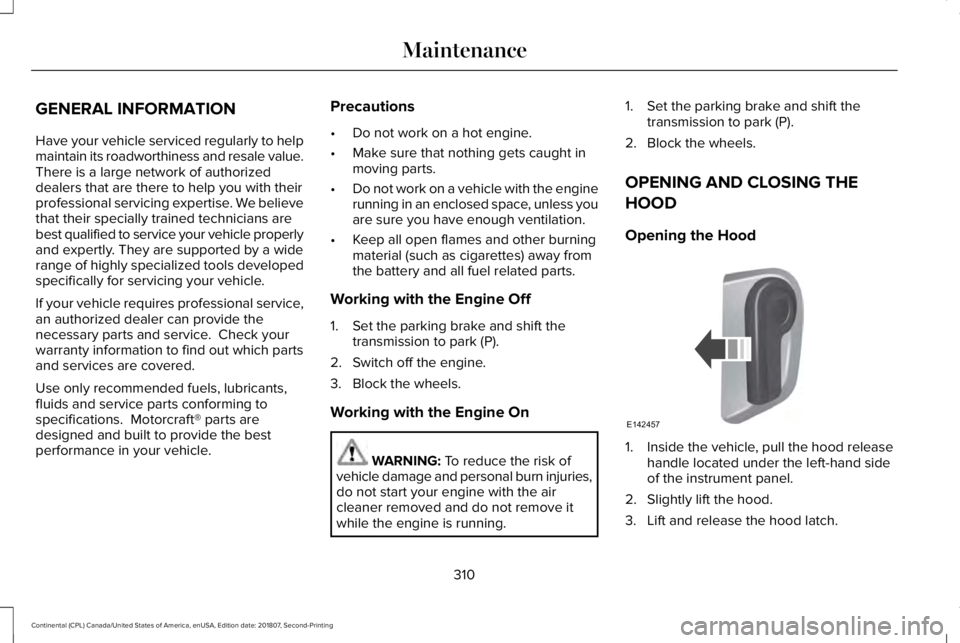
OPENING AND CLOSING THE
HOOD
Opening the Hood 1. Inside the vehicle, pull the hood release
handle located under the left-hand side
of the instrument panel.
2. Slightly lift the hood.
3. Lift and release the hood latch.
310
Continental (CPL) Canada/United States of America, enUSA, Edition date: 201807, Second-Printing MaintenanceE142457
Page 314 of 627

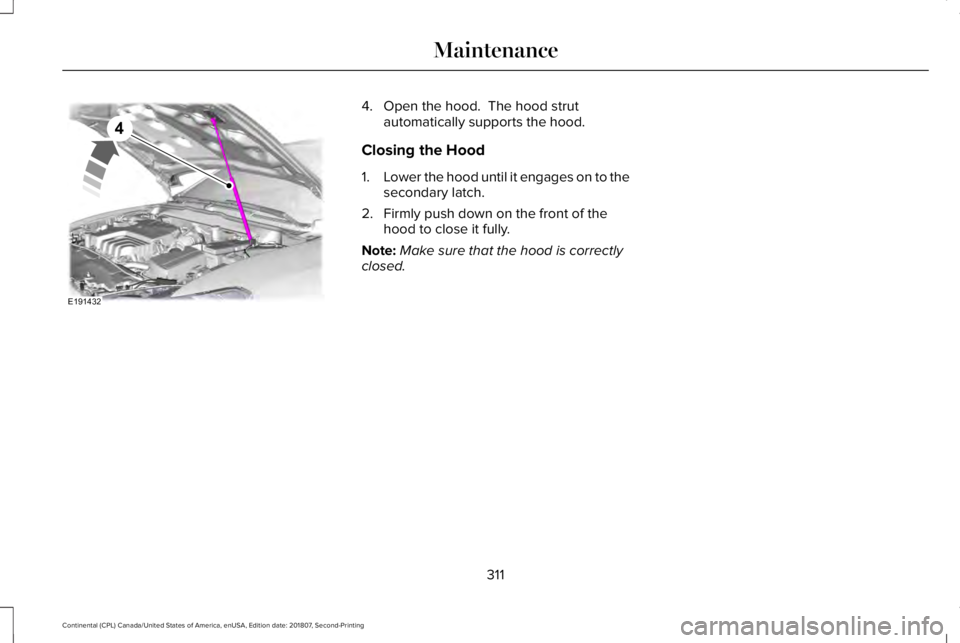
4. Open the hood. The hood strut
automatically supports the hood.
Closing the Hood
1. Lower the hood until it engages on to the
secondary latch.
2. Firmly push down on the front of the hood to close it fully.
Note: Make sure that the hood is correctly
closed.
311
Continental (CPL) Canada/United States of America, enUSA, Edition date: 201807, Second-Printing MaintenanceE191432
4
Page 319 of 627

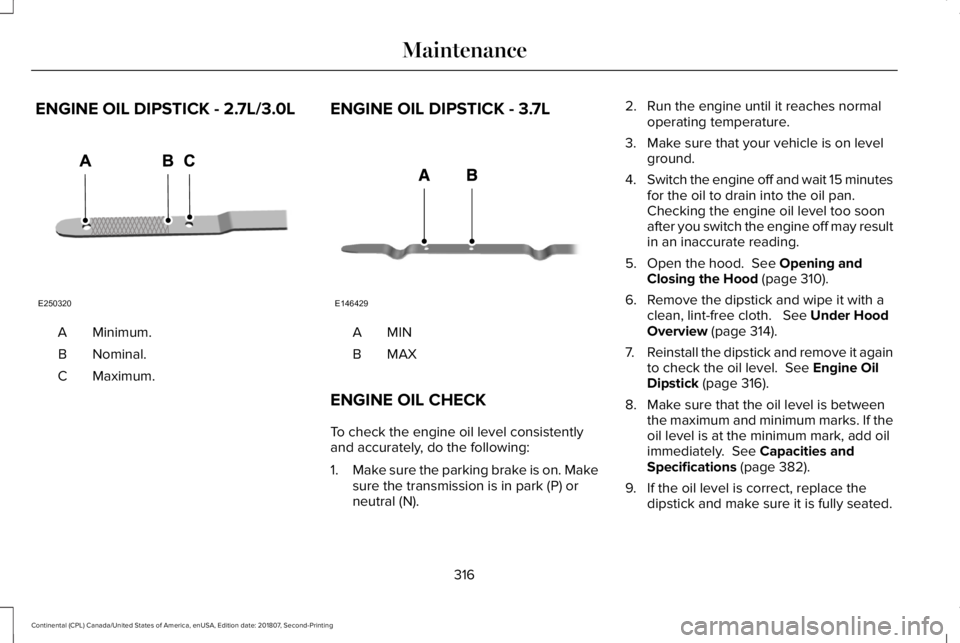
ENGINE OIL DIPSTICK - 2.7L/3.0L
Minimum.
A
Nominal.
B
Maximum.
C ENGINE OIL DIPSTICK - 3.7L MINA
MAXB
ENGINE OIL CHECK
To check the engine oil level consistently
and accurately, do the following:
1. Make sure the parking brake is on. Make
sure the transmission is in park (P) or
neutral (N). 2. Run the engine until it reaches normal
operating temperature.
3. Make sure that your vehicle is on level ground.
4. Switch the engine off and wait 15 minutes
for the oil to drain into the oil pan.
Checking the engine oil level too soon
after you switch the engine off may result
in an inaccurate reading.
5. Open the hood. See Opening and
Closing the Hood (page 310).
6. Remove the dipstick and wipe it with a clean, lint-free cloth.
See Under Hood
Overview (page 314).
7. Reinstall the dipstick and remove it again
to check the oil level.
See Engine Oil
Dipstick (page 316).
8. Make sure that the oil level is between the maximum and minimum marks. If the
oil level is at the minimum mark, add oil
immediately.
See Capacities and
Specifications (page 382).
9. If the oil level is correct, replace the dipstick and make sure it is fully seated.
316
Continental (CPL) Canada/United States of America, enUSA, Edition date: 201807, Second-Printing MaintenanceE250320 E146429