2019 LINCOLN CONTINENTAL steering wheel
[x] Cancel search: steering wheelPage 264 of 627
Note:
If something hits the front end of your
vehicle or damage occurs, the radar sensing
zone may change. This could cause missed
or false vehicle detections. Contact an
authorized dealer to have the radar checked
for proper coverage and operation.
Note: If your vehicle detects excessive heat
at the camera or a potential misalignment
condition, a message may display in the
information display indicating temporary
sensor unavailability. This message
deactivates automatically when operational
conditions are correct. For example, when
the ambient temperature around the sensor
decreases or the sensor automatically
recalibrates.
DRIVE CONTROL (IF EQUIPPED)
Lincoln Drive Control
The system delivers a driving experience
through a suite of sophisticated electronic
vehicle systems. These systems continuously
monitor your driving inputs and the road
conditions to optimize ride comfort, steering,
handling, powertrain response and sound. You can preset your preferences for these
systems within the information display. The
system responds to your preferences based
on what gear position you select. This
provides a single location to control multiple
systems performance settings.
Lincoln Drive Control consists of the
following systems:
•
Adaptive suspension dynamically adjusts
the shock absorbers stiffness in real time
to match the road surface and driver
inputs. This system continuously monitors
your vehicle ’s motion (roll, pitch, bounce),
suspension position, load, speed, road
conditions, and steering to adjust the
suspension damping for optimal vehicle
control.
• Electronically power-assisted steering
adjusts steering effort and feel based on
your vehicle speed and your inputs.
• Adaptive steering optimizes your
vehicle's steering response based on
your steering wheel input, changes in
vehicle speed and other conditions. •
Active noise control utilizes your vehicle
electronics to enhance the acoustic
experience.
• Electronic stability control and traction
control maintain your vehicle control in
adverse conditions or high performance
driving.
• Electronic throttle control enhances the
powertrain response to your inputs.
Using Lincoln Drive Control
You can configure which of the Drive Control
modes are active when your vehicle is in
drive (D) or in sport (S). The configuration
remains active until modified from the main
menu on the information display.
261
Continental (CPL) Canada/United States of America, enUSA, Edition date: 201807, Second-Printing Driving Aids
Page 274 of 627

Trailer lamps are required on most towed
vehicles. Make sure all running lights, brake
lights, turn signals and hazard lights are
working.
Before Towing a Trailer
Practice turning, stopping and backing up to
get the feel of your vehicle-trailer
combination before starting on a trip. When
turning, make wider turns so the trailer
wheels clear curbs and other obstacles.
When Towing a Trailer
•
Do not drive faster than 70 mph
(113 km/h) during the first 500 mi
(800 km).
• Do not make full-throttle starts.
• Check your hitch, electrical connections
and trailer wheel lug nuts thoroughly after
you have traveled
50 mi (80 km).
• When stopped in congested or heavy
traffic during hot weather, place the
transmission in park (P) to aid engine and
transmission cooling and to help A/C
performance. •
Turn off the speed control with heavy
loads or in hilly terrain. The speed control
may turn off automatically when you are
towing on long, steep grades.
• Shift to a lower gear when driving down
a long or steep hill. Do not apply the
brakes continuously, as they may
overheat and become less effective.
• If your transmission is equipped with a
Grade Assist or Tow/Haul feature, use
this feature when towing. This provides
engine braking and helps eliminate
excessive transmission shifting for
optimum fuel economy and transmission
cooling.
• Allow more distance for stopping with a
trailer attached. Anticipate stops and
brake gradually.
• Avoid parking on a grade. However, if
you must park on a grade:
1. Turn the steering wheel to point your vehicle tires away from traffic flow.
2. Set your vehicle parking brake.
3. Place the transmission in park (P). 4. Place wheel chocks in front and back of
the trailer wheels. Chocks are not
included with your vehicle.
Launching or Retrieving a Boat or
Personal Watercraft (PWC)
Note: Disconnect the wiring to the trailer
before
backing the trailer into the water.
Note: Reconnect the wiring to the trailer
after
removing the trailer from the water.
When backing down a ramp during boat
launching or retrieval:
• Do not allow the static water level to rise
above the bottom edge of the rear
bumper.
• Do not allow waves to break higher than
6 in (15 cm)
above the bottom edge of
the rear bumper.
Exceeding these limits may allow water to
enter vehicle components:
• Causing internal damage to the
components.
• Affecting driveability, emissions, and
reliability.
271
Continental (CPL) Canada/United States of America, enUSA, Edition date: 201807, Second-Printing Towing
Page 275 of 627
Replace the rear axle lubricant anytime you
submerge the rear axle in water. Water may
contaminate the rear axle lubricant, which is
not a normal maintenance inspection item
unless there is a possibility of a leak or other
axle repair is required.
TOWING THE VEHICLE ON FOUR
WHEELS
Emergency Towing
WARNING: If your vehicle has a
steering wheel lock make sure the ignition
is in the accessory or on position when
being towed. If your vehicle becomes inoperable (without
access to wheel dollies, car-hauling trailer,
or flatbed transport vehicle), it can be
flat-towed (all wheels on the ground,
regardless of the powertrain and
transmission configuration) under the
following conditions:
•
Your vehicle is facing forward for towing
in a forward direction.
• Place the transmission in position
N. If
you cannot move the transmission into
N
, you must override it and enable stay
in neutral mode. Failing to do so may
result in damage to the transmission. See
Transmission
(page 191).
• Maximum speed is 35 mph (56 km/h).
• Maximum distance is 50 miles (80
kilometers).
Recreational Towing
Note: Put your climate control system in
recirculated air mode to prevent exhaust
fumes from entering the vehicle.
See
Climate Control (page 143). Follow these guidelines if you have a need
for recreational (RV) towing. An example of
recreational towing would be towing your
vehicle behind a motorhome. We designed
these guidelines to prevent damage to your
transmission.
Front-wheel Drive Vehicles
Front-wheel drive vehicles
CANNOT be
flat-towed (all wheels on the ground) as
vehicle or transmission damage may occur.
It is recommended to tow your vehicle with
the front wheels off the ground by using a
tow dolly. If you are using a tow dolly, follow
the instructions specified by the equipment
provider.
All-wheel Drive Vehicles
All-wheel drive vehicles
CANNOT be
flat-towed (all wheels on the ground) as
vehicle or transmission damage may occur.
It is recommended to tow your vehicle with
all four (4) wheels off the ground such as
when using a car-hauling trailer. Otherwise,
you cannot recreational tow your vehicle.
272
Continental (CPL) Canada/United States of America, enUSA, Edition date: 201807, Second-Printing Towing
Page 277 of 627
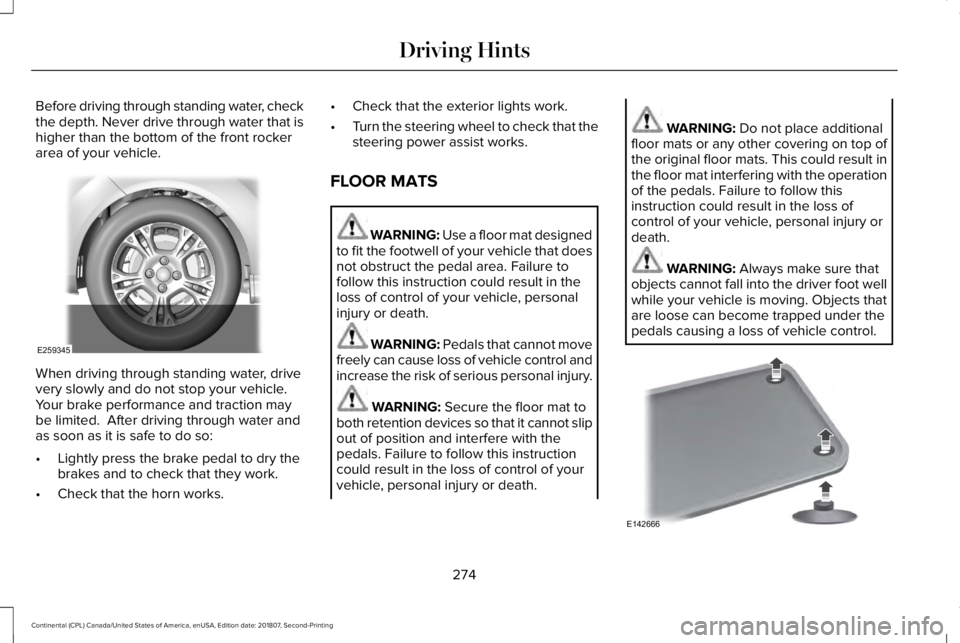
Before driving through standing water, check
the depth. Never drive through water that is
higher than the bottom of the front rocker
area of your vehicle.
When driving through standing water, drive
very slowly and do not stop your vehicle.
Your brake performance and traction may
be limited. After driving through water and
as soon as it is safe to do so:
•
Lightly press the brake pedal to dry the
brakes and to check that they work.
• Check that the horn works. •
Check that the exterior lights work.
• Turn the steering wheel to check that the
steering power assist works.
FLOOR MATS WARNING: Use a floor mat designed
to fit the footwell of your vehicle that does
not obstruct the pedal area. Failure to
follow this instruction could result in the
loss of control of your vehicle, personal
injury or death. WARNING: Pedals that cannot move
freely can cause loss of vehicle control and
increase the risk of serious personal injury. WARNING:
Secure the floor mat to
both retention devices so that it cannot slip
out of position and interfere with the
pedals. Failure to follow this instruction
could result in the loss of control of your
vehicle, personal injury or death. WARNING:
Do not place additional
floor mats or any other covering on top of
the original floor mats. This could result in
the floor mat interfering with the operation
of the pedals. Failure to follow this
instruction could result in the loss of
control of your vehicle, personal injury or
death. WARNING:
Always make sure that
objects cannot fall into the driver foot well
while your vehicle is moving. Objects that
are loose can become trapped under the
pedals causing a loss of vehicle control. 274
Continental (CPL) Canada/United States of America, enUSA, Edition date: 201807, Second-Printing Driving HintsE259345 E142666
Page 309 of 627
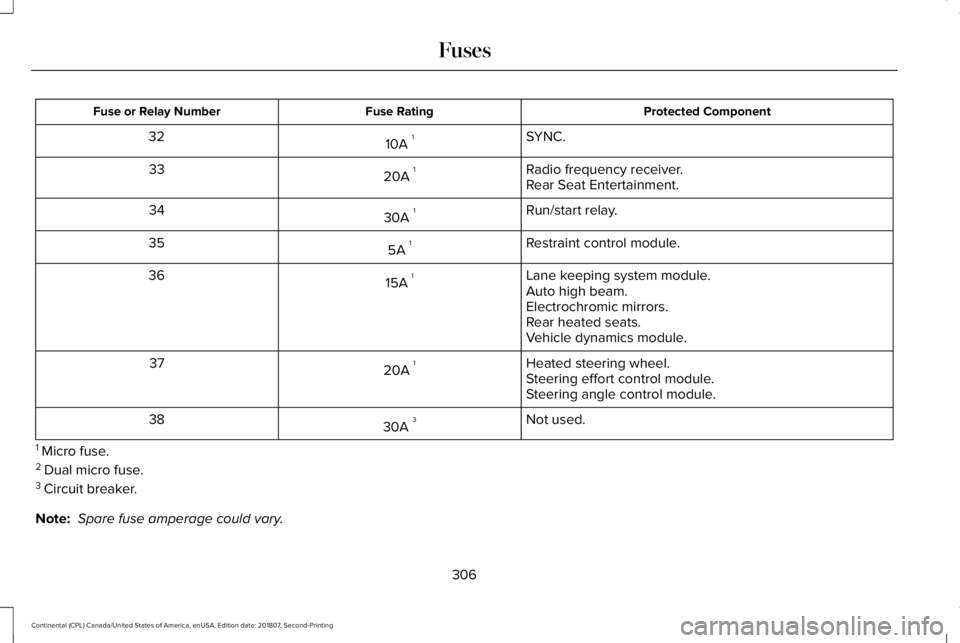
Protected Component
Fuse Rating
Fuse or Relay Number
SYNC.
10A 1
32
Radio frequency receiver.
20A 1
33
Rear Seat Entertainment.
Run/start relay.
30A 1
34
Restraint control module.
5A 1
35
Lane keeping system module.
15A 1
36
Auto high beam.
Electrochromic mirrors.
Rear heated seats.
Vehicle dynamics module.
Heated steering wheel.
20A 1
37
Steering effort control module.
Steering angle control module.
Not used.
30A 3
38
1 Micro fuse.
2 Dual micro fuse.
3 Circuit breaker.
Note: Spare fuse amperage could vary.
306
Continental (CPL) Canada/United States of America, enUSA, Edition date: 201807, Second-Printing Fuses
Page 320 of 627

Note:
Do not remove the dipstick when the
engine is running.
Note: If the oil level is between the
maximum and minimum marks, the oil level
is acceptable. Do not add oil.
Note: The oil consumption of new engines
reaches its normal level after approximately
3,000 mi (5,000 km).
Adding Engine Oil WARNING:
Do not remove the filler
cap when the engine is running.
Do not use supplemental engine oil additives
because they are unnecessary and could
lead to engine damage that may not be
covered by the vehicle Warranty. Only use oils certified for gasoline engines
by the American Petroleum Institute (API).
An oil with this trademark symbol conforms
to the current engine and emission system
protection standards and fuel economy
requirements of the International Lubricants
Specification Advisory Committee (ILSAC).
To top up the engine oil level do the
following:
1. Clean the area surrounding the engine
oil filler cap before you remove it.
2. Remove the engine oil filler cap.
See
Under Hood Overview (page 314). Turn
it counterclockwise and remove it. 3. Add engine oil that meets our
specifications.
See Capacities and
Specifications (page 382). You may have
to use a funnel to pour the engine oil into
the opening.
4. Recheck the oil level.
5. If the oil level is correct, replace the dipstick and make sure it is fully seated.
6. Replace the engine oil filler cap. Turn it clockwise until you feel a strong
resistance.
Note: Do not add oil further than the
maximum mark. Oil levels above the
maximum mark may cause engine damage.
Note: Make sure you install the oil filler cap
correctly.
Note: Soak up any spillage with an
absorbent cloth immediately.
OIL CHANGE INDICATOR RESET
Use the information display controls on the
steering wheel to reset the oil change
indicator.
317
Continental (CPL) Canada/United States of America, enUSA, Edition date: 201807, Second-Printing MaintenanceE142732
Page 341 of 627
CLEANING THE INSTRUMENT
PANEL AND INSTRUMENT
CLUSTER LENS
WARNING: Do not use chemical
solvents or strong detergents when
cleaning the steering wheel or instrument
panel to avoid contamination of the airbag
system.
Note: Follow the same procedure as
cleaning leather seats for cleaning leather
instrument panels and leather interior trim
surfaces. See Cleaning Leather Seats
(page
338).
Clean the instrument panel and cluster lens
with a clean, damp and soft cloth, then use
a clean, dry and soft cloth to dry these areas. •
Avoid cleaners or polishes that increase
the gloss of the upper portion of the
instrument panel. The dull finish in this
area helps protect you from undesirable
windshield reflection.
• Do not use any household cleaning
products or glass cleaners as these may
damage the finish of the instrument
panel, interior trim and cluster lens.
• Wash or wipe your hands clean if you
have been in contact with certain
products such as insect repellent and
suntan lotion to avoid possible damage
to the interior painted surfaces.
• Do not allow air fresheners and hand
sanitizers to spill onto interior surfaces.
If a spill occurs, wipe off immediately.
Your warranty may not cover these
damages.
If a staining liquid like coffee or juice has
been spilled on the instrument panel or on
interior trim surfaces:
1. Wipe up spilled liquid using a clean, soft
cloth as quickly as possible. 2. Use Motorcraft Premium Leather and
Vinyl Cleaner or a commercially available
leather cleaning product for automotive
interiors. Test any cleaner or stain
remover on an inconspicuous area.
3. Alternatively, wipe the surface with a clean, soft cloth and a mild soap and
water solution. Dry the area with a clean,
soft cloth.
4. If necessary, apply more soap and water
solution or cleaning product to a clean,
soft cloth and press it onto the soiled
area. Allow this to set at room
temperature for 30 minutes.
5. Remove the soaked cloth, then with a clean, damp cloth, use a rubbing motion
for 60 seconds on the soiled area.
6. Dry the area with a clean, soft cloth.
CLEANING LEATHER SEATS
Note: Follow the same procedure as
cleaning leather seats for cleaning leather
instrument panels and leather interior trim
surfaces.
338
Continental (CPL) Canada/United States of America, enUSA, Edition date: 201807, Second-Printing Vehicle Care
Page 359 of 627

Front-wheel drive and all-wheel drive
vehicles (front tires on the left side of
the diagram)
Sometimes irregular tire wear can be
corrected by rotating the tires.
USING SUMMER TIRES
Summer tires provide superior performance
on wet and dry roads. Summer tires do not
have the Mud and Snow (M+S or M/S) tire
traction rating on the tire side wall. Since
summer tires do not have the same traction
performance as All-season or Snow tires, we
do not recommend using summer tires when temperatures drop to approximately 45°F
(7°C) or below (depending on tire wear and
environmental conditions) or in snow and ice
conditions. Like any tire, summer tire
performance is affected by tire wear and
environmental conditions. If you must drive
in those conditions, we recommend using
Mud and Snow (M+S, M/S), All-season or
Snow tires.
Always store your summer tires indoors at
temperatures above
19°F (-7°C). The rubber
compounds used in these tires lose flexibility
and may develop surface cracks in the tread
area at temperatures below
19°F (-7°C). If the
tires have been subjected to 19°F (-7°C) or
less, warm them in a heated space to at least
41°F (5°C)
for at least 24 hours before
installing them on a vehicle, or moving the
vehicle with the tires installed, or checking
tire inflation. Do not place tires near heaters
or heating devices used to warm the room
where the tires are stored. Do not apply heat
or blow heated air directly on the tires.
Always inspect the tires after storage periods
and before use. USING SNOW CHAINS WARNING:
Snow tires must be the
same size, load index, and speed rating as
those originally provided by Ford. Use of
any tire or wheel not recommended by
Ford can affect the safety and performance
of your vehicle, which could result in an
increased risk of loss of vehicle control,
vehicle rollover, personal injury, and death.
Additionally, the use of non-recommended
tires and wheels could cause steering,
suspension, axle, transfer case, or power
transfer unit failure. It is also strongly
advised to follow the Ford recommended
tire inflation pressure found on the Safety
Compliance Certification Label (affixed to
either the door hinge pillar, door-latch post,
or the door edge that meets the door-latch
post, next to the driver’ s seating position),
or Tire Label which is located on the
B-Pillar or the edge of the driver door.
Failure to follow the tire pressure
recommendations can cause uneven
treadwear patterns and adversely affect
the way your vehicle handles.
356
Continental (CPL) Canada/United States of America, enUSA, Edition date: 201807, Second-Printing Wheels and TiresE142547