Page 284 of 627

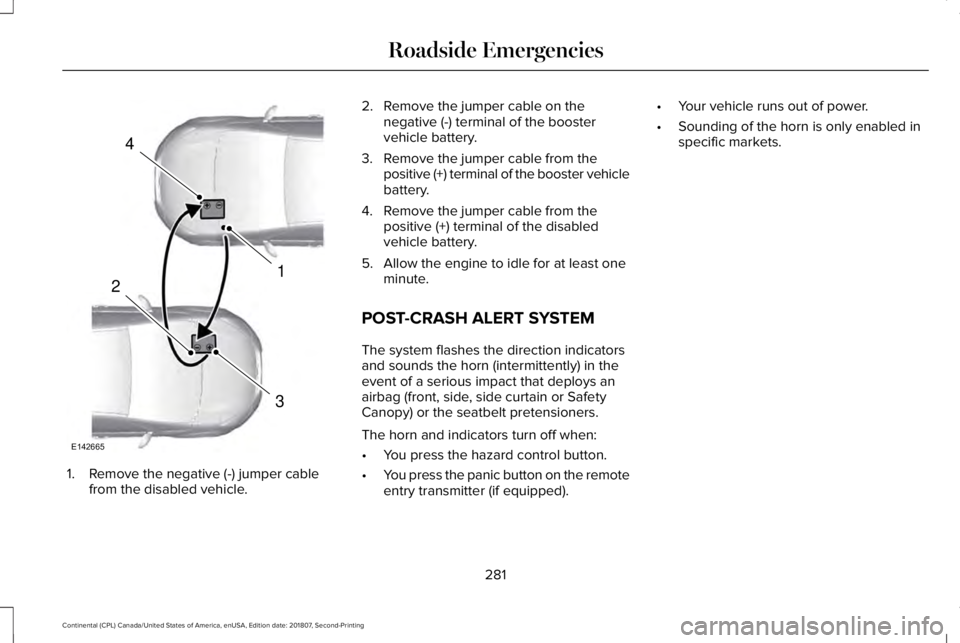
1. Remove the negative (-) jumper cable
from the disabled vehicle. 2. Remove the jumper cable on the
negative (-) terminal of the booster
vehicle battery.
3. Remove the jumper cable from the positive (+) terminal of the booster vehicle
battery.
4. Remove the jumper cable from the positive (+) terminal of the disabled
vehicle battery.
5. Allow the engine to idle for at least one minute.
POST-CRASH ALERT SYSTEM
The system flashes the direction indicators
and sounds the horn (intermittently) in the
event of a serious impact that deploys an
airbag (front, side, side curtain or Safety
Canopy) or the seatbelt pretensioners.
The horn and indicators turn off when:
• You press the hazard control button.
• You press the panic button on the remote
entry transmitter (if equipped). •
Your vehicle runs out of power.
• Sounding of the horn is only enabled in
specific markets.
281
Continental (CPL) Canada/United States of America, enUSA, Edition date: 201807, Second-Printing Roadside Emergencies4
1
3
2
E142665
Page 298 of 627
Protected Component
Fuse Rating
Fuse or Relay Number
Not used.
—
12
Rear seat recline.
40A 2
13
Powertrain control module relay.
—
14
Horn.
20A 1
15
A/C clutch.
10A 1
16
Not used.
—
17
Not used.
—
18
Heated rear window relay.
—
19
Electric cooling fan relay.
—
20
Electric cooling fan relay (3.0L engine).
—
21
Electric cooling fan (3.0L engine).
30A 2
22
Not used.
—
23
Not used.
—
24
Blower motor relay.
—
25
295
Continental (CPL) Canada/United States of America, enUSA, Edition date: 201807, Second-Printing Fuses
Page 300 of 627
Protected Component
Fuse Rating
Fuse or Relay Number
Rear seat recline relay.
—
37
A/C compressor clutch relay.
—
38
Horn relay.
—
39
Not used.
—
40
Not used.
—
41
Blower motor.
40A 2
42
Not used.
—
43
Body control module/voltage quality module
bus.
50A 3
44
Not used.
—
45
Electric cooling fan.
50A 3
46
Electric cooling fan.
50A 3
47
Body control module RP1 bus.
50A 3
48
Torque vectoring (3.0L engine).
40A 3
49
Body control module RP2 bus.
50A 3
50
297
Continental (CPL) Canada/United States of America, enUSA, Edition date: 201807, Second-Printing Fuses
Page 306 of 627
Protected Component
Fuse Rating
Fuse or Relay Number
Not used.
—
1
Driver seat switch.
7.5A 1
2
Passenger seat switch.
Driver unlock relay.
20A 1
3
Not used (spare).
5A 1
4
Subwoofer amplifier.
20A 1
5
Revel digital signal processing amplifier.
Not used.
—
6
Not used.
—
7
Security horn.
10A 1
8
Not used.
10A 1
9
Telematics module.
5A 2
10
Power decklid module.
Keypad.
5A 2
11
Outside lock switch.
Combined security sensor module.
303
Continental (CPL) Canada/United States of America, enUSA, Edition date: 201807, Second-Printing Fuses
Page 365 of 627

necessary. Check the air pressure in the road
tires. If any tire is under-inflated, carefully
drive the vehicle to the nearest location
where air can be added to the tires. Inflate
all the tires to the recommended inflation
pressure.
Tire Pressure Monitoring System Reset
Procedure
WARNING: To determine the
required pressure(s) for your vehicle, see
the Safety Compliance Certification Label
(on the door hinge pillar, door-latch post
or the door edge that meets the door-latch
post, next to the driver seat) or the Tire
Label on the B-Pillar or the edge of the
driver door.
Note: You need to perform the tire pressure
monitoring system reset procedure after
each tire rotation. To provide the vehicle's load carrying
capability, some vehicles require different
recommended tire pressures in the front tires
as compared to the rear tires. The tire
pressure monitoring system equipped on
these vehicles is designed to illuminate the
low tire pressure warning light at two
different pressures; one for the front tires
and one for the rear tires.
Since tires need to be rotated to provide
consistent performance and maximum tire
life, the tire pressure monitoring system
needs to know when the tires are rotated to
determine which set of tires are on the front
and which are on the rear. With this
information, the system can detect and
properly warn of low tire pressures.
System reset tips:
•
To reduce the chances of interference
from another vehicle, perform the system
reset procedure at least
3 ft (1 m) away
from another Ford Motor Company
vehicle undergoing the system reset
procedure at the same time.
• Do not wait more than two minutes
between resetting each tire sensor or the
system can time-out and you have to
repeat the entire procedure on all four
wheels.
• A double horn sounds indicating the
need to repeat the procedure.
Performing the System Reset Procedure
Read the entire procedure before attempting.
1. Drive the vehicle above
20 mph
(32 km/h) for at least two minutes, then
park in a safe location where you can
easily get to all four tires and have access
to an air pump.
2. Place the ignition in the off position and keep the key in the ignition.
3. Cycle the ignition to the on position with
the engine off.
362
Continental (CPL) Canada/United States of America, enUSA, Edition date: 201807, Second-Printing Wheels and Tires
Page 366 of 627

4.
Turn the hazard flashers on then off three
times. You must accomplish this within
10 seconds. If you successfully enter the
reset mode, the horn sounds once, the
system indicator flashes and a message
shows in the information display. If this
does not occur, please try again starting
at step 2. If after repeated attempts to
enter the reset mode, the horn does not
sound, the system indicator does not
flash and no message shows in the
information display, seek service from
your authorized dealer.
5. Train the tire pressure monitoring system
sensors in the tires using the following
system reset sequence starting with the
left front tire in the following clockwise
order: Left front - driver side front tire,
Right front - passenger side front tire,
Right rear - passenger side rear tire, Left
rear - driver side rear tire.
6. Remove the valve cap from the valve stem on the left front tire. Decrease the
air pressure until the horn sounds. Note:
The single horn tone confirms that the
sensor identification code has been learned
by the module for this position. If a double
horn is heard, the reset procedure was
unsuccessful, and you must repeat it.
7. Remove the valve cap from the valve stem on the right front tire. Decrease the
air pressure until the horn sounds.
8. Remove the valve cap from the valve stem on the right rear tire. Decrease the
air pressure until the horn sounds.
9. Remove the valve cap from the valve stem on the left rear tire. Decrease the
air pressure until the horn sounds.
Training is complete after the horn
sounds for the last tire trained, driver side
rear tire, the system indicator stops
flashing, and a message shows in the
information display.
10. Turn the ignition off. If two short horn beeps are heard, the reset procedure
was unsuccessful and you must repeat
it. If after repeating the procedure and
two short beeps are heard when the
ignition is turned to off, seek assistance
from your authorized dealer. 11. Set all four tires to the recommended
air pressure as indicated on the Safety
Compliance Certification Label, affixed
to either the door hinge pillar,
door-latch post, or the door edge that
meets the door-latch post, next to the
driver seating position or Tire Label
located on the B-Pillar or the edge of
the driver door.
CHANGING A ROAD WHEEL WARNING: If the tire pressure
monitor sensor becomes damaged it may
not function.
Note: You should only use tire sealants in
roadside emergencies as they may cause
damage to the tire pressure monitoring
system sensor.
363
Continental (CPL) Canada/United States of America, enUSA, Edition date: 201807, Second-Printing Wheels and Tires
Page 535 of 627

Multi-Point Inspection
Hazard warning system operation
Accessory drive belt(s)
Horn operation
Battery performance
Radiator, cooler, heater and air conditioning hoses
Engine air filter
Suspension components for leaks or damage
Exhaust system
Steering and linkage
Exterior lamps operation
Tires (including spare) for wear and proper pressure2
Fluid levels 1
; fill if necessary
Windshield for cracks, chips or pits
For oil and fluid leaks
Washer spray and wiper operation
Half-shaft dust boots
1 Brake, coolant recovery reservoir, automatic transmission and window washer
2 If your vehicle is equipped with a temporary mobility kit, check the tir\
e sealant expiration Use By date on the canister. Replace as needed.
Be sure to ask your dealership service
advisor or technician about the multi-point
vehicle inspection. It is a comprehensive way
to perform a thorough inspection of your
vehicle. Your checklist gives you immediate
feedback on the overall condition of your
vehicle.
532
Continental (CPL) Canada/United States of America, enUSA, Edition date: 201807, Second-Printing Scheduled Maintenance