Page 369 of 627

WARNING: To help prevent your
vehicle from moving when changing a
wheel, shift the transmission into park (P),
set the parking brake and use an
appropriate block or wheel chock to
secure the wheel diagonally opposite to
the wheel being changed. For example,
when changing the front left wheel, place
an appropriate block or wheel chock on
the right rear wheel. WARNING:
When one of the front
wheels is off the ground, the transmission
alone will not prevent the vehicle from
moving or slipping off the jack, even if the
transmission is in park (P). WARNING:
Do not get under a
vehicle that is only supported by a vehicle
jack. WARNING:
Always use the jack
provided as original equipment with your
vehicle. If using a jack other than the one
provided, make sure the jack capacity is
adequate for the vehicle weight, including
any vehicle cargo or modifications. If you
are unsure if the jack capacity is adequate,
contact the authorized dealer.
Note: The jack does not require
maintenance or additional lubrication over
the service life of your vehicle.
Note: Passengers should not remain in your
vehicle when the vehicle is being jacked.
1. Park on a level firm surface, shift the transmission into park (P), set the parking
brake and switch the ignition off. Activate
the hazard flashers and set up the
warning triangle. 2.
Block both the front and rear of the wheel
diagonally opposite the flat tire. For
example, if the left front tire is flat, block
the right rear wheel.
3. Lift the carpeted load floor panel and slide it forward.
Note: The wheel trim tool in the following
illustration is optional.
366
Continental (CPL) Canada/United States of America, enUSA, Edition date: 201807, Second-Printing Wheels and TiresE175447
Page 370 of 627
4. Remove the steel winged washer nut
securing the spare tire by turning it
counterclockwise.
5. Remove the spare tire from the spare tire
compartment. 6. Remove plastic wing nut and jack and
lug wrench assembly. Remove the strap
from the jack. Turn the jack hex nut drive
screw counterclockwise and detach lug
wrench from the jack. 7. If your vehicle has a wheel trim that
covers the lug nuts, use the tool stored
on the spare tire wing nut to remove the
wheel trim for access to the lug nuts.
Feed the wire end of the tool through the
small hole on the wheel trim to hook
behind it and pull to remove the wheel
trim. 8.
Loosen each wheel lug nut one-half turn
counterclockwise, but do not remove
them until the wheel is raised off the
ground.
367
Continental (CPL) Canada/United States of America, enUSA, Edition date: 201807, Second-Printing Wheels and TiresE224481 E273682 E181744 1
E181745
2
Page 371 of 627

9. The vehicle jacking points are shown
above, and are depicted on the yellow
warning label on the jack. WARNING: Do not attempt to change
a tire on the side of the vehicle close to
moving traffic. Pull far enough off the road
to avoid the danger of being hit when
operating the jack or changing the wheel. 10. Position the jack so that the vehicle
downward flange rests in the jack
saddle. Use the lug wrench and turn
the jack nut clockwise. When the flat
tire is off the ground, remove the lug
nuts with the lug wrench. 11.
Replace the flat tire with the spare tire,
making sure the valve stem is facing
outward. Reinstall the lug nuts until the
wheel is snug against the hub. Do not
fully tighten the lug nuts until the wheel
has been lowered.
12. Lower the wheel by turning the jack handle counterclockwise. 13. Remove the jack and fully tighten the
lug nuts in the order shown. See
Technical Specifications (page 371). 368
Continental (CPL) Canada/United States of America, enUSA, Edition date: 201807, Second-Printing Wheels and TiresE145908 E166722 E201100 12
3
4
5
E75442 E273683
Page 372 of 627

14.
Fold up the wrench and re-attach to the
jack. Re-position the jack and wrench
assembly into the original vehicle
position and secure with the plastic
wing nut. Securely fasten the jack
before you drive.
15. Unblock the wheel and pick up the warning triangle.
Stowing the flat tire
You cannot store the full-sized road wheel
in the temporary spare tire well.
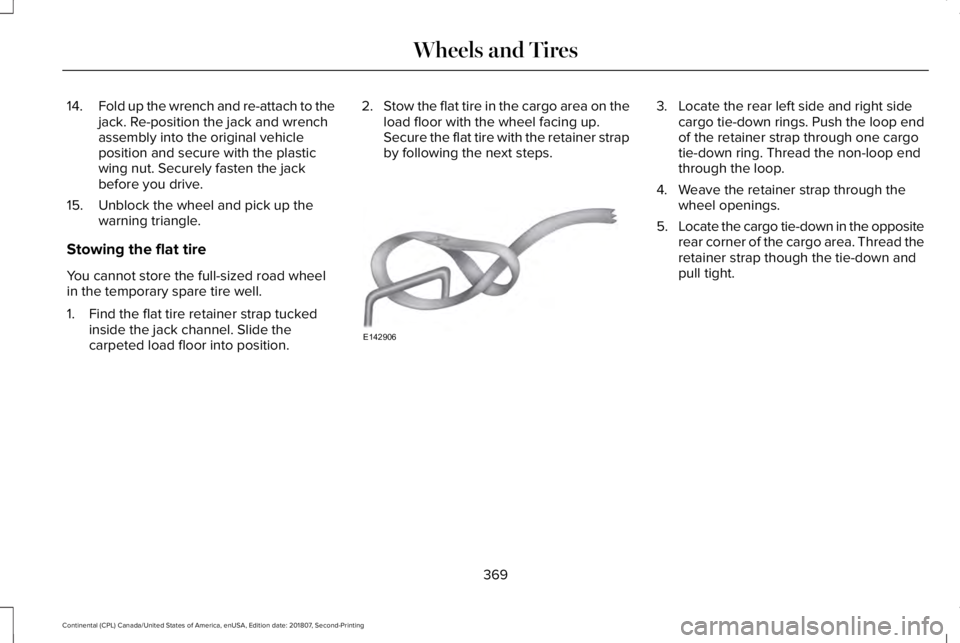
1. Find the flat tire retainer strap tucked inside the jack channel. Slide the
carpeted load floor into position. 2.
Stow the flat tire in the cargo area on the
load floor with the wheel facing up.
Secure the flat tire with the retainer strap
by following the next steps. 3. Locate the rear left side and right side
cargo tie-down rings. Push the loop end
of the retainer strap through one cargo
tie-down ring. Thread the non-loop end
through the loop.
4. Weave the retainer strap through the wheel openings.
5. Locate the cargo tie-down in the opposite
rear corner of the cargo area. Thread the
retainer strap though the tie-down and
pull tight.
369
Continental (CPL) Canada/United States of America, enUSA, Edition date: 201807, Second-Printing Wheels and TiresE142906
Page 389 of 627
Specification
Name
YN-12-D ESA-M1C75-B
Transmission, parking brake linkage and pivots and brake pedal shift grease:
Premium Long-Life Grease
XG-1-E1
ESB-M1C93-B
Multi-purpose grease:
Motorcraft® Multi-Purpose Grease Spray
XL-5-A
-
Lock cylinders (U.S.):
Penetrating and Lock Lubricant
XL-1
-
Lock cylinders (Canada):
Penetrating Fluid
CXC-51-A
-
Lock cylinders (Mexico):
Penetrating and Lock Lubricant
MXL-1
Note: Some Motorcraft® items may not be
available in Mexico.
386
Continental (CPL) Canada/United States of America, enUSA, Edition date: 201807, Second-Printing Capacities and Specifications
Page 396 of 627

Specification
Name
MYN-19 WSH-M1C231-B
A/C refrigerant compressor oil:
Motorcraft® PAG Refrigerant Compressor Oil
YN-12-D
ESB-M1C93-B
Multi-purpose grease:
Motorcraft® Multi-Purpose Grease Spray
XL-5-A
-
Lock cylinders (U.S. and Mexico):
Penetrating and Lock Lubricant
XL-1
-
Lock cylinders (Canada):
Penetrating Fluid
CXC-51-A
Note: Some Motorcraft® items may not be
available in Mexico.
If you use oil and fluids that do not meet the
defined specification and viscosity grade,
this may lead to:
• Component damage which is not
covered by the vehicle warranty.
• Longer engine cranking periods. •
Increased emission levels.
• Reduced engine performance.
• Reduced fuel economy.
• Degraded brake performance. We recommend Motorcraft® motor oil for
your vehicle. If Motorcraft® oil is not
available, use motor oils of the
recommended viscosity grade that meet API
SN PLUS requirements and display the API
Certification Mark for gasoline engines.
393
Continental (CPL) Canada/United States of America, enUSA, Edition date: 201807, Second-Printing Capacities and Specifications
Page 403 of 627
Specification
Name
YN-12-D ESA-M1C75-B
Transmission, parking brake linkage and pivots and brake pedal shift grease:
Premium Long-Life Grease
XG-1-E1
ESB-M1C93-B
Multi-purpose grease:
Motorcraft® Multi-Purpose Grease Spray
XL-5-A
-
Lock cylinders (U.S.):
Penetrating and Lock Lubricant
XL-1
-
Lock cylinders (Canada):
Penetrating Fluid
CXC-51-A
-
Lock cylinders (Mexico):
Penetrating and Lock Lubricant
MXL-1
Note: Some Motorcraft® items may not be
available in Mexico.
400
Continental (CPL) Canada/United States of America, enUSA, Edition date: 201807, Second-Printing Capacities and Specifications
Page 408 of 627
INSTALLING THE VEHICLE
IDENTIFICATION CARD
Install the vehicle identification card to the
specified area on the windshield.
Note:
Follow the manufacturer’ s installation
instructions. Note:
When installing the radio frequency
identification device, do not block objects
such as the rain sensor and the
auto-dimming sensor. Dimension
Dimension Description
Item
1 in (25 mm)
The center of the windshield to the left edge of the identification card\
.
A
2 in (40 mm)
The top edge of the windshield to the top edge of the identification car\
d.
B
405
Continental (CPL) Canada/United States of America, enUSA, Edition date: 201807, Second-Printing Vehicle IdentificationE292412