Page 366 of 627

4.
Turn the hazard flashers on then off three
times. You must accomplish this within
10 seconds. If you successfully enter the
reset mode, the horn sounds once, the
system indicator flashes and a message
shows in the information display. If this
does not occur, please try again starting
at step 2. If after repeated attempts to
enter the reset mode, the horn does not
sound, the system indicator does not
flash and no message shows in the
information display, seek service from
your authorized dealer.
5. Train the tire pressure monitoring system
sensors in the tires using the following
system reset sequence starting with the
left front tire in the following clockwise
order: Left front - driver side front tire,
Right front - passenger side front tire,
Right rear - passenger side rear tire, Left
rear - driver side rear tire.
6. Remove the valve cap from the valve stem on the left front tire. Decrease the
air pressure until the horn sounds. Note:
The single horn tone confirms that the
sensor identification code has been learned
by the module for this position. If a double
horn is heard, the reset procedure was
unsuccessful, and you must repeat it.
7. Remove the valve cap from the valve stem on the right front tire. Decrease the
air pressure until the horn sounds.
8. Remove the valve cap from the valve stem on the right rear tire. Decrease the
air pressure until the horn sounds.
9. Remove the valve cap from the valve stem on the left rear tire. Decrease the
air pressure until the horn sounds.
Training is complete after the horn
sounds for the last tire trained, driver side
rear tire, the system indicator stops
flashing, and a message shows in the
information display.
10. Turn the ignition off. If two short horn beeps are heard, the reset procedure
was unsuccessful and you must repeat
it. If after repeating the procedure and
two short beeps are heard when the
ignition is turned to off, seek assistance
from your authorized dealer. 11. Set all four tires to the recommended
air pressure as indicated on the Safety
Compliance Certification Label, affixed
to either the door hinge pillar,
door-latch post, or the door edge that
meets the door-latch post, next to the
driver seating position or Tire Label
located on the B-Pillar or the edge of
the driver door.
CHANGING A ROAD WHEEL WARNING: If the tire pressure
monitor sensor becomes damaged it may
not function.
Note: You should only use tire sealants in
roadside emergencies as they may cause
damage to the tire pressure monitoring
system sensor.
363
Continental (CPL) Canada/United States of America, enUSA, Edition date: 201807, Second-Printing Wheels and Tires
Page 369 of 627

WARNING: To help prevent your
vehicle from moving when changing a
wheel, shift the transmission into park (P),
set the parking brake and use an
appropriate block or wheel chock to
secure the wheel diagonally opposite to
the wheel being changed. For example,
when changing the front left wheel, place
an appropriate block or wheel chock on
the right rear wheel. WARNING:
When one of the front
wheels is off the ground, the transmission
alone will not prevent the vehicle from
moving or slipping off the jack, even if the
transmission is in park (P). WARNING:
Do not get under a
vehicle that is only supported by a vehicle
jack. WARNING:
Always use the jack
provided as original equipment with your
vehicle. If using a jack other than the one
provided, make sure the jack capacity is
adequate for the vehicle weight, including
any vehicle cargo or modifications. If you
are unsure if the jack capacity is adequate,
contact the authorized dealer.
Note: The jack does not require
maintenance or additional lubrication over
the service life of your vehicle.
Note: Passengers should not remain in your
vehicle when the vehicle is being jacked.
1. Park on a level firm surface, shift the transmission into park (P), set the parking
brake and switch the ignition off. Activate
the hazard flashers and set up the
warning triangle. 2.
Block both the front and rear of the wheel
diagonally opposite the flat tire. For
example, if the left front tire is flat, block
the right rear wheel.
3. Lift the carpeted load floor panel and slide it forward.
Note: The wheel trim tool in the following
illustration is optional.
366
Continental (CPL) Canada/United States of America, enUSA, Edition date: 201807, Second-Printing Wheels and TiresE175447
Page 376 of 627
ENGINE SPECIFICATIONS - 2.7L
Specification
Measurement
164
Cubic inches.
1-4-2-5-3-6
Firing order.
10.0:1
Compression ratio.
0.028–0.031 in (0.7–0.8 mm)
Spark plug gap.
Coil in plug
Ignition system.
Drivebelt Routing 373
Continental (CPL) Canada/United States of America, enUSA, Edition date: 201807, Second-Printing Capacities and SpecificationsE275291
Page 377 of 627
ENGINE SPECIFICATIONS - 3.0L
Specification
Measurement
180
Cubic inches.
1-4-2-5-3-6
Firing order.
9.5:1
Compression ratio.
0.028–0.031 in (0.7–0.8 mm)
Spark plug gap.
Coil in plug
Ignition system.
374
Continental (CPL) Canada/United States of America, enUSA, Edition date: 201807, Second-Printing Capacities and Specifications
Page 379 of 627
ENGINE SPECIFICATIONS - 3.7L
Specification
Measurement
227
Cubic inches.
1-4-2-5-3-6
Firing order.
Coil on plug
Ignition system.
0.049 - 0.053 in (1.25 - 1.35 mm)
Spark plug gap.
10.5:1
Compression ratio.
Drivebelt Routing
3.7L Duratec 376
Continental (CPL) Canada/United States of America, enUSA, Edition date: 201807, Second-Printing Capacities and SpecificationsE191904
Page 418 of 627

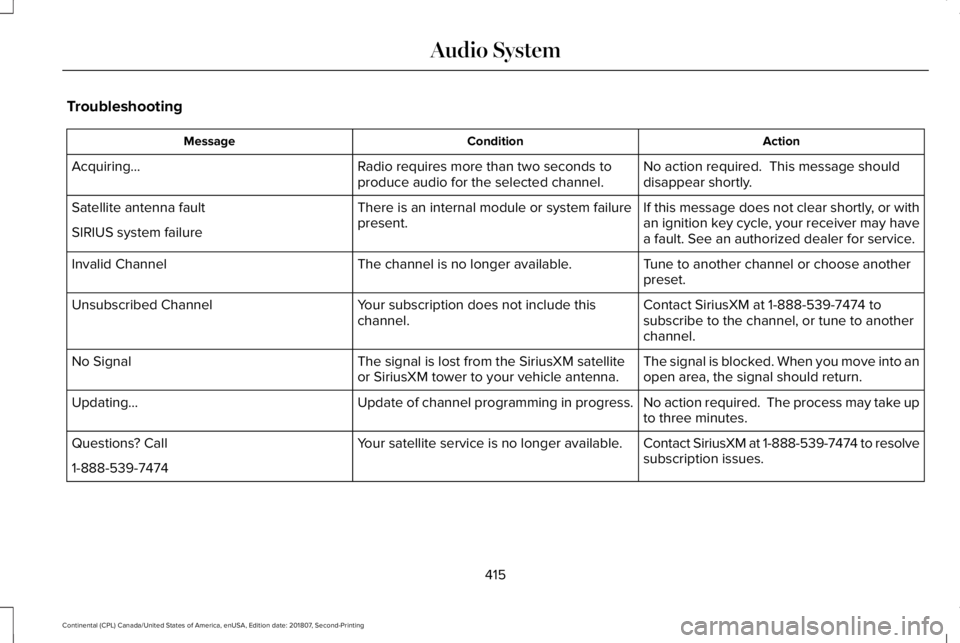
Troubleshooting
Action
Condition
Message
No action required. This message should
disappear shortly.
Radio requires more than two seconds to
produce audio for the selected channel.
Acquiring…
If this message does not clear shortly, or with
an ignition key cycle, your receiver may have
a fault. See an authorized dealer for service.
There is an internal module or system failure
present.
Satellite antenna fault
SIRIUS system failure
Tune to another channel or choose another
preset.
The channel is no longer available.
Invalid Channel
Contact SiriusXM at 1-888-539-7474 to
subscribe to the channel, or tune to another
channel.
Your subscription does not include this
channel.
Unsubscribed Channel
The signal is blocked. When you move into an
open area, the signal should return.
The signal is lost from the SiriusXM satellite
or SiriusXM tower to your vehicle antenna.
No Signal
No action required. The process may take up
to three minutes.
Update of channel programming in progress.
Updating…
Contact SiriusXM at 1-888-539-7474 to resolve
subscription issues.
Your satellite service is no longer available.
Questions? Call
1-888-539-7474
415
Continental (CPL) Canada/United States of America, enUSA, Edition date: 201807, Second-Printing Audio System
Page 423 of 627

Action and Description
Menu Item
Item
This bar displays icons and messages pertaining to current system activi\
ties including climate
settings, voice commands and phone functions such as text messages.
Status Bar
A
This button is available on the main screens. Pressing it takes you to the home screen view.
Home
B
This shows the current time. You can set the clock manually or have it controlled by the vehicle's
GPS location. See Settings (page 485).
Clock
C
This displays the current outside temperature.
Outside Temperature
D
You can touch any of the buttons on this bar to select a feature.
Feature Bar
E
The touchscreen allows you quick access to
all of your comfort, navigation,
communication and entertainment options.
Using the status and feature bar you can
quickly select the feature you want to use. Note:
Your system is equipped with a feature
that allows you to access and control audio
features for 10 minutes after you switch the
ignition off (and no doors open). The Status Bar
Additional icons also display in the status bar
depending on market, vehicle options and
current operation. If a feature is not active,
the icon does not display. Certain icons may
move to the left or right depending on what
options are active.
420
Continental (CPL) Canada/United States of America, enUSA, Edition date: 201807, Second-Printing SYNC™ 3
Page 435 of 627

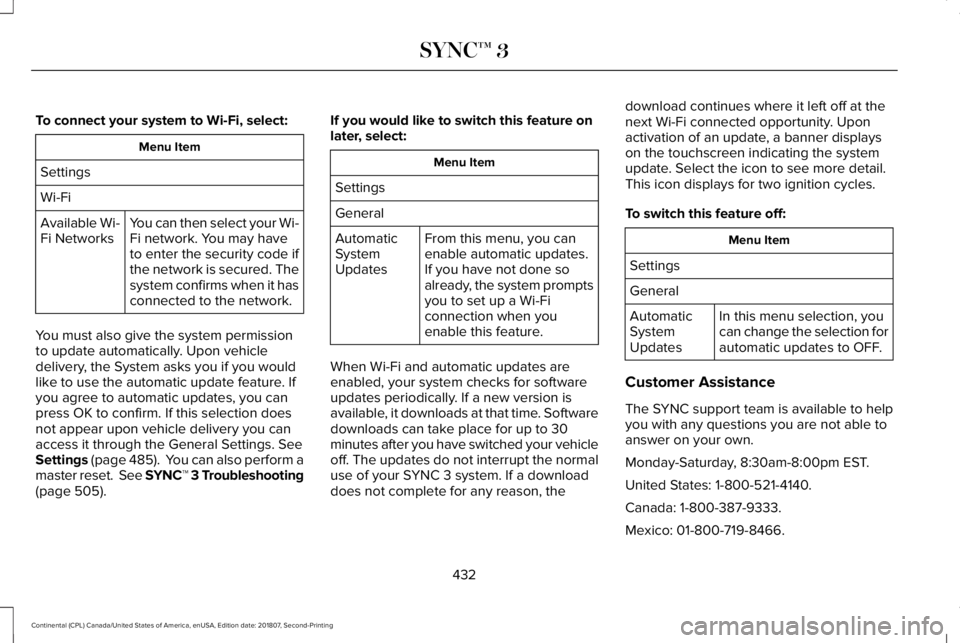
To connect your system to Wi-Fi, select:
Menu Item
Settings
Wi-Fi You can then select your Wi-
Fi network. You may have
to enter the security code if
the network is secured. The
system confirms when it has
connected to the network.
Available Wi-
Fi Networks
You must also give the system permission
to update automatically. Upon vehicle
delivery, the System asks you if you would
like to use the automatic update feature. If
you agree to automatic updates, you can
press OK to confirm. If this selection does
not appear upon vehicle delivery you can
access it through the General Settings. See
Settings (page 485). You can also perform a
master reset. See SYNC™ 3 Troubleshooting
(page 505). If you would like to switch this feature on
later, select: Menu Item
Settings
General From this menu, you can
enable automatic updates.
If you have not done so
already, the system prompts
you to set up a Wi-Fi
connection when you
enable this feature.
Automatic
System
Updates
When Wi-Fi and automatic updates are
enabled, your system checks for software
updates periodically. If a new version is
available, it downloads at that time. Software
downloads can take place for up to 30
minutes after you have switched your vehicle
off. The updates do not interrupt the normal
use of your SYNC 3 system. If a download
does not complete for any reason, the download continues where it left off at the
next Wi-Fi connected opportunity. Upon
activation of an update, a banner displays
on the touchscreen indicating the system
update. Select the icon to see more detail.
This icon displays for two ignition cycles.
To switch this feature off:
Menu Item
Settings
General In this menu selection, you
can change the selection for
automatic updates to OFF.
Automatic
System
Updates
Customer Assistance
The SYNC support team is available to help
you with any questions you are not able to
answer on your own.
Monday-Saturday, 8:30am-8:00pm EST.
United States: 1-800-521-4140.
Canada: 1-800-387-9333.
Mexico: 01-800-719-8466.
432
Continental (CPL) Canada/United States of America, enUSA, Edition date: 201807, Second-Printing SYNC™ 3