2019 LEXUS UX250H wheel
[x] Cancel search: wheelPage 279 of 476

2795-3. Using the air conditioning system and defogger
5
Interior features
diately after the air conditioning system is
started in automatic mode.
■Air conditioning filter
P.364
■Customization
Settings (e.g. A/C automatic mode switch
operation) can be changed.
(Customizable features: P.443)
■Main control screen
Using the touchpad of the Remote
Touch, select the button on the screen.
to can be adjusted by perform-
ing the following operations.
Flick operation: Move the pointer to
the desired item and flick the touchpad
up or down.
The item can be adjusted by one level.
Trace operation: After selecting the
desired item, slide your finger up or
down.
The item can be adjusted by the amount
that you trace.
Trace operation cannot be used while driv-
ing.
Sub menu
Selecting the sub menu item to switch the
main screen.
: Display the air conditioning control
screen
: Display the heated steering
wheel/seat heater/sea t ventilator control
screen (if equipped)
: Display the Lexus Climate Con-
cierge control screen
: Display the option control screen
Adjust the left-hand side tempera-
ture setting
Adjust the fan speed setting
Select the air flow mode
: Air flows to the upper body
: Air flows to the upper body and feet
WARNING
■To prevent the windshield from fog-
ging up
Do not use the windshield defogger
switch during cool air operation in
extremely humid weather. The difference
between the temperature of the outside
air and that of the windshield can cause
the outer surface of the windshield to fog
up, blocking your vision.
■When the outside rear view mirror
defoggers are operating
Do not touch the outside rear view mir-
ror surfaces, as they can become very
hot and burn you.
NOTICE
■To prevent 12-volt battery discharge
Do not leave the air conditioning system
on longer than necessary when the
hybrid system is off.
Air conditioning control screen
BE
A
B
C
D
Page 280 of 476

2805-3. Using the air conditioning system and defogger
: Air flows to the feet
: Air flows to the feet and the wind-
shield defogger operates
Adjust the right-hand side tem-
perature setting
Function on/off indicators
When the function is on, the indicator illu-
minates on the control screen.
Sub function menu
When the sub function button on the
Remote Touch is pressed, the following
functions can be switched on and off.
: Set Lexus Climate Concierge
( P.274)
“AUTO”: Set automatic mode on/off
( P.281)
“OFF”: Turn the fan off
“A/C”: Set cooling and dehumidification
function
“DUAL”: Adjust the temperature for driver
and front passenger seats separately
(“DUAL” mode) ( P.283)
: Set eco air conditioning mode
■Option control screen
Select on the sub menu to display
the option control screen.
The functions can be switched on and off.
When the function is on, the indicator illu-
minates on the screen.
Set Lexus Climate Concierge
( P.274)
Adjusting the temperature for
driver and front passenger seats
separately (“DUAL” mode)
( P.283)
Set eco air conditioning mode
Air conditioning and heater output is lim-
ited to prioritize fuel economy.
Cooling and dehumidification func-
tion
Prevent ice from building up on the
windshield and wiper blades
(Windshield wiper de-icer) (if
equipped)
Select S-FLOW mode ( P.282)
■Side display (10.3-inch display
model)
Display the heated steering
wheel/seat heaters/seat ventilators
E
F
G
A
B
C
D
E
F
A
Page 286 of 476

2865-3. Using the air conditioning system and defogger
*: If equipped
Turns the heated steering wheel on/off
Each time the switch is pressed, the opera-
tion condition changes as follows.
AUTO (lit) Hi (2 segments lit) Lo (1
segment lit) Off
The AUTO indicator and/or level indi-
cator illuminates during operation.
■The heated steering wheel can be used
when
The power switch is in ON.
■Customization
Steering wheel heating preference in auto-
matic mode can be changed. (Customiz-
able features: P.444)
Heated steering wheel*/seat
h
eaters*/seat ventilators*
Heated steering wheel
Warms up the grip of the steering
wheel
Seat heaters
Warm up the seat upholstery
Seat ventilators
Maintain good airflow on the seat
upholstery by sucking air into the
seats
Press the “MENU” button on the
Remote Touch and select “Climate”
to display the air conditioning con-
trol screen. Then, select on the
sub menu ( P.279) to display the
heated steering wheel/seat heat-
ers/seat ventilators control screen.
WARNING
■To prevent minor burn injuries
Care should be taken if anyone in the fol-
lowing categories comes in contact with
the steering wheel or seats when the
heater is on:
●Babies, small children, the elderly, the
sick and the phys ically challenged
●Persons with sensitive skin
●Persons who are fatigued
●Persons who have taken alcohol or
drugs that induce sleep (sleeping
drugs, cold remedies, etc.)
NOTICE
■To prevent damage to the seat heat-
ers and seat ventilators
Do not put heavy objects that have an
uneven surface on the seat and do not
stick sharp objects (n eedles, nails, etc.)
into the seat.
■To prevent battery discharge
Do not use the functions when the hybrid
system is off.
Heated steering wheel
A
B
Page 288 of 476

2885-3. Using the air conditioning system and defogger
up or down.
The item can be adjusted by one level.
Trace operation: After selecting the
desired item, trace the pad surface.
The item can be adjusted by the amount
that you trace.
Trace operation cannot be used while driv-
ing.
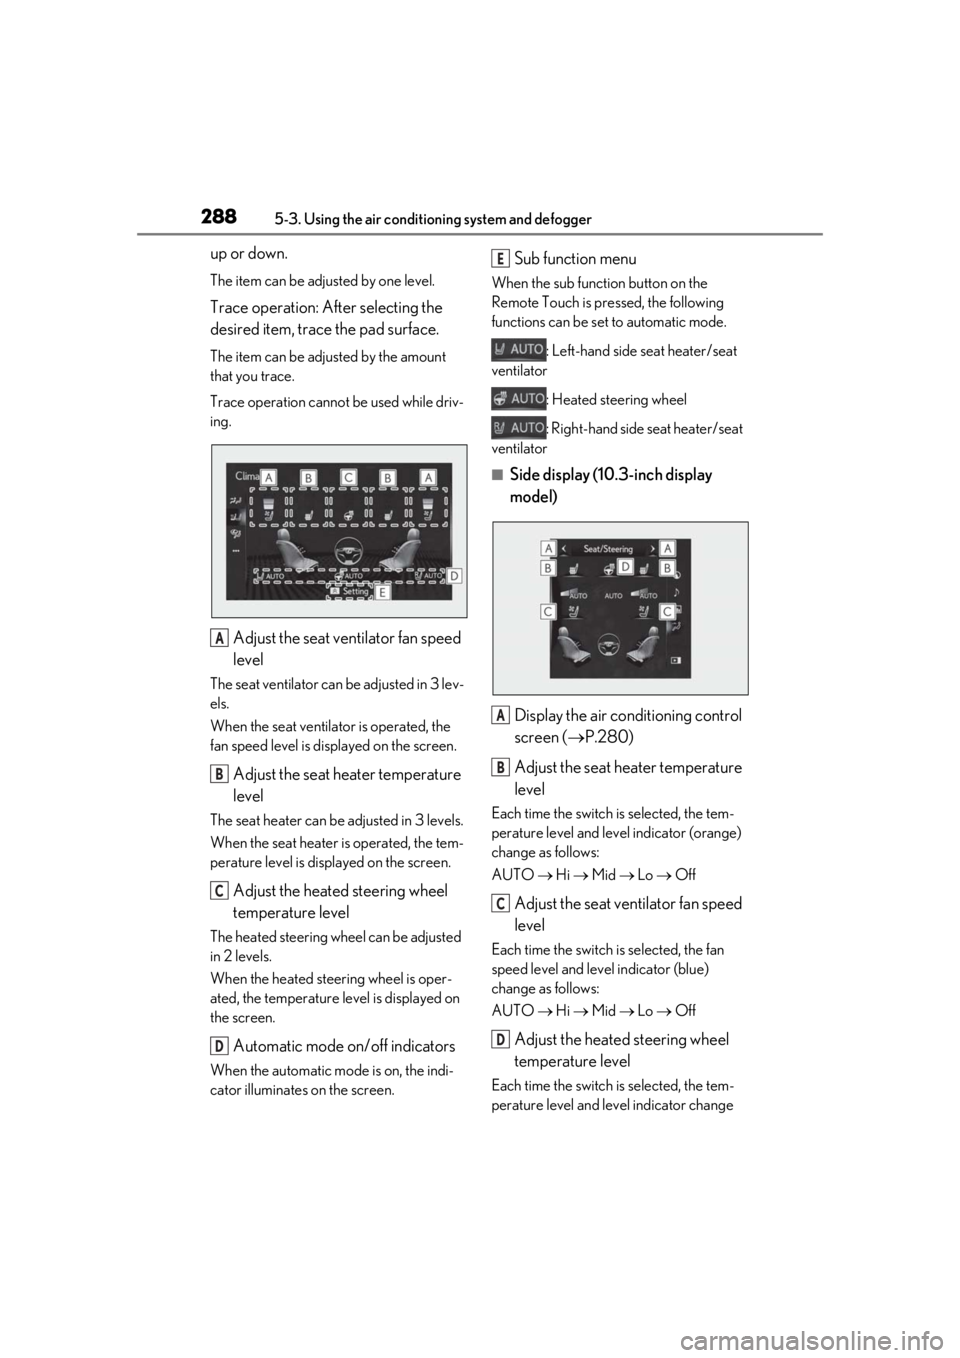
Adjust the seat ventilator fan speed
level
The seat ventilator can be adjusted in 3 lev-
els.
When the seat ventilator is operated, the
fan speed level is disp layed on the screen.
Adjust the seat heater temperature
level
The seat heater can be adjusted in 3 levels.
When the seat heater is operated, the tem-
perature level is displayed on the screen.
Adjust the heated steering wheel
temperature level
The heated steering wheel can be adjusted
in 2 levels.
When the heated steering wheel is oper-
ated, the temperature level is displayed on
the screen.
Automatic mode on/off indicators
When the automatic mode is on, the indi-
cator illuminates on the screen.
Sub function menu
When the sub function button on the
Remote Touch is pressed, the following
functions can be set to automatic mode.
: Left-hand side seat heater/seat
ventilator
: Heated steering wheel
: Right-hand side seat heater/seat
ventilator
■Side display (10. 3-inch display
model)
Display the air conditioning control
screen ( P.280)
Adjust the seat heater temperature
level
Each time the switch is selected, the tem-
perature level and level indicator (orange)
change as follows:
AUTO Hi Mid Lo Off
Adjust the seat ventilator fan speed
level
Each time the switch is selected, the fan
speed level and level indicator (blue)
change as follows:
AUTO Hi Mid Lo Off
Adjust the heated steering wheel
temperature level
Each time the switch is selected, the tem-
perature level and le vel indicator change
A
B
C
D
E
A
B
C
D
Page 297 of 476

2975-5. Using the storage features
5
Interior features
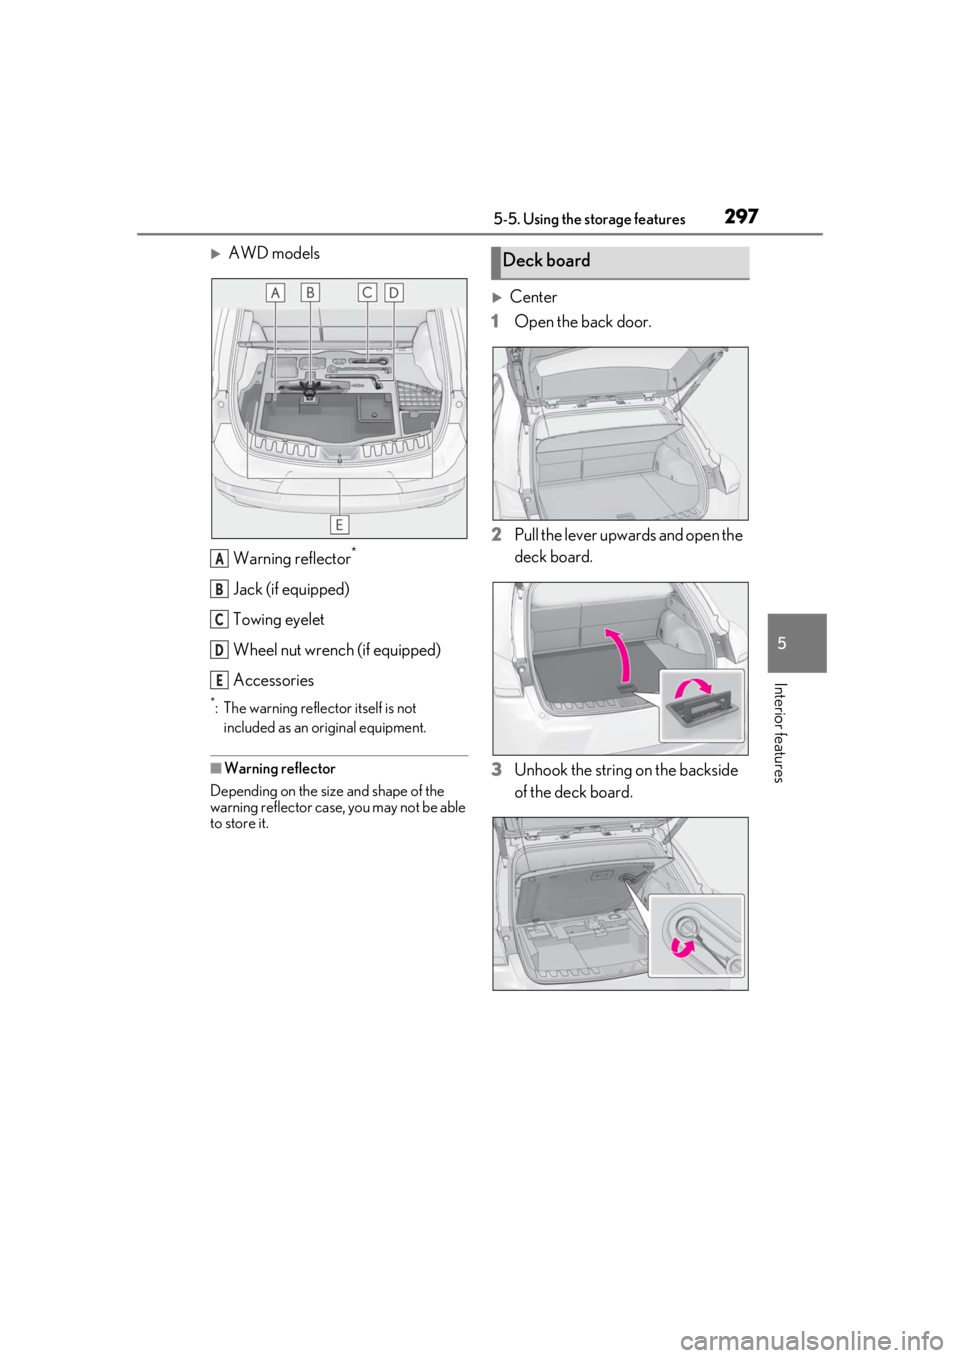
AWD modelsWarning reflector
*
Jack (if equipped)
Towing eyelet
Wheel nut wrench (if equipped)
Accessories
*: The warning reflector itself is not included as an original equipment.
■Warning reflector
Depending on the size and shape of the
warning reflector case, you may not be able
to store it.
Center
1 Open the back door.
2 Pull the lever upwards and open the
deck board.
3 Unhook the string on the backside
of the deck board.
A
B
C
D
E
Deck board
Page 321 of 476

321
6
6
Maintenance and care
Maintenance and care
6-1. Maintenance and careCleaning and protecting the vehi-cle exterior ................................ 322
Cleaning and protecting the vehi- cle interior ................................. 325
6-2. Maintenance Maintenance requirements .. 328
General maintenance ............. 329
Emission inspection and mainte- nance (I/M) programs .......... 331
6-3. Do-it-yourself maintenance Do-it-yourself service precautions........................................................ 333
Hood............................................... 335
Positioning a floor jack............ 336
Engine compartment............... 337
12-volt battery............................. 342
Tires ................................................ 345
Replacing the tire ...................... 355
Tire inflation pressure ............... 361
Wheels........................................... 363
Air conditioning filter...............364
Cleaning the hybrid battery (trac- tion battery) air intake vent and
filter .............................................. 365
Electronic key battery ............. 368
Checking and replacing fuses ........................................................ 370
Headlight aim.............................. 372
Light bulbs .................................... 374
Page 322 of 476

3226-1. Maintenance and care
6-1.Maintenance and care
Working from top to bottom, liber-
ally apply water to the vehicle body,
wheel wells and underside of the
vehicle to remove any dirt and dust.
Wash the vehicle body using a
sponge or soft cloth, such as a
chamois.
For hard-to-remove marks, use car
wash soap and rinse thoroughly with
water.
Wipe away any water.
Wax the vehicle when the water-
proof coating deteriorates.
If water does not bead on a clean surface,
apply wax when the vehicle body is cool.
■Self-restoring coat
The vehicle body has a self-restoring coat-
ing that is resistant to small surface
scratches caused in a car wash etc.
●The coating lasts for 5 to 8 years from
when the vehicle is delivered from the
plant.
●The restoration time differs depending on
the depth of the scratch and outside tem-
perature. The restoration time may
become shorter when the coating is
warmed by applying warm water.
●Deep scratches caused by keys, coins,
etc. cannot be restored.
●Do not use wax that contain abrasives.
■Automatic car washes
●Before washing the vehicle:
• Fold the mirrors
• Turn off the power back door (if equipped)
Start washing from the front of the vehicle.
Extend the mirrors before driving.
●Brushes used in automatic car washes
may scratch the vehicl e surface and harm
your vehicle’s paint.
●Rear spoiler may not be washable in
some automatic car washes. There may
also be an increased risk of damage to
vehicle.
■High pressure car washes
As water may enter the cabin, do not bring
the nozzle tip near the gaps around the
doors or perimeter of the windows, or spray
these areas continuously.
■Note for a smart access system with
push-button start
●If the door handle becomes wet while the
electronic key is within the effective
range, the door may lock and unlock
repeatedly. In that case, follow the follow-
ing correction procedures to wash the
vehicle:
• Place the key in a position 6 ft. (2 m) or
more separate from the vehicle while the
vehicle is being wash ed. (Take care to
ensure that the key is not stolen.)
• Set the electronic key to battery-saving mode to disable the smart access system
with push-button start. ( P.125)
●If the electronic key is inside the vehicle
and a door handle becomes wet during a
car wash, a buzzer may sound outside the
vehicle and “Key Detected in Vehicle”
may be shown on the multi-information
display. To turn off the alarm, lock all the
doors.
■Aluminum wheels
●Remove any dirt immediately by using a
neutral detergent.
●Wash detergent off with water immedi-
ately after use.
●To protect the paint from damage, make
sure to observe the following precau-
Cleaning and protecting the
vehicle exterior
Perform cleaning in a manner
appropriate to each component
and its material.
Cleaning instructions
Page 323 of 476

3236-1. Maintenance and care
6
Maintenance and care
tions.
• Do not use acidic, a lkaline or abrasive
detergent
• Do not use hard brushes
• Do not use detergent on the wheels when they are hot, such as after driving or park-
ing in hot weather
■Bumpers
Do not scrub with abrasive cleaners.
■Front side windows water-repellent
coating
●The following precautions can extend the
effectiveness of the water-repellent coat-
ing.
• Remove any dirt, etc. from the front side
windows regularly.
• Do not allow dirt and dust to accumulate on the windows for a long period.
Clean the windows with a soft, damp
cloth as soon as possible.
• Do not use wax or glass cleaners that
contain abrasives when cleaning the win-
dows.
• Do not use any metallic objects to
remove condensation build up.
●When the water-repellent performance
has become insufficie nt, the coating can
be repaired. Contact your Lexus dealer.
WARNING
■When washing the vehicle
Do not apply water to the inside of the
engine compartment. Doing so may
cause the electrical components etc. to
catch fire.
■When cleaning the windshield (vehi-
cles with rain-sensing windshield wip-
ers)
Set the wiper switch to off.
If the switch is in AUTO, the wipers may
operate unexpectedly in the following sit-
uations, and may result in hands being
caught or other serious injuries and
cause damage to the wiper blades.
Off
AUTO
●When the upper part of the windshield
where the raindrop sensor is located is
touched by hand
●When a wet rag or similar is held close
to the raindrop sensor
●If something bumps against the wind-
shield
●If you directly touch the raindrop sen-
sor body or if something bumps into
the raindrop sensor
■Precautions regarding the exhaust
pipe
Exhaust gasses cause the exhaust pipe to
become quite hot.
When washing the vehicle, be careful not
to touch the pipe until it has cooled suffi-
ciently, as touching a hot exhaust pipe
can cause burns.
■Precautions regarding the rear
bumper
If the paint of the rear bumper is chipped
or scratched, the following systems may
not function correctly.If this occurs, con-
sult your Lexus dealer.
A
B