Page 271 of 452

2715-3. Using the air conditioning system and defogger
5
Interior features
*: If equipped
Turns the heated steering wheel on/off
Each time the switch is pressed, the opera-
tion condition changes as follows.
AUTO (lit) Hi (2 segments lit) Lo (1
segment lit) Off
The AUTO indicator and/or level indi-
cator illuminates during operation.
■The heated steering wheel can be used
when
The engine switch is in ON.
■Customization
Steering wheel heating preference in auto-
matic mode can be changed. (Customiz-
able features: P.417)
Heated steering wheel*/seat
h
eaters*/seat ventilators*
Heated steering wheel
Warms up the grip of the steering
wheel
Seat heaters
Warm up the seat upholstery
Seat ventilators
Maintain good airflow on the seat
upholstery by sucking air into the
seats
Press the “MENU” button on the
Remote Touch and select “Climate”
to display the air conditioning con-
trol screen. Then, select on the
sub menu ( P.265) to display the
heated steering wheel/seat heat-
ers/seat ventilators control screen.
WARNING
■To prevent minor burn injuries
Care should be taken if anyone in the fol-
lowing categories comes in contact with
the steering wheel or seats when the
heater is on:
●Babies, small children, the elderly, the
sick and the phys ically challenged
●Persons with sensitive skin
●Persons who are fatigued
●Persons who have taken alcohol or
drugs that induce sleep (sleeping
drugs, cold remedies, etc.)
NOTICE
■To prevent damage to the seat heat-
ers and seat ventilators
Do not put heavy objects that have an
uneven surface on the seat and do not
stick sharp objects (n eedles, nails, etc.)
into the seat.
■To prevent battery discharge
Do not use the functions when the
engine is off.
Heated steering wheel
A
B
Page 273 of 452

2735-3. Using the air conditioning system and defogger
5
Interior features
Adjust the seat ventilator fan speed
level
The seat ventilator can be adjusted in 3 lev-
els.
When the seat ventilator is operated, the
fan speed level is disp layed on the screen.
Adjust the seat heater temperature
level
The seat heater can be adjusted in 3 levels.
When the seat heater is operated, the tem-
perature level is displayed on the screen.
Adjust the heated steering wheel
temperature level
The heated steering wheel can be adjusted
in 2 levels.
When the heated steering wheel is oper-
ated, the temperature level is displayed on
the screen.
Automatic mode on/off indicators
When the automatic mode is on, the indi-
cator illuminates on the screen.
Sub function menu
When the sub function button on the
Remote Touch is pressed, the following
functions can be set to automatic mode.
: Left-hand side seat heater/seat
ventilator
: Heated steering wheel
: Right-hand side seat heater/seat
ventilator
■Side display (10. 3-inch display
model)
Display the air conditioning control
screen ( P.265)
Adjust the seat heater temperature
level
Each time the switch is selected, the tem-
perature level and level indicator (orange)
change as follows:
AUTO Hi Mid Lo Off
Adjust the seat ventilator fan speed
level
Each time the switch is selected, the fan
speed level and level indicator (blue)
change as follows:
AUTO Hi Mid Lo Off
Adjust the heated steering wheel
temperature level
Each time the switch is selected, the tem-
perature level and le vel indicator change
as follows:
AUTO Hi Lo Off
A
B
C
D
E
A
B
C
D
Page 274 of 452

2745-4. Using the interior lights
5-4.Using the interior lights
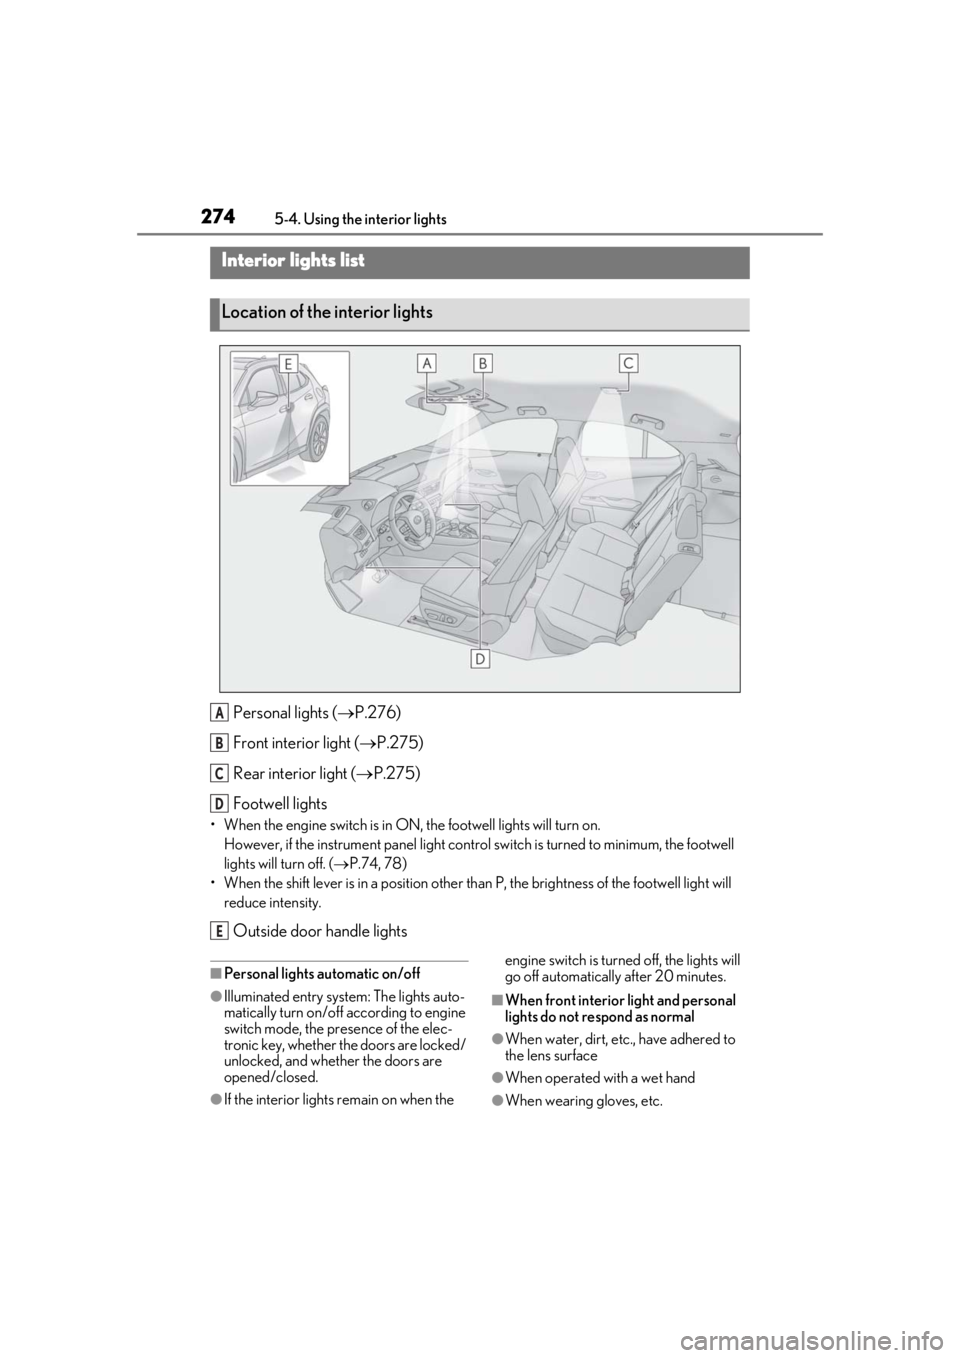
Personal lights ( P.276)
Front interi or light (P.275)
Rear interior light ( P.275)
Footwell lights
• When the engine switch is in ON, the footwell lights will turn on. However, if the instrume nt panel light control switch is turned to minimum, the footwell
lights will turn off. ( P.74, 78)
• When the shift lever is in a position other th an P, the brightness of the footwell light will
reduce intensity.
Outside door handle lights
■Personal lights automatic on/off
●Illuminated entry system: The lights auto-
matically turn on/off according to engine
switch mode, the presence of the elec-
tronic key, whether the doors are locked/
unlocked, and whether the doors are
opened/closed.
●If the interior lights remain on when the engine switch is turned
off, the lights will
go off automatically after 20 minutes.
■When front interior light and personal
lights do not respond as normal
●When water, dirt, etc., have adhered to
the lens surface
●When operated with a wet hand
●When wearing gloves, etc.
Interior lights list
Location of the interior lights
A
B
C
D
E
Page 275 of 452

2755-4. Using the interior lights
5
Interior features
■Automatic turning on of the interior
lights
If any of the SRS airbags deploy (inflate) or
in the event of a strong rear impact, the inte-
rior lights will turn on automatically. The
interior lights will turn off automatically after
approximately 20 minutes. The interior
lights can be turned off manually. However,
in order to help prevent further collisions, it
is recommended that th ey be left on until
safety can be ensured. (The interior lights
may not turn on automatically depending
on the force of the impact and conditions of
the collision.)
■Customization
Setting (e.g. the time elapsed before lights
turn off) can be changed. (Customizable
features: P.412)
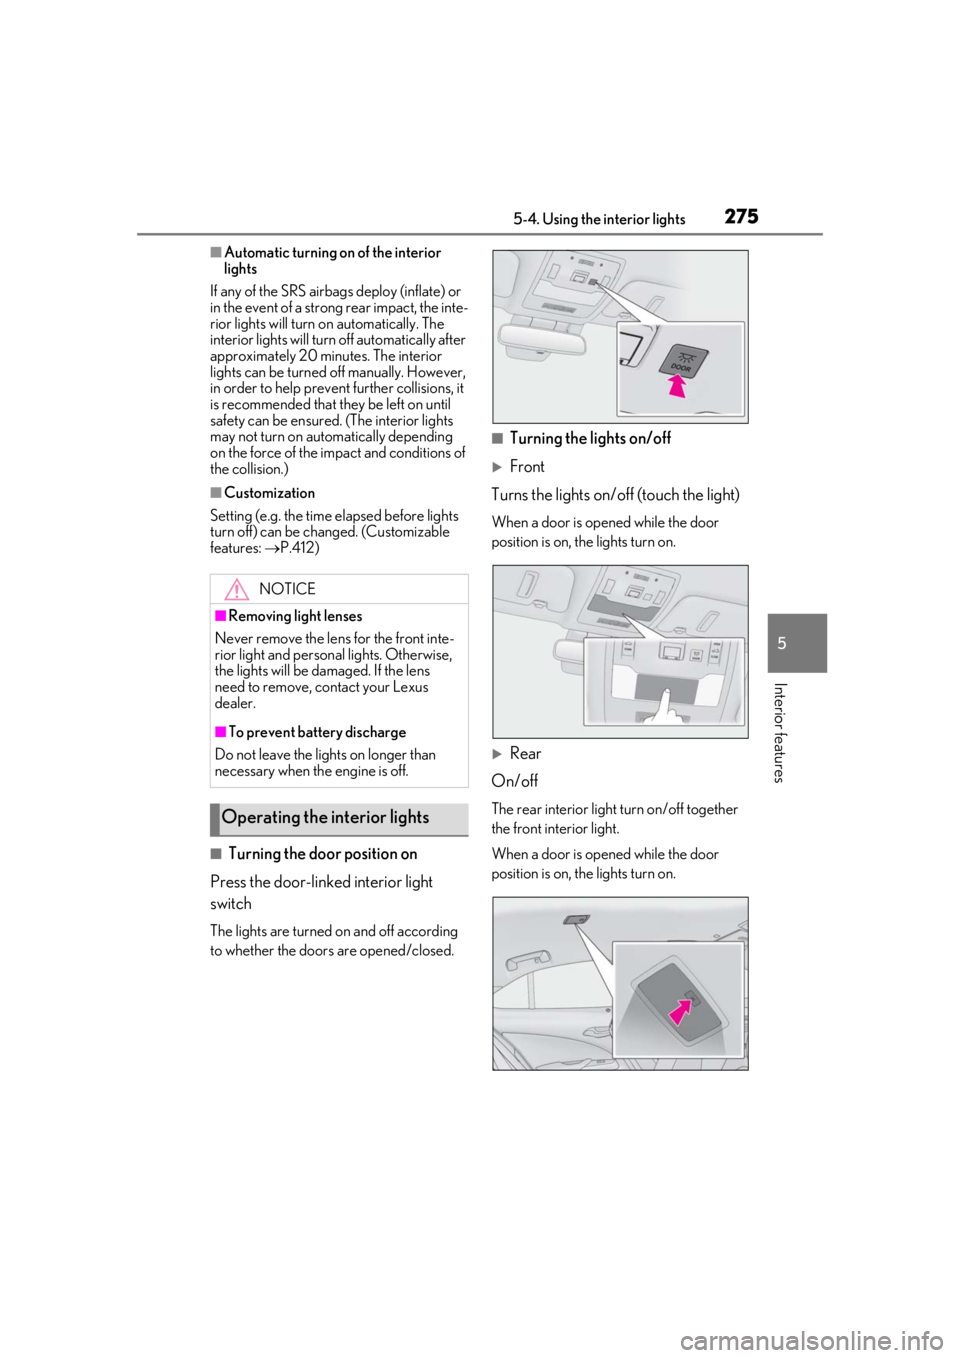
■Turning the door position on
Press the door-linked interior light
switch
The lights are turned on and off according
to whether the doors are opened/closed.
■Turning the lights on/off
Front
Turns the lights on/off (touch the light)
When a door is opened while the door
position is on, the lights turn on.
Rear
On/off
The rear interior light turn on/off together
the front interior light.
When a door is opened while the door
position is on, the lights turn on.
NOTICE
■Removing light lenses
Never remove the lens for the front inte-
rior light and personal lights. Otherwise,
the lights will be damaged. If the lens
need to remove, contact your Lexus
dealer.
■To prevent battery discharge
Do not leave the lights on longer than
necessary when the engine is off.
Operating the interior lights
Page 276 of 452
2765-4. Using the interior lights
■Turning the lights on/off
Turns the lights on/off (touch the light)
When a door is opened while the door
position is on, the lights turn on.
Operating the personal lights
Page 277 of 452
2775-5. Using the storage features
5
Interior features
5-5.Using the storage features
Auxiliary tray/Wireless charger (if equipped) (P.287)
Glove box ( P.278)
Bottle holders ( P.279)
Cup holders ( P.278)
Console box ( P.278)
Coin holder ( P.279)
List of storage features
Location of the storage features
A
B
C
D
E
F
WARNING
■Items that should not be left in the
vehicle
Do not leave glasses, lighters or spray
cans in the storage spaces, as this may
cause the following when cabin tempera-
ture becomes high:
●Glasses may be deformed by heat or
cracked if they come into contact with
other stored items.
●Lighters or spray ca ns may explode. If
they come into contact with other
stored items, the lighter may catch fire
or the spray can may release gas,
causing a fire hazard.
Page 279 of 452
2795-5. Using the storage features
5
Interior features■Bottle holders
●When storing a bottle, close the cap.
●The bottle may not be stored depending
on its size or shape.
Open the console box. (P.278)
WARNING
■Items unsuitable for the cup holders
Do not place anything other than cups or
aluminum cans in the cup holders.
Other items may be thrown out of the
holders in the event of an accident or
sudden braking, causing injury. If possi-
ble, cover hot drinks to prevent burns.
Bottle holders
NOTICE
■Items that should be not stowed in the
bottle holders
Do not place open bottles or glass and
paper cups containing liquid in the bottle
holders. The contents may spill and
glasses may break.
Coin holder
NOTICE
■Coin holder
Do not insert coins exceeding the height
of the tray. Doing so may prevent open-
ing and closing of the lid.
Page 281 of 452
2815-5. Using the storage features
5
Interior features
Vehicles with compact spare tireWarning reflector
*
Jack
Towing eyelet
Wheel nut wrench
Accessories
*: The warning reflector itself is not included as an original equipment.
■Warning reflector
Depending on the size and shape of the
warning reflector case, you may not be able
to store it.
Center
1 Open the back door.
2 Pull the lever upwards and open the
deck board.
3 Unhook the string on the backside
of the deck board.
A
B
C
D
E
Deck board