2019 LEXUS UX200 automatic
[x] Cancel search: automaticPage 124 of 452

1243-3. Adjusting the seats
unfastened.
When any of the following has been
performed, the driver’s seat and steer-
ing wheel automatically return to their
original positions.
The engine switch has been turned
to ACC or ON.
The driver’s seat belt has been fas-
tened.
■Operation of the power easy access sys-
tem
When exiting the vehicle, the power easy
access system may not operate if the seat is
already close to the rearmost position, etc.
■Customization
The seat movement amou nt settings of the
power easy access sy stem can be custom-
ized. (Customizable features: P.413)
1Check that the shift lever is in P.
2
Turn the engine switch to ON.
3
Adjust the driver’s seat, steering
wheel, outside rear view mirrors
and head-up display (if equipped)
to the desired positions.
4
While pressing the “SET” button, or
within 3 seconds after the “SET”
button is pressed, press button “1”,
“2” or “3” until the buzzer sounds.
If the selected button has already been
preset, the previously recorded position will be overwritten.
■Seat positions that can be memorized
(
P.121)
The adjusted positions other than the posi-
tion adjusted by lumbar support switch can
be recorded.
■In order to correctly use the driving
position memory function
If a seat position is already in the furthest
possible position and the seat is operated in
the same direction, the recorded position
may be slightly differen t when it is recalled.
1Check that the shift lever is in P.
2
Turn the engine switch to ON.
Recording a driving position into
memoryWARNING
■Seat adjustme nt caution
Take care during seat adjustment so that
the seat does not strike the rear passen-
ger or squeeze your body against the
steering wheel.
Recalling a driving position
Page 129 of 452

1293-4. Adjusting the steering wheel and mirrors
3
Before driving
3-4.Adjusting the steering wheel and mirrors
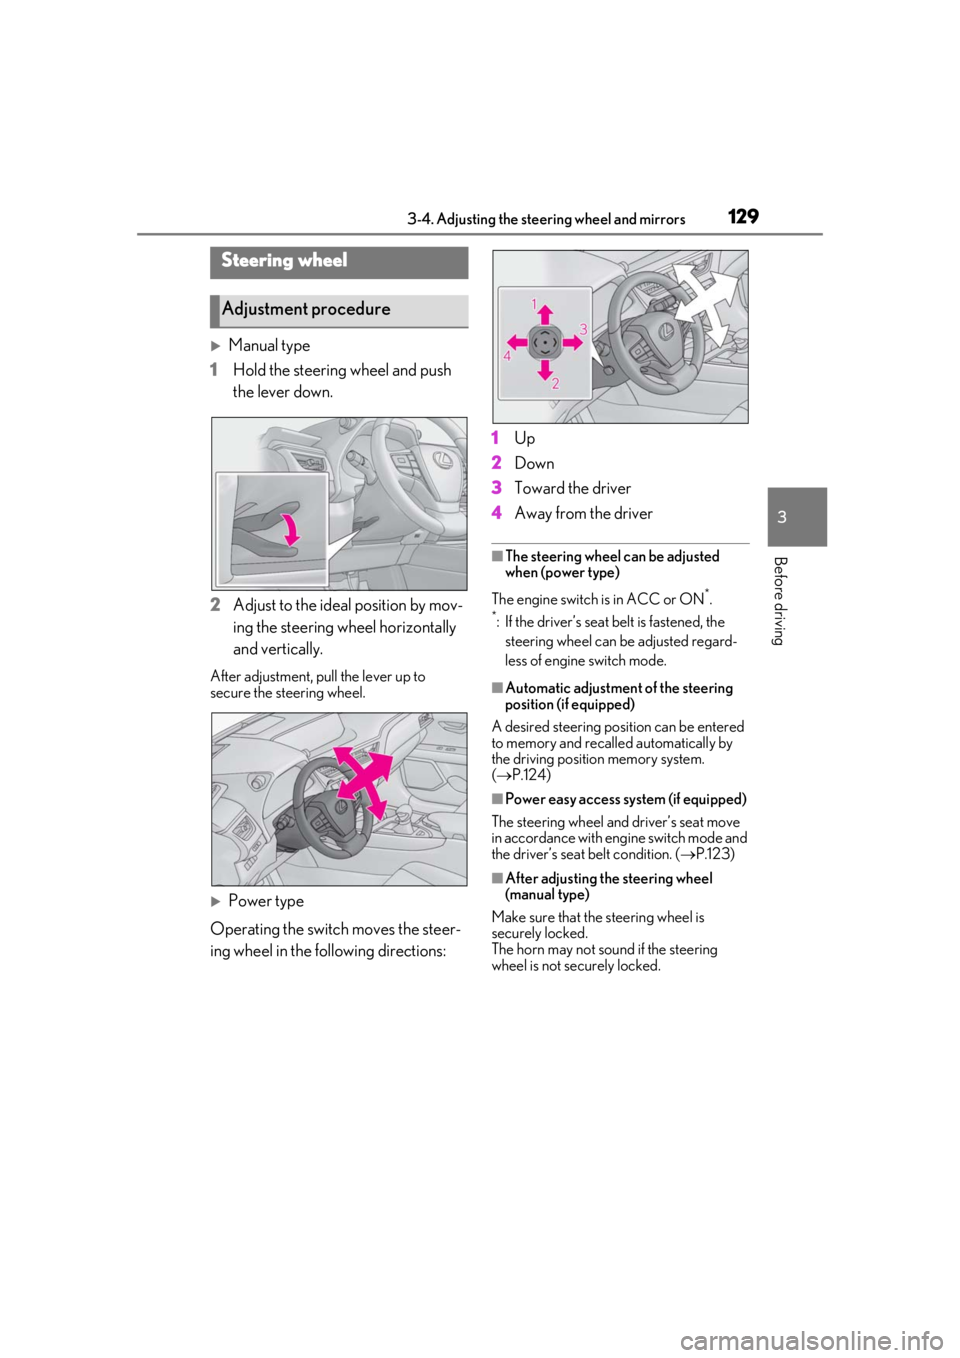
Manual type
1 Hold the steering wheel and push
the lever down.
2 Adjust to the ideal position by mov-
ing the steering wheel horizontally
and vertically.
After adjustment, pull the lever up to
secure the steering wheel.
Power type
Operating the switch moves the steer-
ing wheel in the following directions: 1
Up
2 Down
3 Toward the driver
4 Away from the driver
■The steering wheel can be adjusted
when (power type)
The engine switch is in ACC or ON
*.
*: If the driver’s seat belt is fastened, the
steering wheel can be adjusted regard-
less of engine switch mode.
■Automatic adjustment of the steering
position (if equipped)
A desired steering posi tion can be entered
to memory and recalled automatically by
the driving position memory system.
( P.124)
■Power easy access system (if equipped)
The steering wheel and driver’s seat move
in accordance with engine switch mode and
the driver’s seat belt condition. ( P.123)
■After adjusting the steering wheel
(manual type)
Make sure that the steering wheel is
securely locked.
The horn may not sound if the steering
wheel is not securely locked.
Steering wheel
Adjustment procedure
Page 131 of 452

1313-4. Adjusting the steering wheel and mirrors
3
Before driving
Normal position
Anti-glare position
Auto anti-glare inside rear view mir-
ror
Responding to the level of brightness
of the headlights of vehicles behind, the
reflected light is automatically
reduced.
Turn the automatic anti-glare function
mode on/off
When the automatic anti-glare function is
in ON mode, the indicator illuminates.
The function will set to ON mode each
time the engine switch is turned to ON.
Pressing the button turns the function to
OFF mode. (The indicator also turns
off.)
■To prevent sensor error (vehicles with
auto anti-glare inside rear view mirror)
To ensure that the sensors operate properly,
do not touch or cover them.
A
B
A
A
Page 132 of 452

1323-4. Adjusting the steering wheel and mirrors
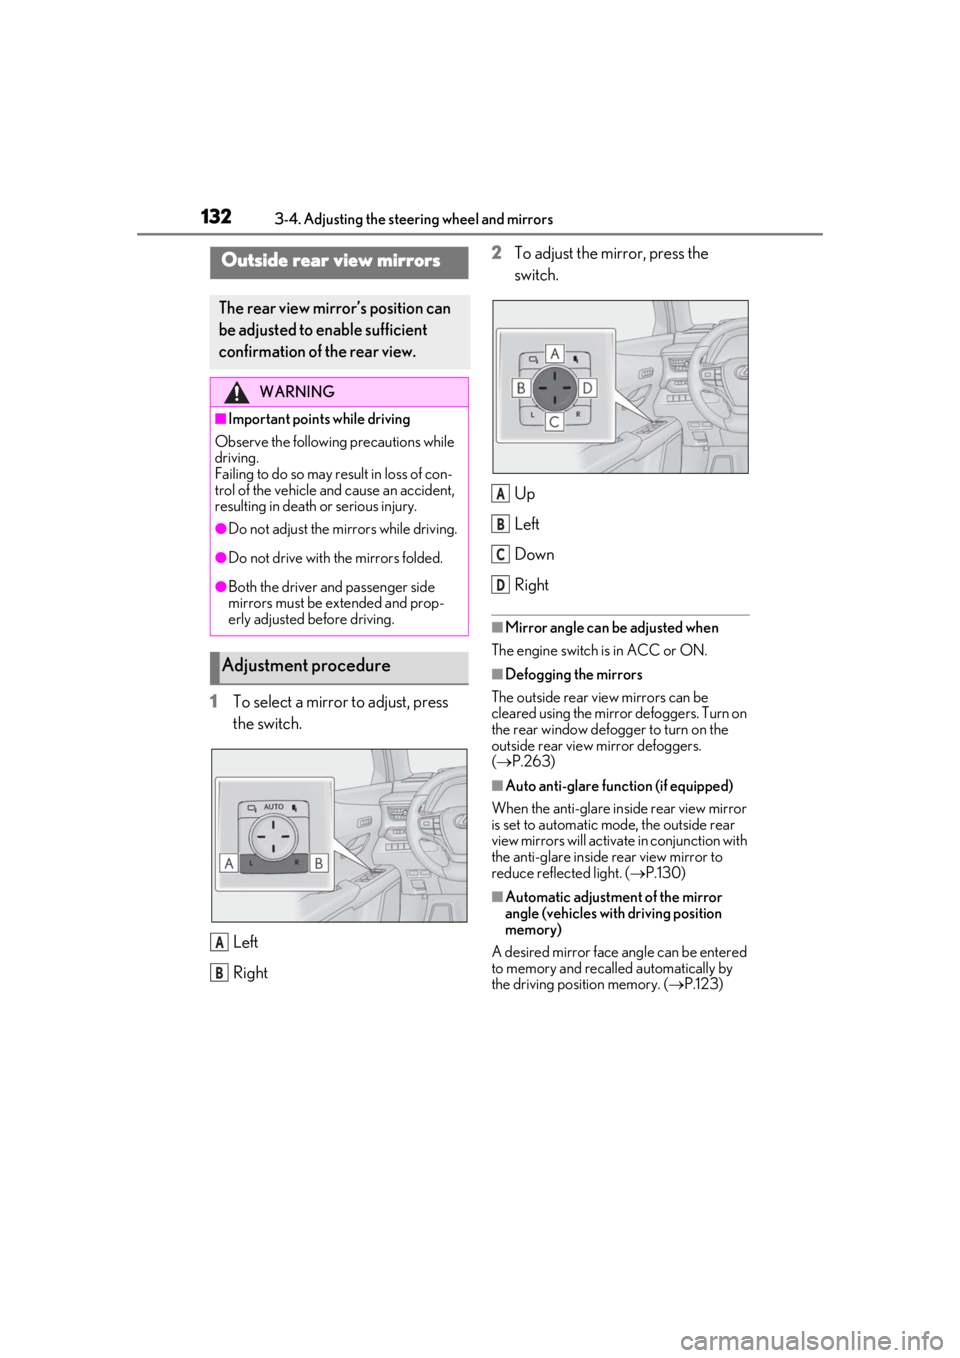
1To select a mirror to adjust, press
the switch.
Left
Right2
To adjust the mirror, press the
switch.
Up
Left
Down
Right
■Mirror angle can be adjusted when
The engine switch is in ACC or ON.
■Defogging the mirrors
The outside rear view mirrors can be
cleared using the mirror defoggers. Turn on
the rear window defogger to turn on the
outside rear view mirror defoggers.
( P.263)
■Auto anti-glare function (if equipped)
When the anti-glare inside rear view mirror
is set to automatic mode, the outside rear
view mirrors will activate in conjunction with
the anti-glare inside rear view mirror to
reduce reflec ted light. (P.130)
■Automatic adjustment of the mirror
angle (vehicles with driving position
memory)
A desired mirror face angle can be entered
to memory and recalled automatically by
the driving position memory. ( P.123)
Outside rear view mirrors
The rear view mirror’s position can
be adjusted to enable sufficient
confirmation of the rear view.
WARNING
■Important points while driving
Observe the following precautions while
driving.
Failing to do so may result in loss of con-
trol of the vehicle and cause an accident,
resulting in death or serious injury.
●Do not adjust the mirrors while driving.
●Do not drive with the mirrors folded.
●Both the driver and passenger side
mirrors must be extended and prop-
erly adjusted before driving.
Adjustment procedure
A
B
A
B
C
D
Page 133 of 452

1333-4. Adjusting the steering wheel and mirrors
3
Before driving
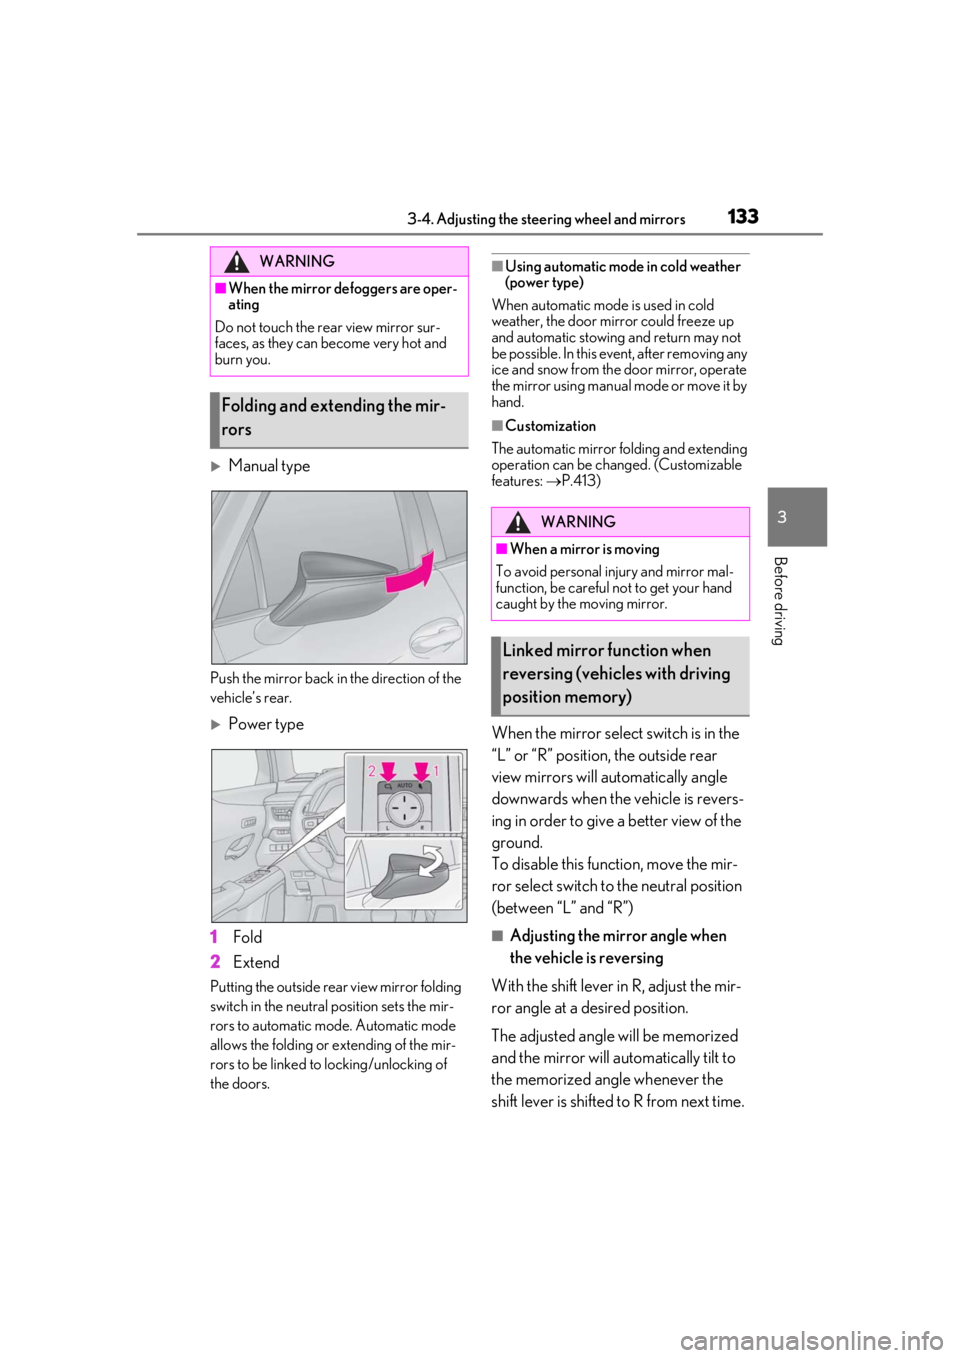
Manual type
Push the mirror back in the direction of the
vehicle’s rear.
Power type
1
Fold
2
Extend
Putting the outside rear view mirror folding
switch in the neutral position sets the mir-
rors to automatic mode. Automatic mode
allows the folding or extending of the mir-
rors to be linked to locking/unlocking of
the doors.
■Using automatic mode in cold weather
(power type)
When automatic mode is used in cold
weather, the door mirror could freeze up
and automatic stowing and return may not
be possible. In this event, after removing any
ice and snow from the door mirror, operate
the mirror using manual mode or move it by
hand.
■Customization
The automatic mirror folding and extending
operation can be changed. (Customizable
features: P.413)
When the mirror select switch is in the
“L” or “R” position, the outside rear
view mirrors will automatically angle
downwards when the vehicle is revers-
ing in order to give a better view of the
ground.
To disable this function, move the mir-
ror select switch to the neutral position
(between “L” and “R”)
■Adjusting the mirror angle when
the vehicle is reversing
With the shift lever in R, adjust the mir-
ror angle at a desired position.
The adjusted angle will be memorized
and the mirror will automatically tilt to
the memorized angle whenever the
shift lever is shifted to R from next time.
WARNING
■When the mirror defoggers are oper-
ating
Do not touch the rear view mirror sur-
faces, as they can become very hot and
burn you.
Folding and extending the mir-
rors
WARNING
■When a mirror is moving
To avoid personal injury and mirror mal-
function, be careful not to get your hand
caught by the moving mirror.
Linked mirror function when
reversing (vehicles with driving
position memory)
Page 138 of 452

1383-5. Opening, closing the windows and moon roof
■The moon roof can be operated when
The engine switch is in ON.
■Operating the moon roof after turning
the engine off
The moon roof can be operated for approx-
imately 45 seconds after the engine switch
is turned to ACC or OFF. It cannot, how-
ever, be operated once either front door is
opened.
■Jam protection function
If an object is detected between the moon
roof and the frame while the moon roof is
closing or tilting down, travel is stopped and
the moon roof opens slightly.
■Sunshade
The sunshade can be opened and closed
manually. However, the sunshade will open
automatically when the moon roof is
opened.
■Door lock linked moon roof operation
●The moon roof can be opened and
closed using the mechanical key.*
( P.381)
●The moon roof can be opened using the
wireless remote control.* ( P.98)
*: These settings must be customized at
your Lexus dealer.
■When the moon roof does not close nor-
mally
Perform the following procedure:
1
Stop the vehicle.
2
Press and hold the “CLOSE” switch.*
The moon roof will close, reopen and pause
for approximately 10 seconds. Then it will
close again and stop at the completely
closed position.
3
Check to make sure that the moon roof
is completely closed and then release
the switch.
*: If the switch is released at the incorrect time, the procedure will have to be per-
formed again from the beginning.
If the moon roof does not fully close even
after performing the above procedure cor- rectly, have the vehicle inspected by your
Lexus dealer.
■If the moon roof does not move normally
If the moon roof does not open or close
normally or the automatic opening function
does not operate, perform the following ini-
tialization procedure.
1
Stop the vehicle.
2
Press and hold the “DOWN” switch.*
The moon roof will stop at the tilt-up posi-
tion. After that, it will open, close, tilt up, tilt
down, and stop at the fully closed position.
3
Confirm that the moon roof has com-
pletely stopped and release the switch.
*: If you release the sw itch while the moon
roof is moving, perform the procedure
again from the beginning.
If, after performing the above procedures
correctly, the moon roof still does not open
or close normally or the automatic opening
function does not operate, have the vehicle
inspected by your Lexus dealer.
■Moon roof open warning buzzer
The buzzer sounds and “Moon Roof Open”
is shown on the multi-information display in
the instrument cluster when the engine
switch is turned off and the driver’s door is
opened with the moon roof open.
■Customization
Some functions can be customized.
( P.413)
WARNING
Observe the following precautions.
Failure to do so may cause death or seri-
ous injury.
■Opening the moon roof
●Do not allow any passengers to put
their hands or heads outside the vehi-
cle while it is moving.
●Do not sit on top of the moon roof.
Page 141 of 452

141
4
4
Driving
Driving
4-1. Before drivingDriving the vehicle ..................... 142
Cargo and luggage ................... 147
Vehicle load limits ...................... 150
Trailer towing ............................... 150
Dinghy towing .............................. 151
4-2. Driving procedures Engine (ignition) switch ........... 152
Continuously variable transmis- sion ................................................ 155
Turn signal lever.......................... 159
Parking brake .............................. 160
Brake Hold.................................... 163
ASC (Active Sound Control) 164
4-3. Operating the lights and wipers Headlight switch ......................... 165
Automatic High Beam ............. 168
Fog light switch ............................ 171
Windshield wipers and washer ......................................................... 172
Rear window wiper and washer ......................................................... 176
4-4. Refueling Opening the fuel tank cap...... 178
4-5. Using the driving support sys- tems
Lexus Safety System+2.0 ....... 180
PCS (Pre-Collision System).. 186
LTA (Lane Tracing Assist)...... 193
RSA (Road Sign Assist) .......... 202Dynamic radar cruise control with
full-speed range...................... 204
BSM (Blind Spot Monitor) ...... 214
PKSA (Parking Support Alert) ........................................................ 219
Intuitive parking assist ............. 220
RCTA (Rear Cross Traffic Alert) function........................................ 227
PKSB (Parking Support Brake) ........................................................ 231
Parking Support Brake function (static objects) ......................... 235
Parking Support Brake function (rear-crossing vehicles) ...... 240
Driving mode select switch .. 243
Driving assist systems.............. 244
4-6. Driving tips Winter driving tips .................... 249
Utility vehicle precautions..... 252
Page 142 of 452

1424-1. Before driving
4-1.Before driving
■Starting the engine
P.152
■Driving
1 With the brake pedal depressed,
shift the shift lever to D. ( P.155)
2 If the parking brake is in manual
mode, release the parking brake.
(P.160)
3 Gradually release the brake pedal
and gently depress the accelerator
pedal to accelerate the vehicle.
■Stopping
1 With the shift lever in D, depress the
brake pedal.
2 If necessary, set the parking brake.
(P.160)
If the vehicle is to be stopped for an
extended period of time, shift the shift lever
to P. ( P.155)
■Parking the vehicle
1 With the shift lever in D, depress the
brake pedal.
2 If the parking brake is in manual
mode, set the parking brake
(P.160), and shift the shift lever to
P ( P.155).
3 Press the engine switch to stop the
engine. 4
Lock the door, making sure that you
have the electronic key on your
person.
If parking on a hill, block the wheels as
needed.
■Starting off on a steep uphill
1 Make sure that the parking brake is
set with the brake pedal depressed,
and then shift the shift lever to D.
2 Release the brake pedal and gently
depress the accelerator pedal.
3 Release the parking brake.
■When starting off on a uphill
The hill-start assist control will be activated.
( P.245)
■Driving in the rain
●Drive carefully when it is raining, because
visibility will be reduced, the windows
may become fogged-up, and the road
will be slippery.
●Drive carefully when it starts to rain,
because the road surface will be espe-
cially slippery.
●Refrain from high speeds when driving on
an expressway in the rain, because there
may be a layer of wa ter between the tires
and the road surface, preventing the
steering and brakes from operating prop-
erly.
■Engine speed while driving
In the following conditions, the engine
speed may become high while driving. This
is due to automatic up-shifting control or
down-shifting implementation to meet driv-
ing conditions. It does not indicate sudden
acceleration.
●The vehicle is judged to be driving uphill
or downhill
●When the accelerato r pedal is released
●When the brake pedal is depressed while
Sport mode is selected
Driving the vehicle
The specified procedures should be
observed to ensure safe driving:
Driving procedure