2019 LEXUS UX200 automatic
[x] Cancel search: automaticPage 266 of 452

2665-3. Using the air conditioning system and defogger
: Air flows to the feet
: Air flows to the feet and the wind-
shield defogger operates
Adjust the right-hand side tem-
perature setting
Function on/off indicators
When the function is on, the indicator illu-
minates on the control screen.
Sub function menu
When the sub function button on the
Remote Touch is pressed, the following
functions can be switched on and off.
: Set Lexus Climate Concierge
( P.260)
“AUTO”: Set automatic mode on/off
( P.267)
“OFF”: Turn the fan off
“A/C”: Set cooling and dehumidification
function
“DUAL”: Adjust the temperature for driver
and front passenger seats separately
(“DUAL” mode) ( P.268)
: Set eco air conditioning mode
■Option control screen
Select on the sub menu to display
the option control screen.
The functions can be switched on and off.
When the function is on, the indicator illu-
minates on the screen.
Set Lexus Climate Concierge
( P.260)
Adjusting the temperature for
driver and front passenger seats
separately (“DUAL” mode)
( P.268)
Set eco air conditioning mode
Air conditioning and heater output is lim-
ited to prioritize fuel economy.
Cooling and dehumidification func-
tion
Prevent ice from building up on the
windshield and wiper blades
(Windshield wiper de-icer) (if
equipped)
■Side display (10. 3-inch display
model)
Display the heated steering
wheel/seat heaters/seat ventilators
control screen (if equipped)
E
F
G
A
B
C
D
E
A
Page 267 of 452

2675-3. Using the air conditioning system and defogger
5
Interior features
(P.265)
Adjust the left-hand side tempera-
ture setting
Adjust the fan speed setting
Adjust the right-hand side tem-
perature setting
Set cooling and dehumidification
function on/off
Adjust the temperature for the
driver’s and front passenger’s seats
separately (“DUAL” mode)
( P.268)
Select the air flow mode
■Windshield wiper de-icer (if equipped)
This feature is used to prevent ice from
building up on the wi ndshield and wiper
blades.
The windshield wiper de-icer will automati-
cally turn off after a period of time.
■Eco air conditioning mode
When Eco drive mode is selected using the
driving mode select switch, eco air condi-
tioning mode turns on.
When a driving mode other than Eco drive
mode is selected, eco air conditioning
mode may turn off.
1Press the automatic mode switch or
select “AUTO” on the sub function
menu. ( P.265)
2
Adjust the temperature setting.
3
To stop the operation, press the off
switch or select “Off” on the sub
function menu.
If the fan speed setting or air flow
modes are operated, the automatic
mode indicator goes off. However,
automatic mode for functions other
than that operated is maintained.
■Using automatic mode
Fan speed is adjusted automatically accord-
ing to the temperature setting and the
ambient conditions.
Therefore, the fan may stop for a while until
warm or cool air is ready to flow immedi-
ately after the automatic mode switch is
pressed or “AUTO” is selected.
Cool air may blow around the upper body
even when the heater is on due to sunlight.
■Windshield fog detection function
When automatic mode is set, the humidity
sensor detects fog on the windshield and
controls the air condit ioning system to pre-
vent fog.
WARNING
■To prevent burns (vehicles with wind-
shield wiper de-icer)
Do not touch the glass at lower part of
the windshield or to the side of the front
pillars when the wind shield wiper de-icer
is on.
B
C
D
E
F
G
Using automatic mode
NOTICE
■Humidity sensor
In order to detect fog on the windshield,
a sensor which monitors the temperature
of the windshield, the surround humidity,
etc., is installed.
Follow these points to avoid damaging
the sensor:
●Do not disassemble the sensor
●Do not spray the glass cleaner on the
sensor or subject it to strong impacts
Page 273 of 452

2735-3. Using the air conditioning system and defogger
5
Interior features
Adjust the seat ventilator fan speed
level
The seat ventilator can be adjusted in 3 lev-
els.
When the seat ventilator is operated, the
fan speed level is disp layed on the screen.
Adjust the seat heater temperature
level
The seat heater can be adjusted in 3 levels.
When the seat heater is operated, the tem-
perature level is displayed on the screen.
Adjust the heated steering wheel
temperature level
The heated steering wheel can be adjusted
in 2 levels.
When the heated steering wheel is oper-
ated, the temperature level is displayed on
the screen.
Automatic mode on/off indicators
When the automatic mode is on, the indi-
cator illuminates on the screen.
Sub function menu
When the sub function button on the
Remote Touch is pressed, the following
functions can be set to automatic mode.
: Left-hand side seat heater/seat
ventilator
: Heated steering wheel
: Right-hand side seat heater/seat
ventilator
■Side display (10. 3-inch display
model)
Display the air conditioning control
screen ( P.265)
Adjust the seat heater temperature
level
Each time the switch is selected, the tem-
perature level and level indicator (orange)
change as follows:
AUTO Hi Mid Lo Off
Adjust the seat ventilator fan speed
level
Each time the switch is selected, the fan
speed level and level indicator (blue)
change as follows:
AUTO Hi Mid Lo Off
Adjust the heated steering wheel
temperature level
Each time the switch is selected, the tem-
perature level and le vel indicator change
as follows:
AUTO Hi Lo Off
A
B
C
D
E
A
B
C
D
Page 274 of 452

2745-4. Using the interior lights
5-4.Using the interior lights
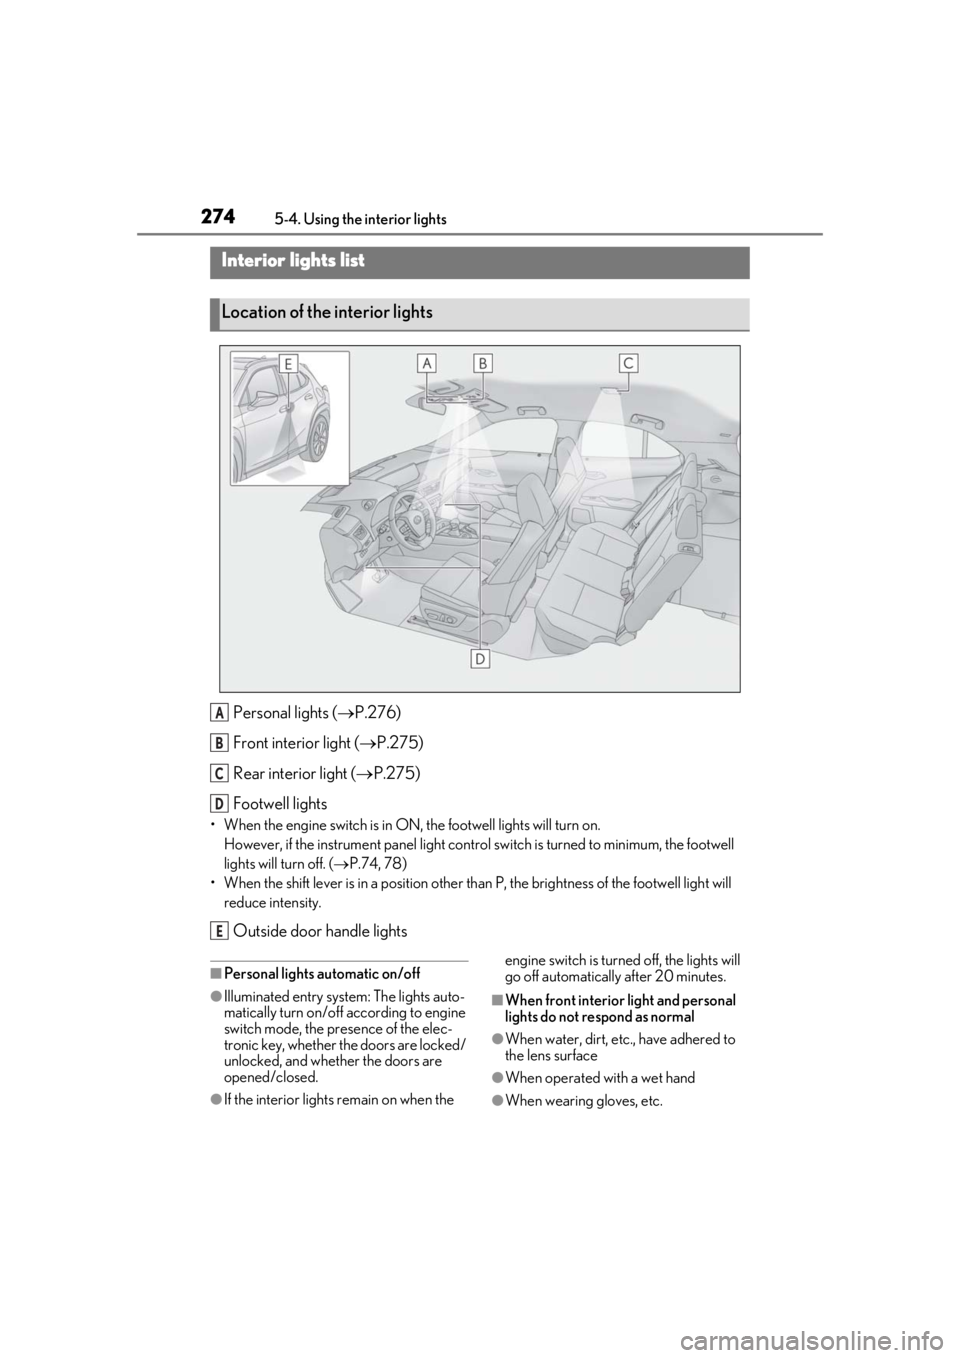
Personal lights ( P.276)
Front interi or light (P.275)
Rear interior light ( P.275)
Footwell lights
• When the engine switch is in ON, the footwell lights will turn on. However, if the instrume nt panel light control switch is turned to minimum, the footwell
lights will turn off. ( P.74, 78)
• When the shift lever is in a position other th an P, the brightness of the footwell light will
reduce intensity.
Outside door handle lights
■Personal lights automatic on/off
●Illuminated entry system: The lights auto-
matically turn on/off according to engine
switch mode, the presence of the elec-
tronic key, whether the doors are locked/
unlocked, and whether the doors are
opened/closed.
●If the interior lights remain on when the engine switch is turned
off, the lights will
go off automatically after 20 minutes.
■When front interior light and personal
lights do not respond as normal
●When water, dirt, etc., have adhered to
the lens surface
●When operated with a wet hand
●When wearing gloves, etc.
Interior lights list
Location of the interior lights
A
B
C
D
E
Page 275 of 452

2755-4. Using the interior lights
5
Interior features
■Automatic turning on of the interior
lights
If any of the SRS airbags deploy (inflate) or
in the event of a strong rear impact, the inte-
rior lights will turn on automatically. The
interior lights will turn off automatically after
approximately 20 minutes. The interior
lights can be turned off manually. However,
in order to help prevent further collisions, it
is recommended that th ey be left on until
safety can be ensured. (The interior lights
may not turn on automatically depending
on the force of the impact and conditions of
the collision.)
■Customization
Setting (e.g. the time elapsed before lights
turn off) can be changed. (Customizable
features: P.412)
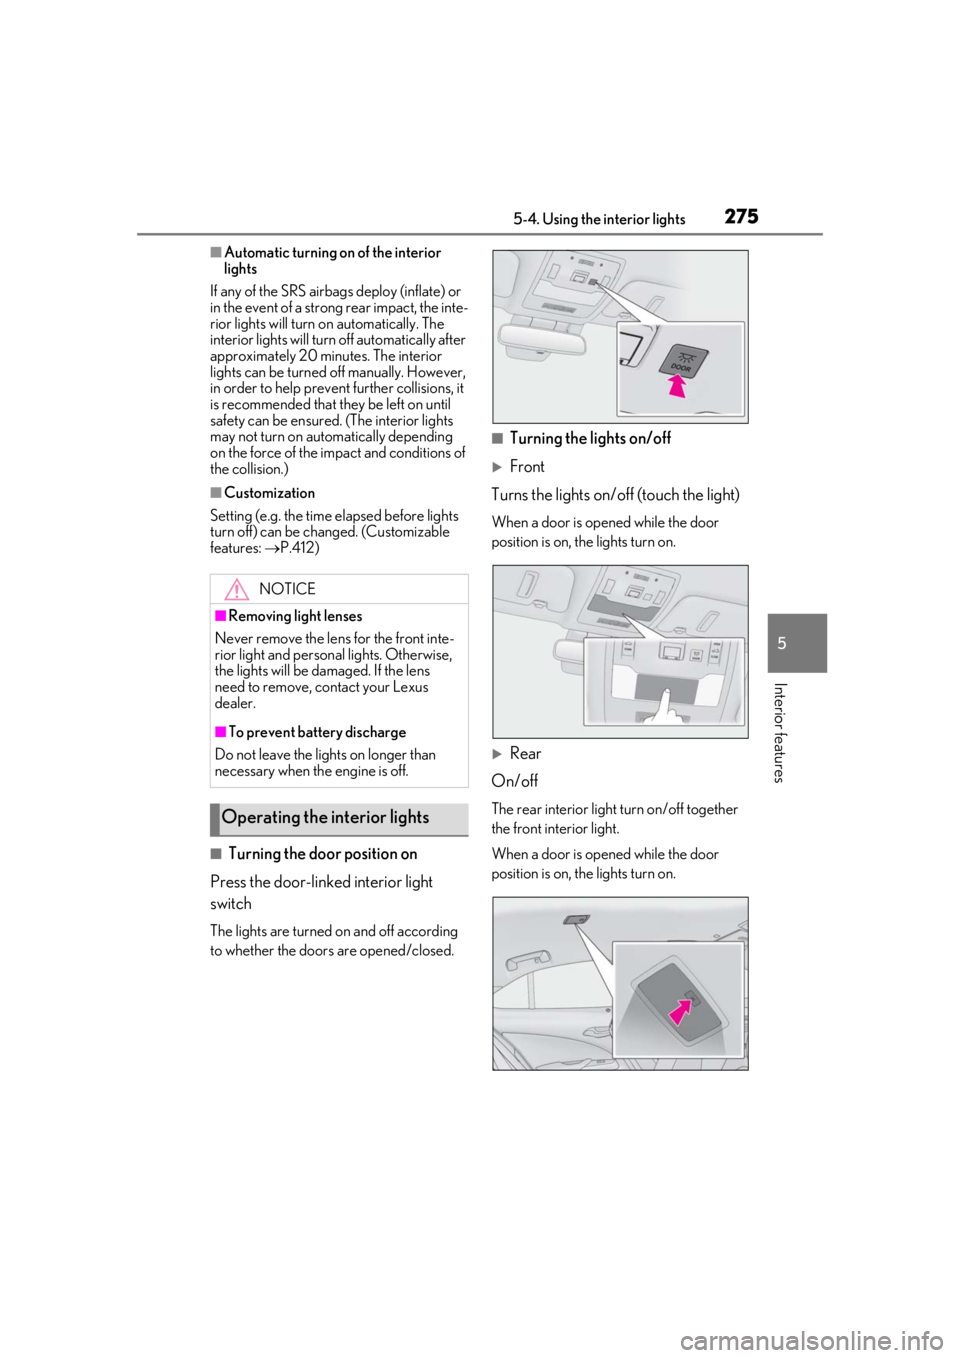
■Turning the door position on
Press the door-linked interior light
switch
The lights are turned on and off according
to whether the doors are opened/closed.
■Turning the lights on/off
Front
Turns the lights on/off (touch the light)
When a door is opened while the door
position is on, the lights turn on.
Rear
On/off
The rear interior light turn on/off together
the front interior light.
When a door is opened while the door
position is on, the lights turn on.
NOTICE
■Removing light lenses
Never remove the lens for the front inte-
rior light and personal lights. Otherwise,
the lights will be damaged. If the lens
need to remove, contact your Lexus
dealer.
■To prevent battery discharge
Do not leave the lights on longer than
necessary when the engine is off.
Operating the interior lights
Page 285 of 452

2855-6. Using the other interior features
5
Interior features
5-6.Using the other interior features
1To set the visor in the forward posi-
tion, flip it down.
2
To set the visor in the side position,
flip down, unhook, and swing it to
the side.
3
To use the side extender, place the
visor in the side position, then slide
it backward.
■When adjusting the inside rear view mir-
ror
Adjust the inside rear view mirror to enable
sufficient confirmation of the rear view with-
out interfering with the sun visor.
Slide the cover to open.
The light turns on when the cover is
opened.
■Vanity lights
If the vanity lights remain on when the
engine switch is turned off, the lights will go
off automatically after 20 minutes.
The GPS clock’s time is automatically
adjusted by utilizing GPS time infor-
mation.
For details, refer to the “NAVIGA-
TION AND MULTIMEDIA SYSTEM
OWNER’S MANUAL”.
Other interior features
Sun visors
NOTICE
■To prevent damage to the sun visors
When using the side extender, do not
swing the visor to the front.
Vanity mirrors
NOTICE
■To prevent battery discharge
Do not leave the vanity lights on for
extended periods while the engine is off.
Clock
Page 306 of 452

3066-1. Maintenance and care
6-1.Maintenance and care
Working from top to bottom, liber-
ally apply water to the vehicle body,
wheel wells and underside of the
vehicle to remove any dirt and dust.
Wash the vehicle body using a
sponge or soft cloth, such as a
chamois.
For hard-to-remove marks, use car
wash soap and rinse thoroughly with
water.
Wipe away any water.
Wax the vehicle when the water-
proof coating deteriorates.
If water does not bead on a clean surface,
apply wax when the vehicle body is cool.
■Self-restoring coat
The vehicle body has a self-restoring coat-
ing that is resistant to small surface
scratches caused in a car wash, etc.
●The coating lasts for 5 to 8 years from
when the vehicle is delivered from the
plant.
●The restoration time differs depending on
the depth of the scratch and outside tem-
perature. The restoration time may
become shorter when the coating is
warmed by applying warm water.
●Deep scratches caused by keys, coins,
etc. cannot be restored.
●Do not use wax that contain abrasives.
■Automatic car washes
●Before washing the vehicle:
• Fold the mirrors
• Turn off the power back door (if equipped)
Start washing from the front of the vehicle.
Extend the mirrors before driving.
●Brushes used in automatic car washes
may scratch the vehicl e surface and harm
your vehicle’s paint.
●Rear spoiler may not be washable in
some automatic car washes. There may
also be an increased risk of damage to
vehicle.
■High pressure car washes
●Do not allow the nozzles of the car wash
to come within close proximity of open-
ing and closing part of the doors or side
windows, and do not continuously let
water hit at the same place.
●Before using the car wash, check that the
fuel filler door on your vehicle is closed
properly.
■Note for a smart access system with
push-button start
●If the door handle becomes wet while the
electronic key is within the effective
range, the door may lock and unlock
repeatedly. In that case, follow the follow-
ing correction procedures to wash the
vehicle:
• Place the key in a position 6 ft. (2 m) or more separate from the vehicle while the
vehicle is being wash ed. (Take care to
ensure that the key is not stolen.)
• Set the electronic key to battery-saving
mode to disable the smart access system
with push-button start. ( P.115)
●If the electronic key is inside the vehicle
and a door handle becomes wet during a
car wash, a buzzer may sound outside the
vehicle and “Key Detected in Vehicle”
may be shown on the multi-information
display. To turn off the alarm, lock all the
doors.
■Aluminum wheels
●Remove any dirt immediately by using a
neutral detergent.
Cleaning and protecting the
vehicle exterior
Perform cleaning in a manner
appropriate to each component
and its material.
Cleaning instructions
Page 308 of 452

3086-1. Maintenance and care
WARNING
●Lexus Safety System+2.0
●BSM (if equipped)
●RCTA (if equipped)
●PKSB (if equipped)NOTICE
■To prevent paint deterioration and
corrosion on the body and compo-
nents (aluminum wheels, etc.)
●Wash the vehicle immediately in the
following cases:
• After driving near the sea coast
• After driving on salted roads
• If coal tar or tree sap is present on the paint surface
• If dead insects, insect droppings or bird droppings are present on the
paint surface
• After driving in an area contaminated with soot, oily smoke, mine dust, iron
powder or chemical substances
• If the vehicle becomes heavily soiled with dust or mud
• If liquids such as benzene and gasoline are spilled on the paint surface
●If the paint is chip ped or scratched,
have it repaired immediately.
●To prevent the wheels from corroding,
remove any dirt and store in a place
with low humidity when storing the
wheels.
■Cleaning the exterior lights
●Wash carefully. Do not use organic
substances or scrub with a hard brush.
This may damage the surfaces of the
lights.
●Do not apply wax to the surfaces of the
lights.
Wax may cause damage to the lenses.
■When using an automatic car wash
(vehicles with rain-sensing windshield
wipers)
Set the wiper switch to the off position.
If the wiper switch is in AUTO, the wipers
may operate and the wiper blades may
be damaged.
■When using a high pressure car wash
●When washing the vehicle, do not let
water of the high pressure washer hit
directly or the vicinity of the camera.
Due to the shock from the high pres-
sure water, it is possible the device may
not operate as normal.
●Do not bring the nozzle tip close to
boots (rubber or resin manufactured
cover), connectors or the following
parts. The parts may be damaged if
they come into contact with high-pres-
sure water.
• Traction related parts
• Steering parts
• Suspension parts
• Brake parts
●Keep the cleaning nozzle at least 11.9
in. (30 cm) away from the vehicle
body. Otherwise resin section, such as
molding and bumpers, may be
deformed and damaged. Also, do not
continuously hold the nozzle in the
same place.
●Do not continuously let water hit at the
lower part of the windshield. As there
is the air inlet vents, the air condition-
ing system may not operate properly.