2019 LEXUS RX450H driver
[x] Cancel search: driverPage 158 of 792

1583-2. Opening, closing and locking the doors
RX450h_RX450hL_U
●Locks and unlocks the doors ( P. 136)
●Locks and unlocks the back door ( P. 142)
●Starts and stops the hybrid system ( P. 239)
■Antenna location
■Effective range (areas within which the electronic key is detected)
Smart access system with push-button start
The following operations can be perfor med simply by carrying the electronic
key on your person, for example in your pocket. The driver should always
carry the electronic key.
Antennas outside the cabin
Antennas inside the cabin
Antenna outside the luggage compartment
When locking or unlocking the doorsThe system can be operated when the elec-
tronic key is within about 2.3 ft. (0.7 m) of
an outside door handle. (Only the doors
detecting the key can be operated.)
When starting the hybrid system or chang- ing power switch modes
The system can be operated when the elec-
tronic key is in side the vehicle.1
2
3
Page 159 of 792

1593-2. Opening, closing and locking the doors
3
Operation of each component
RX450h_RX450hL_U
■Alarms and warning messages
A combination of exterior and interior alar ms as well as warning messages shown on the
multi-information display are used to prevent theft of the vehicle and accidents resulting
from erroneous operation. Take appropriate measures in response to any warning mes-
sage on the multi-information display. ( P. 667)
When only an alarm sounds, circumstances and correction procedures are as follows.
■If a warning message is displayed indicating that there is a malfunction in the smart
access system with push-button start
P. 667
■Battery-saving function
The battery-saving function w ill be activated in order to prevent the electronic key bat-
tery and the 12-volt battery from being discha rged while the vehicle is not in operation
for a long time.
●In the following situations, the smart acce ss system with push-button start may take
some time to unlock the doors.
• The electronic key has been le ft in an area of approximately 6 ft. (2 m) of the outside
of the vehicle for 10 minutes or longer.
• The smart access system with push-button st art has not been used for 5 days or lon-
ger.
●If the smart access system with push-button start has not been used for 14 days or lon-
ger, the doors cannot be unlocked at any doors except the driver’s door. In this case,
take hold of the driver’s d oor handle, or use the wireless remote control or the mechan-
ical key, to unlock the doors.
AlarmSituationCorrection procedure
Exterior alarm
sounds once for 5
secondsAn attempt was made to lock
the vehicle while a door was
open.Close all of the doors and
lock the doors again.
Interior alarm pings
repeatedly
The power switch was turned to
ACCESSORY mode while the
driver’s door was open (The
driver’s door was opened when
the power switch was in
ACCESSORY mode).
Turn the power switch off
and close the driver’s door.
Page 167 of 792
167
3
Operation of each component
RX450h_RX450hL_U3-3. Adjusting the seats
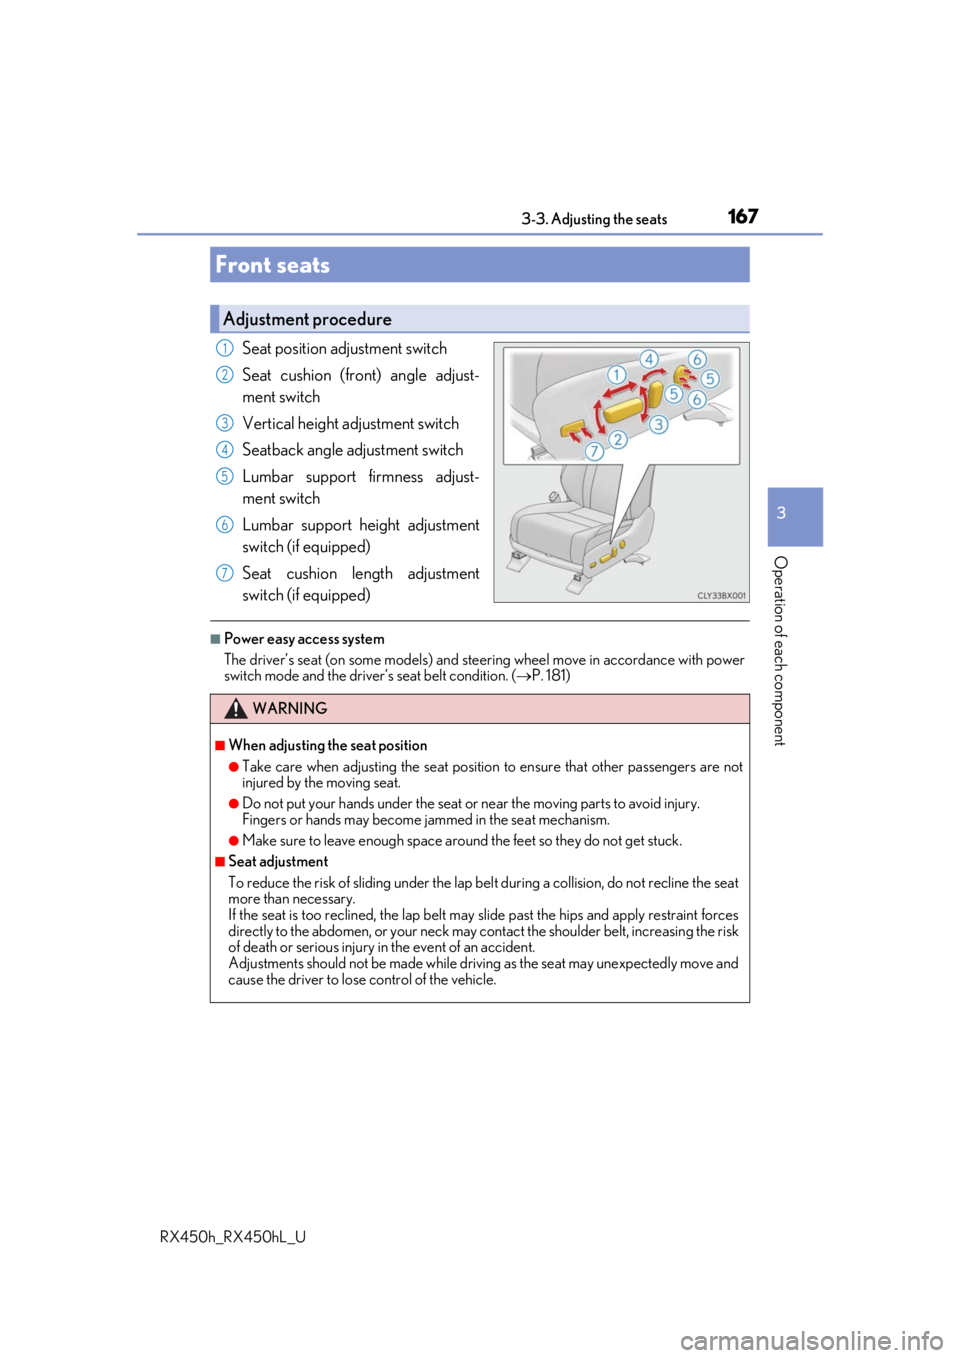
Seat position adjustment switch
Seat cushion (front) angle adjust-
ment switch
Vertical height adjustment switch
Seatback angle adjustment switch
Lumbar support firmness adjust-
ment switch
Lumbar support height adjustment
switch (if equipped)
Seat cushion length adjustment
switch (if equipped)
■Power easy access system
The driver’s seat (on some models) and stee
ring wheel move in accordance with power
switch mode and the driver’s seat belt condition. ( P. 181)
Front seats
Adjustment procedure
1
2
3
4
5
6
7
WARNING
■When adjusting the seat position
●Take care when adjusting the seat position to ensure that other passengers are not
injured by the moving seat.
●Do not put your hands under the seat or near the moving parts to avoid injury.
Fingers or hands may become jammed in the seat mechanism.
●Make sure to leave enough space around the feet so they do not get stuck.
■Seat adjustment
To reduce the risk of sliding under the lap be lt during a collision, do not recline the seat
more than necessary.
If the seat is too reclined, the lap belt may slide past the hips and apply restraint forces
directly to the abdomen, or your neck may contact the shou lder belt, increasing the risk
of death or serious injury in the event of an accident.
Adjustments should not be made while drivin g as the seat may unexpectedly move and
cause the driver to lose control of the vehicle.
Page 179 of 792
1793-3. Adjusting the seats
3
Operation of each component
RX450h_RX450hL_U
WARNING
■When a rear seatback is folded
Observe the following precautions.
Failure to do so may result in death or serious injury.
●Do not fold down the rear seatbacks while driving.
●Stop the vehicle on level grou nd, apply the parking brake and shift the shift lever to P.
●Do not allow anyone to sit on a folded rear seatback or in th e luggage compartment
while driving.
●Do not allow children to enter the luggage compartment.
■When operating the rear seatback
Observe the following precautions.
Failure to do so may result in death or serious injury.
●Make sure that passengers are clear of the rear seatback before operating it.
●To prevent hands and other body parts from being caught, keep them away from the
gaps in the seats and the moving parts of the seats when operating a rear seatback.
●Power seat: Do not let children operate th e rear seatback. Other passengers may get
caught in the seat.
●Power seat: Make sure that a ll passengers are clear of a seat before folding it. Do not
let passengers sit in the seat while it is being folded.
■Seat adjustment
●Second-row seats: To reduce the risk of sliding under the lap belt during a collision,
do not recline the seat more than necessary.
If the seat is reclined excessively, the la p belt may slide past the hips and apply
restraint forces directly to the abdomen, or your neck may contact the shoulder belt,
increasing the risk of de ath or serious injury in the event of an accident.
●Adjustments should not be made while dr iving as the seat may unexpectedly move
and cause the driver to lose control of the vehicle.
■After adjusting the rear seats
Observe the following precautions.
Failure to do so may result in death or serious injury.
●Manual seats: Make sure that the rear se atback is securely locked in position by
lightly pushing it back and forth.
●Check that the seat belts are not twisted or caught between or behind in the rear
seatback.
Page 181 of 792
1813-3. Adjusting the seats
3
Operation of each component
RX450h_RX450hL_U
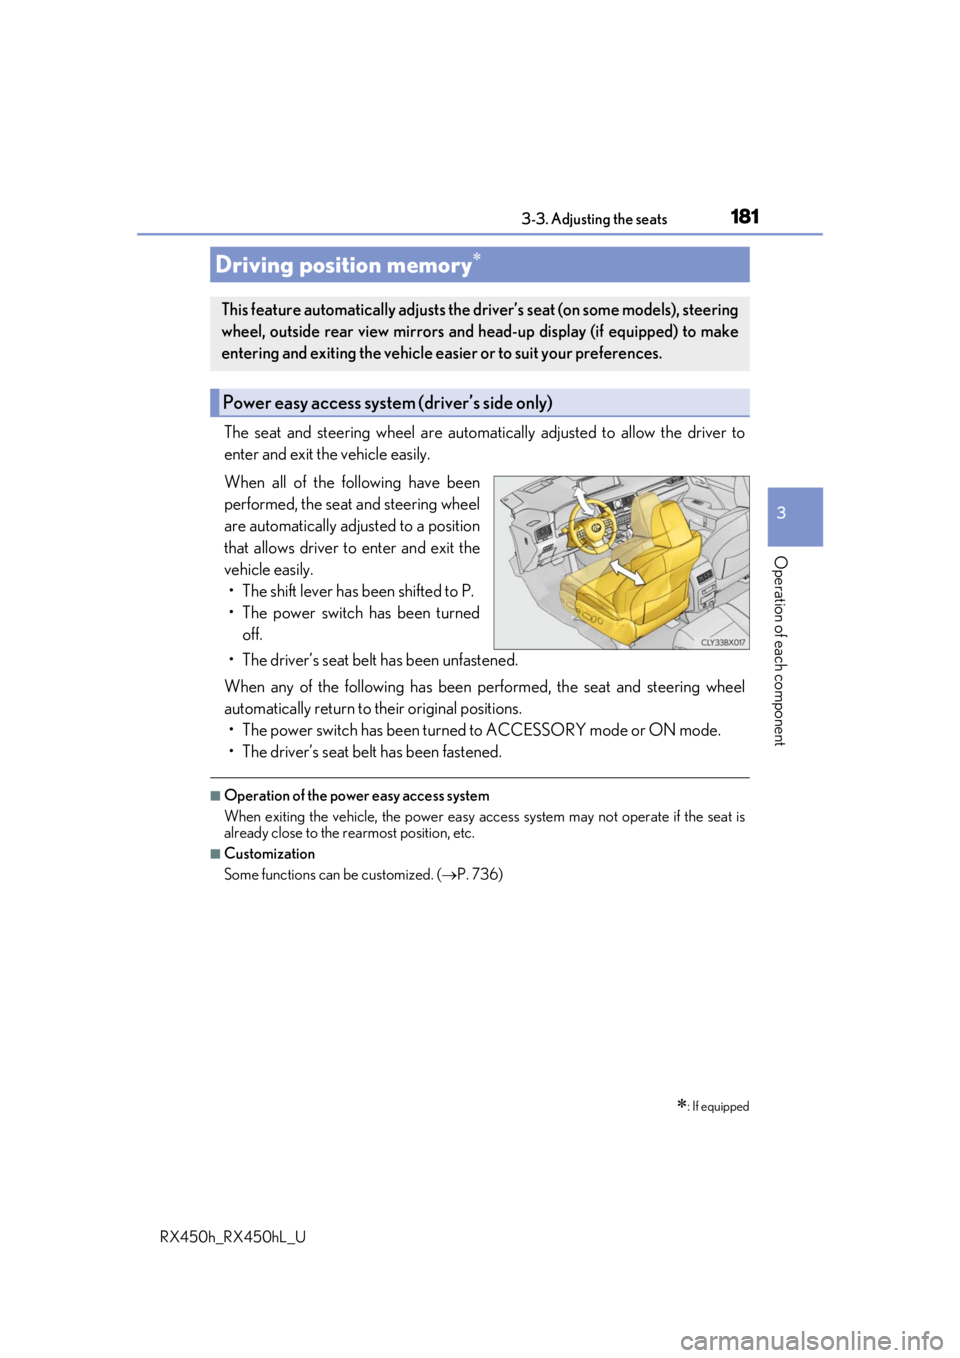
The seat and steering wheel are automatically adjusted to allow the driver to
enter and exit the vehicle easily.
When all of the following have been
performed, the seat and steering wheel
are automatically adjusted to a position
that allows driver to enter and exit the
vehicle easily. • The shift lever has been shifted to P.
• The power switch has been turned off.
• The driver’s seat belt has been unfastened.
When any of the following has been performed, the seat and steering wheel
automatically return to their original positions. • The power switch has been turned to ACCESSORY mode or ON mode.
• The driver’s seat belt has been fastened.
■Operation of the power easy access system
When exiting the vehicle, the power easy ac cess system may not operate if the seat is
already close to the rearmost position, etc.
■Customization
Some functions can be customized. ( P. 736)
Driving position memory
: If equipped
This feature automatically adjusts the driver’s seat (on some models), steering
wheel, outside rear view mirrors and head-up display (if equipped) to make
entering and exiting the vehicle easi er or to suit your preferences.
Power easy access system (driver’s side only)
Page 182 of 792
1823-3. Adjusting the seats
RX450h_RX450hL_U
Your preferred driving position (the positi on of the driver’s seat, steering wheel,
outside rear view mirrors and head-up display
*) can be recorded and recalled
by pressing a button.
Three different driving positions can be recorded into memory.
*: If equipped
■Recording procedure
Check that the shift lever is in P.
Turn the power switch to ON mode.
Adjust the driver’s seat, steering wh eel, outside rear view mirrors and
head-up display (if equipped) to the desired positions.
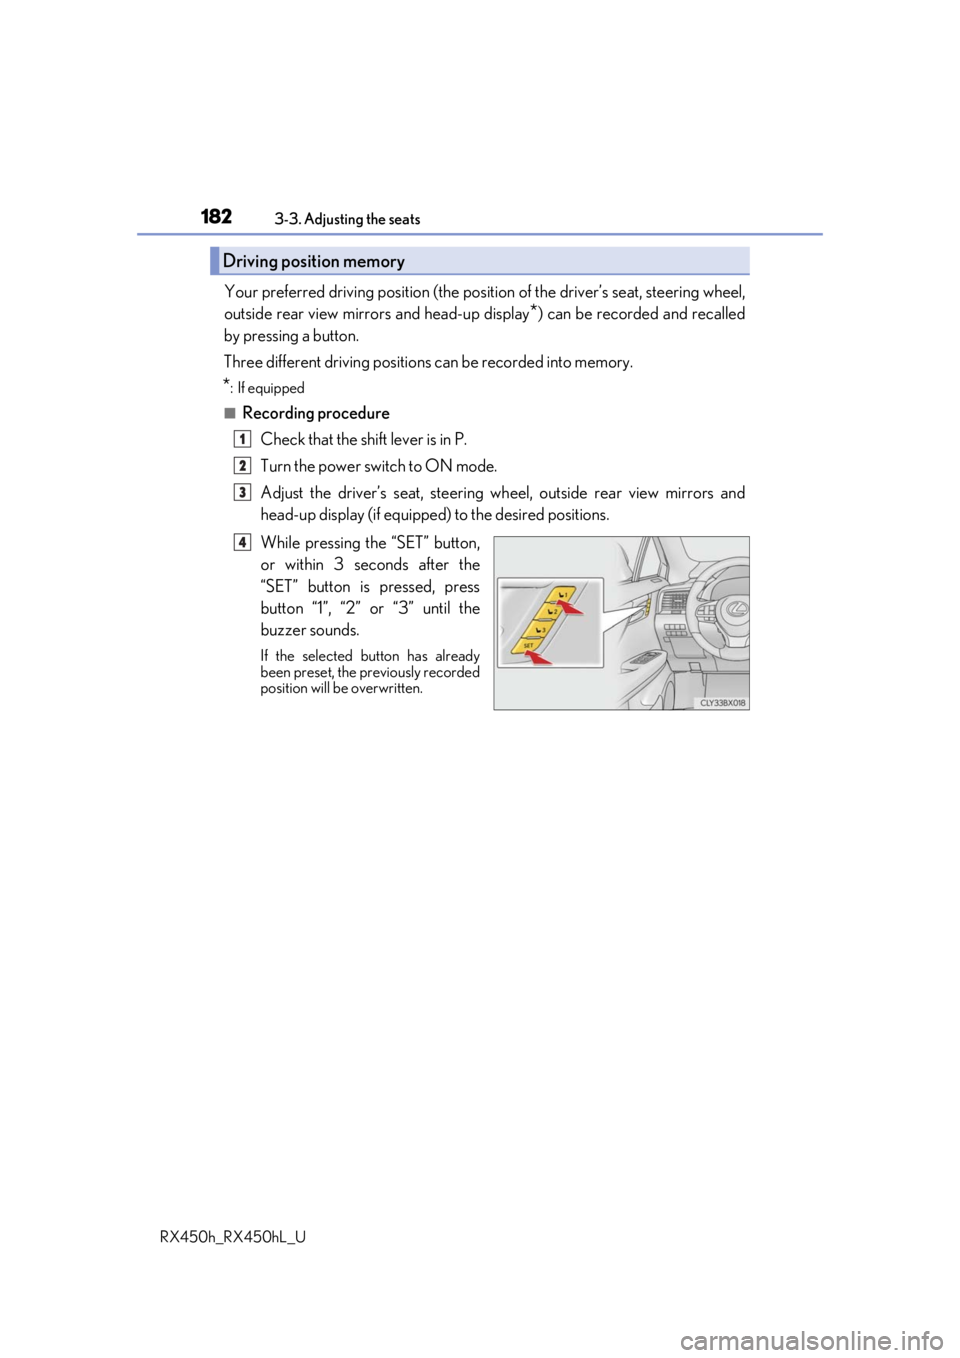
While pressing the “SET” button,
or within 3 seconds after the
“SET” button is pressed, press
button “1”, “2” or “3” until the
buzzer sounds.
If the selected button has already
been preset, the previously recorded
position will be overwritten.
Driving position memory
1
2
3
4
Page 183 of 792
1833-3. Adjusting the seats
3
Operation of each component
RX450h_RX450hL_U
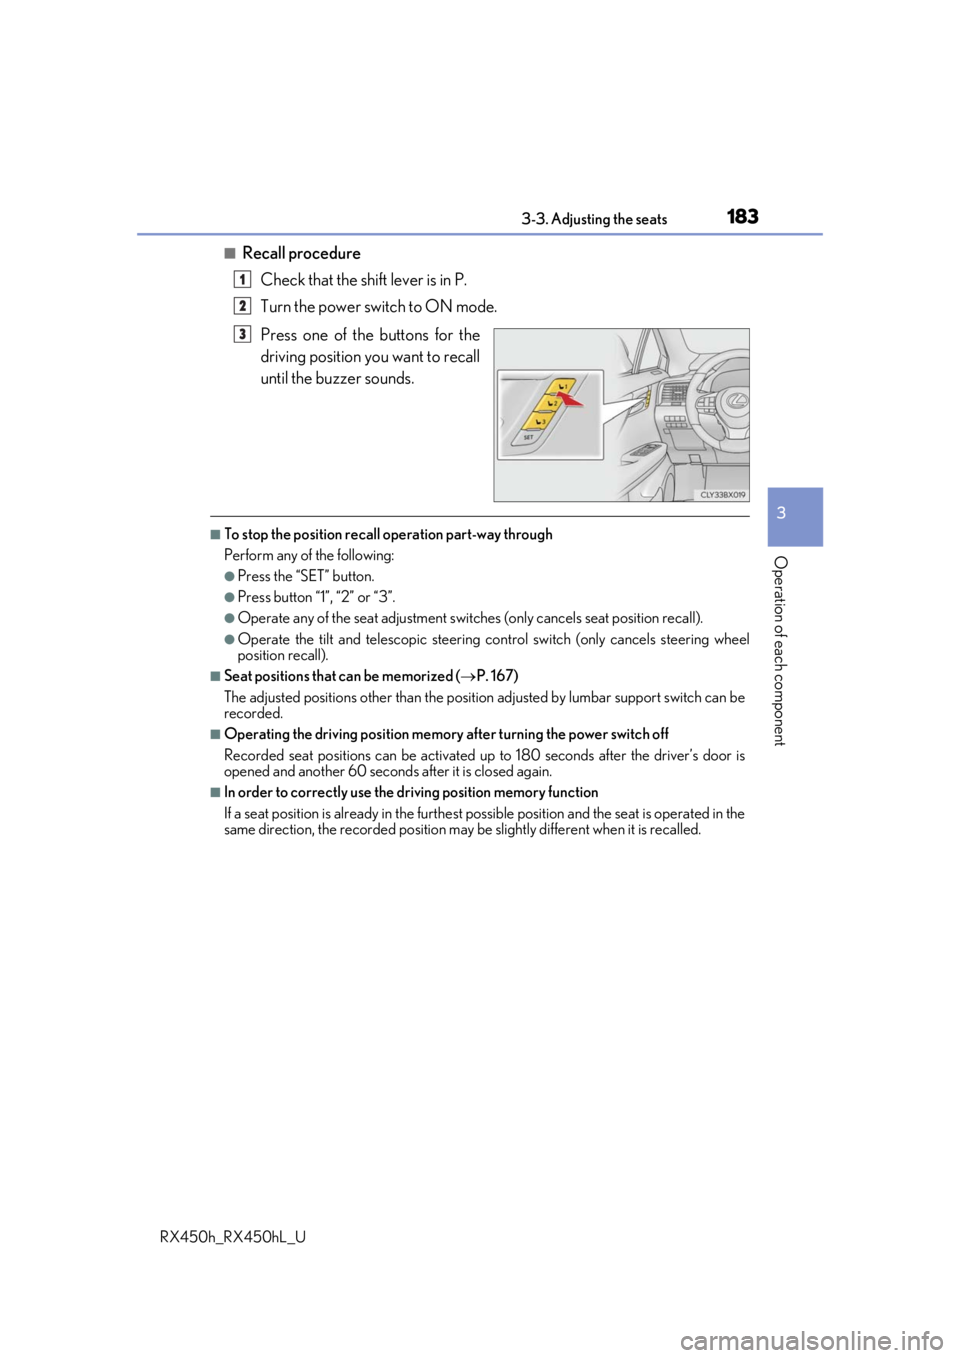
■Recall procedureCheck that the shift lever is in P.
Turn the power switch to ON mode.
Press one of the buttons for the
driving position you want to recall
until the buzzer sounds.
■To stop the position recall operation part-way through
Perform any of the following:
●Press the “SET” button.
●Press button “1”, “2” or “3”.
●Operate any of the seat adjustment switches (only cancels seat position recall).
●Operate the tilt and telescopic steering control switch (only cancels steering wheel
position recall).
■Seat positions that can be memorized ( P. 167)
The adjusted positions other than the position adjusted by lumbar support switch can be
recorded.
■Operating the driving position memory after turning the power switch off
Recorded seat positions can be activated up to 180 seconds after the driver’s door is
opened and another 60 seconds after it is closed again.
■In order to correctly use the driving position memory function
If a seat position is already in the furthest po ssible position and the seat is operated in the
same direction, the recorded position may be slightly different when it is recalled.
1
2
3
Page 184 of 792

1843-3. Adjusting the seats
RX450h_RX450hL_U
Each electronic key can be registered to recall your preferred driving position.
■Registering procedure
Record your driving position to button “1”, “2” or “3” before performing the
following:
Carry only the key you want to regist er, and then close the driver’s door.
If 2 or more keys are in the vehicle, the driving position cannot be recorded
properly.
Check that the shift lever is in P.
Turn the power switch to ON mode.
Recall the driving position that you want to record.
While pressing the recalled but-
ton, press and hold the door lock
switch (either lock or unlock) until
the buzzer sounds.
If the button could not be registered,
the buzzer sounds continuously for
approximately 3 seconds.
■Recall procedureMake sure that the doors are locked before recalling the driving position.
Carry the electronic key that has been registered to the driving position,
and then unlock and open the driver’s door using the smart access system
with push-button start or wireless remote control.
The driving position will move to the recorded position (not including the steering
wheel and head-up display
*). However, the seat will move to a position slightly
behind the recorded position in order to make entering the vehicle easier.
If the driving position is in a position th at has already been recorded, the seat and
outside rear view mirrors will not move.
*: If equipped
Turn the power switch to ACCESSORY mode or ON mode, or fasten a
seat belt.
The seat, steering wheel and head-up display (if equipped) will move to the
recorded position.
Memory recall function (driver’s side only)
1
2
3
4
1
2