2019 LEXUS RX450H tow
[x] Cancel search: towPage 151 of 792

1513-2. Opening, closing and locking the doors
3
Operation of each component
RX450h_RX450hL_U
■Situations in which the close & lock function may not operate properly
In the following situations, the close & lock function may not operate properly:
●If the switch on the lower part of the power back door ( P. 145) is pressed by a
hand which is holding an electronic key
●If the switch on the lower pa rt of the power back door (P. 145) is pressed
when the electronic key is in a bag, etc. that is placed on the ground
●If the switch on the lower pa rt of the power back door (P. 145) is pressed with
the electronic key not near the vehicle.
■Situations in which the touchless sensor may malfunction (vehicles with a touchless
power back door)
In the following situations, the touchless sensor may operate unintentionally.
To prevent unintentional operat ion, keep the electronic key out of the operational range
or disable the touchless sensor operation. ( P. 112)
●When a large amount of water is applied to the rear emblem, such as in heavy rain
●When the vehicle is being washed and water is applied to the rear emblem
●When dirt is wiped off the rear emblem
●If someone leans toward or against the rear emblem
●When a metal object is brought near the rear emblem
●When a vehicle cover is installed or removed near the rear emblem
■Situations in which the touchless sensor may not operate properly (vehicles with a
touchless power back door)
If the touchless sensor does not operate in the following situations, use the back door
opener switch to open the power back door. (P. 145)
●In the following situations, the sensitivity of the touchless sensor may be temporarily
reduced and the touchless sensor may not operate:
• When a large amount of water is applied to the rear emblem, such as in heavy rain
• When the vehicle is being washed and water is applied to the rear emblem
• For several seconds after dirt is wiped off the rear emblem
• When the rear emblem is covered with mud, snow, ice, etc.
• When the vehicle has been parked for a wh ile near objects that may move and con-
tact the rear emblem, such as tall grass or trees
• When an external radio wave source is near the touchless sensor
●The touchless sensor may not operate in the following situations:
• When an electronic ke y is not being carried
• When an electronic key is not within the operational range
• When an external radio wave source in terferes with the communication between
the vehicle and electronic key ( P. 160)
• When the power back door is not fully closed
• When a hand is held pa rallel to the rear emblem
*
*
: The detection settings can be changed by your Lexus dealer. ( P. 739)
■Customization
Some functions can be customized. ( P. 108, 736)
Page 160 of 792

1603-2. Opening, closing and locking the doors
RX450h_RX450hL_U
■Electronic Key battery-Saving Function
When battery-saving mode is set, battery depletion is minimized by stopping the elec-
tronic key from re ceiving radio waves.
■Conditions affecting operation
The smart access system with push-button st art, wireless remote control and immobilizer
system use weak radio waves. In the following situations, the communication between the
electronic key and the vehicle may be affect ed, preventing the smart access system with
push-button start, wireless remote control an d immobilizer system from operating prop-
erly. (Ways of coping: P. 692)
●When the electronic key battery is depleted
●Near a TV tower, electric power plant, gas st ation, radio station, large display, airport or
other facility that generates strong radio wave s or electrical noise
●When the electronic key is in contact with, or is covered by the following metallic
objects
• Cards to which aluminum foil is attached
• Cigarette boxes that have aluminum foil inside
• Metallic wallets or bags
•Coins
• Hand warmers made of metal
• Media such as CDs and DVDs
●When other wireless keys (that emit radio waves) are being used nearby
●When carrying the electronic key together with the following devices that emit radio
waves
• Portable radio, cellular phone, cordle ss phone or other wireless communication
devices
• Another vehicle’s electronic key, another electronic key of your vehicle, or a wireless
key that emits radio waves
• Personal computers or person al digital assistants (PDAs)
• Digital audio players
• Portable game systems
●If window tint with a metallic content or me tallic objects are attached to the rear win-
dow
●When the electronic key is placed near a battery charger or electronic devices
●When the vehicle is parked in a pay parking spot where radio waves are emitted
Press twice while pressing and holding .
Confirm that the electronic key indicator flashes
4 times.
While the battery-saving mode is set, the smart
access system with push
-button start cannot be
used. To cancel the function, press any of the
electronic key buttons.
Page 170 of 792
1703-3. Adjusting the seats
RX450h_RX450hL_U
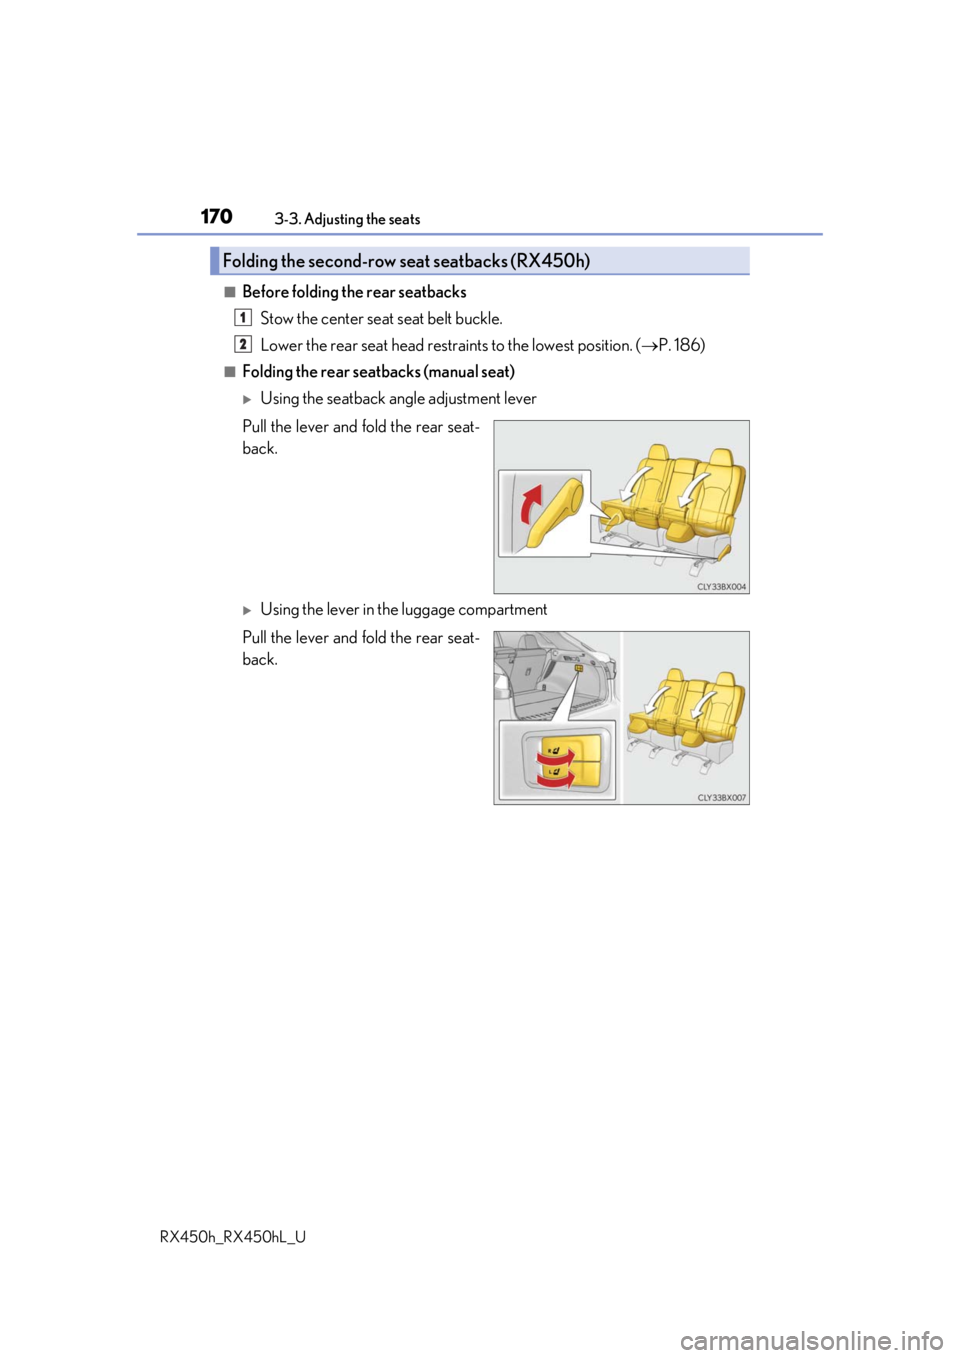
■Before folding the rear seatbacks Stow the center seat seat belt buckle.
Lower the rear seat head restra ints to the lowest position. (P. 186)
■Folding the rear seatbacks (manual seat)
Using the seatback angle adjustment lever
Pull the lever and fold the rear seat-
back.
Using the lever in the luggage compartment
Pull the lever and fold the rear seat-
back.
Folding the second-row seat seatbacks (RX450h)
1
2
Page 173 of 792
1733-3. Adjusting the seats
3
Operation of each component
RX450h_RX450hL_U
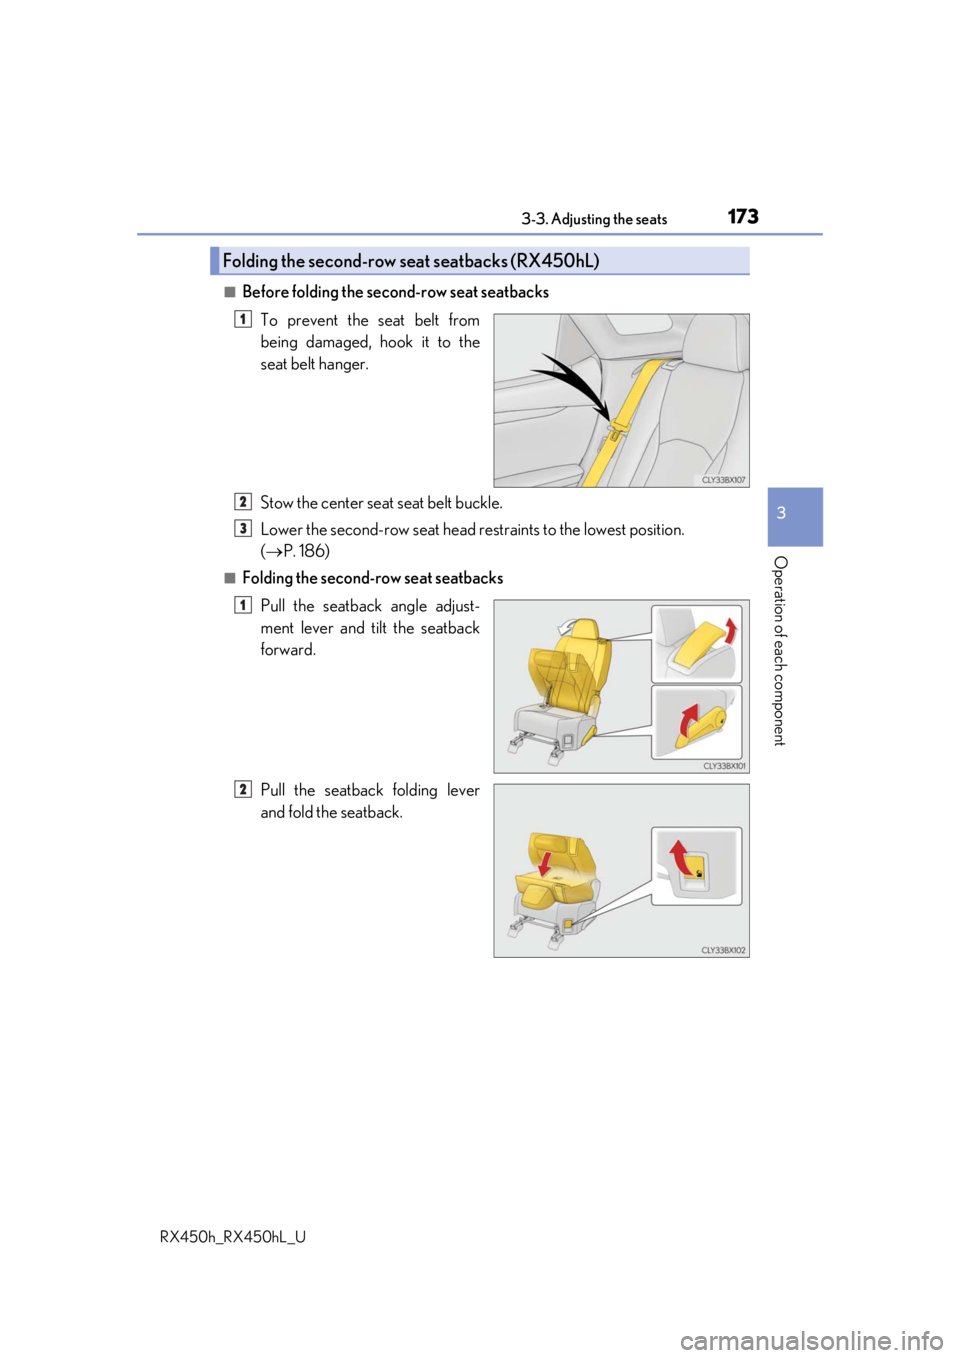
■Before folding the second-row seat seatbacksTo prevent the seat belt from
being damaged, hook it to the
seat belt hanger.
Stow the center seat seat belt buckle.
Lower the second-row seat head re straints to the lowest position.
( P. 186)
■Folding the second-row seat seatbacks
Pull the seatback angle adjust-
ment lever and tilt the seatback
forward.
Pull the seatback folding lever
and fold the seatback.
Folding the second-row seat seatbacks (RX450hL)
1
2
3
1
2
Page 180 of 792
1803-3. Adjusting the seats
RX450h_RX450hL_U
WARNING
■Jam protection function (power seats)
Observe the following precautions.
Failure to do so may result in death or serious injury.
●Never use any part of your body to intentionally activate the jam protection function.
●The jam protection function may not operate if something is caught just before the
fully folded position. Be careful so th at fingers, etc. do not get caught.
●The jam protection function may not operat e depending on the shape or position of
the obstruction. Be careful so that fingers, etc. do not get caught.
■Precautions for third-row seat (RX450hL)
When operating a third-row seat, make sure to press and hold the switch until the third-
row seat seatback is complete ly folded/upright. Do not use a third-row seat in a posi-
tion other than the completely upright position, as doing so may lead to death or seri-
ous injury in an accident. (If the switch is released while the seatback is still moving, a
buzzer will sound continuously until the seatback is completely folded/upright.)
NOTICE
■Before folding a rear seat seatback
●Second-row seats: Make sure to stow the center seat seat belt buckle and armrest
before folding the second-row seat seatbacks. ( P. 558)
●Third-row seats: Make sure th at the third-row seats and trays are free of obstructions
before folding the seatbacks. Otherwise the seat or tray may be damaged.
■When moving the second-row seat for third-row seat access (RX450hL)
Do not slide the second-row se at forward if an electronic device is connected to the
power outlet on the rear console. Otherwise, the second-row seat may contact the
electronic device, possibly resu lting in damage to the device.
■Before returning the third-row seat seatbacks to the upright position (RX450hL)
If the luggage cover is installed in the luggage compartmen t, make sure to remove it
before returning the third-row seat seatbacks. ( P. 541) Otherwise, the luggage
cover may be damaged.
Page 188 of 792
1883-3. Adjusting the seats
RX450h_RX450hL_U
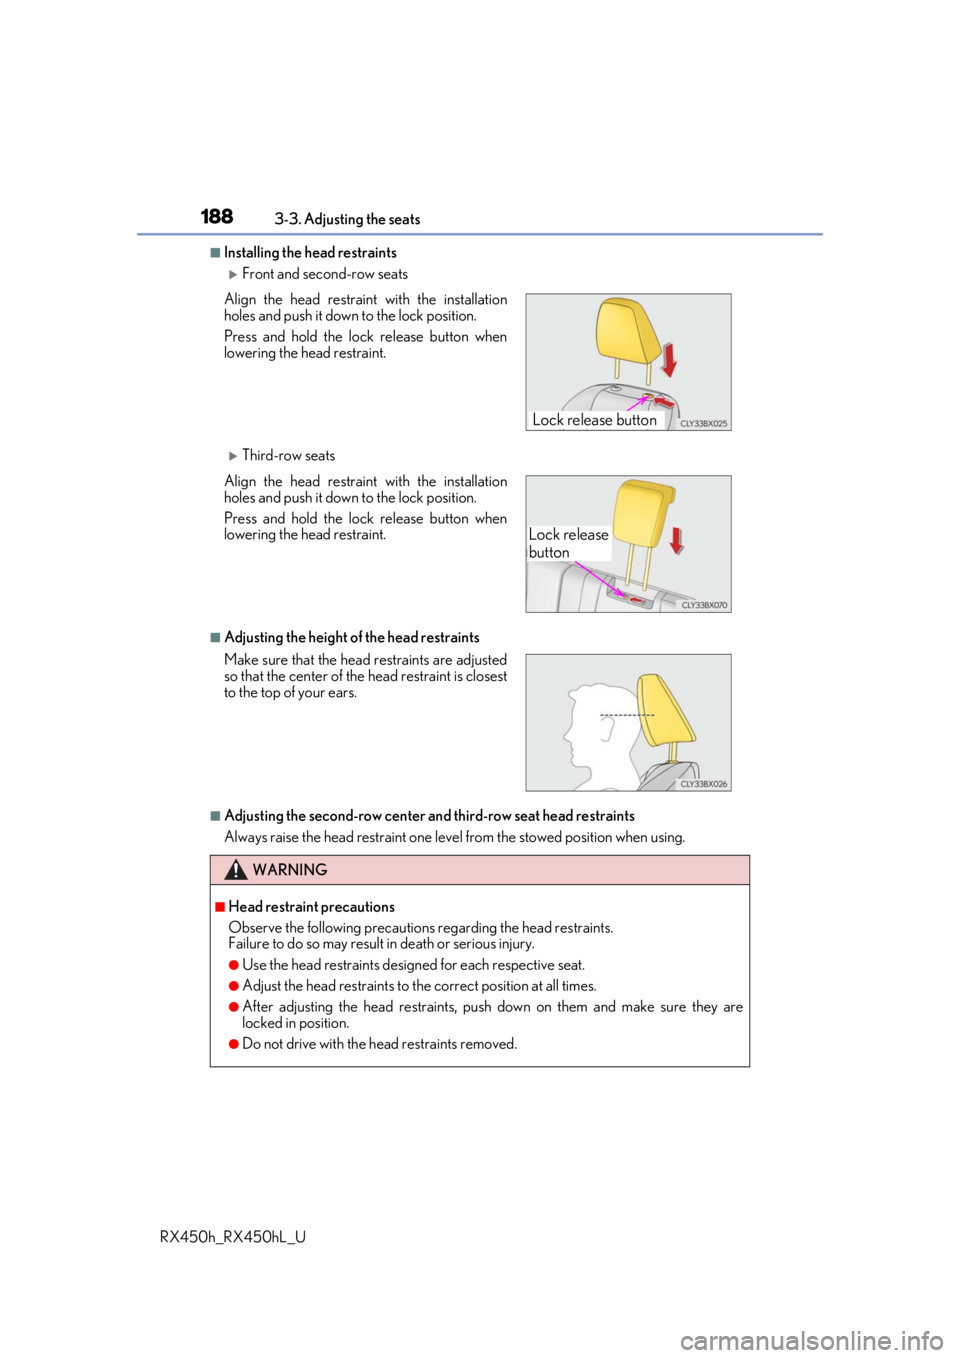
■Installing the head restraints
Front and second-row seats
Third-row seats
■Adjusting the height of the head restraints
■Adjusting the second-row center an d third-row seat head restraints
Always raise the head restraint one leve l from the stowed position when using.
Align the head restraint with the installation
holes and push it down to the lock position.
Press and hold the lock release button when
lowering the head restraint.
Align the head restrain
t with the installation
holes and push it down to the lock position.
Press and hold the lock release button when
lowering the head restraint.
Make sure that the head restraints are adjusted
so that the center of the head restraint is closest
to the top of your ears.
WARNING
■Head restraint precautions
Observe the following precautions regarding the head restraints.
Failure to do so may result in death or serious injury.
●Use the head restraints designed for each respective seat.
●Adjust the head restraints to th e correct position at all times.
●After adjusting the head restraints, push down on them and make sure they are
locked in position.
●Do not drive with the head restraints removed.
Lock release button
Lock release
button
Page 189 of 792
189
3
Operation of each component
RX450h_RX450hL_U3-4. Adjusting the steering wheel and mirrors
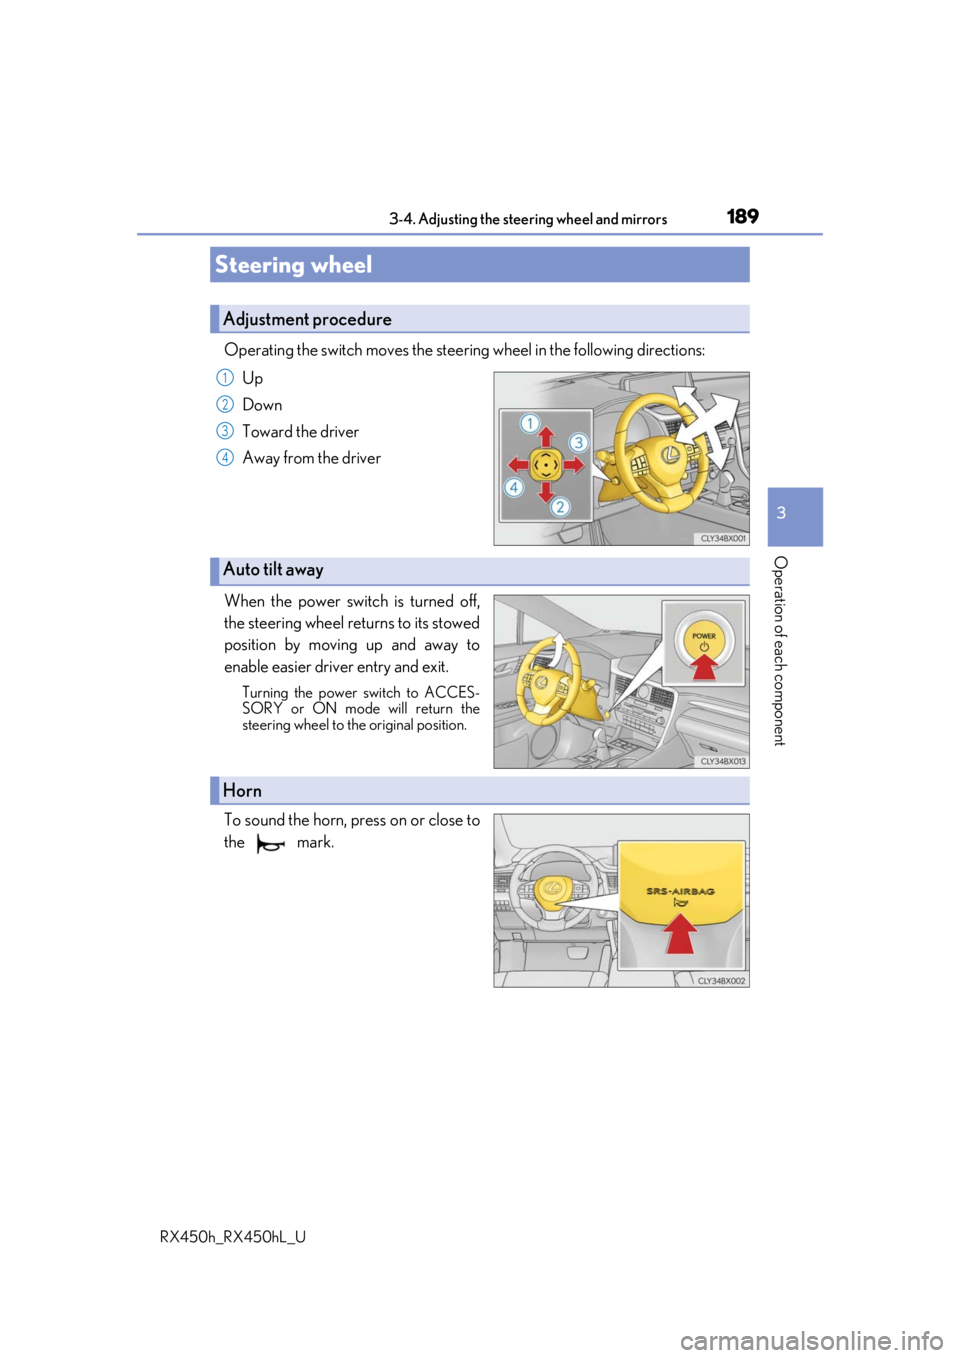
Operating the switch moves the steering wheel in the following directions:
Up
Down
Toward the driver
Away from the driver
When the power switch is turned off,
the steering wheel returns to its stowed
position by moving up and away to
enable easier driv er entry and exit.
Turning the power switch to ACCES-
SORY or ON mode will return the
steering wheel to the original position.
To sound the horn, press on or close to
the mark.
Steering wheel
Adjustment procedure
1
2
3
4
Auto tilt away
Horn
Page 195 of 792
1953-4. Adjusting the steering wheel and mirrors
3
Operation of each component
RX450h_RX450hL_U
■Mirror angle can be adjusted when
The power switch is in ACCESSORY or ON mode.
■When disconnecting and reconnecting 12-volt battery terminals (power type)
The automatic folding/extending mirror function will return to off as default. To turn the
function on, press the switch again to select on.
■When the mirrors are fogged up
The outside rear view mirrors can be cleare d using the mirror defoggers. Turn on the
rear window defogger to turn on the outside rear view mirror defoggers. ( P. 516)
■Automatic adjustment of the mirror angle (if equipped)
A desired mirror face angle can be entered to memory and recalled automatically by the
driving position memory. ( P. 181)
■Auto anti-glare function (if equipped)
When the anti-glare inside re ar view mirror is set to automatic mode, the outside rear
view mirrors will activate in conjunction with the anti-glare inside rear view mirror to
reduce reflected light. ( P. 191)
■Using automatic mode in cold weather (if equipped)
When automatic mode is used in cold weather, the door mirror could freeze up and
automatic stowing and return may not be possible. In this case, remove any ice and snow
from the door mirror, then either operate th e mirror using manual mode or move the mir-
ror by hand.
■Customization
Some functions can be customized. ( P. 736)
WARNING
■Important points while driving
Observe the following precautions while driving.
Failing to do so may result in loss of control of the vehicle and cause an accident, result-
ing in death or serious injury.
●Do not adjust the mirrors while driving.
●Do not drive with the mirrors folded.
●Both the driver and passenger side mirrors must be extended and properly adjusted
before driving.
■When a mirror is moving
To avoid personal injury and mirror malfunctio n, be careful not to get your hand caught
by the moving mirror.
■When the mirror defoggers are operating
Do not touch the rear view mirror surfaces, as they can become very hot and burn you.