Page 175 of 777

174 3-3. Adjusting the seats
RX350/RX350L_U ■
Recall procedure
Check that the shift lever is in P.
Turn the engine switch to IGNITION ON mode.
Press one of the buttons for the
driving position you want to recall
until the buzzer sounds. ■
To stop the position recall operation part-way through
Perform any of the following: ●
Press the “SET” button. ●
Press button “1”, “2” or “3”. ●
Operate any of the seat adjustment switches (only cancels seat position recall). ●
Operate the tilt and telescopic steering control switch (only cancels steering wheel
position recall). ■
Seat positions that can be memorized ( P. 156)
The adjusted positions other than the position adjusted by lumbar support switch can be
recorded. ■
Operating the driving position memory after turning the engine switch off
Recorded seat positions can be activated up to 180 seconds after the driver’s door is
opened and another 60 seconds after it is closed again. ■
In order to correctly use the dr iving position memory function
If a seat position is already in the furthest po ssible position and the seat is operated in the
same direction, the recorded position may be slightly di fferent when it is recalled.1
2
3
Page 395 of 777
394
RX350/RX350L_U 5-1. Basic Operations
Disc slot
“TUNE•SCROLL” knob
Select a radio station band, track or file.
Except radio and A/V mode: Pause or resume playing a track or file.
Radio and A/V mode: Turn mute on/off.
Select preset radio stations, or access a desired track or file.
Display the media top screen.
Display the radio top screen.
Eject a disc.
“PWR•VOL” knob
Press to turn the audio system on/o ff, and turn to adjust the volume.Lexus Display Audio system
: If equippedUse the following buttons to star t listening to the audio system.
Lexus Display Audio operation buttons
1
2
3
4
5
6
7
8
Page 502 of 777
5016-1. Basic operation of the Remote Touch screen
6
Interior features
RX350/RX350L_U ■
Selecting the operation screen
When selecting the main display, move the Remote Touch knob to the left.
When selecting the side display, move the Remote Touch knob to the right. ■
Main display
For details about the functions and operat ion of the main display, refer to the
respective section and “NAVIG ATION SYSTEM OWNER’S MANUAL”.■
Side display
Basic screens
To change the screen displayed on the side display, use the screen buttons on
the right side of the display.
Navigation system
*Audio
* Phone
* Vehicle information ( P. 118)
Air conditioning system
( P. 509)
Interruption screens
Each of the following screens is displayed automatically in accordance with
conditions.
• Intuitive parking assist (if equipped) ( P. 327)
•Phone
*• Destination Assist
*•Driving mode ( P. 373)
* : Refer to the “NAVIGATION SYSTEM OWNER’S MANUAL”.Split-screen display operation
1
2
3
4
5
Page 545 of 777
544 6-5. Using the other interior features
RX350/RX350L_U
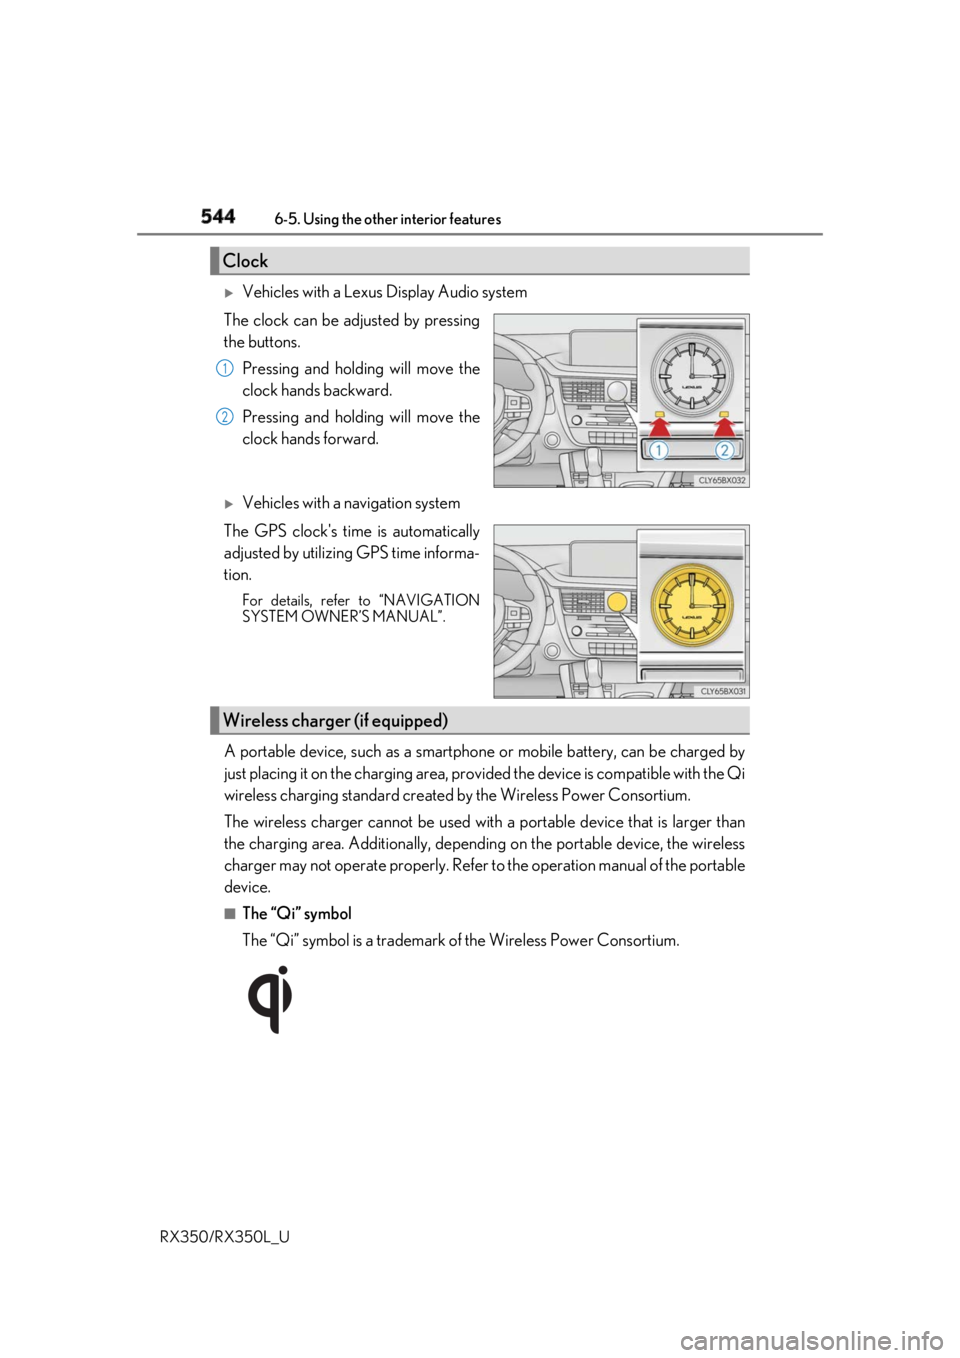
Vehicles with a Lexus Display Audio system
The clock can be adjusted by pressing
the buttons.
Pressing and holding will move the
clock hands backward.
Pressing and holding will move the
clock hands forward.
Vehicles with a navigation system
The GPS clock's time is automatically
adjusted by utilizing GPS time informa-
tion. For details, refer to “NAVIGATION
SYSTEM OWNER’S MANUAL”.
A portable device, such as a smartphone or mobile battery, can be charged by
just placing it on the charging area, prov ided the device is compatible with the Qi
wireless charging standard created by the Wireless Power Consortium.
The wireless charger cannot be used with a portable device that is larger than
the charging area. Additionally, dependin g on the portable device, the wireless
charger may not operate properly. Refer to the operation manual of the portable
device. ■
The “Qi” symbol
The “Qi” symbol is a trademark of the Wireless Power Consortium.Clock 1
2
Wireless charger (if equipped)
Page 558 of 777
5576-5. Using the other interior features
6
Interior features
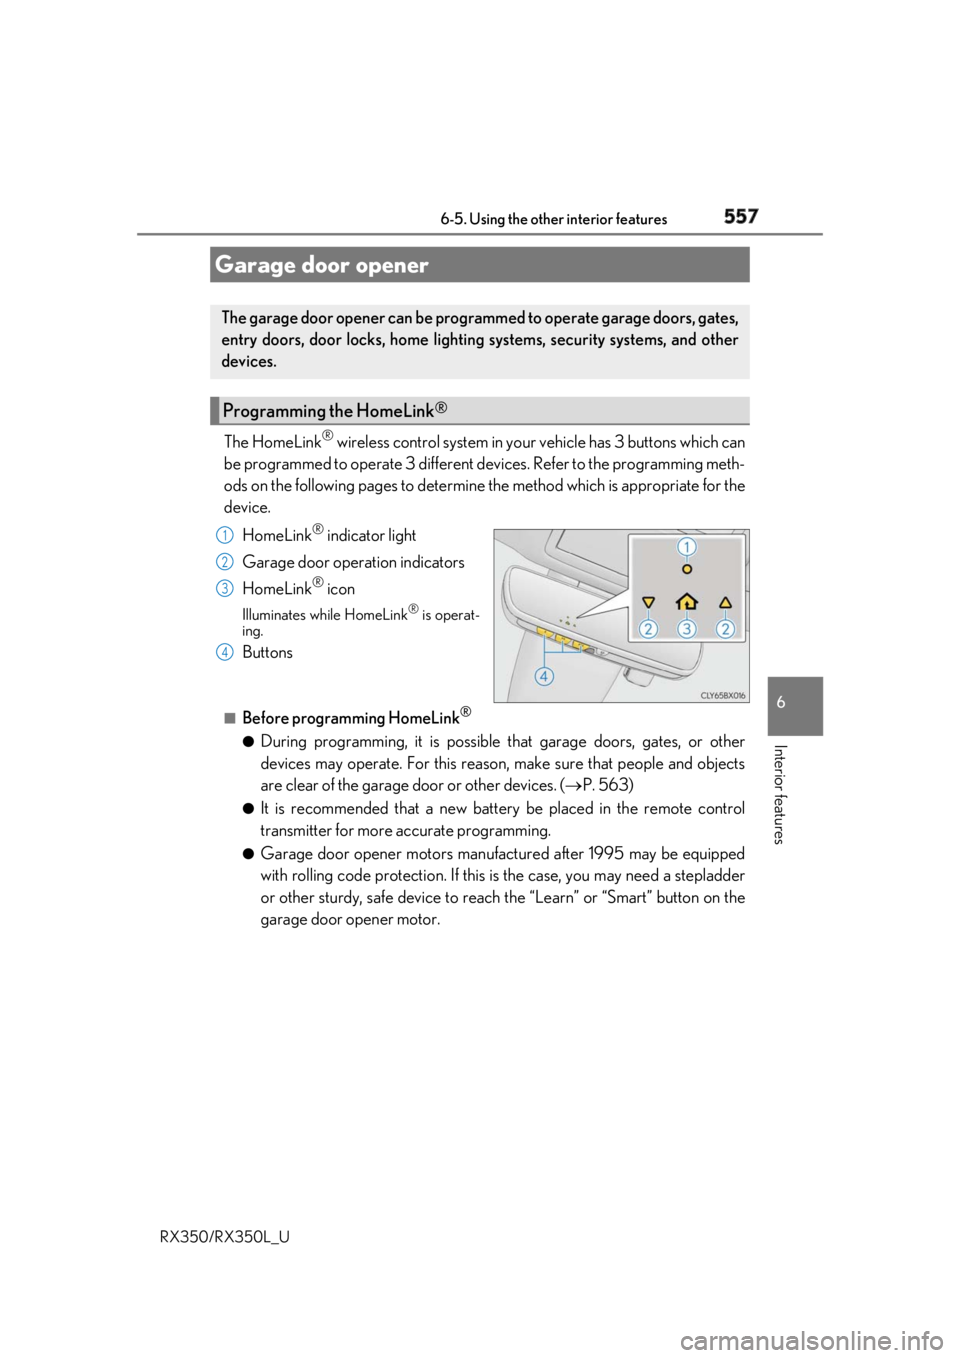
RX350/RX350L_U The HomeLink ®
wireless control system in your vehicle has 3 buttons which can
be programmed to operate 3 different de vices. Refer to the programming meth-
ods on the following pages to determine the method which is appropriate for the
device.
HomeLink ®
indicator light
Garage door operation indicators
HomeLink ®
iconIlluminates while HomeLink ®
is operat-
ing.
Buttons ■
Before programming HomeLink ®
●
During programming, it is possible that garage doors, gates, or other
devices may operate. For this reason, make sure that people and objects
are clear of the garage door or other devices. ( P. 563)●
It is recommended that a new batter y be placed in the remote control
transmitter for more accurate programming. ●
Garage door opener motors manufa ctured after 1995 may be equipped
with rolling code protection. If this is the case, you may need a stepladder
or other sturdy, safe device to reach the “Learn” or “Smart” button on the
garage door opener motor.Garage door opener The garage door opener can be programmed to operate garage doors, gates,
entry doors, door locks, home lightin g systems, security systems, and other
devices.
Programming the HomeLink ®
1
2
3
4
Page 559 of 777
558 6-5. Using the other interior features
RX350/RX350L_U ■
Programming HomeLink ®
Steps through must be performed within 60 seconds, otherwise the
indicator light will stop flashing and pr ogramming will not be able to be com-
pleted.
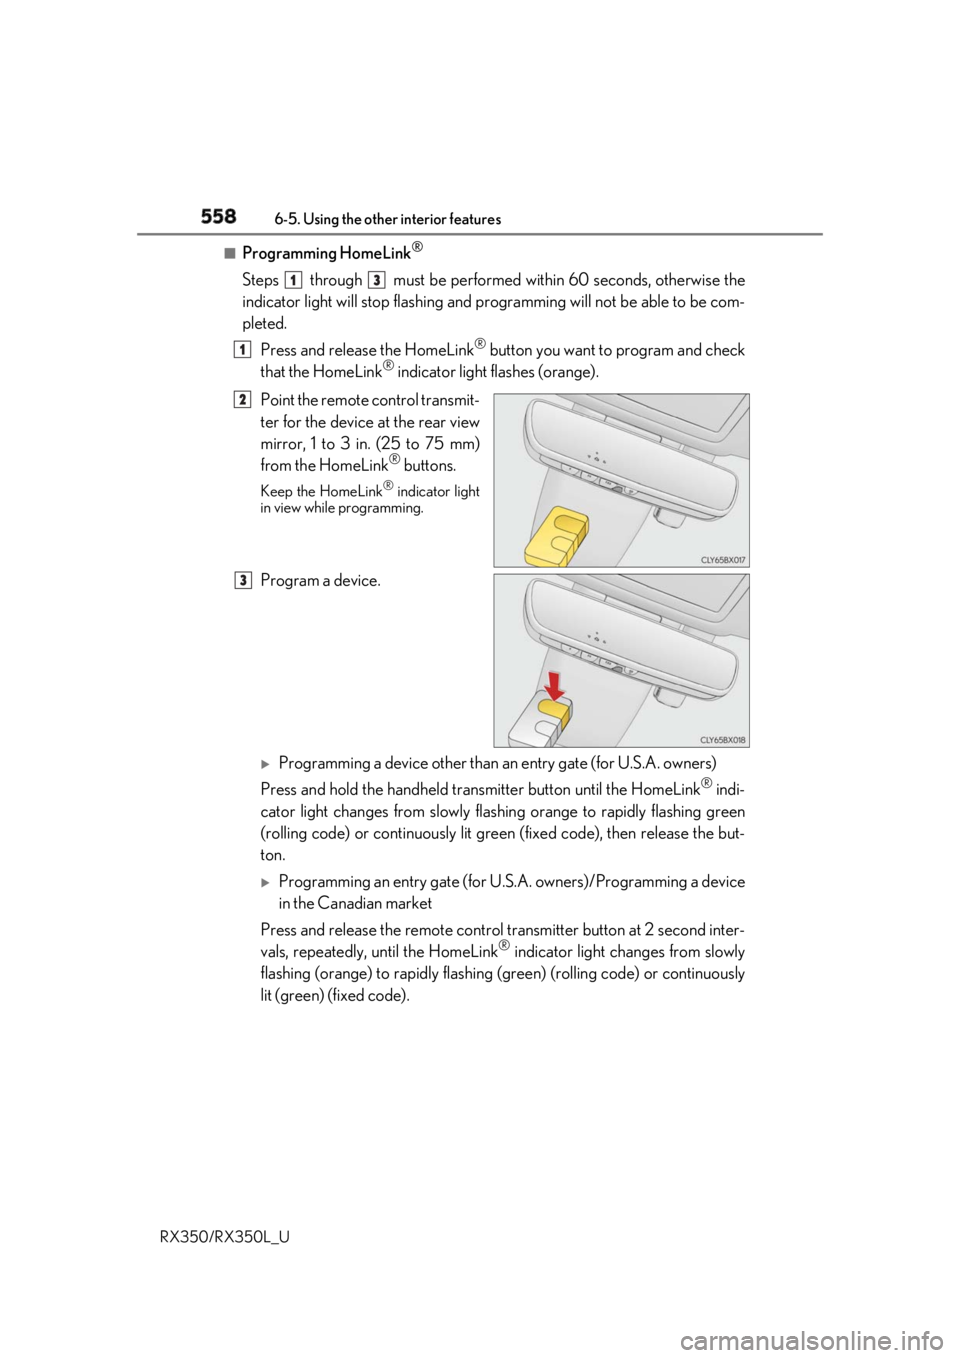
Press and release the HomeLink ®
button you want to program and check
that the HomeLink ®
indicator light flashes (orange).
Point the remote control transmit-
ter for the device at the rear view
mirror, 1 to 3 in. (25 to 75 mm)
from the HomeLink ®
buttons.Keep the HomeLink ®
indicator light
in view while programming.
Program a device.
Programming a device other than an entry gate (for U.S.A. owners)
Press and hold the handheld transmitter button until the HomeLink ®
indi-
cator light changes from slowly flashi ng orange to rapidly flashing green
(rolling code) or continuously lit green (fixed code), then release the but-
ton.
Programming an entry gate (for U. S.A. owners)/Programming a device
in the Canadian market
Press and release the remo te control transm itter button at 2 second inter-
vals, repeatedly, until the HomeLink ®
indicator light changes from slowly
flashing (orange) to rapidly flashing (green) (rolling code) or continuously
lit (green) (fixed code). 1 3
1
2
3
Page 560 of 777
5596-5. Using the other interior features
6
Interior features
RX350/RX350L_U Test the HomeLink ®
operation by pressing the newly programmed button
and observing the indicator light: ●
Indicator light illuminates: Programming of a fixed code device has com-
pleted. The garage door or other de vice should operate when a Home-
Link ®
button is pressed and released.●
Indicator light flashes rapidly: The garage door opener motor or other
device is equipped with a rolling co de. To complete programming, firmly
press and hold the HomeLink ®
button for 2 seconds then release it.●
If the garage door or other device does not operate, proceed to “Pro-
gramming a rollin g code system”.
Repeat the steps above to program anot her device for any of the remaining
HomeLink ®
buttons.■
Programming a rolling code system
2 or more people may be necessary to complete rolling code programming.
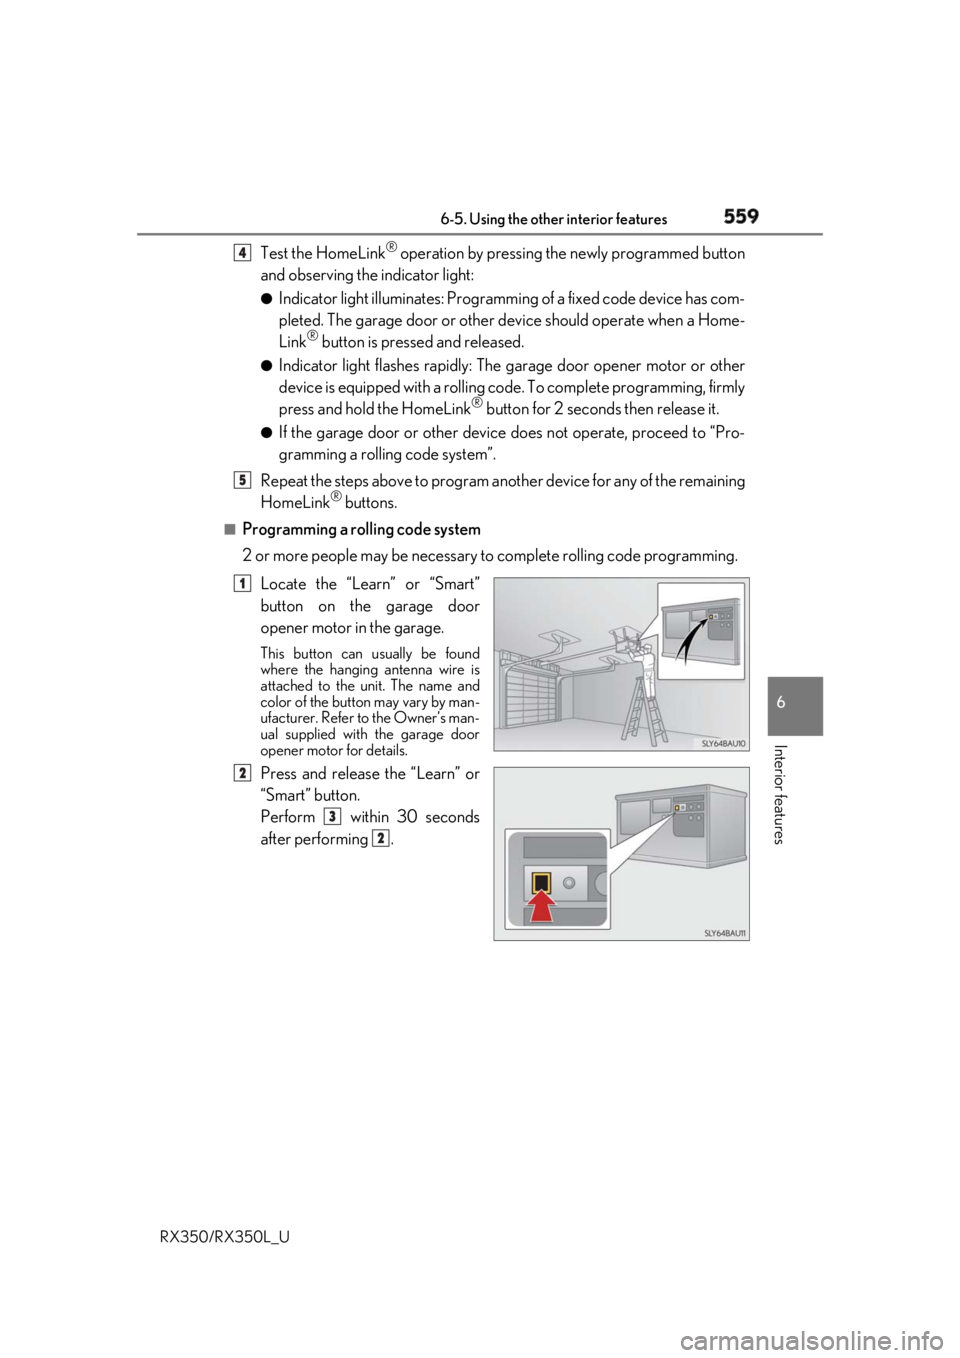
Locate the “Learn” or “Smart”
button on the garage door
opener motor in the garage. This button can usually be found
where the hanging antenna wire is
attached to the unit. The name and
color of the button may vary by man-
ufacturer. Refer to the Owner’s man-
ual supplied with the garage door
opener motor for details.
Press and release the “Learn” or
“Smart” button.
Perform within 30 seconds
after performing . 4
5
1
2
3
2
Page 562 of 777
5616-5. Using the other interior features
6
Interior features
RX350/RX350L_U ■
Reprogramming a single HomeLink ®
button
When the following procedure is pe rformed, buttons which already have
devices registered to them can be overwritten:
With one hand, press and hold the desired HomeLink ®
button.
When the HomeLink ®
indicator starts flashing (orange), continue to hold
the HomeLink ®
button and perform “Programming HomeLink ®
” (it
takes 20 seconds for the HomeLink ®
indicator to start flashing).
Press the appropriate HomeLink ®
button. The HomeLink ®
indicator light
should turn on.
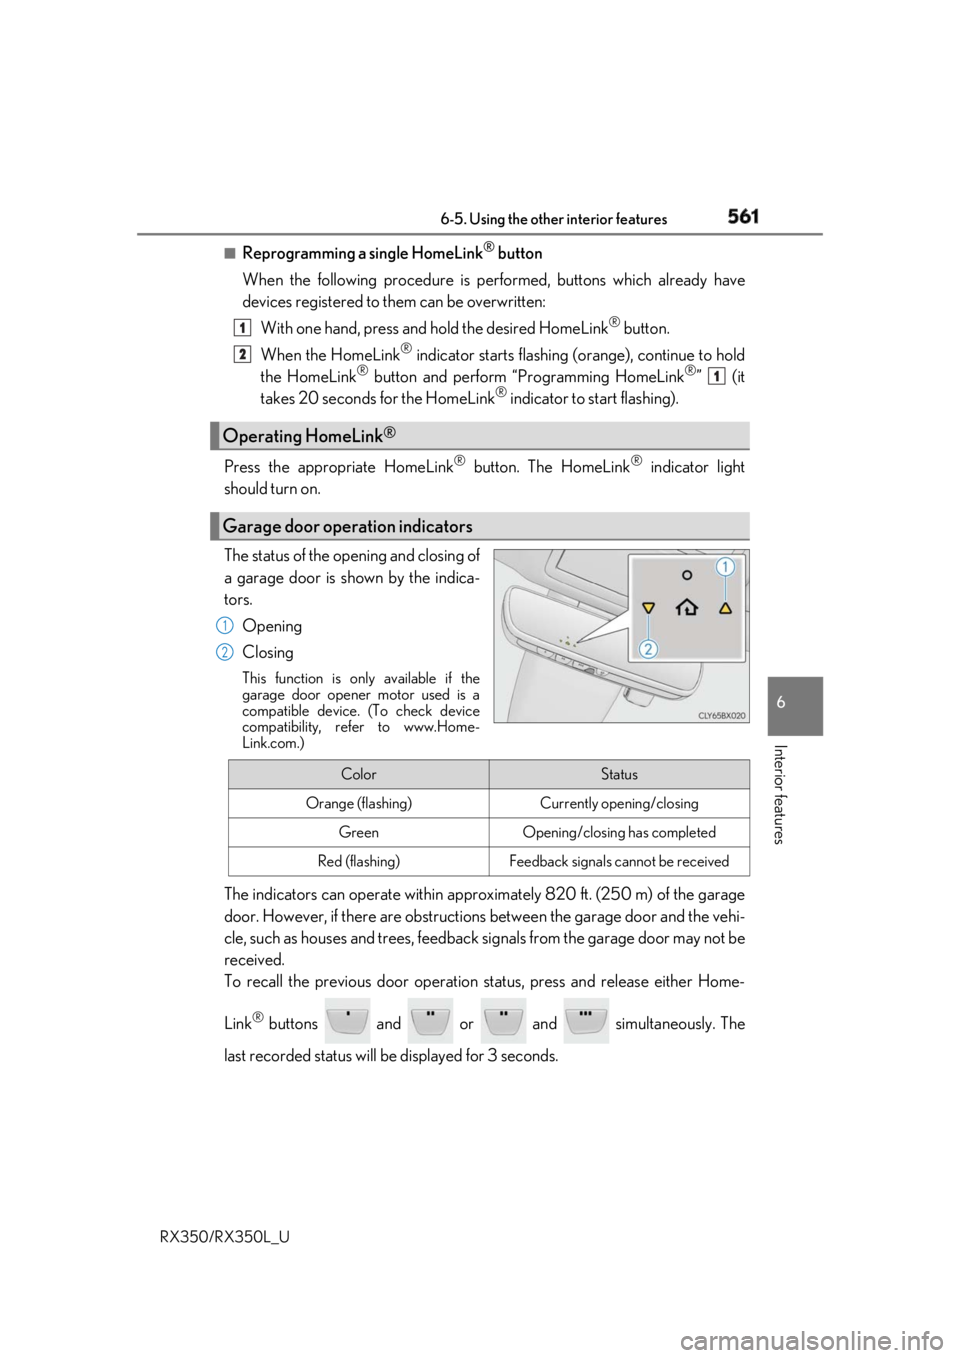
The status of the opening and closing of
a garage door is shown by the indica-
tors.
Opening
Closing This function is only available if the
garage door opener motor used is a
compatible device. (To check device
compatibility, refer to www.Home-
Link.com.)
The indicators can operate wi thin approximately 820 ft. (250 m) of the garage
door. However, if there are obstructions between the garage door and the vehi-
cle, such as houses and trees, feedback signals from the garage door may not be
received.
To recall the previous door operation status, press and release either Home-
Link ®
buttons and or and simultaneously. The
last recorded status will be displayed for 3 seconds.Operating HomeLink ®
Garage door operation indicators 1
2
1
1
2
Color Status
Orange (flashing) Currently opening/closing
Green Opening/closing has completed
Red (flashing) Feedback signals cannot be received