2019 Lexus ES300h remote control
[x] Cancel search: remote controlPage 253 of 456
2535-3. Using the air conditioning system
5
Interior features
5-3.Using the air conditioning system
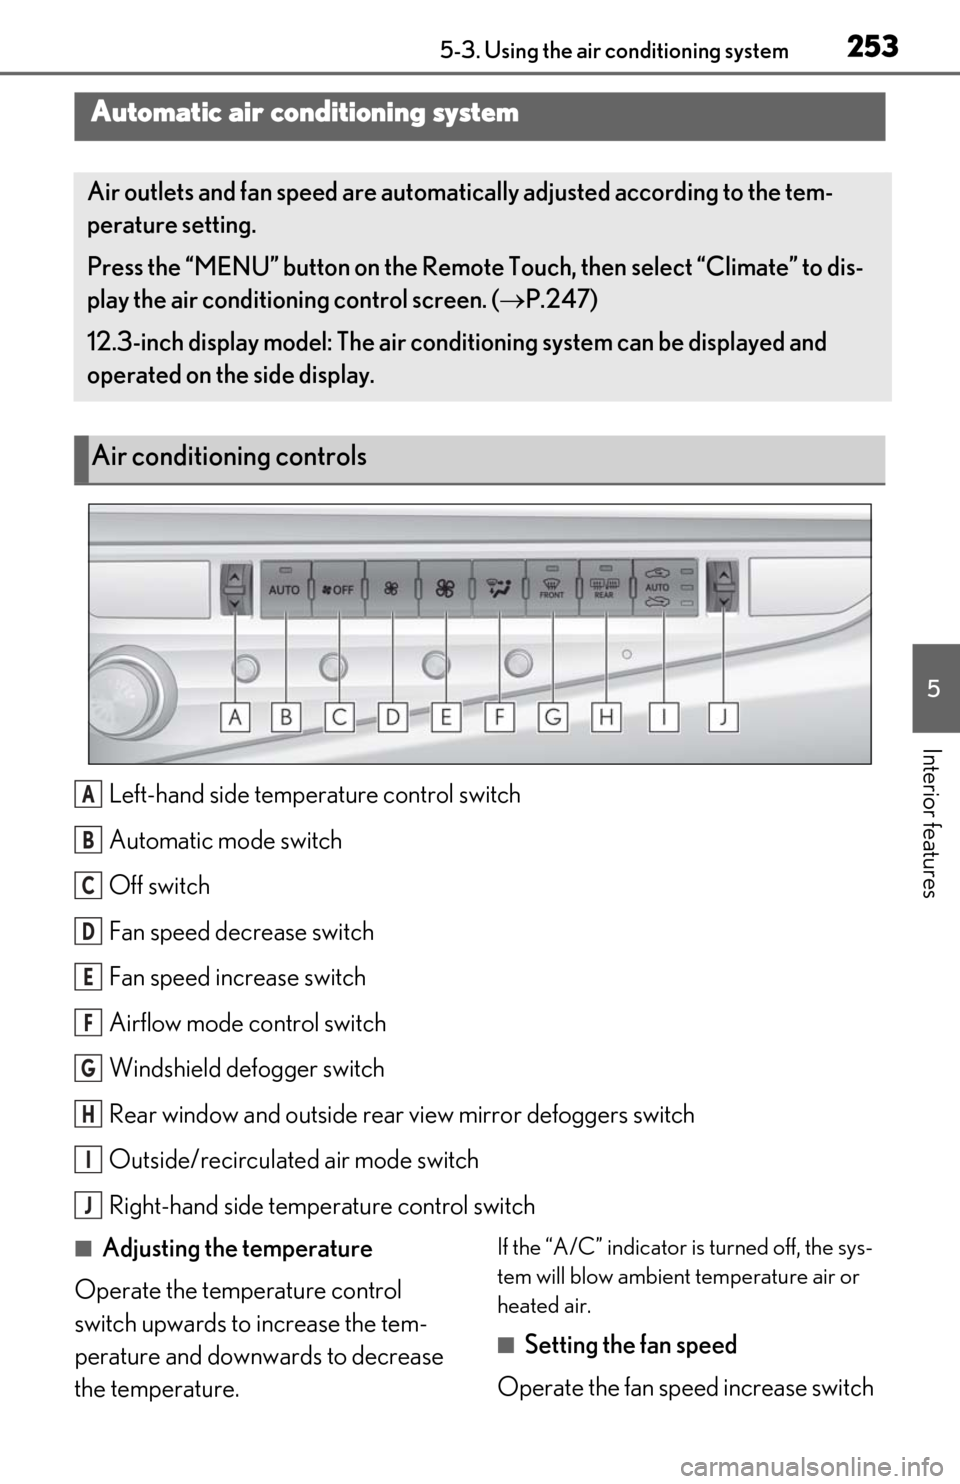
Left-hand side temperature control switch
Automatic mode switch
Off switch
Fan speed decrease switch
Fan speed increase switch
Airflow mode control switch
Windshield defogger switch
Rear window and outside rear view mirror defoggers switch
Outside/recirculated air mode switch
Right-hand side temp erature control switch
■Adjusting the temperature
Operate the temperature control
switch upwards to increase the tem-
perature and downwards to decrease
the temperature.If the “A/C” indicator is turned off, the sys-
tem will blow ambient temperature air or
heated air.
■Setting the fan speed
Operate the fan speed increase switch
Automatic air conditioning system
Air outlets and fan speed are automati cally adjusted according to the tem-
perature setting.
Press the “MENU” button on the Remote Touch, then select “Climate” to dis-
play the air conditioning control screen. ( P.247)
12.3-inch display model: The air condit ioning system can be displayed and
operated on the side display.
Air conditioning controls
A
B
C
D
E
F
G
H
I
J
Page 256 of 456
2565-3. Using the air conditioning system
■Main control screen
Using the touchpad of the Remote
Touch, select the button on the screen.
to can be adjusted by perform-
ing the following operations.
Flick operation: Move the pointer to
the desired item and flick the touchpad
up or down.
The item can be adjusted by one level.
Trace operation: After selecting the
desired item, trace the pad surface.
The item can be adjusted by the amount
that you trace.
Trace operation cannot be used while driv-
ing.
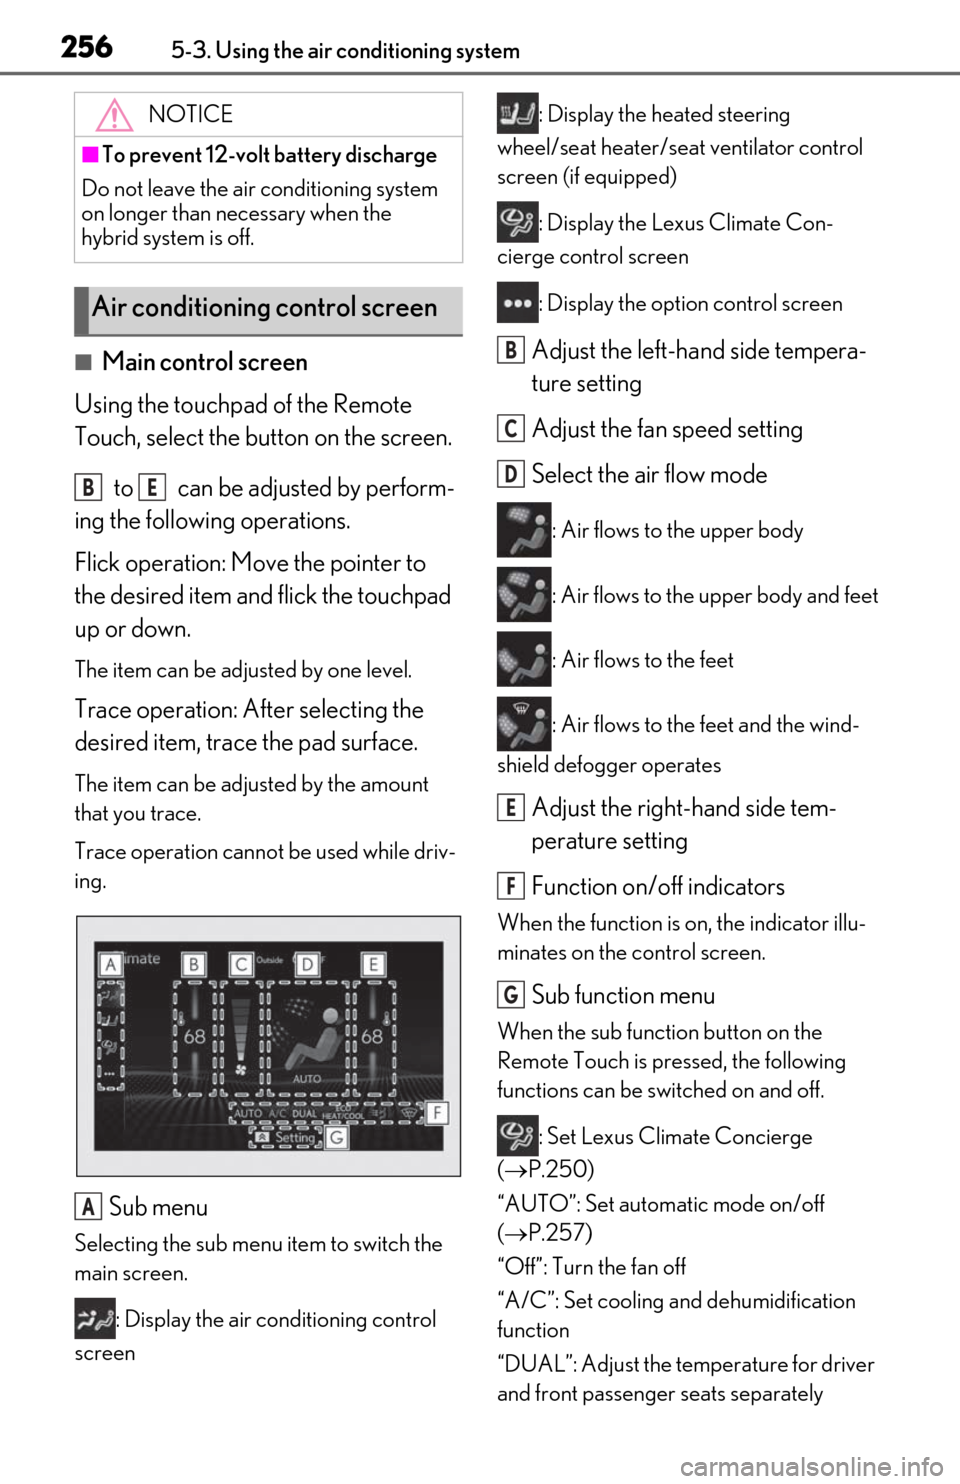
Sub menu
Selecting the sub menu item to switch the
main screen.
: Display the air conditioning control
screen : Display the heated steering
wheel/seat heater/sea t ventilator control
screen (if equipped)
: Display the Lexus Climate Con-
cierge control screen
: Display the option control screen
Adjust the left-hand side tempera-
ture setting
Adjust the fan speed setting
Select the air flow mode
: Air flows to the upper body
: Air flows to the upper body and feet
: Air flows to the feet
: Air flows to the feet and the wind-
shield defogger operates
Adjust the right-hand side tem-
perature setting
Function on/off indicators
When the function is on, the indicator illu-
minates on the control screen.
Sub function menu
When the sub function button on the
Remote Touch is pressed, the following
functions can be switched on and off.
: Set Lexus Climate Concierge
( P.250)
“AUTO”: Set automatic mode on/off
( P.257)
“Off”: Turn the fan off
“A/C”: Set cooling and dehumidification
function
“DUAL”: Adjust the temperature for driver
and front passenger seats separately
NOTICE
■To prevent 12-volt battery discharge
Do not leave the air conditioning system
on longer than necessary when the
hybrid system is off.
Air conditioning control screen
BE
A
B
C
D
E
F
G
Page 261 of 456
2615-3. Using the air conditioning system
5
Interior features
*: If equipped
WARNING
■To prevent the windshield defogger
from operating improperly
Do not place anything on the instrument
panel which may cover the air outlets.
Otherwise, air flow may be obstructed,
preventing the windshield defoggers
from defogging.
Heated steering wheel*/seat
h
eaters*/seat ventilators*
Heated steering wheel
Warms up the grip of the steering wheel
Seat heaters
Warm up the seat upholstery
Seat ventilators
Maintain good air flow by sucking air
into the seats
Press the “MENU” button on the
Remote Touch and select “Climate”
to display the air conditioning con-
trol screen. Then, select on the
sub menu ( P.255) to display the
heated steering wheel/seat heat-
ers/seat ventilators control screen.
WARNING
■To prevent minor burn injuries
Care should be taken if anyone in the fol-
lowing categories comes in contact with
the steering wheel or seats when the
heater is on:
●Babies, small children, the elderly, the
sick and the physically challenged
●Persons with sensitive skin
●Persons who are fatigued
●Persons who have taken alcohol or
drugs that induce sleep (sleeping
drugs, cold remedies, etc.)
Page 263 of 456
2635-3. Using the air conditioning system
5
Interior features
■Operation condition
The power switch is in ON mode.
■Air conditioning system-linked control
mode
When the seat ventilator fan speed level is
Hi (when AUTO is selected), the seat venti-
lator fan speed may become higher
according to the fan speed of the air condi-
tioning system.
■When AUTO mode is selected
The following functions may turn off
according to the air conditioning set tem-
perature, outside temperature, etc.
●Seat heaters
●Seat ventilators
■Stored settings
When the power switch is turned to ON
mode, the following stored settings are
recalled.
●Seat heaters
●Seat ventilators
■Main display
Using the touchpad of the Remote
Touch, select the button on the screen.
to can be adjusted by perform-
ing the following operations.
Flick operation: Move the pointer to
the desired item and flick the touchpad
up or down.
The item can be adjusted by one level.
Trace operation: After selecting the
desired item, trace the pad surface.
The item can be adjusted by the amount
that you trace.
Trace operation cannot be used while driv-
ing.
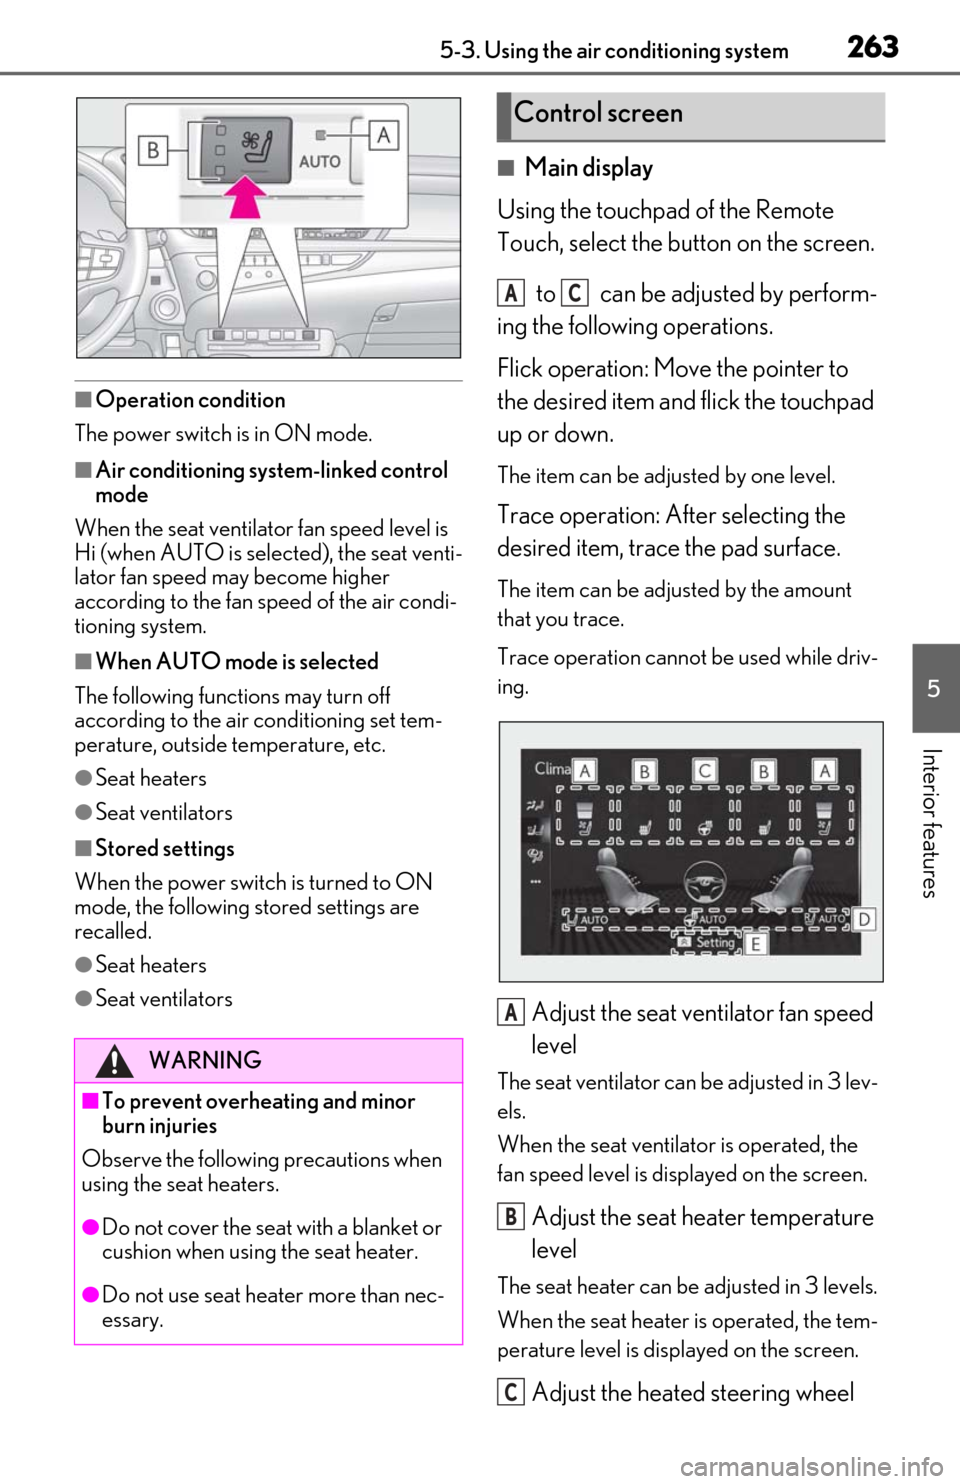
Adjust the seat ventilator fan speed
level
The seat ventilator can be adjusted in 3 lev-
els.
When the seat ventilator is operated, the
fan speed level is displayed on the screen.
Adjust the seat heater temperature
level
The seat heater can be adjusted in 3 levels.
When the seat heater is operated, the tem-
perature level is disp layed on the screen.
Adjust the heated steering wheel
WARNING
■To prevent overheating and minor
burn injuries
Observe the following precautions when
using the seat heaters.
●Do not cover the seat with a blanket or
cushion when using the seat heater.
●Do not use seat heater more than nec-
essary.
Control screen
AC
A
B
C
Page 264 of 456
2645-3. Using the air conditioning system
temperature level
The heated steering wheel can be adjusted
in 2 levels.
When the heated steering wheel is oper-
ated, the temperature level is displayed on
the screen.
Automatic mode on/off indicators
When the automatic mode is on, the indi-
cator illuminates on the screen.
Sub function menu
When the sub function button on the
Remote Touch is pressed, the following
functions can be set to automatic mode.
: Left-hand side seat heater/seat
ventilator
: Heated steering wheel
: Right-hand side seat heater/seat
ventilator
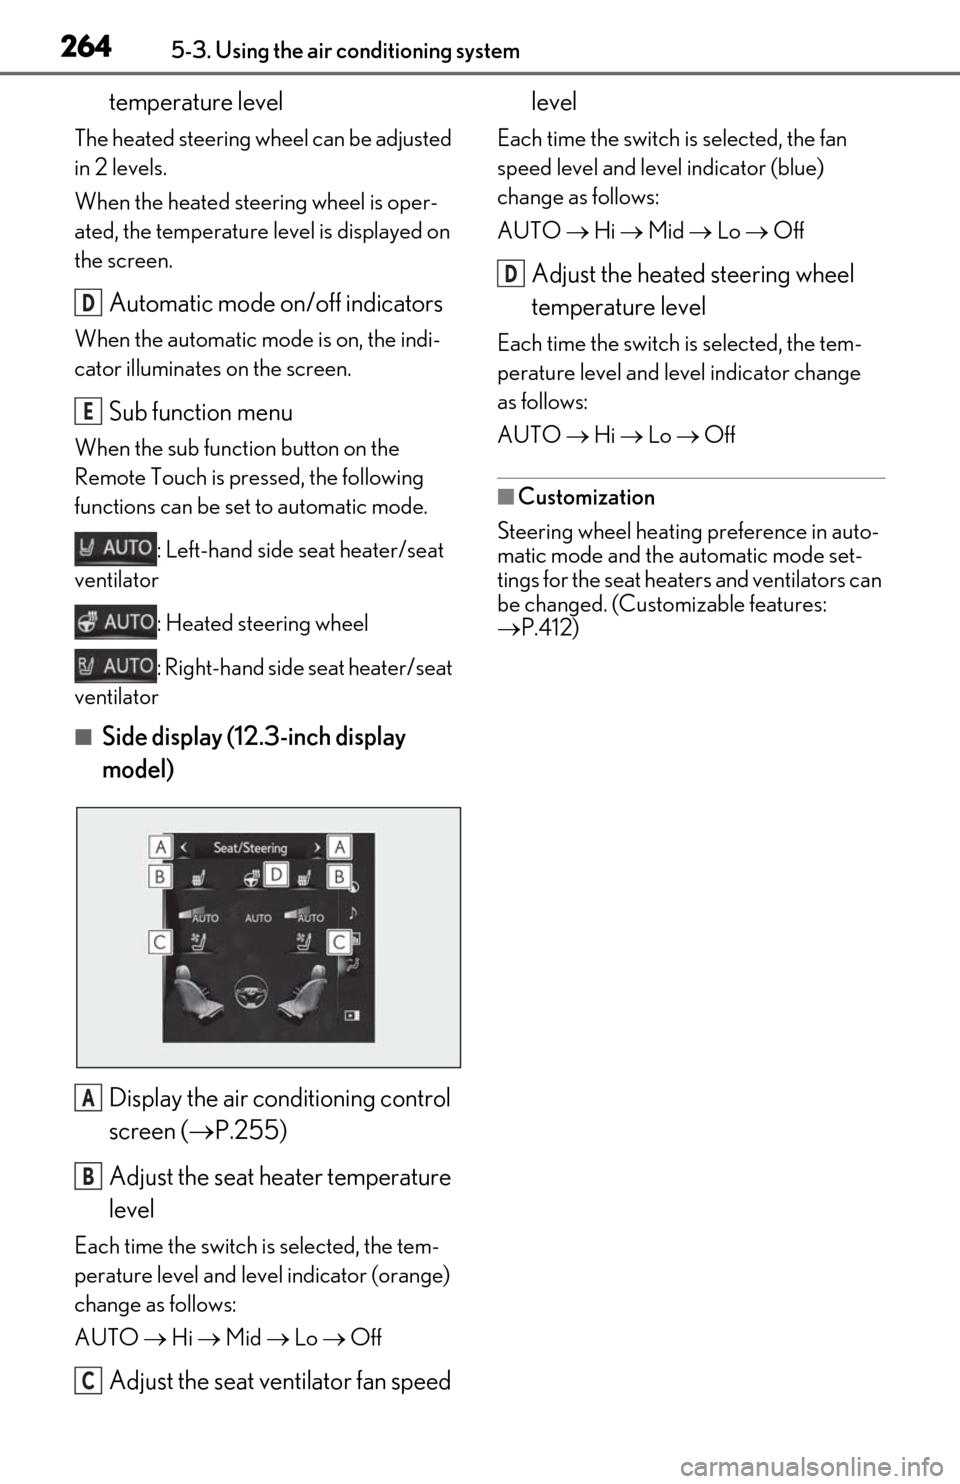
■Side display (12.3-inch display
model)
Display the air conditioning control
screen ( P.255)
Adjust the seat heater temperature
level
Each time the switch is selected, the tem-
perature level and leve l indicator (orange)
change as follows:
AUTO Hi Mid Lo Off
Adjust the seat ventilator fan speed level
Each time the switch is selected, the fan
speed level and level indicator (blue)
change as follows:
AUTO
Hi Mid Lo Off
Adjust the heated steering wheel
temperature level
Each time the switch is selected, the tem-
perature level and le vel indicator change
as follows:
AUTO Hi Lo Off
■Customization
Steering wheel heating preference in auto-
matic mode and the automatic mode set-
tings for the seat heaters and ventilators can
be changed. (Customizable features:
P.412)
D
E
A
B
C
D
Page 285 of 456
2855-6. Using the other interior features
5
Interior features
■When support is necessary
Visit on the web at www.home-
link.com/lexus or call 1-800-355-3515.
■Before programming HomeLink®
During programming, it is possible
that garage doors, gates, or other devices may operate. For this rea-
son, make sure that people and
objects are clear of the garage door
or other devices to prevent injury or
other potential harm.
It is recommended that a new bat-
tery be placed in the remote control
transmitter for more accurate pro-
gramming.
Garage door opener motors manu-
factured after 1995 may be
equipped with rolling code protec-
tion. If this is the case, you may need
a stepladder or other sturdy, safe
device to reach the “Learn” or
“Smart” button on the garage door
opener motor.
■Programming HomeLink®
Steps 1 through 3 must be performed
within 60 seconds, otherwise the indi-
cator light will stop flashing and pro-
gramming will not be able to be
completed.
1
Press and release the HomeLink®
button you want to program and
check that the HomeLink
® indica-
tor light flashes (orange).
WARNING
■When programming a garage door or
other remote control device
The garage door or other device may
operate, so ensure people and objects
are out of danger to prevent potential
harm.
■Conforming to federal safety stan-
dards
Do not use the HomeLink
® compatible
transceiver with any garage door opener
or device that lacks safety stop and
reverse features as required by federal
safety standards.
This includes any garage door that can-
not detect an interfering object. A door
or device without these features
increases the risk of death or serious
injury.
■When operating or programming
HomeLink®
Never allow a child to operate or play
with the HomeLink® buttons.
Programming the HomeLink®
Page 286 of 456
2865-6. Using the other interior features
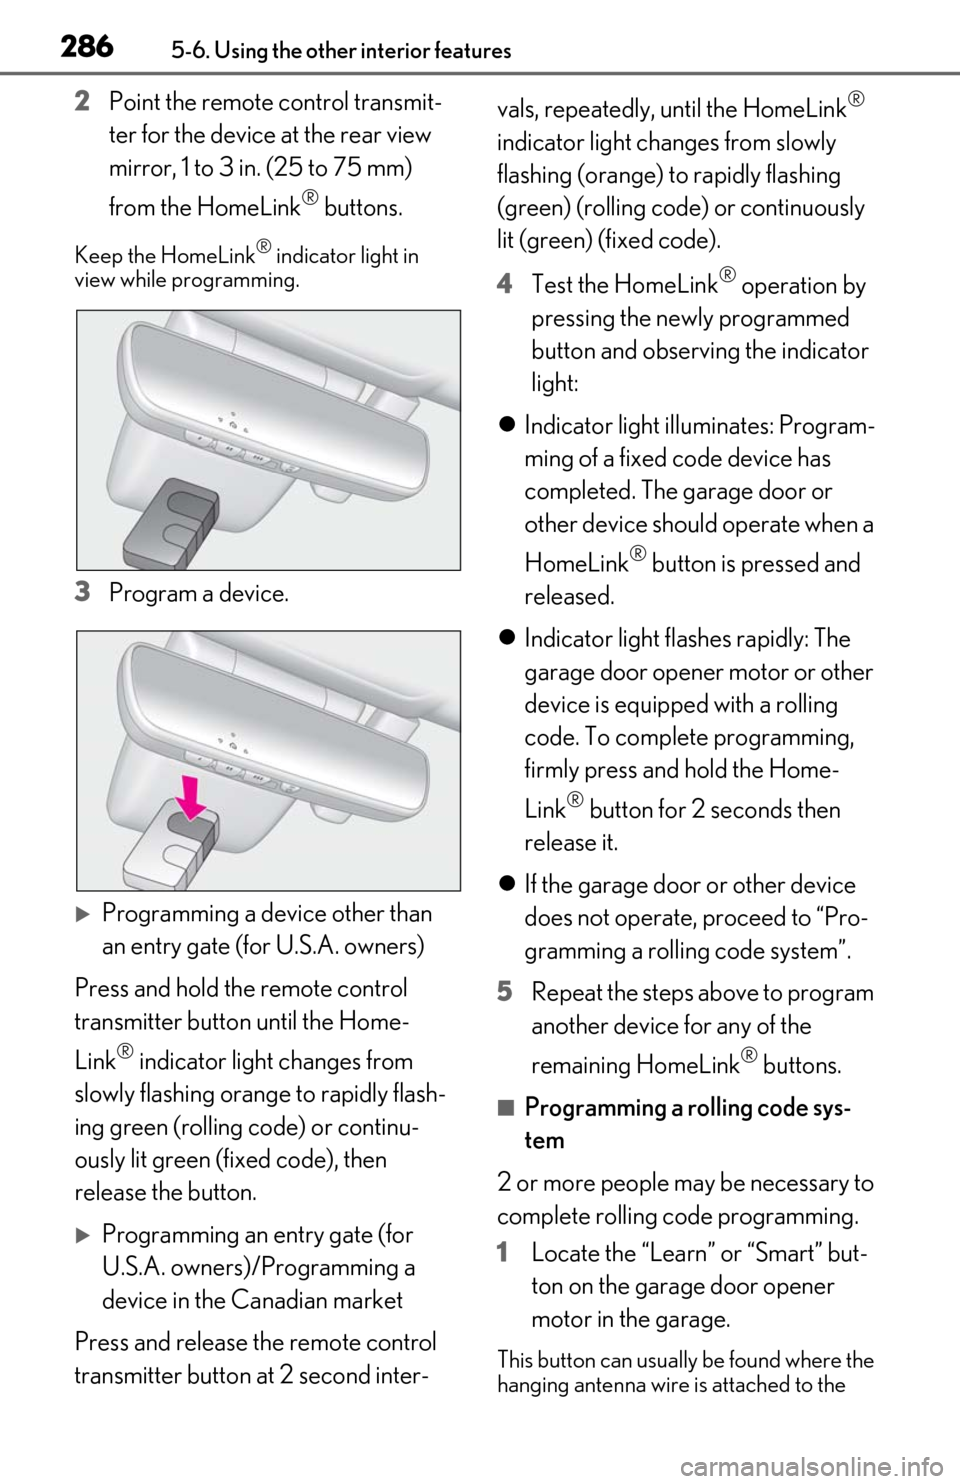
2Point the remote control transmit-
ter for the device at the rear view
mirror, 1 to 3 in. (25 to 75 mm)
from the HomeLink
® buttons.
Keep the HomeLink® indicator light in
view while programming.
3 Program a device.
Programming a device other than
an entry gate (for U.S.A. owners)
Press and hold th e remote control
transmitter button until the Home-
Link
® indicator light changes from
slowly flashing orange to rapidly flash-
ing green (rolling code) or continu-
ously lit green (fixed code), then
release the button.
Programming an entry gate (for
U.S.A. owners)/Programming a
device in the Canadian market
Press and release th e remote control
transmitter button at 2 second inter- vals, repeatedly, until the HomeLink
®
indicator light changes from slowly
flashing (orange) to rapidly flashing
(green) (rolling code) or continuously
lit (green) (fixed code).
4 Test the HomeLink
® operation by
pressing the newly programmed
button and observing the indicator
light:
Indicator light illuminates: Program-
ming of a fixed code device has
completed. The garage door or
other device should operate when a
HomeLink
® button is pressed and
released.
Indicator light flashes rapidly: The
garage door opener motor or other
device is equipped with a rolling
code. To complete programming,
firmly press and hold the Home-
Link
® button for 2 seconds then
release it.
If the garage door or other device
does not operate, proceed to “Pro-
gramming a rolling code system”.
5 Repeat the steps above to program
another device for any of the
remaining HomeLink
® buttons.
■Programming a rolling code sys-
tem
2 or more people may be necessary to
complete rolling code programming.
1 Locate the “Learn” or “Smart” but-
ton on the garage door opener
motor in the garage.
This button can usually be found where the
hanging antenna wire is attached to the
Page 296 of 456
2965-6. Using the other interior features
before using Safety Connect;
The Safety Connect system installed in
your vehicle is a low-power radio trans-
mitter and receiver. It receives and also
sends out radio frequency (RF) signals.
In August 1996, the Federal Commu-
nications Commission (FCC) adopted
RF exposure guidelines with safety lev-
els for mobile wireless phones. Those
guidelines are consistent with the
safety standards previously set by the
following U.S. and international stan-
dards bodies.
ANSI (American National Stan-
dards Institute) C95.1 [1992]
NCRP (National Council on Radia-
tion Protection and Measurement)
Report 86 [1986]
ICNIRP (International Commission
on Non-Ionizing Radiation Protec-
tion) [1996]
Those standards were based on com-
prehensive and periodic evaluations of
the relevant scientific literature. Over
120 scientists, engi neers, and physi-
cians from universi ties, and govern-
ment health agencies and industries
reviewed the available body of
research to develop the ANSI Stan-
dard (C95.1).
The design of Safety Connect com-
plies with the FCC guidelines in addi-
tion to those standards.
*: If equipped
After you sign the Telematics Subscrip-
tion Service Agreement, download the
Lexus Enform Remote app from your
cellular phone’s app st ore, and register
within the app (or en roll and complete
registration at the dealer), you can
begin using these services. ( P.291)
A variety of subscription terms are
available. Contact your Lexus dealer,
or call 1-800-25-LEXUS (1-800-
255-3987) for further subscription
details.
■Availability of service
Lexus Enform Remote is available in the
contiguous United States, Washington D.C.
and Alaska.
Lexus Enform Remote is not available in
some countries or areas.
■Lexus Enform Remote Information
●Lexus Enform Remote should only be
used by authorized users.
●Laws in some communities may require
that the vehicle be within view of the user
Lexus Enform Remote*
Lexus Enform Remote is a cellular
phone application that lets you view
and remotely control certain
aspects of your vehicle.
For details about the functions and
services of this application, refer to
http://www.lexus.com/enform/
.
Function of the Lexus Enform
Remote is achieved by using DCM
(Data Communication Module).
Subscription