2019 Lexus ES300h light
[x] Cancel search: lightPage 386 of 456

3867-2. Steps to take in an emergency
6Open and close any of the doors of
your vehicle with the power switch
off.
7 Maintain the engine speed of the
second vehicle and start the hybrid
system of your vehicle by turning
the power switch to ON mode.
8 Make sure the “READY” indicator
comes on. If the indicator does not
come on, contact your Lexus
dealer.
9 Once the vehicle’s hybrid system
has started, remove the jumper
cables in the exact reverse order
from which they were connected.
10 Close the exclusive jump starting
terminal cover, and reinstall the fuse
box cover to tits original position.
Once the hybrid system starts, have the
vehicle inspected at your Lexus dealer as
soon as possible.
■Starting the hybrid system when the 12-
volt battery is discharged
The hybrid system cannot be started by
push-starting.
■To prevent 12-volt battery discharge
●Turn off the headlights and the audio sys-
tem while the hybrid system is stopped.
●Turn off any unnecessary electrical com-
ponents when the vehicle is running at a
low speed for an extended period, such
as in heavy traffic.
■When the 12-volt battery is removed or
discharged
●Information stored in the ECU is cleared.
When the 12-volt battery is depleted,
have the vehicle inspected at your Lexus
dealer.
●Some systems may require initialization.
( P.423)
■When removing the 12-volt battery ter-
minals
When the 12-volt battery terminals are
removed, the information stored in the
ECU is cleared. Before removing the 12-
volt battery terminals, contact your Lexus
dealer.
■Charging the 12-volt battery
The electricity stored in the 12-volt battery
will discharge gradually even when the
vehicle is not in use, due to natural dis-
charge and the draining effects of certain
electrical appliances. If the vehicle is left for
a long time, the 12-volt battery may dis-
charge, and the hybrid system may be
unable to start. (The 12-volt battery
recharges automatically while the hybrid
system is operating.)
■When recharging or replacing the 12-
volt battery
●In some cases, it may not be possible to
unlock the doors using the smart access
system with push-button start when the
12-volt battery is discharged. Use the
wireless remote control or the mechani-
cal key to lock or unlock the doors.
●The hybrid system may not start on the
first attempt after the 12-volt battery has
recharged but will start normally after the
second attempt. This is not a malfunction.
●The power switch mode is memorized by
the vehicle. When the 12-volt battery is
reconnected, the system will return to the
mode it was in before the 12-volt battery
was discharged. Before disconnecting
the 12-volt battery, turn the power switch
off.
If you are unsure what mode the power
switch was in before the 12-volt battery
discharged, be especially careful when
reconnecting the 12-volt battery.
■When replacing the 12-volt battery
●Use a 12-volt battery that conforms to
European regulations.
●Use a 12-volt battery that the case size is
same as the previous one (LN2), 20 hour
rate capacity (20HR) is equivalent
(60Ah) or greater, and performance rat-
ing (CCA) is equivalent (345A) or
greater.
Page 387 of 456

3877-2. Steps to take in an emergency
7
When trouble arises
• If the sizes differ, the 12-volt battery can-not be properly secured.
• 12-volt battery performance may decrease and the hybrid system may not
be able to start.
• If the 20 hour rate capacity is low, even if the time period where the vehicle is not
used is a short time, the 12-volt battery
may discharge and hybrid system may
not be able to start.
●Use a 12-volt battery with a handle. If a
12-volt battery without a handle is used,
removal is more difficult.
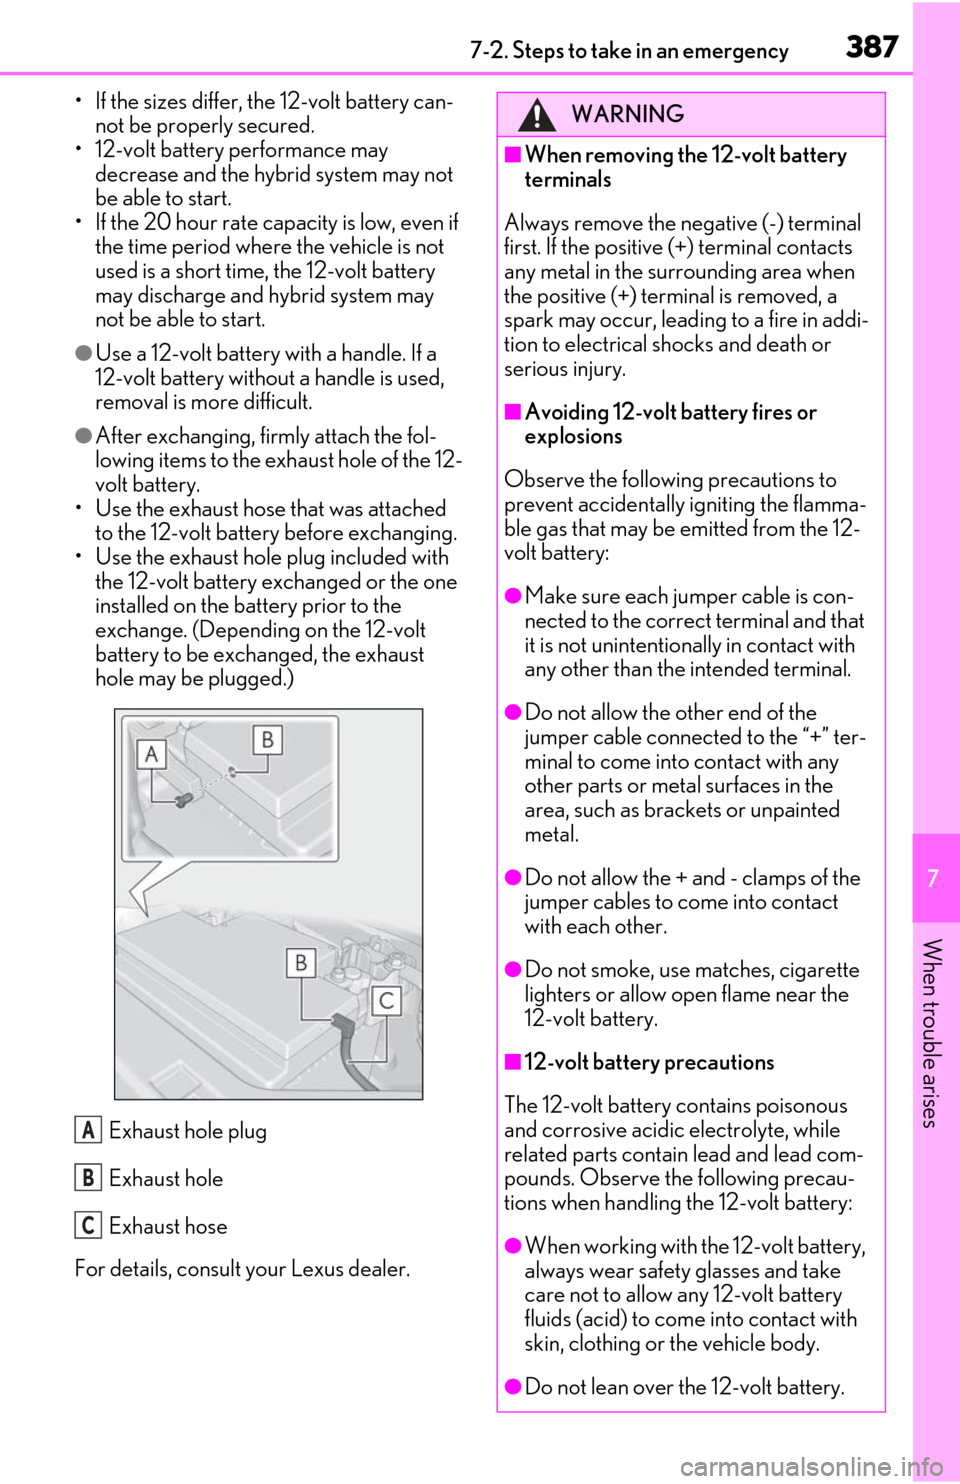
●After exchanging, firmly attach the fol-
lowing items to the exhaust hole of the 12-
volt battery.
• Use the exhaust hose that was attached
to the 12-volt battery before exchanging.
• Use the exhaust hole plug included with the 12-volt battery exchanged or the one
installed on the battery prior to the
exchange. (Depending on the 12-volt
battery to be exchanged, the exhaust
hole may be plugged.)
Exhaust hole plug
Exhaust hole
Exhaust hose
For details, consult your Lexus dealer.
A
B
C
WARNING
■When removing the 12-volt battery
terminals
Always remove the negative (-) terminal
first. If the positive (+) terminal contacts
any metal in the surrounding area when
the positive (+) terminal is removed, a
spark may occur, leading to a fire in addi-
tion to electrical shocks and death or
serious injury.
■Avoiding 12-volt battery fires or
explosions
Observe the following precautions to
prevent accidentally igniting the flamma-
ble gas that may be emitted from the 12-
volt battery:
●Make sure each jumper cable is con-
nected to the correct terminal and that
it is not unintentiona lly in contact with
any other than the intended terminal.
●Do not allow the other end of the
jumper cable connected to the “+” ter-
minal to come into contact with any
other parts or metal surfaces in the
area, such as brackets or unpainted
metal.
●Do not allow the + and - clamps of the
jumper cables to come into contact
with each other.
●Do not smoke, use matches, cigarette
lighters or allow open flame near the
12-volt battery.
■12-volt battery precautions
The 12-volt battery contains poisonous
and corrosive acidic electrolyte, while
related parts contain lead and lead com-
pounds. Observe the following precau-
tions when handling the 12-volt battery:
●When working with the 12-volt battery,
always wear safety glasses and take
care not to allow any 12-volt battery
fluids (acid) to come into contact with
skin, clothing or the vehicle body.
●Do not lean over the 12-volt battery.
Page 398 of 456

3988-1. Specifications
*: The fluid capacity is a reference quantity.If replacement is necessary, contact your Lexus dealer. NOTICE
■Iridium-tipped spark plugs
Use only iridium-tipped spark plugs. Do not adjust the spark plug gap.
Electrical system (12-volt battery)
Open voltage at 68°F (20°C):12.0 V or higher
(Turn the power switch off and turn on the high beam
headlights for 30 seconds.)
Charging rates
Quick charge
Slow charge
15 A max.
5 A max.
Hybrid transmission
Fluid capacity*4.1 qt. (3.9 L, 3.4 Imp.qt.)
Fluid typeToyota Genuine ATF WS
NOTICE
■Hybrid transmission fluid type
Using transmission fluid other than “Toyota Genuine ATF WS” may ultimately damage
the transmission of your vehicle.
Brakes
Pedal clearance*13.3 in. (85 mm) Min.
Pedal free play0.04 0.24 in. (1.0 6.0 mm)
Brake pad wear limit0.04 in. (1.0 mm)
Parking brake lining wear limit0.04 in. (1.0 mm)
Page 399 of 456

3998-1. Specifications
8
Vehicle specifications
*1: Minimum pedal clearance when depressed with a force of 67.4 lbf (300 N, 30.6 kgf)
while the hybrid system is operating.
When performing the brake pedal inspection, also be sure to check that the brake sys-
tem warning light is not illuminated when the hybrid system is operating. (If the brake
system warning light is illuminated, refer to P.358.)
*2: Make sure to confirm that the brake system wa rning light (yellow) does not illuminate. (If
the brake system warning light illuminates, refer to P.358.)
Type A
*1: 99 mph (160 km/h) or less
*2: More than 99 mph (160 km/h)
Parking brake indicator*2
When pushing the parking brake switch for
1 to 2 seconds: comes on
When pulling the parking brake switch for 1
to 2 seconds: turns off
Fluid typeFMVSS No.116 DOT 3 or SAE J1703
FMVSS No.116 DOT 4 or SAE J1704
Steering
Free playLess than 1.2 in. (30 mm)
Tires and wheels
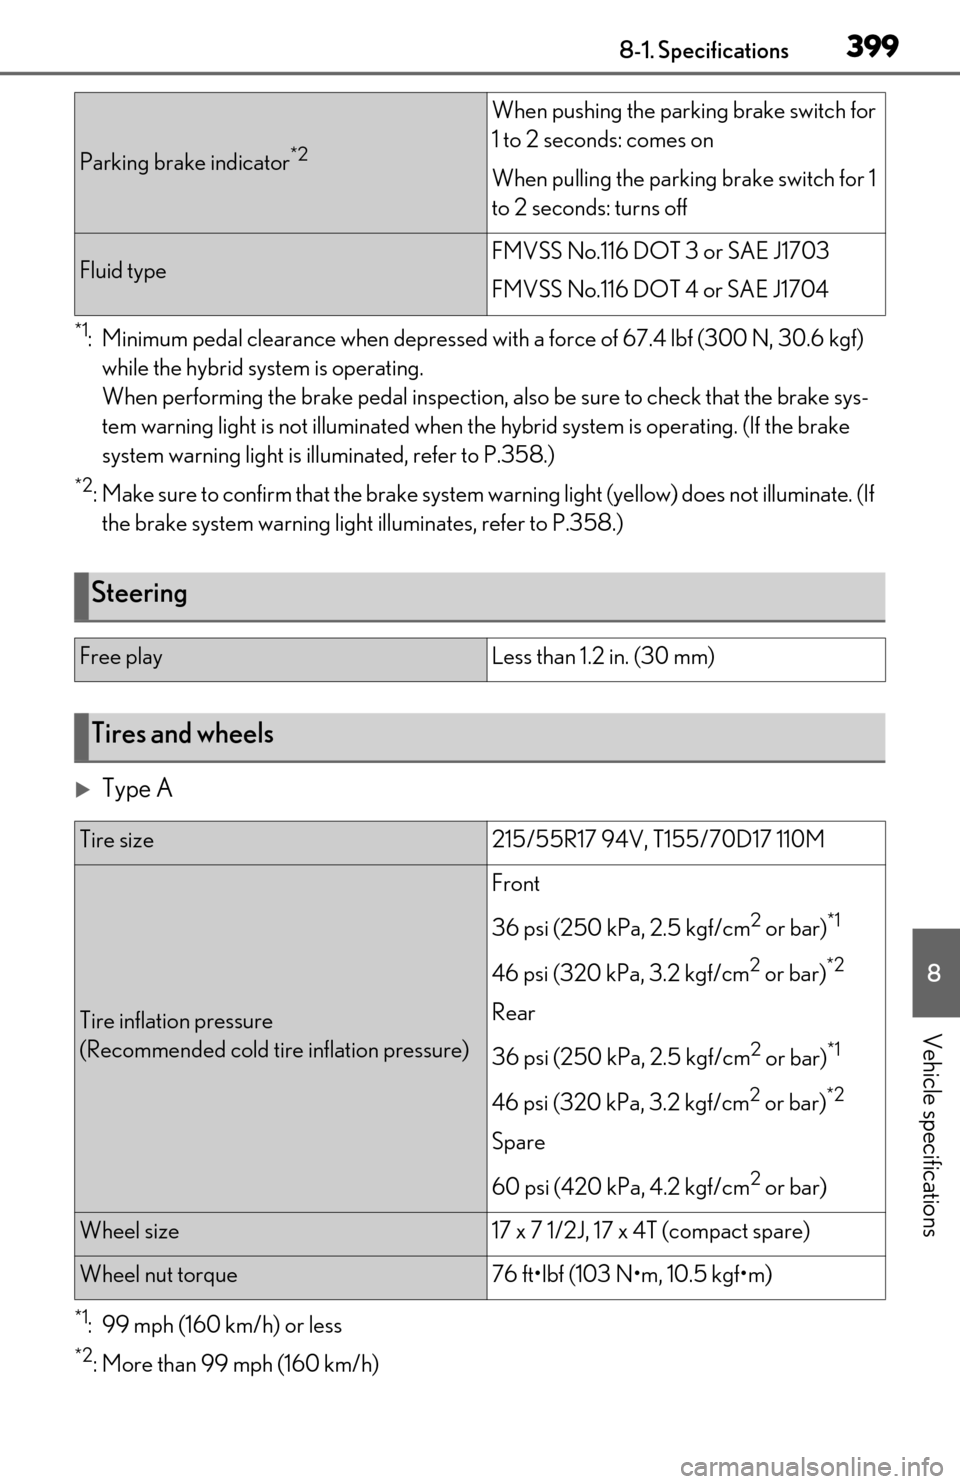
Tire size215/55R17 94V, T155/70D17 110M
Tire inflation pressure
(Recommended cold tire inflation pressure)
Front
36 psi (250 kPa, 2.5 kgf/cm
2 or bar)*1
46 psi (320 kPa, 3.2 kgf/cm2 or bar)*2
Rear
36 psi (250 kPa, 2.5 kgf/cm
2 or bar)*1
46 psi (320 kPa, 3.2 kgf/cm2 or bar)*2
Spare
60 psi (420 kPa, 4.2 kgf/cm
2 or bar)
Wheel size17 x 7 1/2J, 17 x 4T (compact spare)
Wheel nut torque76 ft•lbf (103 N•m, 10.5 kgf•m)
Page 400 of 456

4008-1. Specifications
Type B
*1: 99 mph (160 km/h) or less
*2: More than 99 mph (160 km/h)
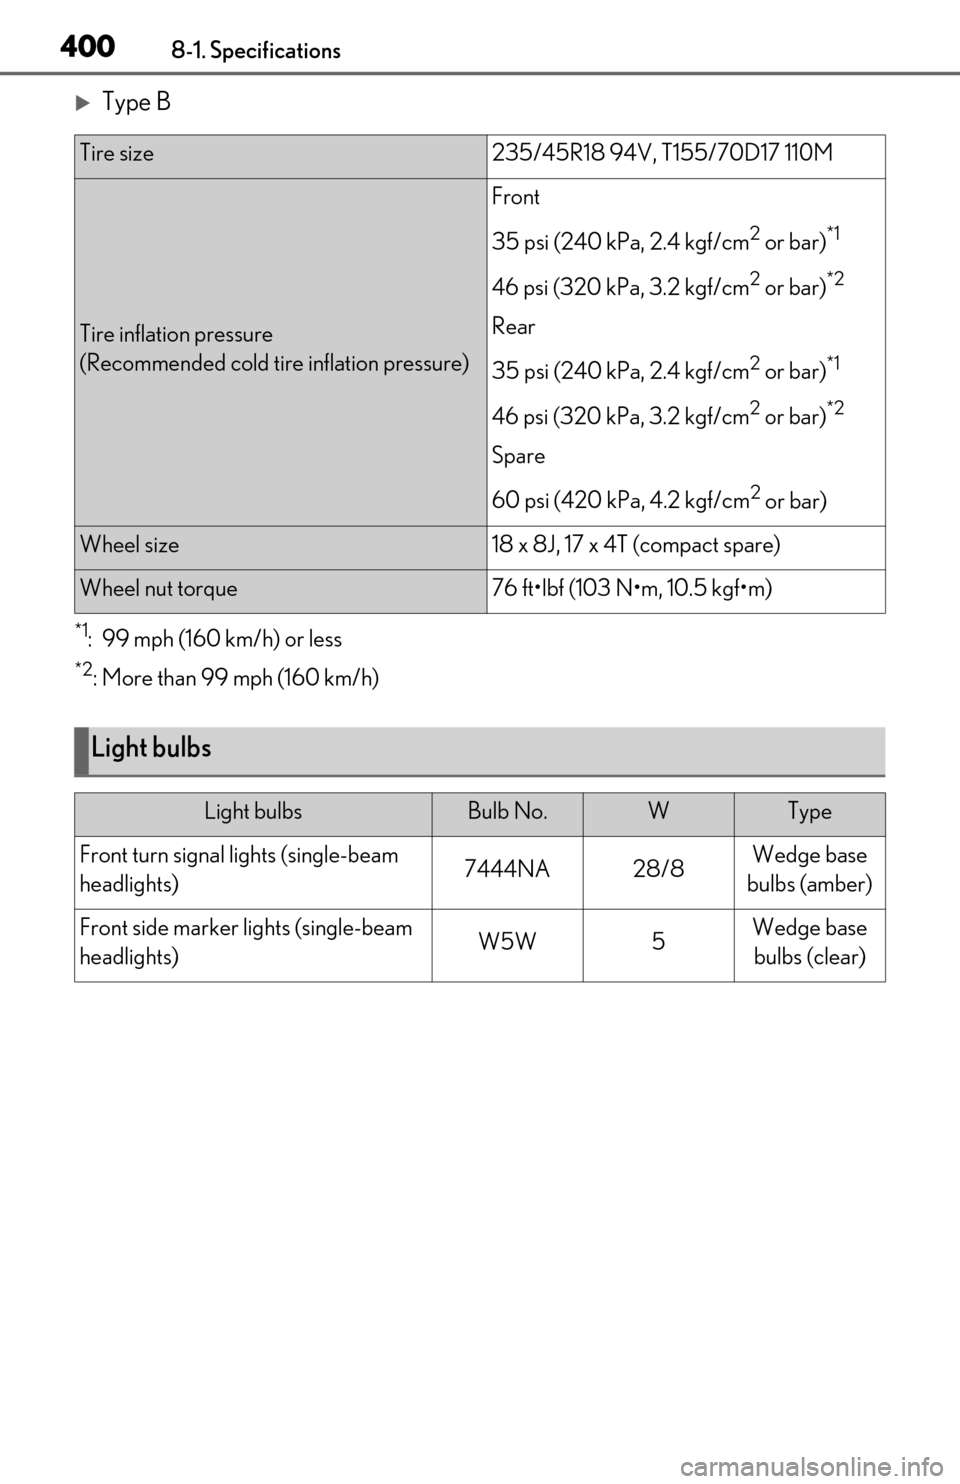
Tire size235/45R18 94V, T155/70D17 110M
Tire inflation pressure
(Recommended cold tire inflation pressure)
Front
35 psi (240 kPa, 2.4 kgf/cm
2 or bar)*1
46 psi (320 kPa, 3.2 kgf/cm2 or bar)*2
Rear
35 psi (240 kPa, 2.4 kgf/cm
2 or bar)*1
46 psi (320 kPa, 3.2 kgf/cm2 or bar)*2
Spare
60 psi (420 kPa, 4.2 kgf/cm
2 or bar)
Wheel size18 x 8J, 17 x 4T (compact spare)
Wheel nut torque76 ft•lbf (103 N•m, 10.5 kgf•m)
Light bulbs
Light bulbsBulb No.WType
Front turn signal lights (single-beam
headlights)7444NA28/8Wedge base
bulbs (amber)
Front side marker lights (single-beam
headlights)W5W5Wedge base bulbs (clear)
Page 402 of 456

4028-1. Specifications
Lexus does not recommend the use of gas-
oline that contains MMT. If fuel containing
MMT is used, your emission control system
may be adversely affected.
The malfunction indicator lamp on the
instrument cluster may come on. If this hap-
pens, contact your Lexus dealer for service.
■If your engine knocks
●Consult your Lexus dealer.
●You may occasionally notice light knock-
ing for a short time while accelerating or
driving uphill. This is normal and there is
no need for concern.
NOTICE
■Notice on fuel quality
●Do not use improper fuels. If improper
fuels are used, the engine will be dam-
aged.
●Do not use leaded gasoline.
Leaded gasoline can cause damage to
your vehicle’s three-way catalytic con-
verters causing the emission control
system to malfunction.
●Do not use gasohol other than the type
previously stated.
Other gasohol may cause fuel system
damage or vehicle performance prob-
lems.
●Using unleaded gasoline with an
octane number or rating lower than
the level previously stated may cause
persistent he avy knocking.
At worst, this may lead to engine dam-
age and will void the vehicle warranty.
■Fuel-related poor driveability
If poor driveability (poor hot starting,
vaporization, engine knocking, etc.) is
encountered after using a different type
of fuel, discontinue the use of that type of
fuel.
■When refueling with gasohol
Take care not to spill gasohol. It can dam-
age your vehicle’s paint.
Page 409 of 456

4098-1. Specifications
8
Vehicle specifications
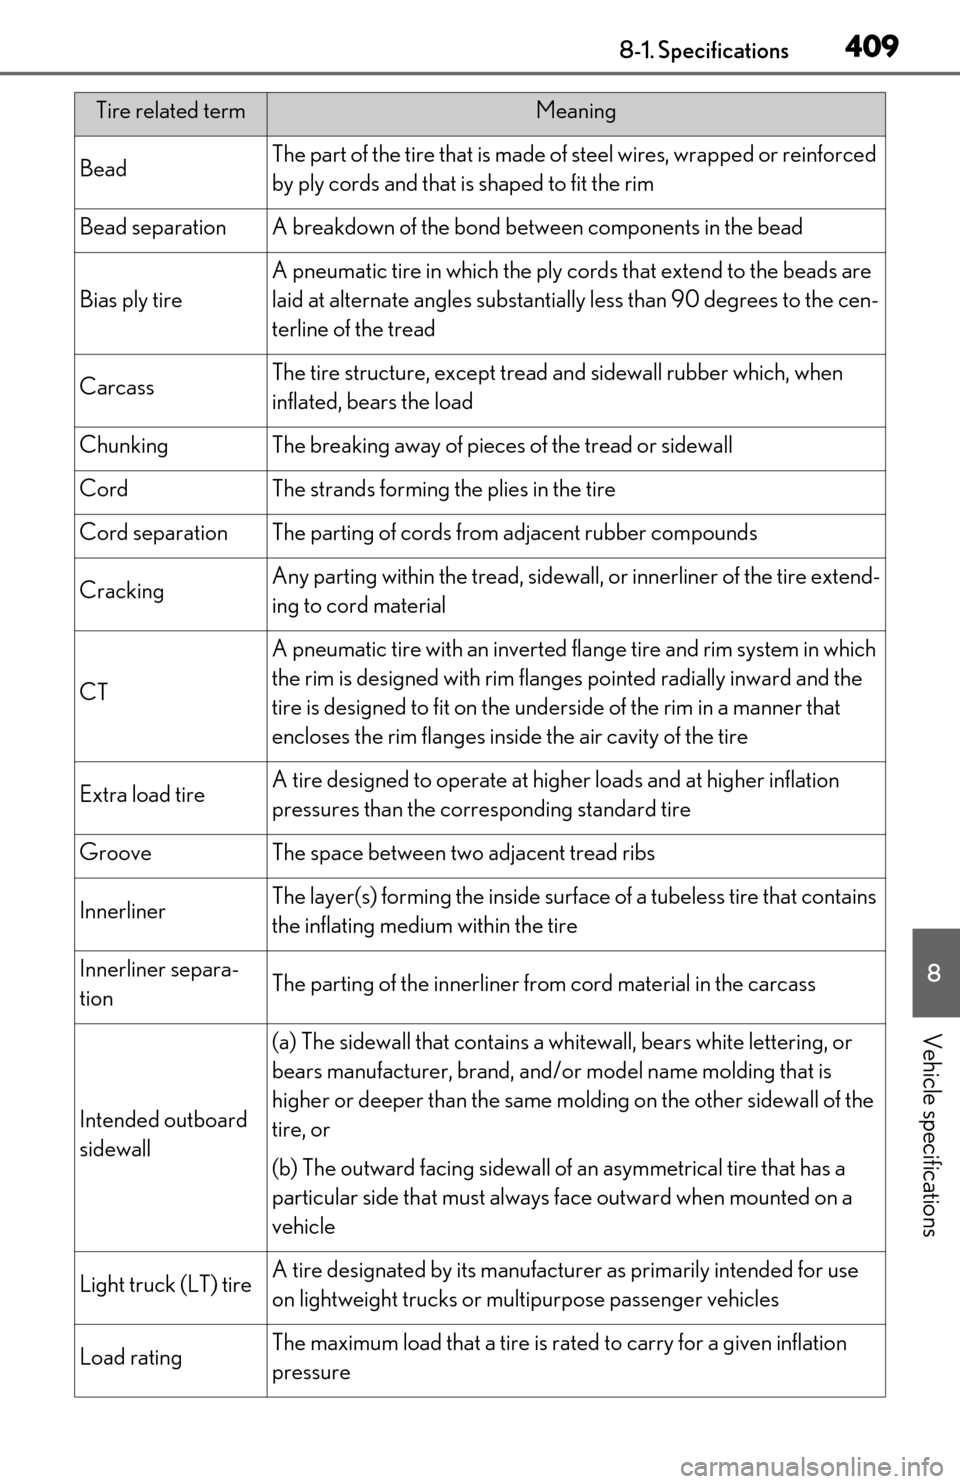
BeadThe part of the tire that is made of steel wires, wrapped or reinforced
by ply cords and that is shaped to fit the rim
Bead separationA breakdown of the bond between components in the bead
Bias ply tire
A pneumatic tire in which the ply cords that extend to the beads are
laid at alternate angles substantia lly less than 90 degrees to the cen-
terline of the tread
CarcassThe tire structure, except tread and sidewall rubber which, when
inflated, bears the load
ChunkingThe breaking away of pieces of the tread or sidewall
CordThe strands forming the plies in the tire
Cord separationThe parting of cords from adjacent rubber compounds
CrackingAny parting within the tread, sidewall, or innerliner of the tire extend-
ing to cord material
CT
A pneumatic tire with an inverted fl ange tire and rim system in which
the rim is designed with rim flanges pointed radially inward and the
tire is designed to fit on the unde rside of the rim in a manner that
encloses the rim flanges inside the air cavity of the tire
Extra load tireA tire designed to operate at high er loads and at higher inflation
pressures than the corre sponding standard tire
GrooveThe space between two adjacent tread ribs
InnerlinerThe layer(s) forming the inside surfac e of a tubeless tire that contains
the inflating medium within the tire
Innerliner separa-
tionThe parting of the innerliner from cord material in the carcass
Intended outboard
sidewall
(a) The sidewall that contains a whit ewall, bears white lettering, or
bears manufacturer, brand, and/or model name molding that is
higher or deeper than the same molding on the other sidewall of the
tire, or
(b) The outward facing sidewall of an asymmetrical tire that has a
particular side that must always face outward when mounted on a
vehicle
Light truck (LT) tireA tire designated by its manufactur er as primarily intended for use
on lightweight trucks or mu ltipurpose passenger vehicles
Load ratingThe maximum load that a tire is rated to carry for a given inflation
pressure
Tire related termMeaning
Page 417 of 456

4178-2. Customization
8
Vehicle specifications
■Power windows and moon roof (P.120, 122)
■Automatic light control system ( P.150)
■Lights ( P.150)
*1:Except for Canada
*2: If equipped
FunctionDefault settingCustomized set-
ting
Mechanical key linked opera-
tionOffOnO
Wireless remote control linked
operationOffOn (open only)O
Wireless remote control linked
operation signal (buzzer)OnOffO
FunctionDefault settingCustomized set-ting
Light sensor sensitivityStandard-2 to 2OO
Time elapsed before headlights
automatically turn off after
doors are closed
30 seconds
Off
OO60 seconds
90 seconds
Windshield wiper linked head-
light illuminationOnOffO
FunctionDefault settingCustomized set-ting
Daytime running lightsOnOff*1OO
Welcome lightingOnOffO
AFS (Adaptive Front-lighting
System)
*2OnOffO
ABC
ABC
ABC