2019 Lexus ES300h light
[x] Cancel search: lightPage 368 of 456
3687-2. Steps to take in an emergency
The master warning light and warning buzzers operate as follows depending on
the content of the message. If a message indicates the need for inspection by a
dealer, have the vehicle inspected by your Lexus dealer immediately.
If a warning message is dis-
played
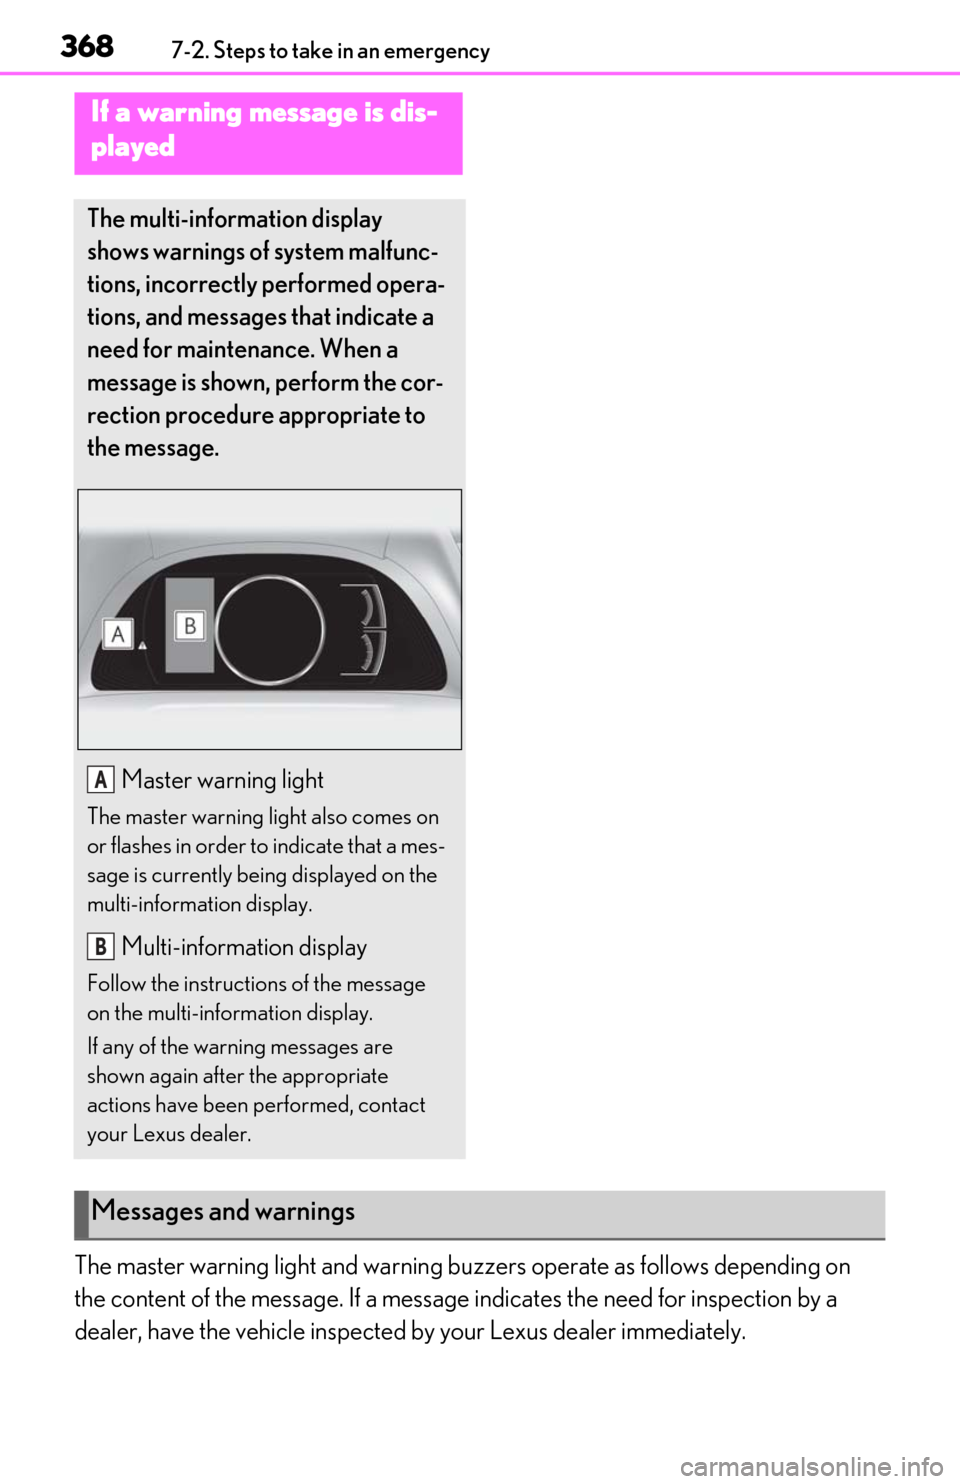
The multi-information display
shows warnings of system malfunc-
tions, incorrectly performed opera-
tions, and messages that indicate a
need for maintenance. When a
message is shown, perform the cor-
rection procedure appropriate to
the message.
Master warning light
The master warning light also comes on
or flashes in order to indicate that a mes-
sage is currently being displayed on the
multi-information display.
Multi-information display
Follow the instructions of the message
on the multi-information display.
If any of the warning messages are
shown again after the appropriate
actions have been performed, contact
your Lexus dealer.
A
B
Messages and warnings
Page 369 of 456

3697-2. Steps to take in an emergency
7
When trouble arises
*: A buzzer sounds the first time a message is shown on the multi-information display.
In some situations, the master warning light and warning buzzer may not oper-
ate as specified. In this case, follow the instructions displayed in the warning
message.
If a warning light comes on or flashes at the same time that a warning message is
displayed, take corrective actio n according to the warning light. ( P.358)
■Warning messages
The warning messages explained below
may differ from the actual messages
according to operation conditions and vehi-
cle specifications.
■Warning buzzer
In some cases, the bu zzer may not be heard
due to being in a noisy location or audio
sound.
■If “Engine Oil Level Low Add or
Replace” is displayed
The engine oil level is low. Check the level
of the engine oil, and add if necessary.
This message may appear if the vehicle is
stopped on a slope. Move the vehicle to a
level surface and check to see if the mes-
sage disappears.
■If “Hybrid System Stopped Steering
Power Low” is displayed
This message is displayed if the hybrid sys- tem is stopped while driving.
When steering wheel operations are
heavier than usual, gr
ip the steering wheel
firmly and operate it using more force than
usual.
■If “Hybrid system overheated Output
power reduced” is displayed
This message may be displayed when driv-
ing under severe operat ing conditions. (For
example, when driving up a long steep hill.)
Handling method: P.389
■If “Traction Battery Needs to be Pro-
tected Refrain From the Use of N Posi-
tion” is displayed
This message may be displayed when the
shift lever is in N.
As the hybrid battery (traction battery) can
not be charged when the shift lever is in N,
shift the shift lever to P when the vehicle is
stopped.
Warning buzzer*Warning
Comes onSounds
Indicates an important situation, such as when a sys-
tem related to driving is ma lfunctioning or that dan-
ger may result if the co rrection procedure is not
performed
FlashesSoundsIndicates a situation, such as when damage to the
vehicle or danger may result
Comes onDoes not sound
Indicates a condition, such as malfunction of electri-
cal components, their condition, or indicates the
need for maintenance
FlashesDoes not sound
Indicates a situation, such as when an operation has
been performed incorrectly, or indicates how to
perform an operation correctly
Page 370 of 456
3707-2. Steps to take in an emergency
■If “Traction Battery Needs to be Pro-
tected Shift into P to Restart” is dis-
played
This message is displayed when the hybrid
battery (traction battery) charge has
become extremely low because the shift
lever has been left in N for a certain amount
of time.
When operating the vehicle, shift to P and
restart the hybrid system.
■If “Shift to P Before exiting vehicle” is
displayed
Message is displayed when the driver’s
door is opened with out turning the power
switch off with the shift lever in any position
other than P.
Shift the shift lever to P.
■If “Shift is in N Release accelerator
before shifting” is displayed
The accelerator pedal has been depressed
when the shift lever is in N.
Release the accelerator pedal and shift the
shift lever to D or R.
■If “Accelerator pedal is pressed” is dis-
played
The accelerator pedal has been depressed
when the shift lever is in P.
Release the accelerator pedal.
■If “Press brake when vehicle is stopped
Hybrid system may overheat” is dis-
played
The message may be displayed when the
accelerator pedal is depressed to hold the
vehicle while the vehicle is stopped on an
incline, etc. The hybrid system may over-
heat. Release the accelerator pedal and
depress the brake pedal.
■If “Auto Power Off to Conserve Battery”
is displayed
Power was turned off due to the automatic
power off function. Next time when starting
the hybrid system, operate the hybrid sys-
tem for approximately 5 minutes to
recharge the 12-volt battery.
■If “High Power Cons umption Power to
Climate Temporarily Limited” is dis-
played
Turn off unnecessary electronic equipment
to reduce power consumption.
Please wait until the power supply returns to
normal.
■If “Headlight System Uninitialized Visit
Your Dealer” is displayed
The following systems may be malfunction-
ing. Have the vehicle inspected by your
Lexus dealer immediately.
●The LED headlight system
●AFS (Adaptive Front-lighting System)
●The automatic headlight leveling system
(if equipped)
●Automatic High Beam
■If “Radar Cruise Control Unavailable
See Owner’s Manual” is displayed
The dynamic radar cruise control with full-
speed range system is suspended tempo-
rarily or until the pr oblem shown in the mes-
sage is resolved. (causes and coping
methods: P.167)
■If “Radar Cruise Control Unavailable” is
displayed
The dynamic radar cruise control with full-
speed range system cannot be used tempo-
rarily. Use the system when it becomes
available again.
■If “Front Camera Unavailable” is dis-
played
The following systems may be suspended
until the problem shown in the message is
resolved. ( P.167, 364)
●PCS (Pre-Collision System)
●LTA (Lane Tracing Assist)
●Automatic High Beam
●RSA (Road Sign Assist) (if equipped)
●Dynamic radar cruise control with full-
speed range
■If “Maintenance Required Soon” is dis-
played
Indicates that all maintenance according to
the driven distance on the maintenance
Page 376 of 456
3767-2. Steps to take in an emergency
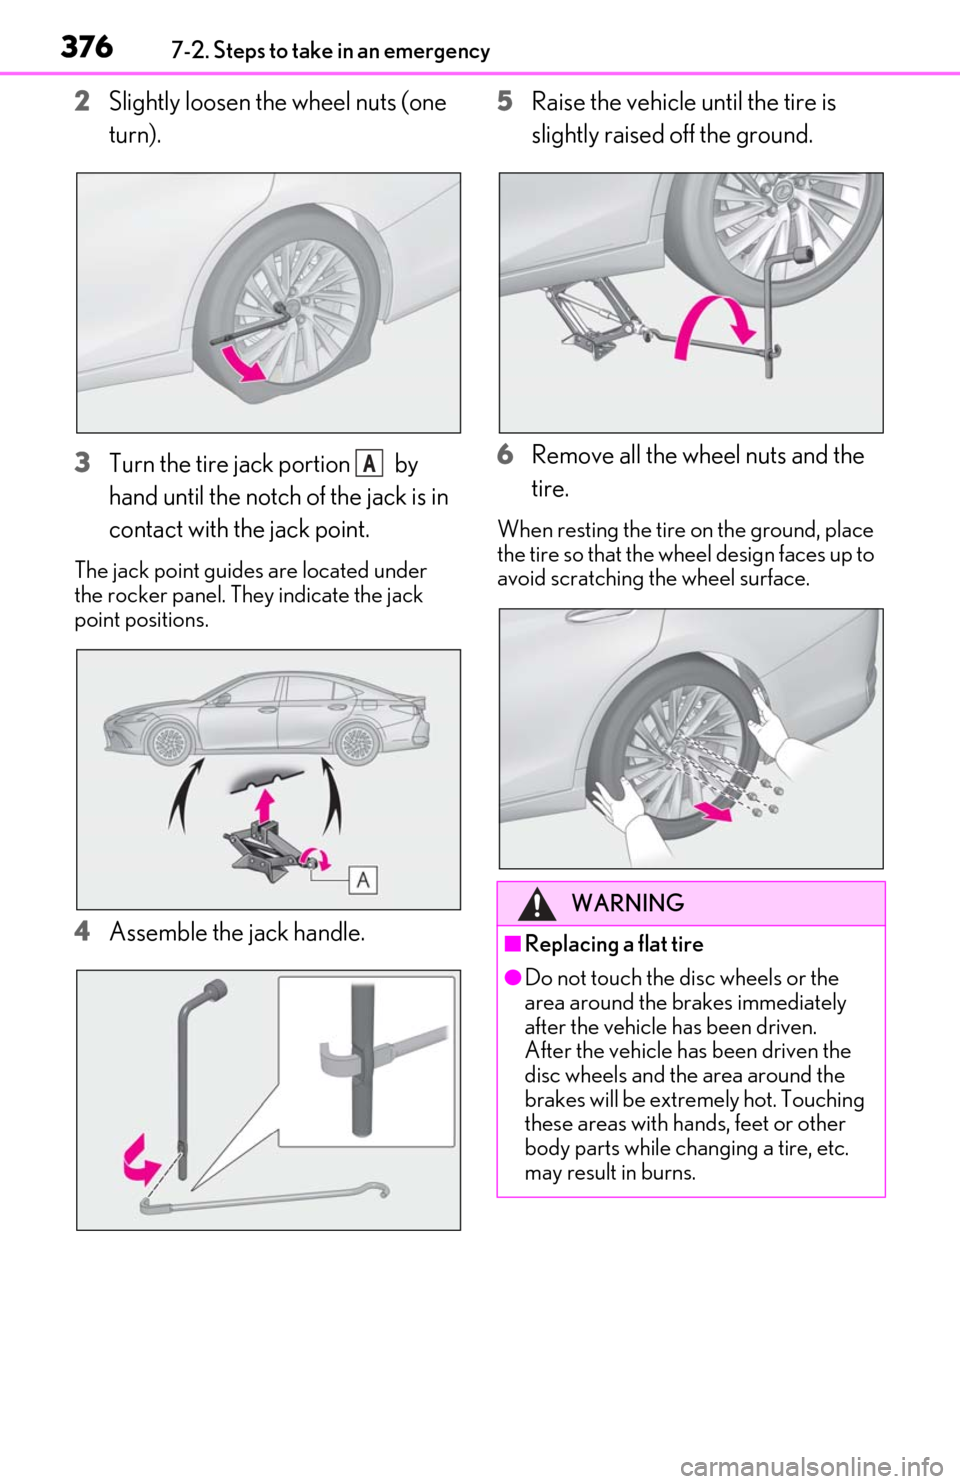
2Slightly loosen the wheel nuts (one
turn).
3
Turn the tire jack portion by
hand until the notch of the jack is in
contact with the jack point.
The jack point guides are located under
the rocker panel. They indicate the jack
point positions.
4Assemble the jack handle. 5
Raise the vehicle until the tire is
slightly raised off the ground.
6
Remove all the wheel nuts and the
tire.
When resting the tire on the ground, place
the tire so that the wheel design faces up to
avoid scratching the wheel surface.
A
WARNING
■Replacing a flat tire
●Do not touch the disc wheels or the
area around the brakes immediately
after the vehicle has been driven.
After the vehicle has been driven the
disc wheels and the area around the
brakes will be extremely hot. Touching
these areas with hands, feet or other
body parts while changing a tire, etc.
may result in burns.
Page 378 of 456

3787-2. Steps to take in an emergency
76 ft•lbf (103 N•m, 10.5 kgf•m)
5Stow the flat tire, tire jack and all
tools.
■The compact spare tire
●The compact spare tire is identified by the
label “TEMPORARY USE ONLY” on
the tire sidewall.
Use the compact spare tire temporarily,
and only in an emergency.
●Make sure to check the tire inflation pres-
sure of the compact spare tire. (P.399)
■After completing the tire change
The tire pressure warning system must be
reset. ( P.330)
■When using the compact spare tire
As the compact spare tire is not equipped
with a tire pressure warning valve and trans-
mitter, low inflation pressure of the spare
tire will not be indicated by the tire pressure
warning system. Also, if you replace the
compact spare tire after the tire pressure
warning light comes on, the light remains
on.
■When the compact spare tire is
equipped
The vehicle becomes lower when driving
with the compact spar e tire compared to
when driving with standard tires.
■If you have a flat front tire on a road cov-
ered with snow or ice
Install the compact spare tire on one of the
rear wheels of the vehicle. Perform the fol-
lowing steps and fit tire chains to the front
tires: 1
Replace a rear tire with the compact
spare tire.
2
Replace the flat front tire with the tire
removed from the rear of the vehicle.
3
Fit tire chains to the front tires.
WARNING
■When using the compact spare tire
●Remember that the compact spare tire
provided is specific ally designed for
use with your vehicle. Do not use your
compact spare tire on another vehicle.
●Do not use more than one compact
spare tire simultaneously.
●Replace the compact spare tire with a
standard tire as soon as possible.
●Avoid sudden acceleration, abrupt
steering, sudden braking and shifting
operations that cause sudden engine
braking.
■When the compact spare tire is
attached
The vehicle speed may not be correctly
detected, and the following systems may
not operate correctly:
• ABS & Brake assist
• VSC
• TRAC
• Dynamic radar cruise control with full- speed range
• PCS (Pre-Collision System)
• EPS
• LTA (Lane Tracing Assist)
• Panoramic view monitor (if equipped)
• Lexus parking assist monitor (if equipped)
• Intuitive parking assist (if equipped)
• Navigation system (if equipped)
• BSM (Blind spot monitor) (if equipped)
• Automatic high Beam
Page 379 of 456
3797-2. Steps to take in an emergency
7
When trouble arises
One of the following may be the cause
of the problem:
The electronic key may not be func-
tioning properly. ( P.383)
There may not be sufficient fuel in
the vehicle’s tank.
Refuel the vehicle. ( P.161)
There may be a malfunction in the
immobilizer system. ( P.60)
There may be a malfunction in the
steering lock system.
The hybrid system may be malfunc-
tioning due to an electrical problem
such as electronic key battery
depletion or a blown fuse. However,
depending on the type of malfunc-
tion, an interim measure is available
to start the hybrid system.
One of the following may be the cause
WARNING
■Speed limit when using the compact
spare tire
Do not drive at speeds in excess of 50
mph (80 km/h) when a compact spare
tire is installed on the vehicle.
The compact spare tire is not designed
for driving at high speeds. Failure to
observe this precaution may lead to an
accident causing deat h or serious injury.
■After using the tools and jack
Before driving, make sure all the tools
and jack are securely in place in their
storage location to reduce the possibility
of personal injury during a collision or
sudden braking.
NOTICE
■Be careful when driving over bumps
with the compact spare tire installed
on the vehicle
The vehicle becomes lower when driving
with the compact spare tire compared to
when driving with standard tires. Be
careful when driving over uneven road
surfaces.
■Driving with tire chains and the com-
pact spare tire
Do not fit tire chains to the compact
spare tire.
Tire chains may damage the vehicle body
and adversely affect driving perfor-
mance.
■When replacing the tires
When removing or fitting the wheels,
tires or the tire pressure warning valve
and transmitter, contact your Lexus
dealer as the tire pr essure warning valve
and transmitter may be damaged if not
handled correctly.
If the hybrid system will not
s
tart
Reasons for the hybrid system not
starting vary depending on the situ-
ation. Check the following and per-
form the appropriate procedure:
The hybrid system will not start
even though the correct starting
procedure is being followed.
( P.135)
The interior lights and head-
lights are dim, or the horn does
not sound or sounds at a low vol-
ume.
Page 380 of 456
3807-2. Steps to take in an emergency
of the problem:
The 12-volt battery may be dis-
charged. ( P.384)
The 12-volt battery terminal con-
nections may be loose or corroded.
( P.325)
One of the following may be the cause
of the problem:
The 12-volt battery may be dis-
charged. ( P.384)
One or both of the 12-volt battery
terminals may be disconnected.
( P.325)
Contact your Lexus dealer if the problem
cannot be repaired, or if repair procedures
are unknown.
When the hybrid system does not start,
the following steps can be used as an
interim measure to start the hybrid sys-
tem if the power switch is functioning
normally.
Do not use this starting procedure
except in cases of emergency.
1 Press the parking brake switch to
check that the parking brake is set.
(P.146)
Parking brake indicator will come on.
2 Shift the shift lever to P. 3
Turn the power switch to ACCES-
SORY mode.
4 Press and hold the power switch for
about 15 seconds while depressing
the brake pedal firmly.
Even if the hybrid system can be
started using the above steps, the sys-
tem may be malfunctioning. Have the
vehicle inspected by your Lexus dealer.
The interior lights and head-
lights do not turn on, or the horn
does not sound.
Starting the hybrid system in an
emergency
Page 385 of 456
3857-2. Steps to take in an emergency
7
When trouble arises
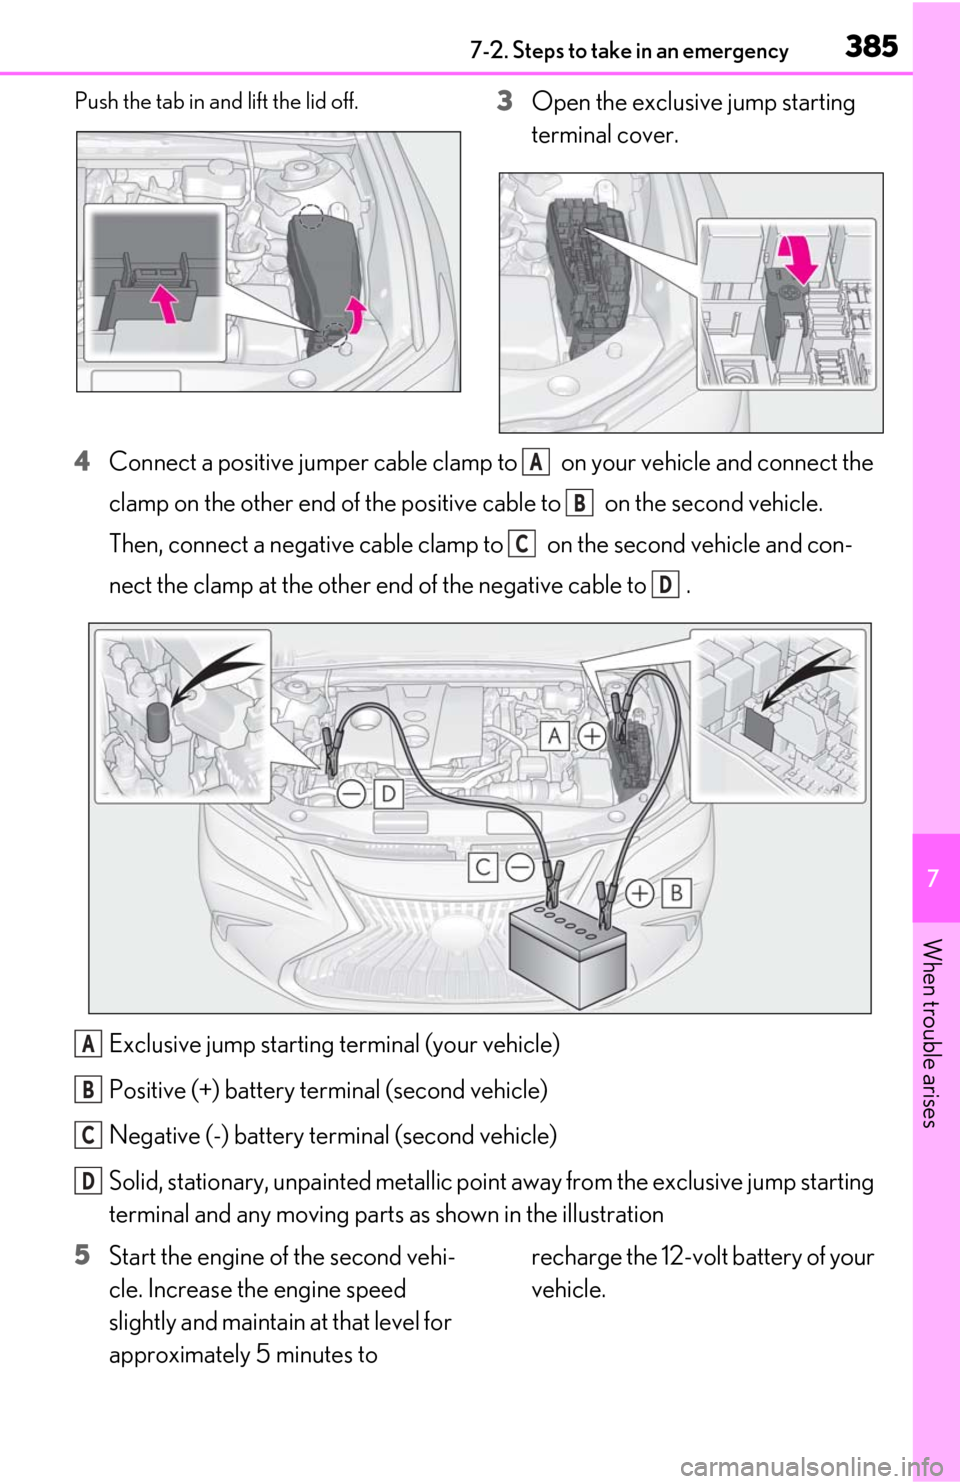
Push the tab in and lift the lid off.3Open the exclusive jump starting
terminal cover.
4 Connect a positive jumper cable clamp to on your vehicle and connect the
clamp on the other end of the positive cable to on the second vehicle.
Then, connect a negative cable clamp to on the second vehicle and con-
nect the clamp at the other end of the negative cable to .
Exclusive jump starting terminal (your vehicle)
Positive (+) battery terminal (second vehicle)
Negative (-) battery terminal (second vehicle)
Solid, stationary, unpainted metallic point away from the exclusive jump starting
terminal and any mo ving parts as shown in the illustration
5 Start the engine of the second vehi-
cle. Increase the engine speed
slightly and maintain at that level for
approximately 5 minutes to recharge the 12-volt battery of your
vehicle.
A
B
C
D
A
B
C
D