Page 204 of 555
4117
Features of your vehicle
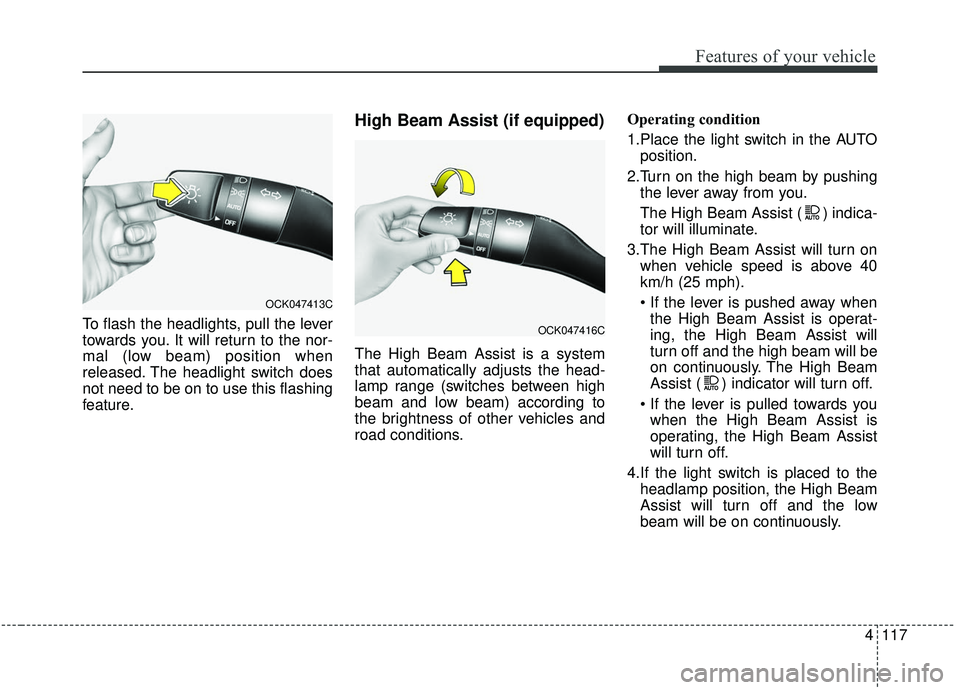
To flash the headlights, pull the lever
towards you. It will return to the nor-
mal (low beam) position when
released. The headlight switch does
not need to be on to use this flashing
feature.
High Beam Assist (if equipped)
The High Beam Assist is a system
that automatically adjusts the head-
lamp range (switches between high
beam and low beam) according to
the brightness of other vehicles and
road conditions.Operating condition
1.Place the light switch in the AUTO
position.
2.Turn on the high beam by pushing the lever away from you.
The High Beam Assist ( ) indica-
tor will illuminate.
3.The High Beam Assist will turn on when vehicle speed is above 40
km/h (25 mph).
the High Beam Assist is operat-
ing, the High Beam Assist will
turn off and the high beam will be
on continuously. The High Beam
Assist ( ) indicator will turn off.
when the High Beam Assist is
operating, the High Beam Assist
will turn off.
4.If the light switch is placed to the headlamp position, the High Beam
Assist will turn off and the low
beam will be on continuously.
OCK047413C
OCK047416C
Page 205 of 555
Features of your vehicle
118
4
The high beam switches to low beam
in the following conditions:
- When the High Beam Assist is off.
- When the light switch is not in the
AUTO position.
- When the headlamp is detected from the on-coming vehicle.
- When the tail lamp is detected from the front vehicle.
- When the surrounding is bright enough that high beams are not
needed.
- When streetlights or other lights are detected.
- When vehicle speed is below 24 km/h (15 mph).
- When headlamp / taillamp of bicy- cle/motorcycle is detected The system may not operate in the
following conditions:
When the light from a vehicle is not
detected because of lamp dam-
age, or because it is hidden from
sight, etc.
When the lamp of a vehicle is cov- ered with dust, snow or water.
When the light from a vehicle is not detected because of exhaust fume,
smoke, fog, snow, etc.
When the front window is covered with foreign matters such as ice,
dust, fog, or is damaged.
When there is a similar shape lamp with the front vehicle’s lamps.
When it is hard to see because of fog, heavy rain or snow.
When the headlamp is not repaired or replaced at an authorized deal-
er.
When headlamp aiming is not properly adjusted.
When driving on a narrow curved road or rough road. When driving downhill or uphill.
When only part of the vehicle in
front is visible on a crossroad or
curved road.
When there is a traffic light, reflect- ing sign, flashing sign or mirror.
When the road conditions are bad such as being wet or covered with
snow.
When the front vehicle’s head- lamps are off but the fog lamps on.
When a vehicle suddenly appears from a curve.
When the vehicle is tilted from a flat tire or being towed.
When the LKA (Lane Keeping Assist) system warning light illumi-
nates. (if equipped)
Page 211 of 555

Features of your vehicle
124
4
Front windshield washers
In the OFF position, pull the lever
gently toward you to spray washer
fluid on the windshield and to run the
wipers 1-3 cycles.
Use this function when the wind-
shield is dirty.
The spray and wiper operation will
continue until you release the lever.
If the washer does not work, check
the washer fluid level. If the fluid level
is not sufficient, you will need to add
appropriate non-abrasive windshield
washer fluid to the washer reservoir. The reservoir filler neck is located in
the front of the engine compartment
on the passenger side.
OCK047419
CAUTION
When washing the vehicle, set
the wiper switch in the OFFposition to stop the auto wiperoperation.
The wiper may operate and bedamaged if the switch is set inthe AUTO mode while washingthe vehicle.
Do not remove the sensor cover located on the upperend of the passenger sidewindshield glass. Damage tosystem parts could occur andmay not be covered by yourvehicle warranty.
When starting the vehicle in winter, set the wiper switch inthe OFF position. Otherwise,wipers may operate and icemay damage the windshieldwiper blades. Always removeall snow and ice and defrostthe windshield properly priorto operating the windshieldwipers.
CAUTION - Washer pump
To prevent possible damage tothe washer pump, do not oper-ate the washer when the fluidreservoir is empty.
WARNING - Obscured
visibility
Do not use the washer in freez-
ing temperatures without first
warming the windshield with
the defrosters; the washer solu-
tion could freeze on the wind-
shield and obscure your vision.
Page 223 of 555
Features of your vehicle
136
4
The mode selection button controls
the direction of the air flow through
the ventilation system.
The air flow outlet port is converted
as follows: Face-Level (B, D, F)
Air flow is directed toward the upper
body and face. Additionally, each
outlet can be controlled to direct the
air discharged from the outlet.
Bi-Level (B, C, D, E, F)
Air flow is directed towards the face
and the floor. Floor-Level (A, C, E, F)
Most of the air flow is directed to the
floor, with a small amount of the air
being directed to the windshield and
side window defrosters.
Floor/Defrost-Level
(A, C, D, E, F)
Most of the air flow is directed to the
floor and the windshield with a small
amount directed to the side window
defrosters.
OCK047308
Page 235 of 555
Features of your vehicle
148
4
Automatic climate control system
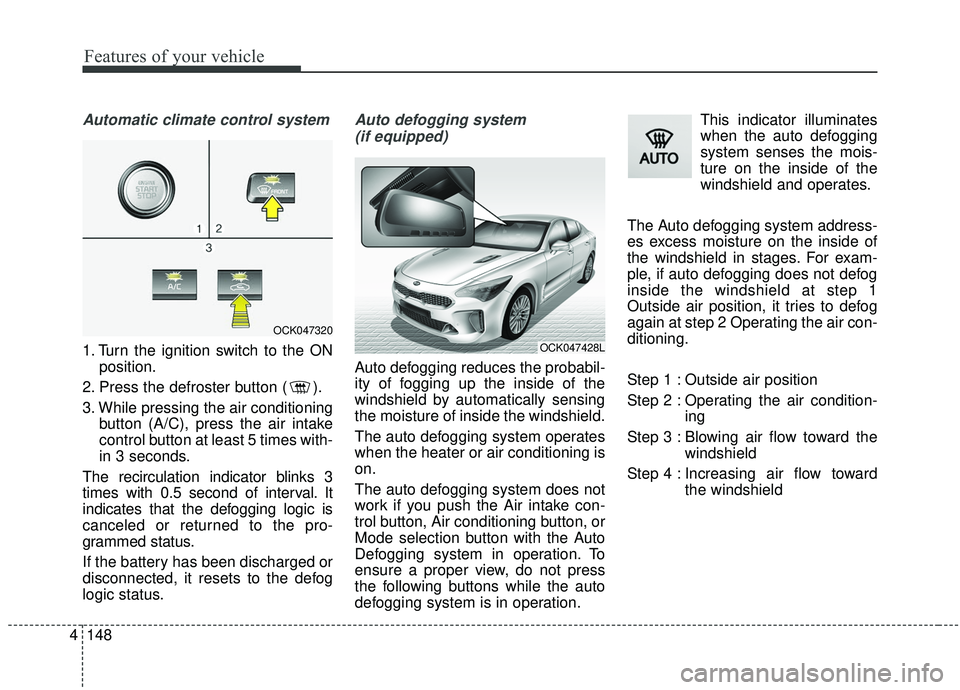
1. Turn the ignition switch to the ON
position.
2. Press the defroster button ( ).
3. While pressing the air conditioning button (A/C), press the air intake
control button at least 5 times with-
in 3 seconds.
The recirculation indicator blinks 3
times with 0.5 second of interval. It
indicates that the defogging logic is
canceled or returned to the pro-
grammed status.
If the battery has been discharged or
disconnected, it resets to the defog
logic status.
Auto defogging system (if equipped)
Auto defogging reduces the probabil-
ity of fogging up the inside of the
windshield by automatically sensing
the moisture of inside the windshield.
The auto defogging system operates
when the heater or air conditioning is
on.
The auto defogging system does not
work if you push the Air intake con-
trol button, Air conditioning button, or
Mode selection button with the Auto
Defogging system in operation. To
ensure a proper view, do not press
the following buttons while the auto
defogging system is in operation. This indicator illuminates
when the auto defogging
system senses the mois-
ture on the inside of the
windshield and operates.
The Auto defogging system address-
es excess moisture on the inside of
the windshield in stages. For exam-
ple, if auto defogging does not defog
inside the windshield at step 1
Outside air position, it tries to defog
again at step 2 Operating the air con-
ditioning.
Step 1 : Outside air position
Step 2 : Operating the air condition- ing
Step 3 : Blowing air flow toward the windshield
Step 4 : Increasing air flow toward the windshield
OCK047320
OCK047428L
Page 242 of 555
4155
Features of your vehicle
The seat warmer (with air ventila-tion) defaults to the OFF position
whenever the ignition switch is
turned on.Sunvisor
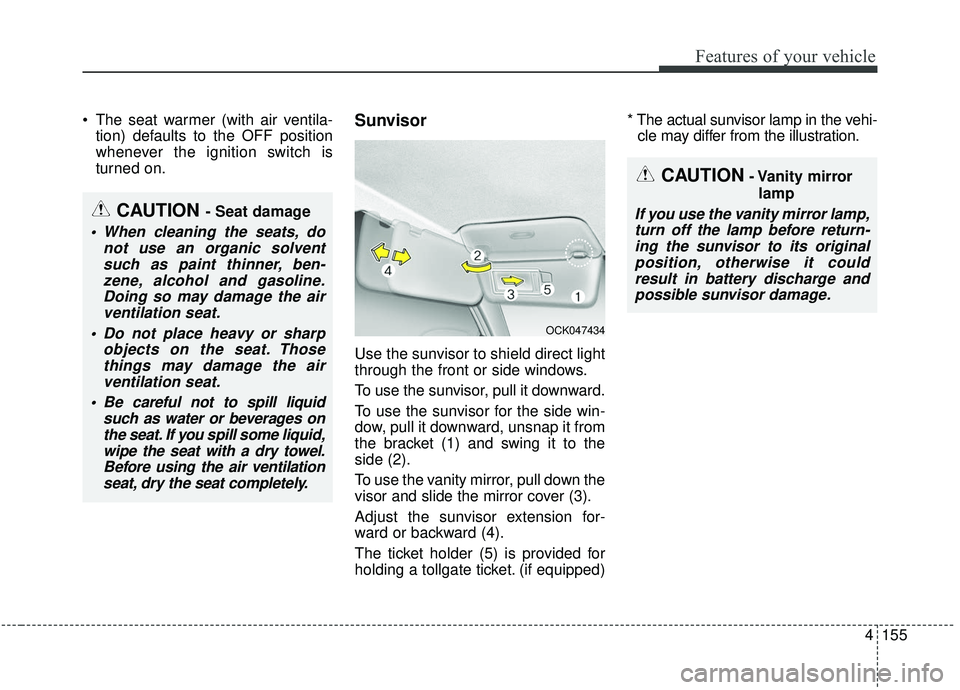
Use the sunvisor to shield direct light
through the front or side windows.
To use the sunvisor, pull it downward.
To use the sunvisor for the side win-
dow, pull it downward, unsnap it from
the bracket (1) and swing it to the
side (2).
To use the vanity mirror, pull down the
visor and slide the mirror cover (3).
Adjust the sunvisor extension for-
ward or backward (4).
The ticket holder (5) is provided for
holding a tollgate ticket. (if equipped) * The actual sunvisor lamp in the vehi-
cle may differ from the illustration.
CAUTION- Vanity mirror
lamp
If you use the vanity mirror lamp,turn off the lamp before return-ing the sunvisor to its originalposition, otherwise it couldresult in battery discharge andpossible sunvisor damage.CAUTION - Seat damage
When cleaning the seats, do not use an organic solventsuch as paint thinner, ben-zene, alcohol and gasoline.Doing so may damage the airventilation seat.
Do not place heavy or sharp objects on the seat. Thosethings may damage the airventilation seat.
Be careful not to spill liquid such as water or beverages onthe seat. If you spill some liquid,wipe the seat with a dry towel.Before using the air ventilationseat, dry the seat completely.
OCK047434
Page 291 of 555
Driving your vehicle
38
5
✽ ✽
NOTICE
• Do not drive in water if the level is
higher than the bottom of the vehi-
cle.
• Check your brake condition once you are out of mud or water.
Depress the brake pedal several
times as you move slowly until you
feel normal braking return.
• Shorten your scheduled mainte- nance interval if you drive in off-
road conditions such as sand, mud
or water (see "Maintenance Under
Severe Usage Conditions" in chap-
ter 7).
• Make sure that AWD vehicle is towed by a flatbed tow truck.
For safe AWD operation
Before driving
Make sure all passengers are
wearing seat belts.
Sit upright and closer to the steer- ing wheel than usual. Adjust the
steering wheel to a position com-
fortable for you to drive.
Driving on snow-covered or icy roads
Start off slowly by applying the accelerator pedal gently.
Use snow tires.
Keep sufficient distance between your vehicle and the vehicle in front
of you.
Use engine braking during deceler- ation.
Avoid speeding, rapid acceleration, sudden brake applications, and
sharp turns to prevent skids. Driving in sand or mud
Maintain slow and constant speed.
Keep sufficient distance between
your vehicle and the vehicle in front
of you.
Reduce vehicle speed and always check the road condition.
Avoid speeding, rapid acceleration, sudden brake applications, and
sharp turns to prevent getting
stuck.
✽ ✽ NOTICE
When the vehicle is stuck in snow,
sand or mud, place a non-slip mate-
rial under the drive wheels to pro-
vide traction OR slowly spin the
wheels in forward and reverse direc-
tions which causes a rocking motion
that may free the vehicle. See the
Section "Rocking the Vehicle" for
more details. However, avoid run-
ning the engine continuously at high
rpm, which could damage the AWD
system.
Page 293 of 555
Driving your vehicle
40
5
Towing
AWD vehicles must be towed with a
wheel lift and dollies or flatbed equip-
ment with all the wheels off the
ground. For more information, refer
to "Towing" in chapter 6.
Vehicle inspection
When the vehicle is on a car lift, do
not operate the front and rear
wheels separately. All four wheels
should be operated.
Never engage the parking brake while running the engine on a car
lift. This may damage the AWD
system.WARNING
Never start or run the engine
while an AWD vehicle is raised
on a jack. The vehicle can slip or
roll off of a jack causing serious
injury or death to you or those
nearby.
OCK057159L