Page 219 of 555
Features of your vehicle
132
4
AUTOMATIC CLIMATE CONTROL SYSTEM
OCK047300/OCK047322
1. Driver’s temperature control knob
2. AUTO (automatic control) button
3. Front windshield defroster button
4. Rear window/mirrors defroster button
5. Air conditioning button
6. Air intake control buttons
7. OFF button
8. Fan speed control buttons
9. Mode selection button
10. Passenger's temperature control knob
11. SYNC temperature control selection but-
ton
12. Climate control display
13. Rear temperature control knob
■ ■ Rear seat
■ ■Front seat
CAUTION
Operating the blower when the
ignition switch is in the ON posi-tion could cause the battery todischarge. Operate the blowerwhen the engine is running.
Page 228 of 555
4141
Features of your vehicle
OFF mode
Press the front blower OFF button to
turn off the front air climate control
system. However, you can still oper-
ate the mode and air intake buttons
as long as the ignition switch is in the
ON position.
Climate information screen selection (if equipped)
Press the climate information screen
selection button to display climate
information on the screen.
OCK047317
WARNING - Recirculated
Air
Continued use of the climate
control system in the recirculat-
ed air position can cause
drowsiness or sleepiness, and
loss of vehicle control. Set the
air intake control to the outside
(fresh) air position as much as
possible while driving.
WARNING - Sleeping with
AC on
Do not sleep in a vehicle with
the air conditioning or heating
on as this may cause serious
harm or death due to a drop in
the oxygen level and/or body
temperature.OCK047316
Page 235 of 555

Features of your vehicle
148
4
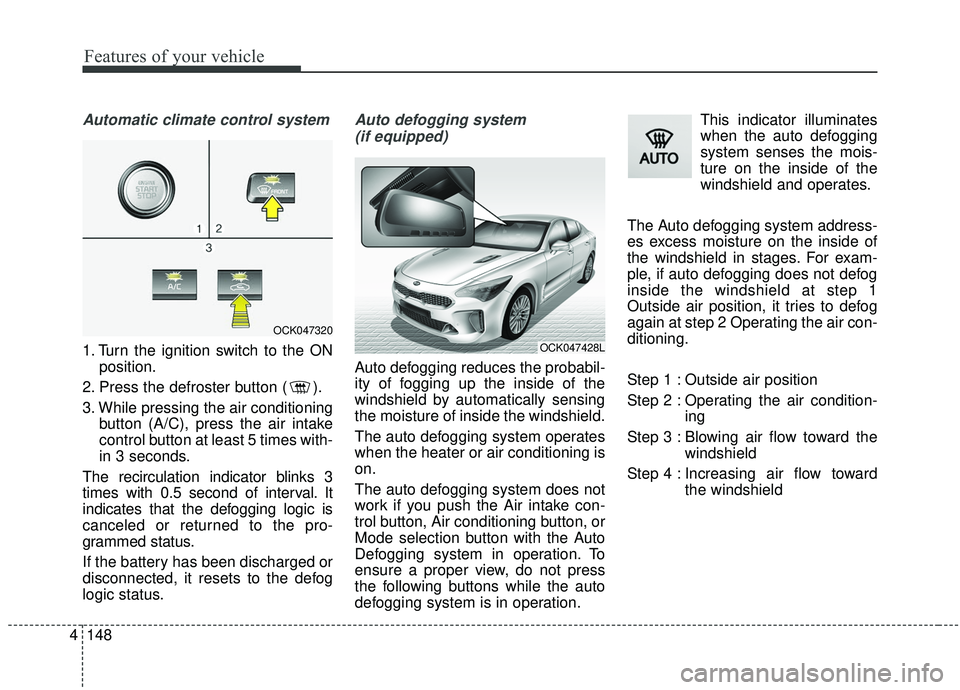
Automatic climate control system
1. Turn the ignition switch to the ON
position.
2. Press the defroster button ( ).
3. While pressing the air conditioning button (A/C), press the air intake
control button at least 5 times with-
in 3 seconds.
The recirculation indicator blinks 3
times with 0.5 second of interval. It
indicates that the defogging logic is
canceled or returned to the pro-
grammed status.
If the battery has been discharged or
disconnected, it resets to the defog
logic status.
Auto defogging system (if equipped)
Auto defogging reduces the probabil-
ity of fogging up the inside of the
windshield by automatically sensing
the moisture of inside the windshield.
The auto defogging system operates
when the heater or air conditioning is
on.
The auto defogging system does not
work if you push the Air intake con-
trol button, Air conditioning button, or
Mode selection button with the Auto
Defogging system in operation. To
ensure a proper view, do not press
the following buttons while the auto
defogging system is in operation. This indicator illuminates
when the auto defogging
system senses the mois-
ture on the inside of the
windshield and operates.
The Auto defogging system address-
es excess moisture on the inside of
the windshield in stages. For exam-
ple, if auto defogging does not defog
inside the windshield at step 1
Outside air position, it tries to defog
again at step 2 Operating the air con-
ditioning.
Step 1 : Outside air position
Step 2 : Operating the air condition- ing
Step 3 : Blowing air flow toward the windshield
Step 4 : Increasing air flow toward the windshield
OCK047320
OCK047428L
Page 240 of 555
4153
Features of your vehicle
Seat warmer (if equipped)Temperature control (Manual)
Each time you push up or press the switch, the temperature setting
of the seat will change as follows :
■ Front seat
■ Rear seat
The seat warmer defaults to the OFF position whenever the ignition
switch is turned on.▼
OFF→ HIGH( )→ MIDDLE( )→LOW( )
→
OFF→HIGH( )→ MIDDLE( )→LOW( )
→
OCK047437N
OCK047468N
OCK047438
The seat warmer is provided to
warm the front seats during cold
weather. With the ignition switch in
the ON position, push up either of
the switches to warm the driver's
seat or the front passenger's seat.
During mild weather or under condi-
tions where the operation of the seat
warmer is not needed, keep the
switches in the “OFF” position.
■Rear seat■Front seat
Page 242 of 555

4155
Features of your vehicle
The seat warmer (with air ventila-tion) defaults to the OFF position
whenever the ignition switch is
turned on.Sunvisor
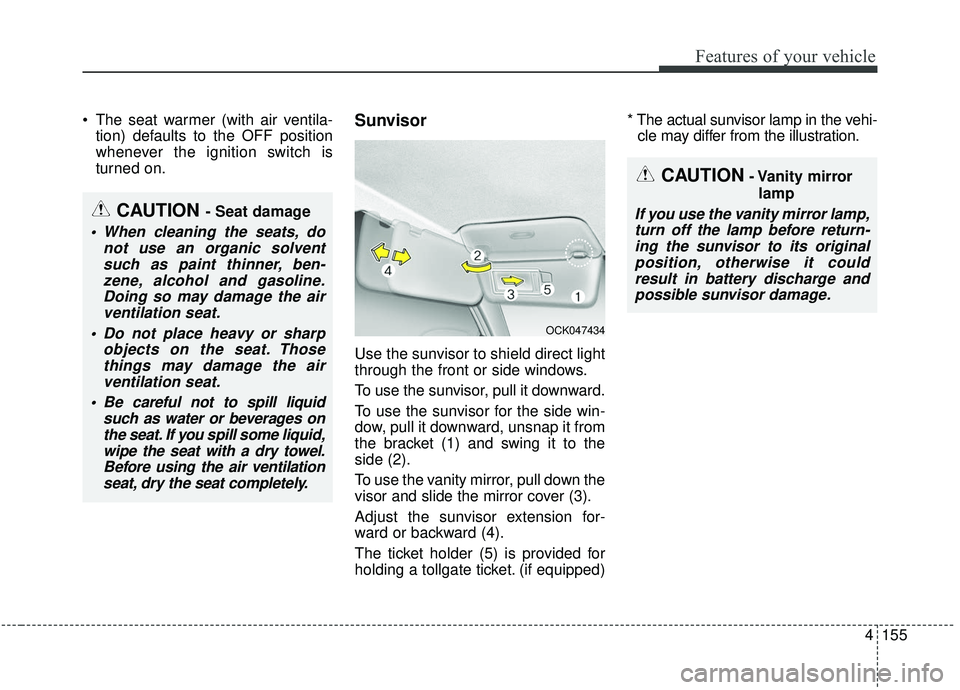
Use the sunvisor to shield direct light
through the front or side windows.
To use the sunvisor, pull it downward.
To use the sunvisor for the side win-
dow, pull it downward, unsnap it from
the bracket (1) and swing it to the
side (2).
To use the vanity mirror, pull down the
visor and slide the mirror cover (3).
Adjust the sunvisor extension for-
ward or backward (4).
The ticket holder (5) is provided for
holding a tollgate ticket. (if equipped) * The actual sunvisor lamp in the vehi-
cle may differ from the illustration.
CAUTION- Vanity mirror
lamp
If you use the vanity mirror lamp,turn off the lamp before return-ing the sunvisor to its originalposition, otherwise it couldresult in battery discharge andpossible sunvisor damage.CAUTION - Seat damage
When cleaning the seats, do not use an organic solventsuch as paint thinner, ben-zene, alcohol and gasoline.Doing so may damage the airventilation seat.
Do not place heavy or sharp objects on the seat. Thosethings may damage the airventilation seat.
Be careful not to spill liquid such as water or beverages onthe seat. If you spill some liquid,wipe the seat with a dry towel.Before using the air ventilationseat, dry the seat completely.
OCK047434
Page 244 of 555
4157
Features of your vehicle
USB charger (if equipped)
The USB charger is designed to
recharge devices using a USB cable.
The electrical devices can be
recharged when the Engine Start/Stop
button is in ACC/ON/START position.
The battery charging state may be
monitored on the electrical device.
Disconnect the USB cable from the
USB port after use. Use the USB charger when the
engine is running to prevent bat-
tery discharge.
Only devices that fits the USB port can be used.
The USB charger can be used only for battery charging purposes.
Wireless smart phone charg-
ing system (if equipped)
A wireless smart phone charging
system is located in front of the cen-
ter console.
Firmly close all doors, and turn the
ignition to ACC or IGN ON. To start
wireless charging, place the smart
phone equipped with wireless charg-
ing function on the wireless charging
pad.
For best wireless charging results,
place the smart phone on the center
of the charging pad.
OCK047461
OCK047440N
Page 247 of 555

Features of your vehicle
160
4
(Continued)
• The wireless charging will stop
when the smart key is moved out
of the vehicle with the ignition in
ON.
• Charging may be temporarily interrupted when smart key detec-
tion is activated. (when turning on
ignition, opening or closing the
doors)
• The wireless charging will stop when the vehicle is turned OFF.
• The wireless charging will stop when the smart phone is not in
complete contact with the wireless
charging pad.
• Items equipped with magnetic components such as credit card,
telephone card, bankbook, any
transportation ticket and such
may become damaged during
wireless charging.
• Place the smart phone on the cen- ter of the charge pad for best
results. The smart phone may not
charge when placed near the rim
of the charging pad. When the
smart phone does get charged, it
may heat up excessively. (Continued)(Continued)
• For smart phones without built-in
wireless charging system, an
appropriate accessory has to be
equipped.
• Cellphones that are not certified for wireless smart phone charging
standards (QI) may not be able to
charge.
• Self-protection features in some smart phones could slow down or
stop charging.
• In some cases, the wireless charg- ing indicator could not turn green
even when the phone is fully
charged.
• Smart phones of some manufac- turers may display messages on
weak current. This is due to the
particular characteristic of the
smart phone and does not imply a
malfunction on wireless charging
function. (Continued)(Continued)
• The indicator light of some manu-
facturers’ smart phones may still
be yellow after the smart phone is
fully charged. This is due to the
particular characteristic of the
smart phone and not a malfunc-
tion of the wireless charging.
• When any smart phone without a wireless charging function or a
metallic object is placed on the
charging pad, a small noise may
sound. This small sound is due to
the vehicle discerning compatibili-
ty of the object placed on the
charging pad. It does not affect
your vehicle or the smart phone in
any way.
Page 258 of 555

55
Driving your vehicle
Before entering vehicle
• Be sure that all windows, outsidemirror(s), and outside lights are
clean.
Check the condition of the tires.
Check under the vehicle for any sign of leaks.
Be sure there are no obstacles behind you if you intend to back up.
Necessary inspections
Fluid levels, such as engine oil,
engine coolant, brake fluid, and
washer fluid should be checked on a
regular basis, at the exact interval
depending on the fluid. Further
details are provided in chapter 7,
“Maintenance”.
Before starting
Close and lock all doors.
Position the seat so that all con-trols are easily reached.
Buckle your seat belt.
Adjust the inside and outside rearview mirrors.
Be sure that all lights work.
Check all gauges.
Check the operation of warning lights when the ignition switch is
turned to the ON position.
Release the parking brake and make sure the brake warning light
goes out.
For safe operation, be sure you are
familiar with your vehicle and its
equipment.
BEFORE DRIVING
WARNING - Distracted driving
Focus on the road while driving.
The driver's primary responsi-
bility is in the safe and legal
operation of the vehicle. Use of
any handled devices, other
equipment or vehicle systems
that distract the driver should
not be used during vehicle
operation.