2019 KIA STINGER mirror
[x] Cancel search: mirrorPage 143 of 555

Features of your vehicle
56
4
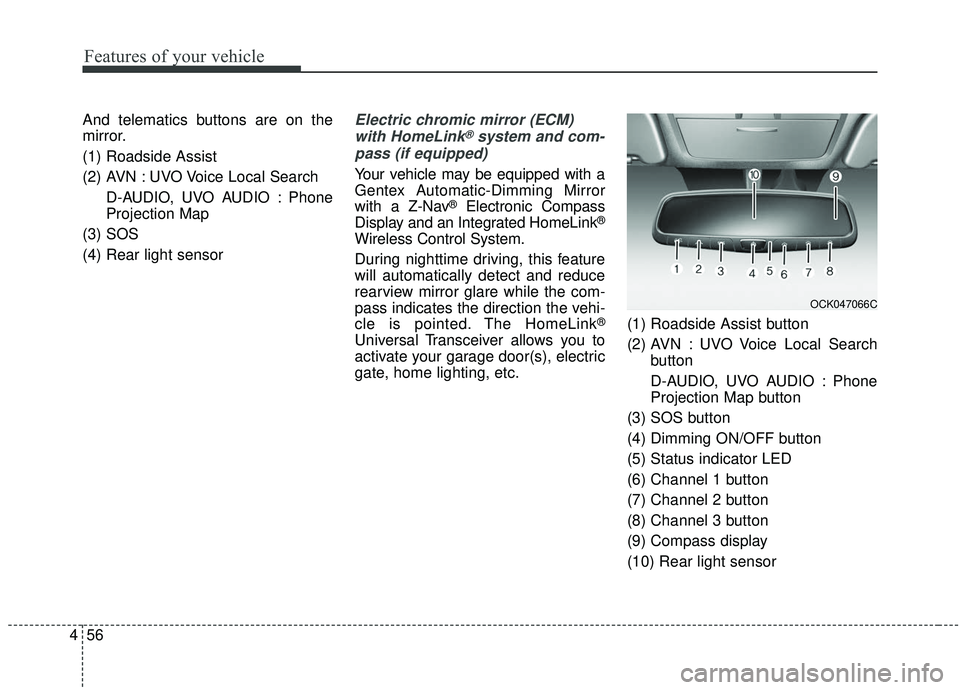
And telematics buttons are on the
mirror.
(1) Roadside Assist
(2) AVN : UVO Voice Local Search
D-AUDIO, UVO AUDIO : Phone
Projection Map
(3) SOS
(4) Rear light sensorElectric chromic mirror (ECM) with HomeLink®system and com-
pass (if equipped)
Your vehicle may be equipped with a
Gentex Automatic-Dimming Mirror
with a Z-Nav
®Electronic Compass
Display and an Integrated HomeLink®
Wireless Control System.
During nighttime driving, this feature
will automatically detect and reduce
rearview mirror glare while the com-
pass indicates the direction the vehi-
cle is pointed. The HomeLink
®
Universal Transceiver allows you to
activate your garage door(s), electric
gate, home lighting, etc. (1) Roadside Assist button
(2) AVN : UVO Voice Local Search
button
D-AUDIO, UVO AUDIO : Phone
Projection Map button
(3) SOS button
(4) Dimming ON/OFF button
(5) Status indicator LED
(6) Channel 1 button
(7) Channel 2 button
(8) Channel 3 button
(9) Compass display
(10) Rear light sensor
OCK047066C
Page 144 of 555

457
Features of your vehicle
Automatic-Dimming Night Vision
Safety™ (NVS®) Mirror
The NVS
®Mirror in your vehicle is
the most advanced way to reduce
annoying glare in the rearview mirror
during any driving situation. For more
information regarding NVS
®mirrors
and other applications, please refer
to the Gentex website:
www.gentex.com
❈ Night Vision Safety™ is a registered
trademark of Gentex Corporation. Automatic-dimming function
Your mirror will automatically dim
upon detecting glare from the vehi-
cles traveling behind you. The auto-
dimming function can be controlled
by the Dimming ON/OFF Button:
1. Pressing the button turns the
auto-dimming function OFF which
is indicated by the green Status
Indicator LED turning off.
2. Pressing the button again turns the auto-dimming function ON
which is indicated by the green
Status Indicator LED turning on.
✽ ✽NOTICE
The mirror defaults to the ON posi-
tion each time the vehicle is started.
Z-Nav™ Compass Display
The NVS
®Mirror in your vehicle is
also equipped with a Z-NAV™
Compass that shows the vehicle
Compass heading in the Display
Window using the 8 basic cardinal
headings (N, NE, E, SE, etc.).
❈ Z-Nav™ is a registered trademark
of Gentex Corporation. Compass function
The Compass can be turned ON and
OFF and will remember the last state
when the ignition is cycled. To turn
the display feature ON/OFF:
1. Press and release the button to
turn the display feature OFF.
2. Press and release the button
again to turn the display back ON.
Additional options can be set with
press and hold sequences of the
button and are detailed below.
There is a difference between mag-
netic north and true north. The com-
pass in the mirror can compensate
for this difference when it knows the
Magnetic Zone in which it is operat-
ing. This is set either by the dealer or
by the user. The operating Zone
Numbers for North America are
shown in the figure on the following
section.
CAUTION
The NVS®Mirror automatically
reduces glare during driving conditions based upon light lev-els monitored in front of thevehicle and from the rear of thevehicle. These light sensors arevisible through openings in thefront and rear of the mirror case.Any object that obstructs eitherlight sensor will degrade theautomatic dimming control fea-ture.
Page 151 of 555

Features of your vehicle
64
4
Outside rearview mirror
Be sure to adjust the mirror angles
before driving.
Your vehicle is equipped with both
left-hand and right-hand outside
rearview mirrors. The mirrors can be
adjusted remotely with the remote
switch. The mirror heads can be fold-
ed back to prevent damage during an
automatic vehicle wash or when
passing through a narrow street.
The right outside rearview mirror is
convex. Objects seen in the mirror
are closer than they appear.
Use your interior rearview mirror or
direct observation to determine the
actual distance of following vehicles
when changing lanes. If the mirror is jammed with ice, do
not adjust the mirror by force. Use an
approved spray de-icer (not radiator
antifreeze) to release the frozen
mechanism or move the vehicle to a
warm place and allow the ice to melt.
Adjusting outside rearview mirror
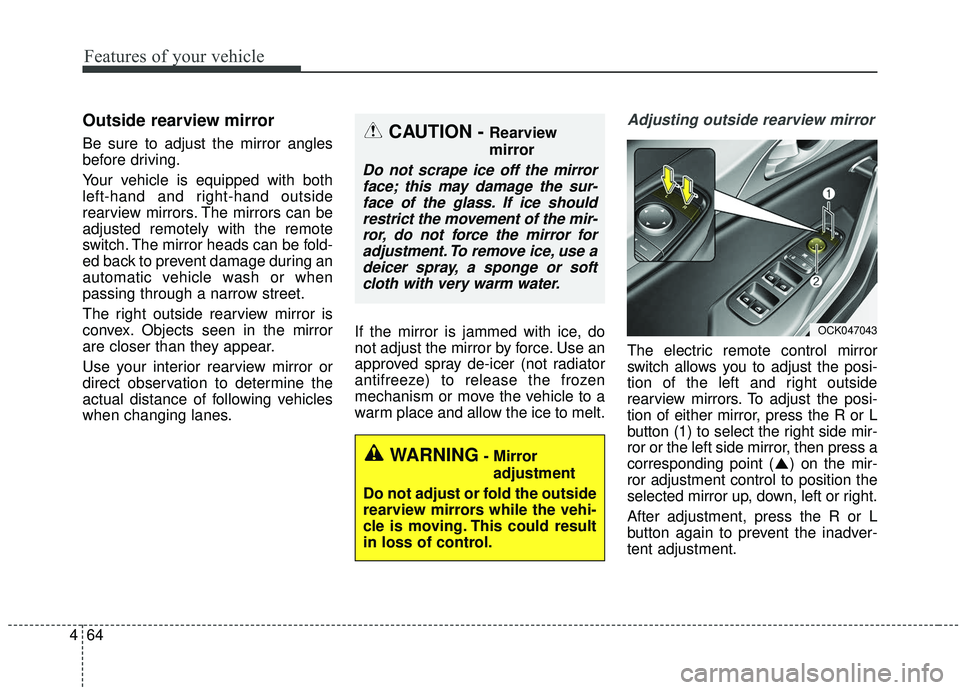
The electric remote control mirror
switch allows you to adjust the posi-
tion of the left and right outside
rearview mirrors. To adjust the posi-
tion of either mirror, press the R or L
button (1) to select the right side mir-
ror or the left side mirror, then press a
corresponding point ( ) on the mir-
ror adjustment control to position the
selected mirror up, down, left or right.
After adjustment, press the R or L
button again to prevent the inadver-
tent adjustment.
WARNING- Mirror
adjustment
Do not adjust or fold the outside
rearview mirrors while the vehi-
cle is moving. This could result
in loss of control.
CAUTION - Rearview
mirror
Do not scrape ice off the mirror face; this may damage the sur-face of the glass. If ice shouldrestrict the movement of the mir-ror, do not force the mirror foradjustment. To remove ice, use adeicer spray, a sponge or softcloth with very warm water.
OCK047043
Page 152 of 555

465
Features of your vehicle
Reverse parking aid function (if equipped)
While the vehicle is moving in
reverse, the outside rearview mir-
ror(s) will move downward to aid
reverse parking. According to the
position of the outside rearview mir-
ror switch (1), the outside rearview
mirror(s) will operate as follows: L/R
: When the remote control outside
rearview mirror switch (1) is
selected to the L (left) or R (right)
position, both outside rearview
mirrors will move downward.
Neutral : When the remote control
outside rearview mirror
switch is placed in the mid-
dle position, the outside
rearview mirrors will not
operate while the vehicle is
moving rearward.
The outside rearview mirrors will auto-
matically revert to their original posi-
tions under the following conditions:
1. The Engine Start/Stop button is in the OFF position.
2. Shift lever is moved to any position except R (Reverse).
3. Remote control outside rearview mirror switch is placed in the middle
position.
CAUTION - Outside mirror
The mirrors stop moving whenthey reach the maximumadjusting angles, but themotor continues to operatewhile the switch is pressed.
Do not press the switch longerthan necessary, the motormay be damaged.
Do not attempt to adjust the outside rearview mirror byhand. Doing so may damagethe parts.
OCK047045N
Page 153 of 555

Features of your vehicle
66
4
Folding the outside rearview mirror
Electric type
The outside rearview mirror can be
folded or unfolded by pressing the
switch as below.
Left (1) : The mirror will unfold.
Right (2) : The mirror will fold. Center (AUTO, 3)
:
The mirror will fold or unfold automat-
ically as follows:
The mirror will fold or unfold when the door is locked or unlocked by
the smart key.
The mirror will fold or unfold when the door is locked or unlocked by the
button on the outside door handle.
The mirror will unfold when you approach the vehicle (all doors
closed and locked) with a smart
key in possession.
OCK047044L
CAUTION -Electric type
outside rearview mirror
The electric type outside rearview mirror operates even though theengine start/stop button is in theOFF position. However, to preventunnecessary battery discharge,do not adjust the mirrors longerthan necessary while the engineis not running.
Do not fold the electric type out-side rearview mirror by hand. Thiscould cause motor failure.
Page 173 of 555

Features of your vehicle
86
4
Steering Easy Access (if
equipped)
- On (checked) : The steeringwheel will automatically move to
the top of Steering column when
leaving the vehicle and move to
the last saved position when
entering the vehicle for the driver
to enter or exit the vehicle com-
fortably.
- Off (unchecked) : The steering easy access function will be
deactivated.
❈ For more details, refer to “Driver
Position Memory System” in chap-
ter 3.
Welcome Mirror/Light (if equipped) : - If this item is checked, the wel-come Mirror/light function will be
activated.
Wiper/Light Display (if equipped) : If this item is checked, the
Wiper/Light Display will be activat-
ed. Gear Position Pop-up (if equipped)
: If this item is checked, the gear
position pop-up display will be acti-
vated.
Icy road warning (if equipped) : If this item is checked, the Icy road
warning display will be activated.
Service interval
Service Interval To activate or deactivate the serv-
ice interval function.
Adjust Interval To adjust the interval by mileage-
and period.
Reset To reset the service interval func-
tion. Other features
Fuel Economy Auto Reset
- Off : The average fuel economywill not reset automatically when-
ever refueling.
- After Ignition : The average fuel economy will reset automatically
whenever it has passed 4 hours
after turning OFF the engine.
- After Refueling : The average fuel economy will reset automatically
when refueling.
❈ For more details, refer to “Trip
Computer” in this chapter.
Fuel Economy Unit - Choose the fuel economy unit.(L/100km, US gallon, UK gallon)
Temperature Unit - Choose the temperature unit.(°C,°F)
Page 198 of 555

4111
Features of your vehicle
The rear view monitor will activate
with the ignition switch ON, engine
ON and the shift lever in the R
(Reverse) position.This system is a supplemental sys-
tem that shows the area behind the
vehicle on the audio screen while
backing up. If the vehicle is equipped
with a navigation system, then will
display the image on the navigation
screen.
This system is a supplemental sys-
tem only. It is the responsibility of
the driver to always check the
inside/outside rearview mirrors and
the area behind the vehicle before
and while backing up.
Always keep the camera lens clean. If lens is covered with for-
eign matter, the camera may not
operate normally.
REAR VIEW MONITOR (IF EQUIPPED)
OCK047403L
OCK048406N
WARNING - Backing &
using camera
Never rely solely on the rear view
monitor. You must always use
methods of viewing the area
behind you including looking
over both shoulders as well as
continuously checking all three
rear view mirrors. Due to the dif-
ficulty of ensuring that the area
behind you remains clear, always
back up slowly and stop immedi-
ately if you suspect that a per-
son, and especially a child, might
be behind you.
Page 199 of 555

Features of your vehicle
112
4
The 360° camera monitoring system
is not a substitute for proper and safe
parking procedures. The 360° cam-
era monitoring system may not
detect every object surrounding the
vehicle. Always drive safely and use
caution when parking. The 360° camera monitoring system
can assist in parking by allowing the
driver to see around the vehicle.
Push the button into the [ON] posi-
tion to operate the system.
To cancel the system, push the but-
ton again.
Operating conditions
- When the Engine Start/Stop
Button is ON position
- When the transaxle is on D, N or R
When the vehicle moves back- wards, regardless of On/Off of but-
ton and vehicle speed, the 360°
camera monitoring system is oper-
ated.
When the liftgate and driver/pas- senger door are opened and the
outside mirror is folded, the warn-
ing is illuminated in the 360° cam-
era monitoring system.
If the 360° camera monitoring sys- tem is not operating normally, the
system should be checked by an
authorized Kia dealer.
360° CAMERA MONITORING SYSTEM (IF EQUIPPED)
OCK047405
OCK048468N