2019 KIA STINGER climate control
[x] Cancel search: climate controlPage 233 of 555
Features of your vehicle
146
4
For maximum defrosting, set the
temperature control to the extreme
right/hot position and the fan speed
control to the highest speed.
If warm air to the floor is desired while defrosting or defogging, set
the mode to the floor-defrost posi-
tion.
Before driving, clear all snow and ice from the windshield, rear win-
dow, outside rear view mirrors, and
all side windows.
Clear all snow and ice from the hood and air inlet in the cowl grill to
improve heater and defroster effi-
ciency and to reduce the probabili-
ty of fogging up the inside of the
windshield.Automatic climate control
system
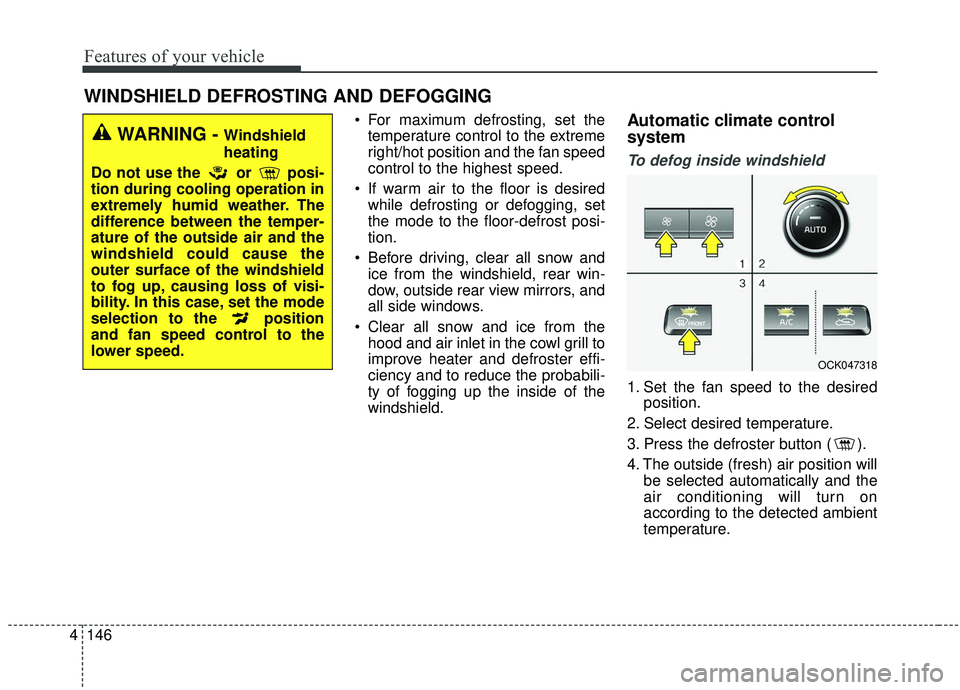
To defog inside windshield
1. Set the fan speed to the desired position.
2. Select desired temperature.
3. Press the defroster button ( ).
4. The outside (fresh) air position will be selected automatically and the
air conditioning will turn on
according to the detected ambient
temperature.
WINDSHIELD DEFROSTING AND DEFOGGING
WARNING - Windshield
heating
Do not use the or posi-
tion during cooling operation in
extremely humid weather. The
difference between the temper-
ature of the outside air and the
windshield could cause the
outer surface of the windshield
to fog up, causing loss of visi-
bility. In this case, set the mode
selection to the position
and fan speed control to the
lower speed.
OCK047318
Page 235 of 555
Features of your vehicle
148
4
Automatic climate control system
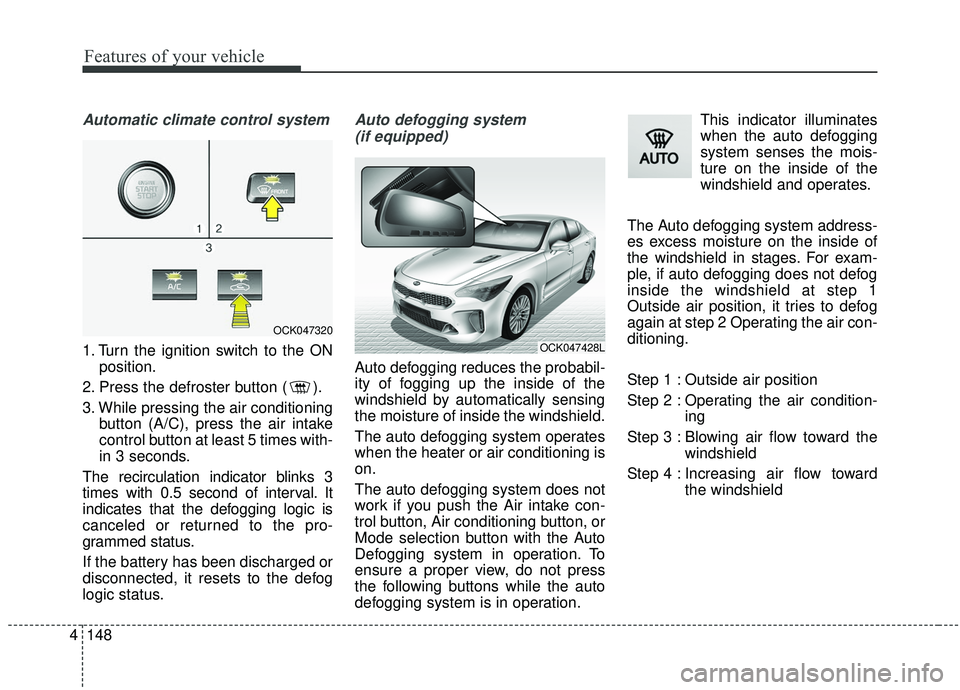
1. Turn the ignition switch to the ON
position.
2. Press the defroster button ( ).
3. While pressing the air conditioning button (A/C), press the air intake
control button at least 5 times with-
in 3 seconds.
The recirculation indicator blinks 3
times with 0.5 second of interval. It
indicates that the defogging logic is
canceled or returned to the pro-
grammed status.
If the battery has been discharged or
disconnected, it resets to the defog
logic status.
Auto defogging system (if equipped)
Auto defogging reduces the probabil-
ity of fogging up the inside of the
windshield by automatically sensing
the moisture of inside the windshield.
The auto defogging system operates
when the heater or air conditioning is
on.
The auto defogging system does not
work if you push the Air intake con-
trol button, Air conditioning button, or
Mode selection button with the Auto
Defogging system in operation. To
ensure a proper view, do not press
the following buttons while the auto
defogging system is in operation. This indicator illuminates
when the auto defogging
system senses the mois-
ture on the inside of the
windshield and operates.
The Auto defogging system address-
es excess moisture on the inside of
the windshield in stages. For exam-
ple, if auto defogging does not defog
inside the windshield at step 1
Outside air position, it tries to defog
again at step 2 Operating the air con-
ditioning.
Step 1 : Outside air position
Step 2 : Operating the air condition- ing
Step 3 : Blowing air flow toward the windshield
Step 4 : Increasing air flow toward the windshield
OCK047320
OCK047428L
Page 236 of 555

4149
Features of your vehicle
To cancel or reset the Auto Defogging
System
Press the front windshield defroster
button for 3 seconds when the igni-
tion switch is in the ON position.
When the ADS system is canceled,
Indicator on the button will blink 3
times per 0.5 sec and the position
“ADS OFF” will be displayed on the
climate control information screen.
When the ADS system is reset,
Indicator on the button will blink 6
times per 0.25sec and the position
“ADS OFF” will be disappeared on
the climate control information
screen. You can set or release the
Auto Defogging System on the AVN
Climate Information selection screen.
If the battery is discharged or
detached, the auto defogging system
will be reset. Adjust the feature
accordingly.Automatic ventilation
(if equipped)
The system automatically selects the
outside (fresh) air position when the
climate control system operates over
a certain period of time (approxi-
mately 30 minutes) in low tempera-
ture with the recirculated air position
selected.
To cancel or reset the Automatic
Ventilation
When the air conditioning system is
on, select Face Level mode and
while pressing the A/C button, press
the recirculated air position button
five times within three seconds.
When the automatic ventilation is
canceled, the indicator blinks 3
times. When the automatic ventila-
tion is activated, the indicator blinks
6 times.
If the battery is discharged or
detached, the automatic ventilation
will be reset. Adjust the feature
accordingly.
Smart ventilation (if equipped)
The smart ventilation system main-
tains pleasant/fresh air condition
inside the passenger compartment
by automatically detecting/controlling
the temperature and humidity when
you drive the vehicle with the climate
control system in the OFF position.
When the smart ventilation system
starts to operate, the message,
“SMART VENTILATION ON”
appears for 5 seconds.
The smart ventilation system stops operating, when the OFF button of
the climate control system is
selected.
The smart ventilation system stops operating, when any button of the
climate control system is selected
for operation.
The smart ventilation system may not operate, when the vehicle is
driven at low speed.
CAUTION
Do not remove the sensor coverlocated on the upper end of thepassenger side windshield glass.Damage to the system partscould occur and may not be cov-ered by your vehicle warranty.
Page 296 of 555
543
Driving your vehicle
In the event of brake failure
If the service brakes fail to operate
while the vehicle is in motion, you
can make an emergency stop with
the parking brake. The stopping dis-
tance, however, will be much greater
than normal.
Disc brakes wear indicator
When your brake pads are worn and
new pads are required, you will hear
a high-pitched warning sound from
your front brakes or rear brakes. You
may hear this sound come and go or
it may occur whenever you depress
the brake pedal.
Please remember that some driving
conditions or climates may cause a
brake squeal when you first apply (or
lightly apply) the brakes. This is nor-
mal and does not indicate a problem
with your brakes.
Always replace the front or rear
brake pads as pairs.
WARNING- Parking
brake
Avoid applying the parking
brake to stop the vehicle while it
is moving except in an emer-
gency situation. Applying the
parking brake while the vehicle
is moving at normal speeds can
cause a sudden loss of control
of the vehicle. If you must use
the parking brake to stop the
vehicle, use great caution in
applying the brake.
WARNING- Brake wear
Do not ignore high pitched wear
sounds from your brakes. If you
ignore this audible warning, you
will eventually lose braking per-
formance, which could lead to a
serious accident.
CAUTION- Replace brake pads
Do not continue to drive withworn brake pads. Continuing todrive with worn brake pads candamage the braking system andresult in costly brake repairs.
Page 357 of 555

Driving your vehicle
104
5
(Continued)
• If you move the transmission lever
from N to D (manual mode) or R
without depressing the brake
pedal after stopping engine auto-
matically, the engine does not
restart automatically and a warn-
ing chime alarms. When this hap-
pens, press the brake pedal for
auto start.
Auto start
To restart the engine from idle
stop mode
Release the brake pedal.
or
Move the shift gear to the R (Reverse) position or the manual
mode while depressing the brake
pedal.
The engine will start and the green
AUTO STOP indicator ( ) on the
instrument cluster will go out.
The engine will also restart auto- matically without any driveractions if the following occurs:
- The fan speed of manual climate control system is set above the 3rd
position when the air conditioning is
on.
- The fan speed of automatic climate control system is set above the 6th
position when the air conditioning is
on.
- When a certain amount of time has passed with the climate control sys-
tem on.
- When the defroster is on.
- The brake vacuum pressure is low.
- The battery charging status is low.
- The vehicle speed exceeds 1 km/h (1 mph).
- Engine is turned off by Auto Stop for a long time.
- If you unfasten the seat belt or open the driver's door while depressing
the brake pedal.
OCK057096L
OCK057145
Page 432 of 555

Maintenance
Engine compartment . . . . . . . . . . . . . . . . . . . . . . . . 7-3
Maintenance services . . . . . . . . . . . . . . . . . . . . . . . . 7-4
• Owner’s responsibility . . . . . . . . . . . . . . . . . . . . . . . . . 7-4
• Owner maintenance precautions . . . . . . . . . . . . . . . . . 7-5
Owner maintenance . . . . . . . . . . . . . . . . . . . . . . . . . 7-7
• Owner maintenance schedule. . . . . . . . . . . . . . . . . . . . 7-7
Scheduled maintenance service. . . . . . . . . . . . . . . . 7-9
Explanation of scheduled maintenance items . . . 7-16
Checking fluid levels . . . . . . . . . . . . . . . . . . . . . . . 7-19
Engine oil. . . . . . . . . . . . . . . . . . . . . . . . . . . . . . . . . 7-20
• Checking the engine oil level . . . . . . . . . . . . . . . . . . . 7-20
• Changing the engine oil and filter . . . . . . . . . . . . . . . 7-21
Engine coolant . . . . . . . . . . . . . . . . . . . . . . . . . . . . 7-22
• Checking the coolant level . . . . . . . . . . . . . . . . . . . . . 7-22
• Changing the coolant . . . . . . . . . . . . . . . . . . . . . . . . . 7-25
Brake fluid . . . . . . . . . . . . . . . . . . . . . . . . . . . . . . . 7-26
• Checking the brake fluid level . . . . . . . . . . . . . . . . . . 7-26
Washer fluid . . . . . . . . . . . . . . . . . . . . . . . . . . . . . . 7-27
• Checking the washer fluid level . . . . . . . . . . . . . . . . . 7-27
Parking brake . . . . . . . . . . . . . . . . . . . . . . . . . . . . . 7-28
• Checking the parking brake. . . . . . . . . . . . . . . . . . . . 7-28
Air cleaner. . . . . . . . . . . . . . . . . . . . . . . . . . . . . . . . 7-29
• Filter replacement . . . . . . . . . . . . . . . . . . . . . . . . . . . . 7-29
Climate control air filter . . . . . . . . . . . . . . . . . . . . 7-30
• Filter inspection . . . . . . . . . . . . . . . . . . . . . . . . . . . . . . 7-30
Wiper blades . . . . . . . . . . . . . . . . . . . . . . . . . . . . . . 7-32
• Blade inspection . . . . . . . . . . . . . . . . . . . . . . . . . . . . . . 7-32
• Blade replacement . . . . . . . . . . . . . . . . . . . . . . . . . . . . 7-32
Battery . . . . . . . . . . . . . . . . . . . . . . . . . . . . . . . . . . . 7-\
35
• Battery replacement . . . . . . . . . . . . . . . . . . . . . . . . . . 7-35
• For best battery service . . . . . . . . . . . . . . . . . . . . . . . 7-35
• Recharging the battery . . . . . . . . . . . . . . . . . . . . . . . . 7-37
• Reset items . . . . . . . . . . . . . . . . . . . . . . . . . . . . . . . . . . 7-38\
Tires and wheels . . . . . . . . . . . . . . . . . . . . . . . . . . . 7-39
• Tire care . . . . . . . . . . . . . . . . . . . . . . . . . . . . . . . . . . . . \
7-39
• Recommended cold tire inflation pressures . . . . . . . 7-39
• Tire pressure . . . . . . . . . . . . . . . . . . . . . . . . . . . . . . . . 7-40
• Checking tire inflation pressure. . . . . . . . . . . . . . . . . 7-40
• Tire rotation . . . . . . . . . . . . . . . . . . . . . . . . . . . . . . . . . 7-41
• Wheel alignment and tire balance . . . . . . . . . . . . . . . 7-42
• Flat spots . . . . . . . . . . . . . . . . . . . . . . . . . . . . . . . . . . . 7-\
43
• Tire replacement . . . . . . . . . . . . . . . . . . . . . . . . . . . . . 7-43
• Wheel replacement . . . . . . . . . . . . . . . . . . . . . . . . . . . 7-44
• Tire traction . . . . . . . . . . . . . . . . . . . . . . . . . . . . . . . . . 7-44
• Tire maintenance . . . . . . . . . . . . . . . . . . . . . . . . . . . . 7-44
• Tire sidewall labeling . . . . . . . . . . . . . . . . . . . . . . . . . 7-45
• All season tires . . . . . . . . . . . . . . . . . . . . . . . . . . . . . . 7-51
• Summer tires . . . . . . . . . . . . . . . . . . . . . . . . . . . . . . . . 7-51
7
Page 442 of 555
711
Maintenance
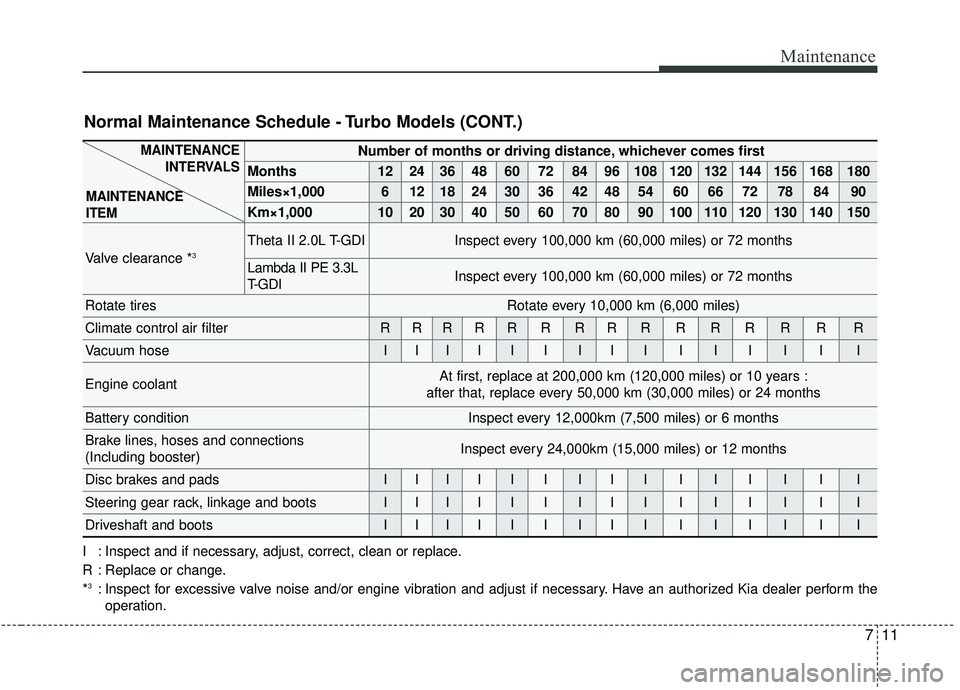
Number of months or driving distance, whichever comes first
Months1224364860728496108120132144156168180
Miles×1,00061218243036424854606672788490
Km×1,000102030405060708090100110120130140150
Valve clearance *3Theta II 2.0L T-GDIInspect every 100,000 km (60,000 miles) or 72 months
Lambda II PE 3.3L
T- G D IInspect every 100,000 km (60,000 miles) or 72 months
Rotate tiresRotate every 10,000 km (6,000 miles)
Climate control air filterRRRRRRRRRRRRRRR
Vacuum hoseIIIIIIIIIIIIIII
Engine coolantAt first, replace at 200,000 km (120,000 miles) or 10 years :
after that, replace every 50,000 km (30,000 miles) or 24 months
Battery conditionInspect every 12,000km (7,500 miles) or 6 months
Brake lines, hoses and connections
(Including booster)Inspect every 24,000km (15,000 miles) or 12 months
Disc brakes and padsIIIIIIIIIIIIIII
Steering gear rack, linkage and bootsIIIIIIIIIIIIIII
Driveshaft and bootsIIIIIIIIIIIIIII
MAINTENANCE INTERVALS
MAINTENANCE
ITEM
Normal Maintenance Schedule - Turbo Models (CONT.)
I : Inspect and if necessary, adjust, correct, clean or replace.
R : Replace or change.
*
3: Inspect for excessive valve noise and/or engine vibration and adjust if necessary. Have an authorized Kia dealer perform the operation.
Page 446 of 555
715
Maintenance
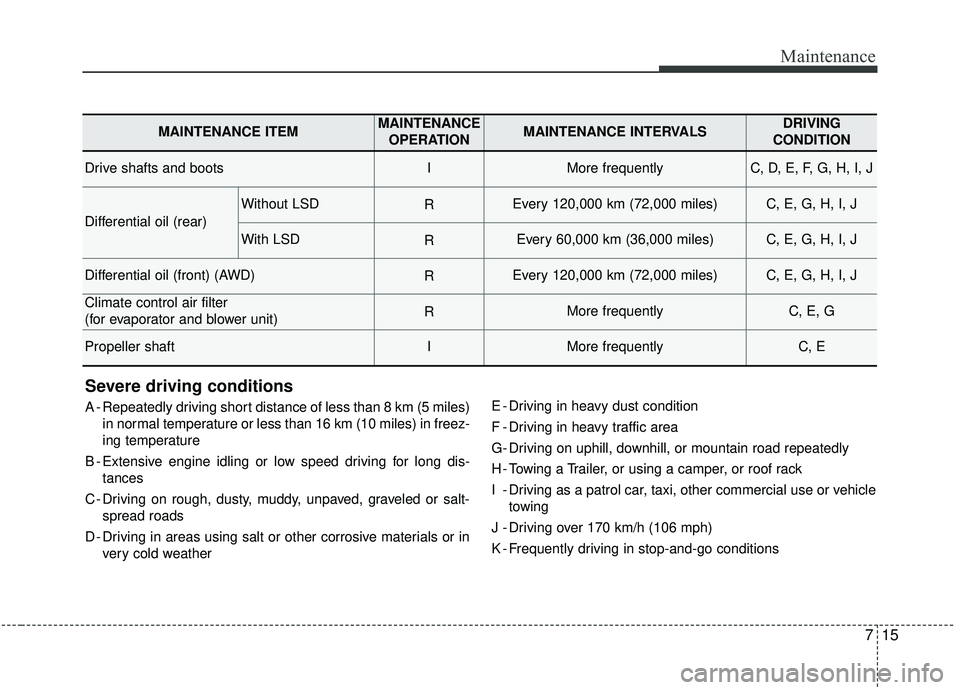
Severe driving conditions
A - Repeatedly driving short distance of less than 8 km (5 miles)in normal temperature or less than 16 km (10 miles) in freez-
ing temperature
B - Extensive engine idling or low speed driving for long dis- tances
C - Driving on rough, dusty, muddy, unpaved, graveled or salt- spread roads
D - Driving in areas using salt or other corrosive materials or in very cold weather E - Driving in heavy dust condition
F - Driving in heavy traffic area
G- Driving on uphill, downhill, or mountain road repeatedly
H - Towing a Trailer, or using a camper, or roof rack
I - Driving as a patrol car, taxi, other commercial use or vehicle
towing
J - Driving over 170 km/h (106 mph)
K - Frequently driving in stop-and-go conditions
MAINTENANCE ITEMMAINTENANCE OPERATIONMAINTENANCE INTERVALSDRIVING
CONDITION
Drive shafts and bootsIMore frequentlyC, D, E, F, G, H, I, J
Differential oil (rear)
Without LSDREvery 120,000 km (72,000 miles)C, E, G, H, I, J
With LSDREvery 60,000 km (36,000 miles)C, E, G, H, I, J
Differential oil (front) (AWD)REvery 120,000 km (72,000 miles)C, E, G, H, I, J
Climate control air filter
(for evaporator and blower unit)RMore frequentlyC, E, G
Propeller shaftIMore frequentlyC, E