2019 KIA SPORTAGE settings
[x] Cancel search: settingsPage 89 of 607
Mirrors . . . . . . . . . . . . . . . . . . . . . . . . . . . . . . . . . . 4-58\
• Inside rearview mirror . . . . . . . . . . . . . . . . . . . . . . . . 4-58
• Outside rearview mirror . . . . . . . . . . . . . . . . . . . . . . 4-65
Instrument cluster . . . . . . . . . . . . . . . . . . . . . . . . . 4-68
• Instrument Cluster Control . . . . . . . . . . . . . . . . . . . . 4-69
• LCD Display Control . . . . . . . . . . . . . . . . . . . . . . . . . 4-69
• Gauges . . . . . . . . . . . . . . . . . . . . . . . . . . . . . . . . . . . . \
. 4-70
• Transaxle Shift Indicator . . . . . . . . . . . . . . . . . . . . . . 4-73
LCD Display . . . . . . . . . . . . . . . . . . . . . . . . . . . . . . 4-74
• LCD Modes . . . . . . . . . . . . . . . . . . . . . . . . . . . . . . . . . 4-74
• Service Mode . . . . . . . . . . . . . . . . . . . . . . . . . . . . . . . . 4-75
• User Settings Mode . . . . . . . . . . . . . . . . . . . . . . . . . . . 4-77
Trip modes (Trip computer) . . . . . . . . . . . . . . . . . 4-83
• Trip Modes . . . . . . . . . . . . . . . . . . . . . . . . . . . . . . . . . . 4-83\
• Fuel Economy . . . . . . . . . . . . . . . . . . . . . . . . . . . . . . . 4-83
• Trip A/B . . . . . . . . . . . . . . . . . . . . . . . . . . . . . . . . . . . . \
4-85
• Digital speedometer . . . . . . . . . . . . . . . . . . . . . . . . . . . 4-86
• One time driving information mode . . . . . . . . . . . . . 4-86
• Turn By Turn Mode . . . . . . . . . . . . . . . . . . . . . . . . . . 4-87
• LDWS Mode . . . . . . . . . . . . . . . . . . . . . . . . . . . . . . . . 4-87
• A/V Mode . . . . . . . . . . . . . . . . . . . . . . . . . . . . . . . . . . . 4-\
87
• Warning Messages . . . . . . . . . . . . . . . . . . . . . . . . . . . . 4-88
Warning and indicator lights . . . . . . . . . . . . . . . . 4-96
• Warning lights . . . . . . . . . . . . . . . . . . . . . . . . . . . . . . . 4-96
• Indicator Lights . . . . . . . . . . . . . . . . . . . . . . . . . . . . . 4-103
Rear parking assist system . . . . . . . . . . . . . . . . . 4-108
• Operation of the rear parking assist system . . . . . . 4-108
• Non-operational conditions of rear parking assist system . . . . . . . . . . . . . . . . . . . 4-109
• Rear parking assist system precautions . . . . . . . . . 4-110
• Self-diagnosis . . . . . . . . . . . . . . . . . . . . . . . . . . . . . . . 4-111
Parking assist system . . . . . . . . . . . . . . . . . . . . . . 4-112
• Operation of the parking assist system . . . . . . . . . . 4-112
• Non-operational conditions of parking assist system. . 4-114
• Self-diagnosis . . . . . . . . . . . . . . . . . . . . . . . . . . . . . . . 4-116
Rearview camera . . . . . . . . . . . . . . . . . . . . . . . . . 4-117
Lighting . . . . . . . . . . . . . . . . . . . . . . . . . . . . . . . . . 4-118
• Battery saver function . . . . . . . . . . . . . . . . . . . . . . . . 4-118
• Daytime running light . . . . . . . . . . . . . . . . . . . . . . . . 4-118
• Lighting control . . . . . . . . . . . . . . . . . . . . . . . . . . . . . 4-118
• High beam operation. . . . . . . . . . . . . . . . . . . . . . . . . 4-120
• High Beam Assist . . . . . . . . . . . . . . . . . . . . . . . . . . . . 4-121
• Turn signals and lane change signals . . . . . . . . . . . 4-123
• Front fog light . . . . . . . . . . . . . . . . . . . . . . . . . . . . . . 4-123
• Check headlight . . . . . . . . . . . . . . . . . . . . . . . . . . . . 4-124
• AFLS (Adaptive Front Lighting System) . . . . . . . . 4-124
Wipers and washers . . . . . . . . . . . . . . . . . . . . . . . 4-125
• Windshield wipers . . . . . . . . . . . . . . . . . . . . . . . . . . 4-125
• Front windshield washers . . . . . . . . . . . . . . . . . . . . . 4-126
• Rear window wiper and washer switch. . . . . . . . . . 4-127
4
Page 93 of 607
Features of your vehicle
64
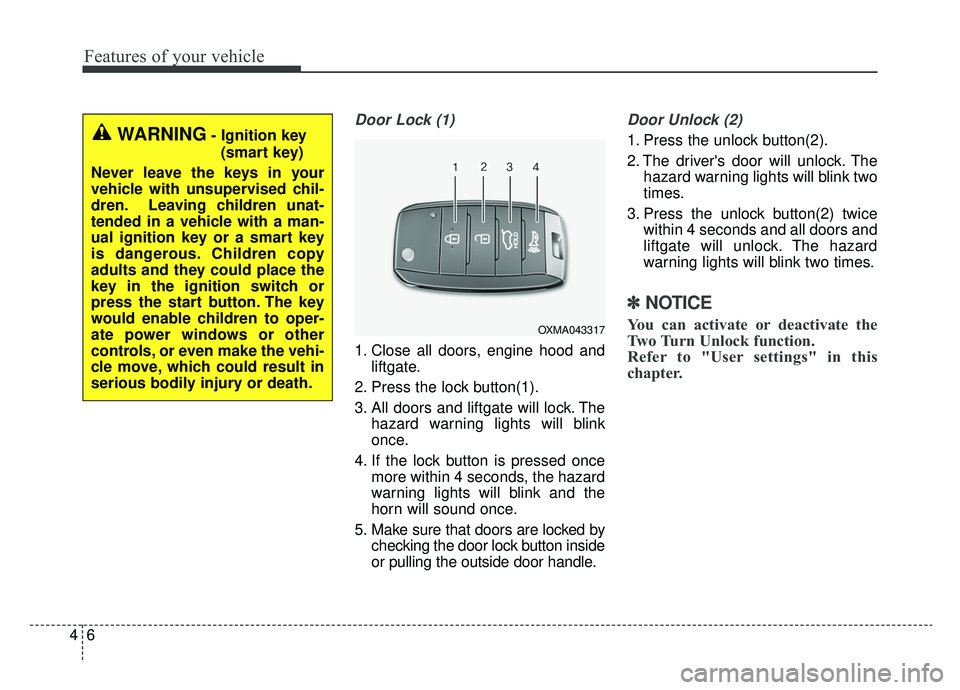
Door Lock (1)
1. Close all doors, engine hood andliftgate.
2. Press the lock button(1).
3. All doors and liftgate will lock. The hazard warning lights will blink
once.
4. If the lock button is pressed once more within 4 seconds, the hazard
warning lights will blink and the
horn will sound once.
5. Make sure that doors are locked by checking the door lock button inside
or pulling the outside door handle.
Door Unlock (2)
1. Press the unlock button(2).
2. The driver's door will unlock. Thehazard warning lights will blink two
times.
3. Press the unlock button(2) twice within 4 seconds and all doors and
liftgate will unlock. The hazard
warning lights will blink two times.
✽ ✽NOTICE
You can activate or deactivate the
Two Turn Unlock function.
Refer to "User settings" in this
chapter.
WARNING- Ignition key
(smart key)
Never leave the keys in your
vehicle with unsupervised chil-
dren. Leaving children unat-
tended in a vehicle with a man-
ual ignition key or a smart key
is dangerous. Children copy
adults and they could place the
key in the ignition switch or
press the start button. The key
would enable children to oper-
ate power windows or other
controls, or even make the vehi-
cle move, which could result in
serious bodily injury or death.
OXMA043317
Page 101 of 607
Features of your vehicle
14
4
Unlocking
Using the door handle button
1. Carry the smart key.
2. Press the button of the driver's
outside door handle.
3. The driver’s door will unlock. The hazard warning lights will blink and
the chime will sound two times.
4. Press the button twice within 4 seconds and all doors and the lift-
gate will unlock and the hazard
warning lights will blink and the
chime will sound two times.
✽ ✽NOTICE
• The button will only operate when
the smart key is within 28~40in.
(0.7 ~ 1 m) from the outside door
handle.
• When the smart key is recognized in the area of 28 ~ 40 in. (0.7 ~ 1 m)
from the front outside door handle,
other people can also open the
doors.
• After unlocking the driver’s door or all doors, the door(s) will lock
automatically unless the door is
opened.
Using the button on the smart key
1. Press the unlock button(2) of the
smart key.
2. The driver’s door will unlock. The hazard warning lights will blink and
the chime will sound two times.
3. Press the unlock button(2) twice within 4 seconds and all doors and
the liftgate will unlock. The hazard
warning lights will blink and the
chime will sound two times.
✽ ✽NOTICE
After pressing the button, the doors
will lock automatically unless any
door is opened within 30 seconds.
✽ ✽NOTICE
You can activate or deactivate the
Two Turn Unlock function.
Refer to "User settings" in this
chapter.
Liftgate unlocking
Using the liftgate handle button
1. Carry the smart key.
2. Press the liftgate handle button.
3. When all doors are locked, the
hazard warning lights will blink two
times.
Once the liftgate is opened and
then closed, the liftgate will lock
automatically.
✽ ✽ NOTICE
The button will only operate when
the smart key is within 28 ~ 40 in.
(0.7 ~ 1 m) from the liftgate handle.
Page 112 of 607
425
Features of your vehicle
Impact sensing door unlock
system
In the event of air bag deployment
resulting from a vehicle impact, all
doors will automatically unlock.
Speed sensing door lock system
All doors will automatically lock after
the vehicle speed exceeds 10 mph
(15 km/h).
✽ ✽NOTICE
You can select some auto door
lock/unlock features in “User
Settings”.
For more information, refer to
“User Settings” in this chapter.
WARNING - Unattended
children/animals
Never leave children or animals
unattended in your vehicle. An
enclosed vehicle can become
extremely hot, causing death or
severe injury to unattended
children or animals who cannot
escape the vehicle.WARNING - Doors
The doors should always be fully closed and locked while
the vehicle is in motion to pre-
vent accidental opening of the
door.
Be careful when opening doors and watch for vehicles, motor-
cycles, bicycles or pedestrians
approaching the vehicle in the
path of the door. Opening a
door when something is
approaching can cause dam-
age or injury.
Page 122 of 607
435
Features of your vehicle
1. Setting
To activate the Smart Power Liftgate,
go to User Settings Mode and select
Smart Power Liftgate on the LCD
display.❈ ❈ For more information, refer to
the "LCD Display" section in
this chapter.
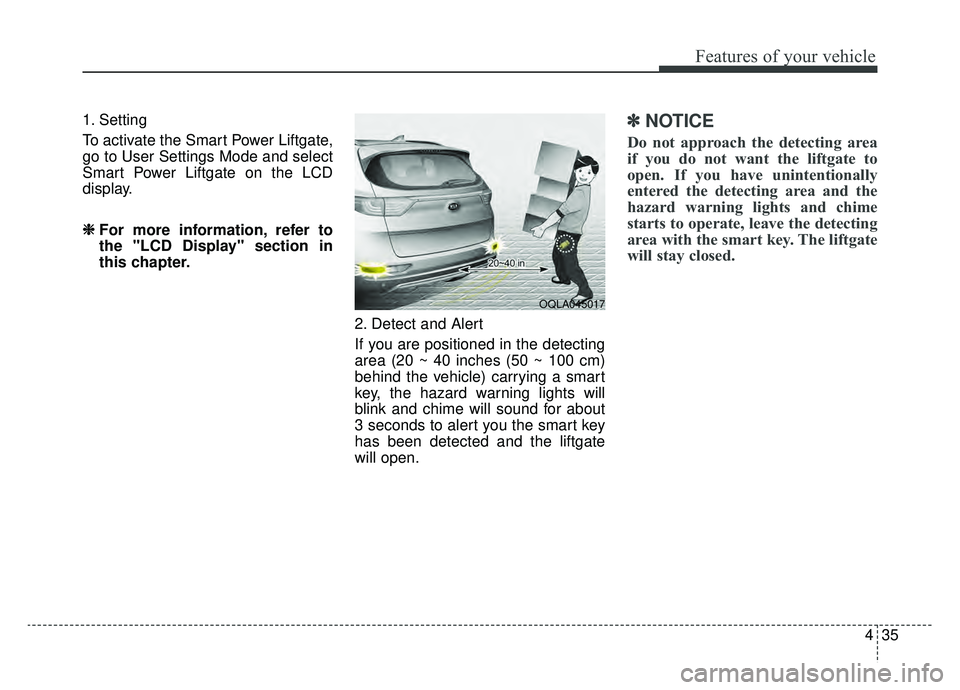
2. Detect and Alert
If you are positioned in the detecting
area (20 ~ 40 inches (50 ~ 100 cm)
behind the vehicle) carrying a smart
key, the hazard warning lights will
blink and chime will sound for about
3 seconds to alert you the smart key
has been detected and the liftgate
will open.✽ ✽NOTICE
Do not approach the detecting area
if you do not want the liftgate to
open. If you have unintentionally
entered the detecting area and the
hazard warning lights and chime
starts to operate, leave the detecting
area with the smart key. The liftgate
will stay closed.
OQLA045017
Page 159 of 607
Features of your vehicle
72
4
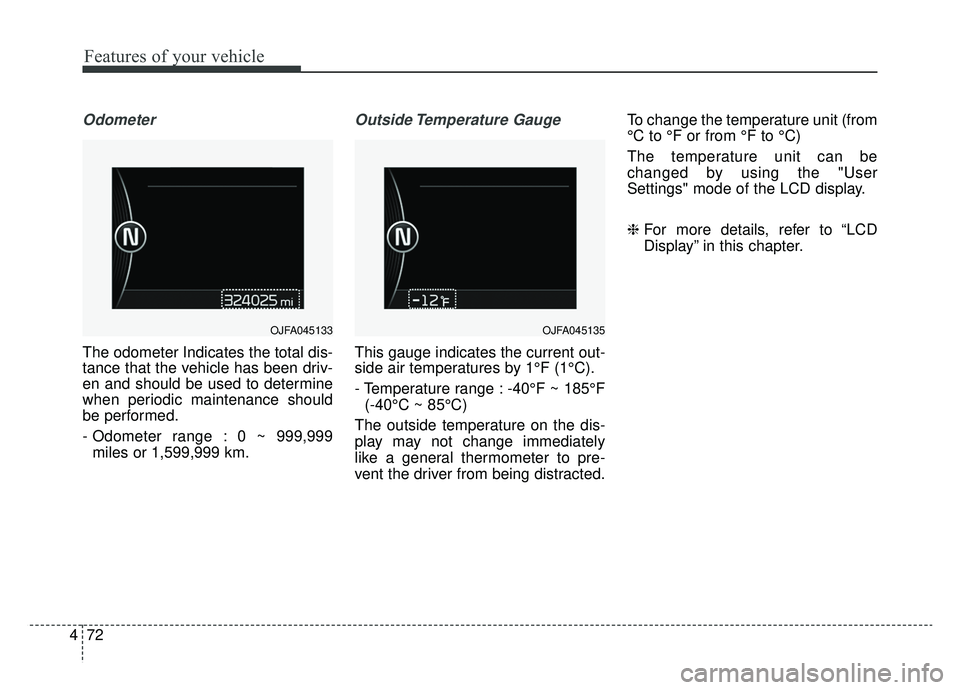
Odometer
The odometer Indicates the total dis-
tance that the vehicle has been driv-
en and should be used to determine
when periodic maintenance should
be performed.
- Odometer range : 0 ~ 999,999
miles or 1,599,999 km.
Outside Temperature Gauge
This gauge indicates the current out-
side air temperatures by 1°F (1°C).
- Temperature range : -40°F ~ 185°F (-40°C ~ 85°C)
The outside temperature on the dis-
play may not change immediately
like a general thermometer to pre-
vent the driver from being distracted. To change the temperature unit (from
°C to °F or from °F to °C)
The temperature unit can be
changed by using the "User
Settings" mode of the LCD display.
❈
For more details, refer to “LCD
Display” in this chapter.
OJFA045133OJFA045135
Page 161 of 607
Features of your vehicle
74
4
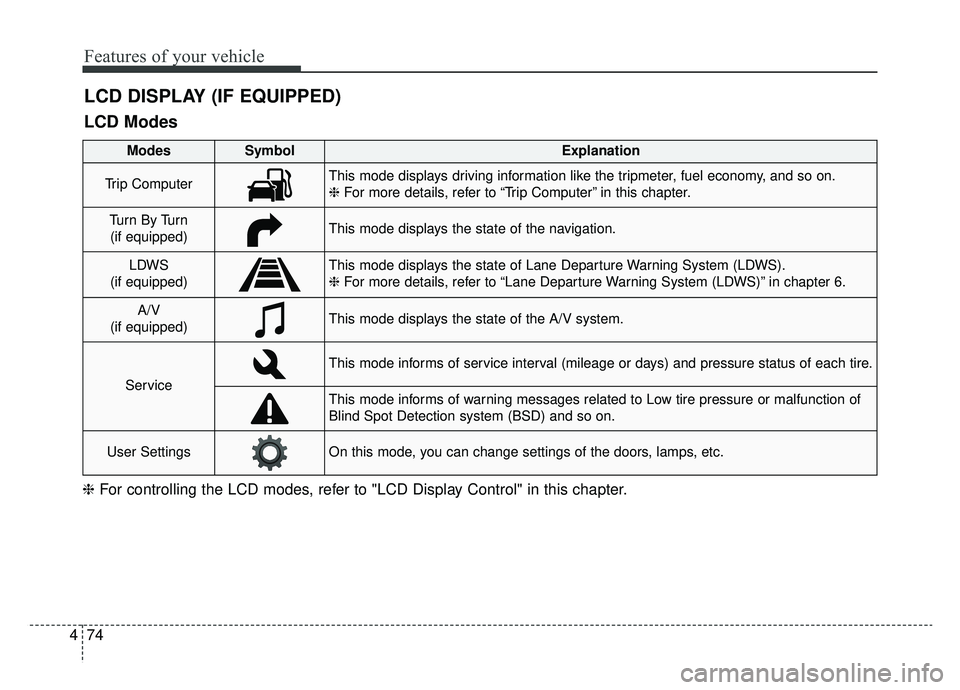
LCD DISPLAY (IF EQUIPPED)
❈ For controlling the LCD modes, refer to "LCD Display Control" in this chapter.
LCD Modes
Modes SymbolExplanation
Trip ComputerThis mode displays driving information like the tripmeter, fuel economy, and so on.
❈ For more details, refer to “Trip Computer” in this chapter.
Tu r n B y Tu r n
(if equipped)This mode displays the state of the navigation.
LDWS
(if equipped)This mode displays the state of Lane Departure Warning System (LDWS).
❈ For more details, refer to “Lane Departure Warning System (LDWS)” in chapter 6.
A/V
(if equipped)This mode displays the state of the A/V system.
Service
This mode informs of service interval (mileage or days) and pressure status of each tire.
This mode informs of warning messages related to Low tire pressure or malfunction of
Blind Spot Detection system (BSD) and so on.
User SettingsOn this mode, you can change settings of the doors, lamps, etc.
Page 162 of 607
475
Features of your vehicle
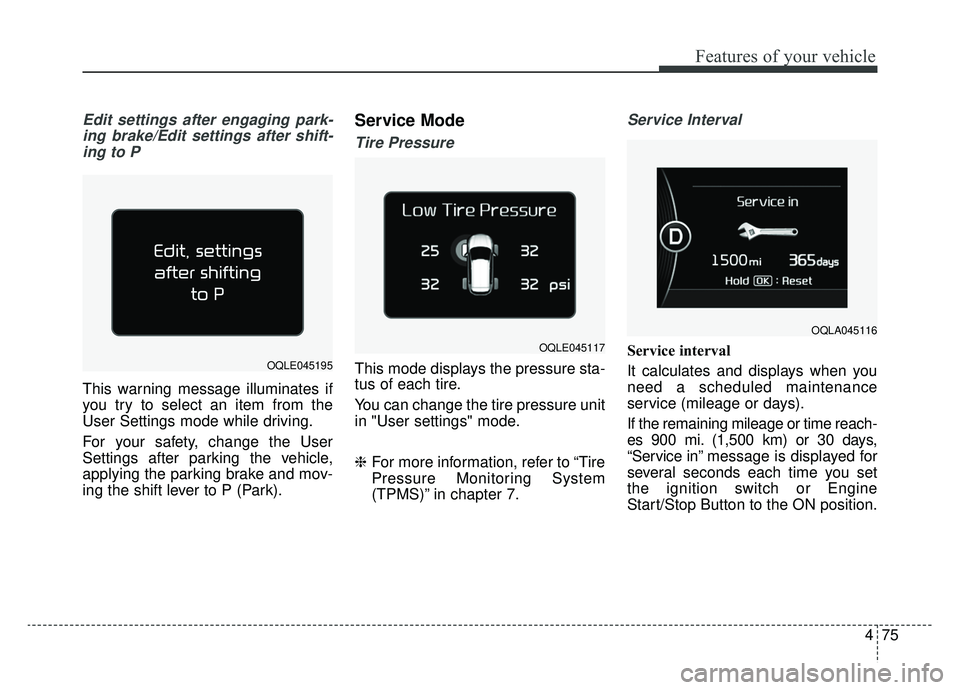
Edit settings after engaging park-ing brake/Edit settings after shift-ing to P
This warning message illuminates if
you try to select an item from the
User Settings mode while driving.
For your safety, change the User
Settings after parking the vehicle,
applying the parking brake and mov-
ing the shift lever to P (Park).
Service Mode
Tire Pressure
This mode displays the pressure sta-
tus of each tire.
You can change the tire pressure unit
in "User settings" mode.
❈ For more information, refer to “Tire
Pressure Monitoring System
(TPMS)” in chapter 7.
Service Interval
Service interval
It calculates and displays when you
need a scheduled maintenance
service (mileage or days).
If the remaining mileage or time reach-
es 900 mi. (1,500 km) or 30 days,
“Service in” message is displayed for
several seconds each time you set
the ignition switch or Engine
Start/Stop Button to the ON position.
OQLA045116
OQLE045195
OQLE045117