2019 KIA SPORTAGE Chapter 7
[x] Cancel search: Chapter 7Page 418 of 607
Driving your vehicle
90
6
A heavy rainfall will make it harder
to see and will increase the dis-
tance needed to stop your vehicle,
so slow down.
Keep your windshield wiping equipment in good shape. Replace
your windshield wiper blades when
they show signs of streaking or
missing areas on the windshield.
If your tires are not in good condi- tion, making a quick stop on wet
pavement can cause a skid and
possibly lead to an accident. Be
sure your tires are in good shape.
Turn on your headlights to make it easier for others to see you.
Driving too fast through large pud- dles can affect your brakes. If you
must go through puddles, try to
drive through them slowly.
If you believe you may have gotten your brakes wet, apply them lightly
while driving until normal braking
operation returns.Driving in flooded areas
Avoid driving through flooded areas
unless you are sure the water is no
higher than the bottom of the wheel
hub. Drive through any water slowly.
Allow adequate stopping distance
because brake performance may be
affected.
After driving through water, dry the
brakes by gently applying them sev-
eral times while the vehicle is moving
slowly.
Driving off-road
Drive carefully off-road because your
vehicle may be damaged by rocks or
roots of trees. Become familiar with
the off-road conditions where you
are going to drive before you begin
driving.
Highway driving
Tires
Adjust the tire inflation pressures to
specification. Low tire inflation pres-
sures will result in overheating and
possible failure of the tires.
Avoid using worn or damaged tires
which may result in reduced traction
or tire failure.
Never exceed the maximum tire
inflation pressure shown on the tires.
WARNING- Under/over
inflated tires
Always check the tires for proper
inflation before driving.
Underinflated or overinflated
tires can cause poor handling,
loss of vehicle control, and sud-
den tire failure leading to acci-
dents, injuries, and even death.
For proper tire pressures, refer to
“Tires and wheels” in chapter 9.
Page 419 of 607
691
Driving your vehicle
Fuel, engine coolant and engine oil
High speed travel consumes more
fuel than urban motoring. Do not for-
get to check both the engine coolant
and engine oil.
Drive belt
A loose or damaged drive belt may
result in overheating of the engine.
WARNING- Tire tread
Always check the tire tread
before driving your vehicle.
Worn-out tires can result in loss
of vehicle control. Worn-out tires
should be replaced as soon as
possible. For further information
and tread limits, refer to "Tires
and wheels" in chapter 8.
Page 422 of 607
Driving your vehicle
94
6
The use of chains may adversely
affect vehicle handling.
Do not exceed 20 mph (30 km/h) or the chain manufacturer’s recom-
mended speed limit, whichever is
lower.
Drive carefully and avoid bumps, holes, sharp turns, and other road
hazards, which may cause the
vehicle to bounce.
Avoid sharp turns or locked-wheel braking.Use high quality ethylene gly-
col coolant
Your vehicle is delivered with high
quality ethylene glycol coolant in the
cooling system. It is the only type of
coolant that should be used because
it helps prevent corrosion in the cool-
ing system, lubricates the water
pump and prevents freezing. Be sure
to replace or replenish your coolant
in accordance with the maintenance
schedule in chapter 8. Before winter,
have your coolant tested to assure
that its freezing point is sufficient for
the temperatures anticipated during
the winter.
Check battery and cables
Winter puts additional burdens on
the battery system. Visually inspect
the battery and cables as described
in chapter 8. The level of charge in
your battery can be checked by an
authorized Kia dealer or a service
station.
Change to "winter weight" oil
if necessary
In some climates it is recommended
that a lower viscosity "winter weight"
oil be used during cold weather. See
chapter 9 for recommendations. If
you aren't sure what weight oil you
should use, consult an authorized
Kia dealer.
Check spark plugs and ignition
system
Inspect your spark plugs as
described in chapter 8 and replace
them if necessary. Also check all
ignition wiring and components to be
sure they are not cracked, worn or
damaged in any way.CAUTION- Snow chains
Chains that are the wrong size or improperly installed candamage your vehicle's brakelines, suspension, body andwheels.
Stop driving and retighten the chains any time you hear themhitting the vehicle.
Page 437 of 607
6109
Driving your vehicle
This chapter will guide you in the
proper loading of your vehicle and/or
trailer, to keep your loaded vehicle
weight within its design rating capa-
bility, with or without a trailer.
Properly loading your vehicle will
provide maximum return of the vehi-
cle design performance. Before load-
ing your vehicle, familiarize yourself
with the following terms for determin-
ing your vehicle's weight ratings, with
or without a trailer, from the vehicle's
specifications and the compliance
label:Base curb weight
This is the weight of the vehicle
including a full tank of fuel and all
standard equipment. It does not
include passengers, cargo, or option-
al equipment.
Vehicle curb weight
This is the weight of your new vehicle
when you picked it up from your deal-
er plus any aftermarket equipment.
Cargo weight
This figure includes all weight added
to the Base Curb Weight, including
cargo and optional equipment.
GAW (Gross axle weight)
This is the total weight placed on
each axle (front and rear) - including
vehicle curb weight and all payload.GAWR (Gross axle weight rating)
This is the maximum allowable
weight that can be carried by a single
axle (front or rear). These numbers
are shown on the compliance label.
The total load on each axle must
never exceed its GAWR.
GVW (Gross vehicle weight)
This is the Base Curb Weight plus
actual Cargo Weight plus passen-
gers.
GVWR (Gross vehicle weight rating)
This is the maximum allowable
weight of the fully loaded vehicle
(including all options, equipment,
passengers and cargo). The GVWR
is shown on the certification label
located on the driver’s door sill.
VEHICLE WEIGHT
Page 445 of 607
What to do in an emergency
87
TIRE PRESSURE MONITORING SYSTEM (TPMS)
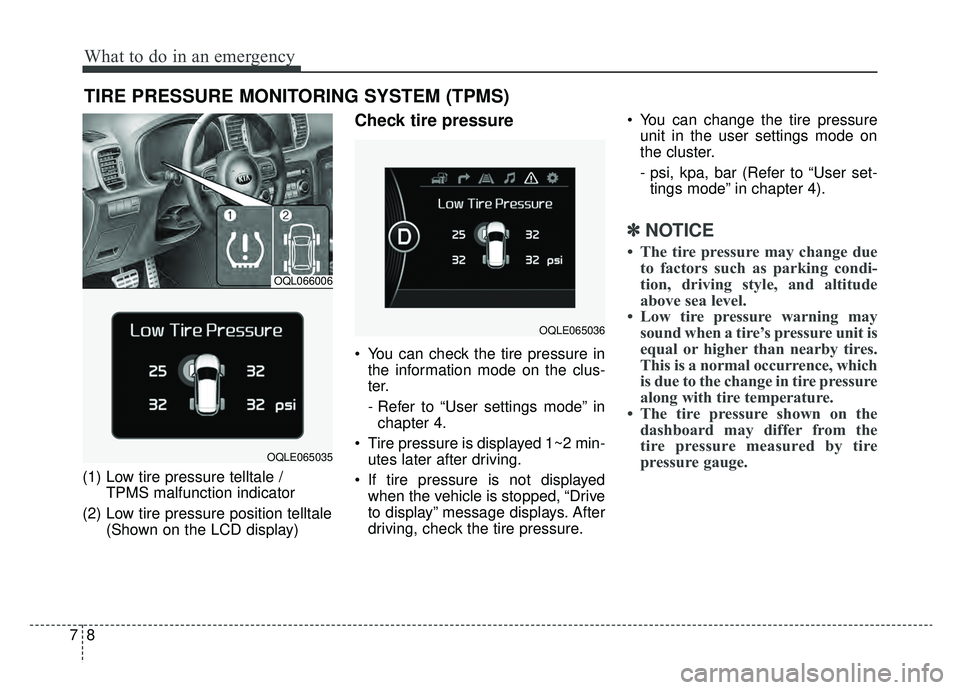
(1) Low tire pressure telltale / TPMS malfunction indicator
(2) Low tire pressure position telltale (Shown on the LCD display)
Check tire pressure
You can check the tire pressure inthe information mode on the clus-
ter.
- Refer to “User settings mode” inchapter 4.
Tire pressure is displayed 1~2 min- utes later after driving.
If tire pressure is not displayed when the vehicle is stopped, “Drive
to display” message displays. After
driving, check the tire pressure. You can change the tire pressure
unit in the user settings mode on
the cluster.
- psi, kpa, bar (Refer to “User set-tings mode” in chapter 4).
✽ ✽ NOTICE
• The tire pressure may change due
to factors such as parking condi-
tion, driving style, and altitude
above sea level.
• Low tire pressure warning may sound when a tire’s pressure unit is
equal or higher than nearby tires.
This is a normal occurrence, which
is due to the change in tire pressure
along with tire temperature.
• The tire pressure shown on the dashboard may differ from the
tire pressure measured by tire
pressure gauge.
OQL066006
OQLE065035
OQLE065036
Page 466 of 607
729
What to do in an emergency
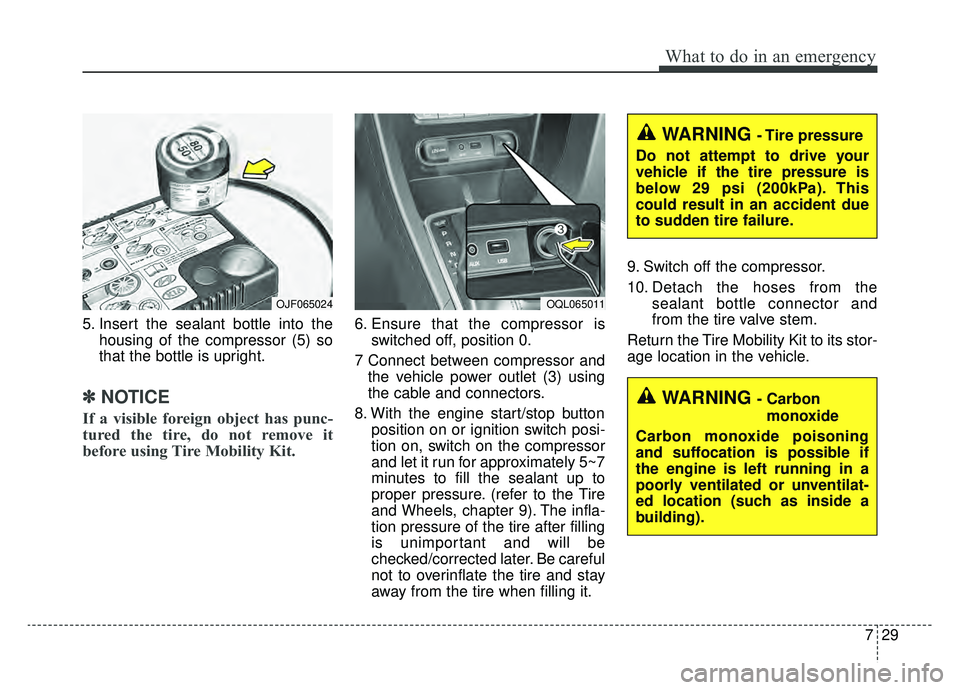
5. Insert the sealant bottle into thehousing of the compressor (5) so
that the bottle is upright.
✽ ✽NOTICE
If a visible foreign object has punc-
tured the tire, do not remove it
before using Tire Mobility Kit.
6. Ensure that the compressor is
switched off, position 0.
7 Connect between compressor and the vehicle power outlet (3) using
the cable and connectors.
8. With the engine start/stop button position on or ignition switch posi-
tion on, switch on the compressor
and let it run for approximately 5~7
minutes to fill the sealant up to
proper pressure. (refer to the Tire
and Wheels, chapter 9). The infla-
tion pressure of the tire after filling
is unimportant and will be
checked/corrected later. Be careful
not to overinflate the tire and stay
away from the tire when filling it. 9. Switch off the compressor.
10. Detach the hoses from the
sealant bottle connector and
from the tire valve stem.
Return the Tire Mobility Kit to its stor-
age location in the vehicle.
OJF065024OQL065011
WARNING - Carbon monoxide
Carbon monoxide poisoning
and suffocation is possible if
the engine is left running in a
poorly ventilated or unventilat-
ed location (such as inside a
building).
WARNING - Tire pressure
Do not attempt to drive your
vehicle if the tire pressure is
below 29 psi (200kPa). This
could result in an accident due
to sudden tire failure.
Page 495 of 607
Maintenance
22
8
Automatic transaxle fluid
Automatic transaxle fluid should not
be checked under normal usage
conditions.
But in severe conditions, the fluid
should be changed at an authorized
Kia dealer in accordance to the
scheduled maintenance at the begin-
ning of this chapter.
✽ ✽
NOTICE
Automatic transaxle fluid color is
reddish.
As the vehicle is driven, the auto-
matic transaxle fluid will begin to
look darker.
It is normal condition and you should
not judge the need to replace the fluid
based upon the changed color.
Brake hoses and lines
Visually check for proper installation,
chafing, cracks, deterioration and
any leakage. Replace any deteriorat-
ed or damaged parts immediately.
✽ ✽NOTICE- NHTSA Safety
Corrosion Alert
NHTSA has warned all vehicle own-
ers of all brands that they must
maintain their vehicles in a manner
which will prevent brake hose and
brake line failures due to corrosion
when such vehicles are exposed to
winter road salt and related chemi-
cals. While serious corrosion condi-
tions typically only manifest them-
selves as safety issues after 7 years of
vehicle use, the corrosion process
starts immediately and thus under-
body cleaning maintenance must
commence from your vehicle's first
exposure to road salts and chemi-
cals. NHTSA urges vehicle owners to
take the following steps to prevent
corrosion: (Continued)
CAUTION
Use only specified automatic
transaxle fluid. The use of a non-specified fluid could result in atransaxle malfunction and fail-ure. (Refer to "Recommendedlubricants and capacities" inchapter 9.)
Page 498 of 607
825
Maintenance
ENGINE OIL
Checking the engine oil level
1. Be sure the vehicle is on levelground.
2. Start the engine and allow it to reach normal operating tempera-
ture. 3. Turn the engine off and wait for a
few minutes (about 5 minutes) for
the oil to return to the oil pan.
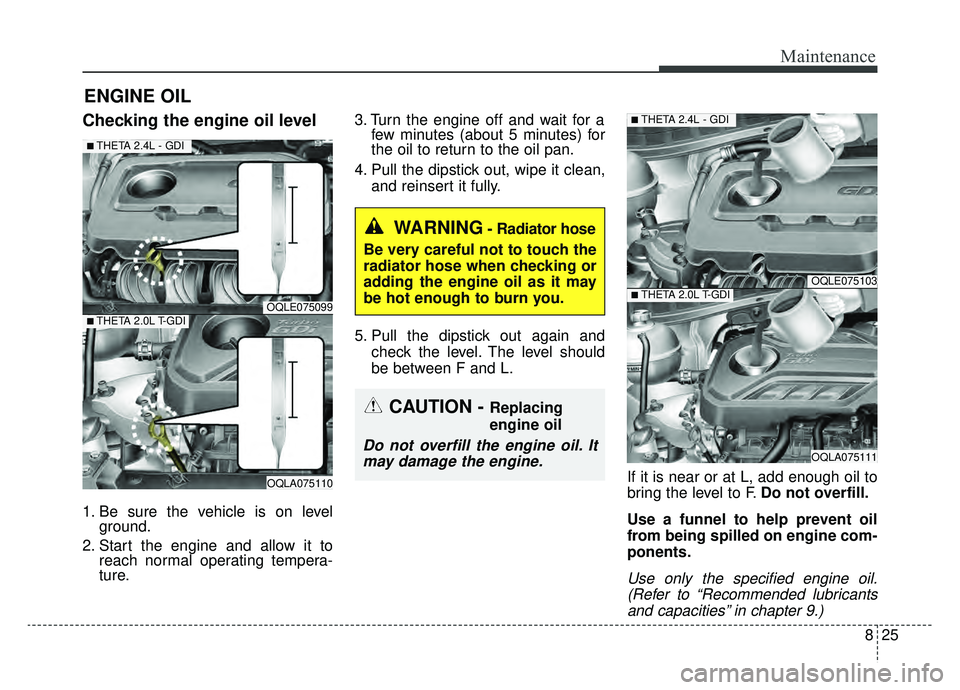
4. Pull the dipstick out, wipe it clean, and reinsert it fully.
5. Pull the dipstick out again and check the level. The level should
be between F and L.
If it is near or at L, add enough oil to
bring the level to F.Do not overfill.
Use a funnel to help prevent oil
from being spilled on engine com-
ponents.
Use only the specified engine oil. (Refer to “Recommended lubricantsand capacities” in chapter 9.)
OQLE075099
OQLA075110
■THETA 2.4L - GDI
■THETA 2.0L T-GDI
CAUTION - Replacing
engine oil
Do not overfill the engine oil. Itmay damage the engine.
WARNING- Radiator hose
Be very careful not to touch the
radiator hose when checking or
adding the engine oil as it may
be hot enough to burn you.
OQLE075103
OQLA075111
■THETA 2.4L - GDI
■THETA 2.0L T-GDI