2019 KIA SPORTAGE power steering
[x] Cancel search: power steeringPage 15 of 607
Your vehicle at a glance
42
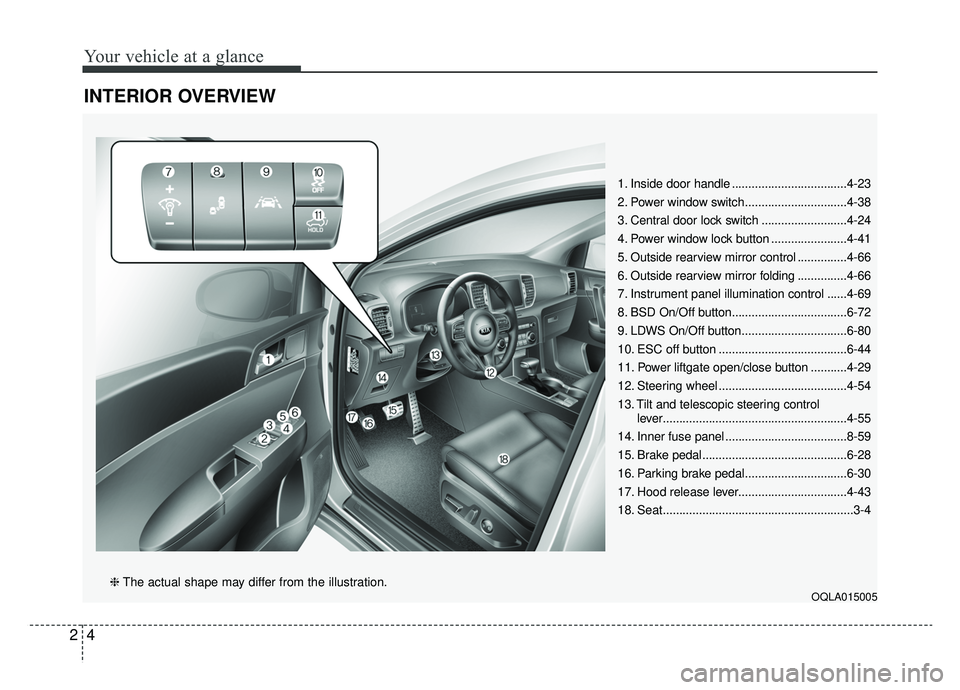
INTERIOR OVERVIEW
1. Inside door handle ...................................4-23
2. Power window switch...............................4-38
3. Central door lock switch ..........................4-24
4. Power window lock button .......................4-41
5. Outside rearview mirror control ...............4-66
6. Outside rearview mirror folding ...............4-66
7. Instrument panel illumination control ......4-69
8. BSD On/Off button...................................6-72
9. LDWS On/Off button................................6-80
10. ESC off button .......................................6-44
11. Power liftgate open/close button ...........4-29
12. Steering wheel .......................................4-54
13. Tilt and telescopic steering controllever........................................................4-55
14. Inner fuse panel .....................................8-59
15. Brake pedal............................................6-28
16. Parking brake pedal...............................6-30
17. Hood release lever.................................4-43
18. Seat..........................................................3-4
OQLA015005❈ The actual shape may differ from the illustration.
Page 16 of 607
25
Your vehicle at a glance
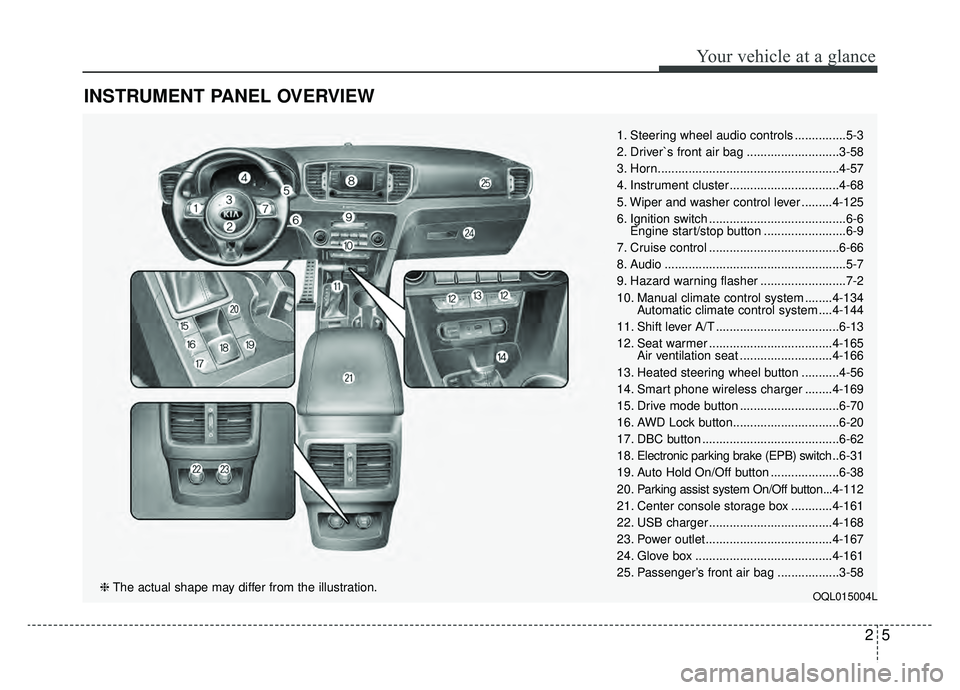
INSTRUMENT PANEL OVERVIEW
1. Steering wheel audio controls ...............5-3
2. Driver`s front air bag ...........................3-58
3. Horn.....................................................4-57
4. Instrument cluster ................................4-68
5. Wiper and washer control lever .........4-125
6. Ignition switch ........................................6-6Engine start/stop button ........................6-9
7. Cruise control ......................................6-66
8. Audio .....................................................5-7
9. Hazard warning flasher .........................7-2
10. Manual climate control system ........4-134 Automatic climate control system ....4-144
11. Shift lever A/T ....................................6-13
12. Seat warmer ....................................4-165 Air ventilation seat ...........................4-166
13. Heated steering wheel button ...........4-56
14. Smart phone wireless charger ........4-169
15. Drive mode button .............................6-70
16. AWD Lock button...............................6-20
17. DBC button ........................................6-62
18. Electronic parking brake (EPB) switch .. 6-31
19. Auto Hold On/Off button ....................6-38
20. Parking assist system On/Off button...4-112
21. Center console storage box ............4-161
22. USB charger ....................................4-168
23. Power outlet.....................................4-167
24. Glove box ........................................4-161
25. Passenger’s front air bag ..................3-58
OQL015004L❈ The actual shape may differ from the illustration.
Page 26 of 607
39
Safety features of your vehicle
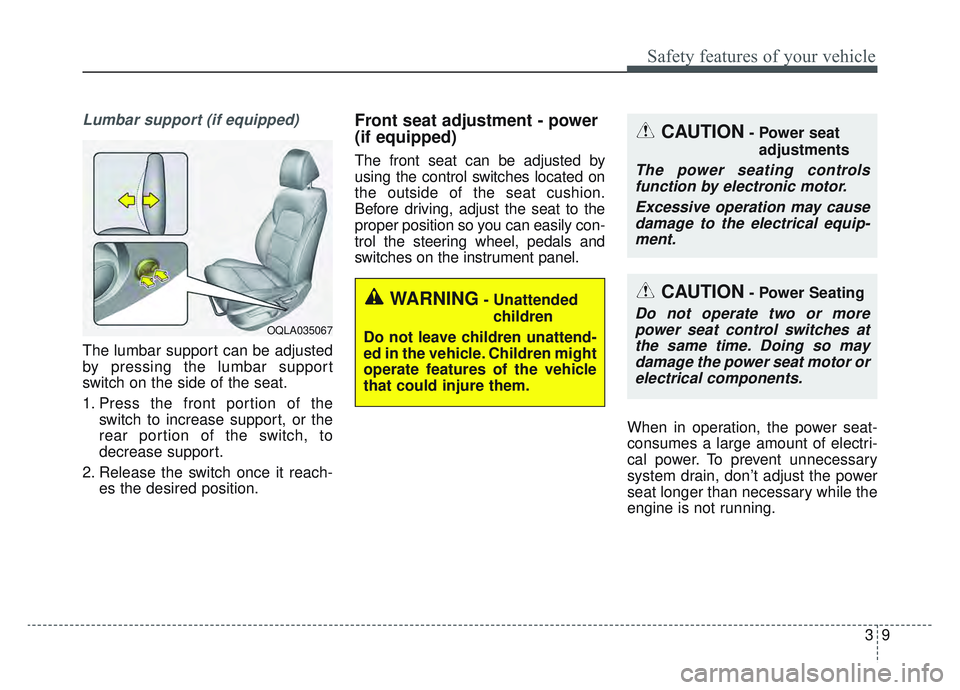
Lumbar support (if equipped)
The lumbar support can be adjusted
by pressing the lumbar support
switch on the side of the seat.
1. Press the front portion of theswitch to increase support, or the
rear portion of the switch, to
decrease support.
2. Release the switch once it reach- es the desired position.
Front seat adjustment - power
(if equipped)
The front seat can be adjusted by
using the control switches located on
the outside of the seat cushion.
Before driving, adjust the seat to the
proper position so you can easily con-
trol the steering wheel, pedals and
switches on the instrument panel.
When in operation, the power seat-
consumes a large amount of electri-
cal power. To prevent unnecessary
system drain, don’t adjust the power
seat longer than necessary while the
engine is not running.
OQLA035067
CAUTION- Power seatadjustments
The power seating controlsfunction by electronic motor.
Excessive operation may causedamage to the electrical equip-ment.
CAUTION- Power Seating
Do not operate two or morepower seat control switches atthe same time. Doing so maydamage the power seat motor orelectrical components.WARNING- Unattended
children
Do not leave children unattend-
ed in the vehicle. Children might
operate features of the vehicle
that could injure them.
Page 88 of 607
Features of your vehicle
Folding key . . . . . . . . . . . . . . . . . . . . . . . . . . . . . . . . 4-5
• Record your key number . . . . . . . . . . . . . . . . . . . . . . . 4-5
• Key operations . . . . . . . . . . . . . . . . . . . . . . . . . . . . . . . . 4-5
• Transmitter precautions . . . . . . . . . . . . . . . . . . . . . . . . 4-7
• Battery replacement . . . . . . . . . . . . . . . . . . . . . . . . . . . 4-8
• Immobilizer system . . . . . . . . . . . . . . . . . . . . . . . . . . . . 4-9
Smart key . . . . . . . . . . . . . . . . . . . . . . . . . . . . . . . . 4-12
• Record your key number . . . . . . . . . . . . . . . . . . . . . . 4-12
• Smart key function . . . . . . . . . . . . . . . . . . . . . . . . . . . 4-12
• Loss of the smart key . . . . . . . . . . . . . . . . . . . . . . . . . 4-16
• Smart key precautions . . . . . . . . . . . . . . . . . . . . . . . . 4-16
• Battery replacement . . . . . . . . . . . . . . . . . . . . . . . . . . 4-17
• Smart key immobilizer system . . . . . . . . . . . . . . . . . . 4-17
Theft-alarm system . . . . . . . . . . . . . . . . . . . . . . . . 4-19
• Armed stage . . . . . . . . . . . . . . . . . . . . . . . . . . . . . . . . . 4-19
• Theft-alarm stage . . . . . . . . . . . . . . . . . . . . . . . . . . . . 4-20
• Disarmed stage. . . . . . . . . . . . . . . . . . . . . . . . . . . . . . . 4-20
Door locks . . . . . . . . . . . . . . . . . . . . . . . . . . . . . . . . 4-22
• Operating door locks from outside the vehicle . . . . 4-22
• Operating door locks from inside the vehicle . . . . . . 4-23
• Impact sensing door unlock system . . . . . . . . . . . . . . 4-25
• Child-protector rear door lock. . . . . . . . . . . . . . . . . . 4-26
Liftgate (for manual liftgate) . . . . . . . . . . . . . . . . 4-27
• Opening the liftgate . . . . . . . . . . . . . . . . . . . . . . . . . . . 4-27
• Closing the liftgate. . . . . . . . . . . . . . . . . . . . . . . . . . . . 4-27• Emergency liftgate safety release. . . . . . . . . . . . . . . . 4-28
Power liftgate . . . . . . . . . . . . . . . . . . . . . . . . . . . . . 4-29
• Opening the liftgate . . . . . . . . . . . . . . . . . . . . . . . . . . . 4-30
• Closing the liftgate. . . . . . . . . . . . . . . . . . . . . . . . . . . . 4-31
• Smart power liftgate . . . . . . . . . . . . . . . . . . . . . . . . . . 4-34
Windows . . . . . . . . . . . . . . . . . . . . . . . . . . . . . . . . . 4-38
• Power windows . . . . . . . . . . . . . . . . . . . . . . . . . . . . . . 4-39
Hood. . . . . . . . . . . . . . . . . . . . . . . . . . . . . . . . . . . . \
. 4-43
• Opening the hood . . . . . . . . . . . . . . . . . . . . . . . . . . . . 4-43
• Closing the hood . . . . . . . . . . . . . . . . . . . . . . . . . . . . . 4-44
Fuel filler lid . . . . . . . . . . . . . . . . . . . . . . . . . . . . . . 4-45
• Opening the fuel filler lid . . . . . . . . . . . . . . . . . . . . . . 4-45
• Closing the fuel filler lid . . . . . . . . . . . . . . . . . . . . . . . 4-45
Panoramic sunroof . . . . . . . . . . . . . . . . . . . . . . . . . 4-48
• Sunroof open warning. . . . . . . . . . . . . . . . . . . . . . . . . 4-49
• Sunshade . . . . . . . . . . . . . . . . . . . . . . . . . . . . . . . . . . . 4-\
49
• Sliding the sunroof . . . . . . . . . . . . . . . . . . . . . . . . . . . 4-50
• Tilting the sunroof . . . . . . . . . . . . . . . . . . . . . . . . . . . . 4-52
• Closing the sunroof . . . . . . . . . . . . . . . . . . . . . . . . . . . 4-52
• Resetting the sunroof . . . . . . . . . . . . . . . . . . . . . . . . . 4-52
Steering wheel . . . . . . . . . . . . . . . . . . . . . . . . . . . . . 4-54
• Electronic power steering (EPS) . . . . . . . . . . . . . . . . 4-54
• Tilt and telescopic steering . . . . . . . . . . . . . . . . . . . . 4-55
• Heated steering wheel . . . . . . . . . . . . . . . . . . . . . . . . . 4-56
• Horn . . . . . . . . . . . . . . . . . . . . . . . . . . . . . . . . . . . . \
. . . 4-57
4
Page 141 of 607
Features of your vehicle
54
4
Electronic power steering
(EPS)
The power steering uses a motor to
assist you in steering the vehicle. If
the engine is off or if the power steer-
ing system becomes inoperative, the
vehicle may still be steered, but it will
require increased steering effort.
Electronic power steering is con-
trolled by a power steering control
unit which senses the steering wheel
torque and vehicle speed to com-
mand the motor.
The steering becomes heavier as the
vehicle’s speed increases and
becomes lighter as the vehicle’s
speed decreases for optimum steer-
ing control.
Should you notice any change in the
effort required to steer during normal
vehicle operation, have the power
steering checked by an authorized
Kia dealer. If the Electronic Power Steering
System does not operate normally,
the warning light will illuminate on
the instrument cluster. The steering
wheel may require increased
steering effort. Take your vehicle to
an authorized Kia dealer and have
the vehicle checked as soon as
possible.
When you operate the steering wheel in low temperature, the steer-
ing effort may be high or abnormal
noise may occur. If temperature
rises, the noise will likely disappear.
This is a normal condition.
When the vehicle is stationary, and the steering wheel is turned all the
way to the left or right continuous-
ly, the steering wheel becomes
harder to turn. The power assist is
limited to protect the motor from
overheating.
As time passes, the steering wheel
will return to its normal condition.
✽ ✽ NOTICE
The following symptoms may occur
during normal vehicle operation:
• The EPS warning light does not
illuminate.
• The steering gets heavy immedi- ately after turning the ignition
switch on. This happens as the sys-
tem performs the EPS system
diagnostics. When the diagnostics
are completed, the steering wheel
will return to its normal condition.
• A click noise may be heard from the EPS relay after the ignition
switch is turned to the ON or
LOCK (OFF) position.
• A motor noise may be heard when the vehicle is at a stop or at a low
driving speed.
• If the Electronic Power Steering System does not operate normally,
the warning light will illuminate on
the instrument cluster. The steer-
ing wheel may become difficult to
control or operate abnormally.
Take your vehicle to an authorized
Kia dealer and have the vehicle
checked as soon as possible. (Continued)
STEERING WHEEL
Page 186 of 607
499
Features of your vehicle
✽ ✽NOTICE- Electronic Brake
force Distribution (EBD)
System Warning Light
When the ABS Warning Light is on
or both ABS and Parking Brake &
Brake Fluid Warning Lights are on,
the speedometer, odometer, or trip-
meter may not work. Also, the EPS
Warning Light may illuminate and
the steering effort may increase or
decrease.
In this case, have your vehicle inspect-
ed by an authorized Kia dealer as
soon as possible.
Electronic Power Steering (EPS) WarningLight
This warning light illuminates:
Once you set the ignition switch or Engine Start/Stop Button to the ON
position.
- It remains on until the engine isstarted.
When there is a malfunction with the EPS.
In this case, have your vehicle
inspected by an authorized Kia
dealer.
Malfunction Indicator
Lamp (MIL)
This warning light illuminates:
Once you set the ignition switch or Engine Start/Stop Button to the ON
position.
- It remains on until the engine isstarted.
When there is a malfunction with the emission control system.
In this case, have your vehicle
inspected by an authorized Kia
dealer.
Page 356 of 607
Driving your vehicle
28
6
Power brakes
Your vehicle has power-assisted
brakes that adjust automatically
through normal usage.
In the event that the power-assisted
brakes lose power because of a
stalled engine or some other reason,
you can still stop your vehicle by
applying greater force to the brake
pedal than you normally would. The
stopping distance, however, will be
longer.
When the engine is not running, the
reserve brake power is partially
depleted each time the brake pedal
is applied. Do not pump the brake
pedal when the power assist has
been interrupted.
Pump the brake pedal only when
necessary to maintain steering con-
trol on slippery surfaces. Wet brakes may impair the vehicle’s
ability to safely slow down; the vehi-
cle may also pull to one side when
the brakes are applied. Applying the
brakes lightly will indicate whether
they have been affected in this way.
Always test your brakes in this fash-
ion after driving through deep water.
To dry the brakes, apply them lightly
while maintaining a safe forward
speed until brake performance
returns to normal.
BRAKE SYSTEM
WARNING- Steep hill
braking
Avoid continuous application of
the brakes when descending a
long or steep hill by shifting to a
lower gear. Continuous brake
application will cause the brakes
to overheat and could result in a
temporary loss of braking per-
formance.
CAUTION- Brake Pedal
Do not drive with your foot rest- ing on the brake pedal. This willcreate abnormally high braketemperatures which can causeexcessive brake lining and padwear.
Page 376 of 607
Driving your vehicle
48
6
Vehicle stability management
(VSM)
This system provides further
enhancements to vehicle stability
and steering responses when a vehi-
cle is driving on a slippery road or a
vehicle detects changes in coeffi-
cient of friction between right wheels
and left wheels when braking.
VSM operation
When the VSM is in operation, ESC
indicator light ( ) blinks.
When the vehicle stability manage-
ment is operating properly, you can
feel a slight pulsation in the vehicle
and/or abnormal steering responses
(EPS- Electronic Power Steering).
This is only the effect of brake and
EPS control and indicates nothing
unusual.
The VSM does not operate when:
Driving on a sloping road such as a
gradient or incline
Driving in reverse
ESC OFF indicator light ( ) remains on the instrument cluster
EPS indicator light remains on the instrument cluster
VSM operation off
If you press the ESC OFF button to
turn off the ESC, the VSM will also
cancel and the ESC OFF indicator
light ( ) illuminates.
To turn on the VSM, press the button
again. The ESC OFF indicator light
goes out.
WARNING- Tire/
Wheel size
When replacing tires and wheels,
make sure they are the same size
as the original tires and wheels
installed. Driving with varying
tire or wheel sizes may diminish
any supplemental safety benefits
of the VSM system.