2019 KIA SPORTAGE brake
[x] Cancel search: brakePage 504 of 607
831
Maintenance
BRAKE FLUID
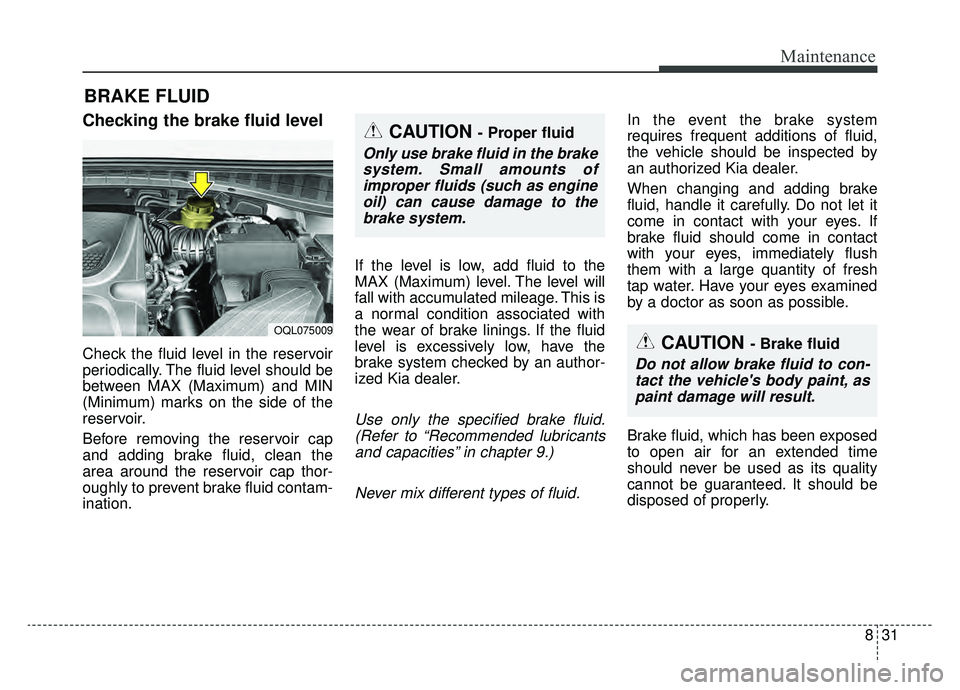
Checking the brake fluid level
Check the fluid level in the reservoir
periodically. The fluid level should be
between MAX (Maximum) and MIN
(Minimum) marks on the side of the
reservoir.
Before removing the reservoir cap
and adding brake fluid, clean the
area around the reservoir cap thor-
oughly to prevent brake fluid contam-
ination.If the level is low, add fluid to the
MAX (Maximum) level. The level will
fall with accumulated mileage. This is
a normal condition associated with
the wear of brake linings. If the fluid
level is excessively low, have the
brake system checked by an author-
ized Kia dealer.
Use only the specified brake fluid.
(Refer to “Recommended lubricantsand capacities” in chapter 9.)
Never mix different types of fluid.
In the event the brake system
requires frequent additions of fluid,
the vehicle should be inspected by
an authorized Kia dealer.
When changing and adding brake
fluid, handle it carefully. Do not let it
come in contact with your eyes. If
brake fluid should come in contact
with your eyes, immediately flush
them with a large quantity of fresh
tap water. Have your eyes examined
by a doctor as soon as possible.
Brake fluid, which has been exposed
to open air for an extended time
should never be used as its quality
cannot be guaranteed. It should be
disposed of properly.
OQL075009CAUTION - Brake fluid
Do not allow brake fluid to con-tact the vehicle's body paint, aspaint damage will result.
CAUTION - Proper fluid
Only use brake fluid in the brakesystem. Small amounts ofimproper fluids (such as engineoil) can cause damage to thebrake system.
Page 506 of 607
833
Maintenance
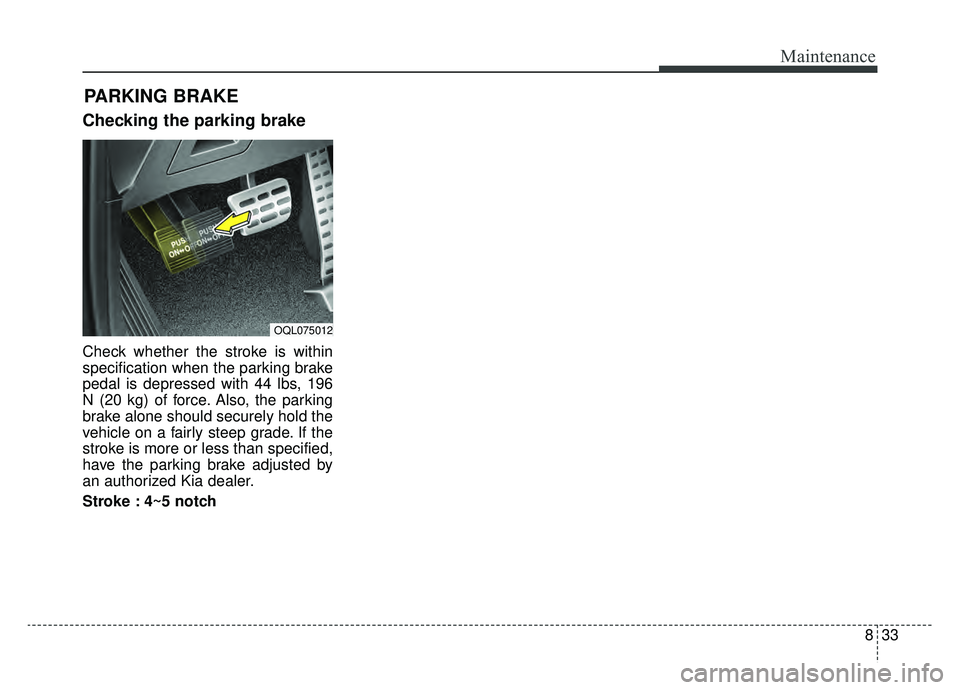
Checking the parking brake
Check whether the stroke is within
specification when the parking brake
pedal is depressed with 44 lbs, 196
N (20 kg) of force. Also, the parking
brake alone should securely hold the
vehicle on a fairly steep grade. If the
stroke is more or less than specified,
have the parking brake adjusted by
an authorized Kia dealer.
Stroke : 4~5 notch
PARKING BRAKE
OQL075012
Page 520 of 607
847
Maintenance
Disc brake pads should be inspectedfor wear whenever tires are rotated.
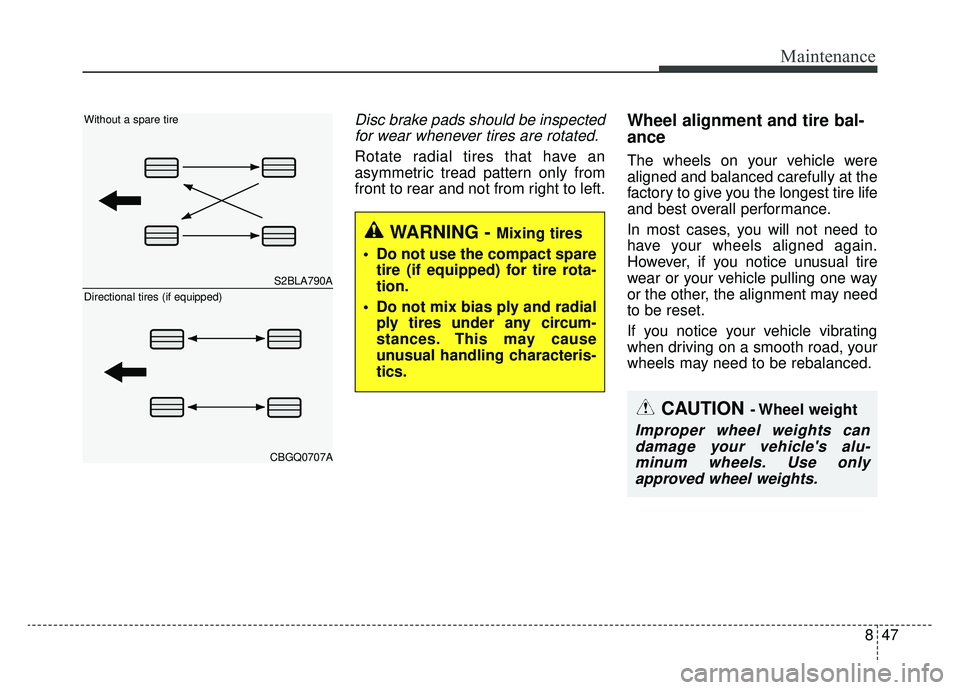
Rotate radial tires that have an
asymmetric tread pattern only from
front to rear and not from right to left.
Wheel alignment and tire bal-
ance
The wheels on your vehicle were
aligned and balanced carefully at the
factory to give you the longest tire life
and best overall performance.
In most cases, you will not need to
have your wheels aligned again.
However, if you notice unusual tire
wear or your vehicle pulling one way
or the other, the alignment may need
to be reset.
If you notice your vehicle vibrating
when driving on a smooth road, your
wheels may need to be rebalanced.
WARNING - Mixing tires
Do not use the compact spare tire (if equipped) for tire rota-
tion.
Do not mix bias ply and radial ply tires under any circum-
stances. This may cause
unusual handling characteris-
tics.
CAUTION - Wheel weight
Improper wheel weights candamage your vehicle's alu-minum wheels. Use onlyapproved wheel weights.
S2BLA790A
CBGQ0707A
Without a spare tire
Directional tires (if equipped)
Page 521 of 607
Maintenance
48
8
Tire replacement
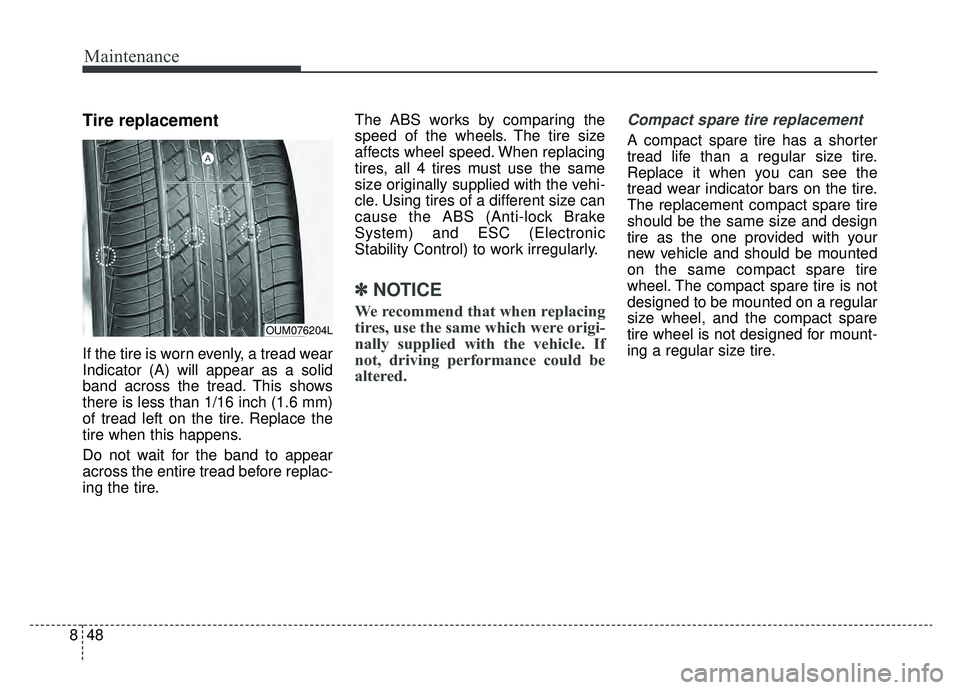
If the tire is worn evenly, a tread wear
Indicator (A) will appear as a solid
band across the tread. This shows
there is less than 1/16 inch (1.6 mm)
of tread left on the tire. Replace the
tire when this happens.
Do not wait for the band to appear
across the entire tread before replac-
ing the tire. The ABS works by comparing the
speed of the wheels. The tire size
affects wheel speed. When replacing
tires, all 4 tires must use the same
size originally supplied with the vehi-
cle. Using tires of a different size can
cause the ABS (Anti-lock Brake
System) and ESC (Electronic
Stability Control) to work irregularly.
✽ ✽
NOTICE
We recommend that when replacing
tires, use the same which were origi-
nally supplied with the vehicle. If
not, driving performance could be
altered.
Compact spare tire replacement
A compact spare tire has a shorter
tread life than a regular size tire.
Replace it when you can see the
tread wear indicator bars on the tire.
The replacement compact spare tire
should be the same size and design
tire as the one provided with your
new vehicle and should be mounted
on the same compact spare tire
wheel. The compact spare tire is not
designed to be mounted on a regular
size wheel, and the compact spare
tire wheel is not designed for mount-
ing a regular size tire.
OUM076204L
Page 528 of 607
855
Maintenance
Production options weight:The
combined weight of installed regular
production options weighing over 5
lb.(2.3 kg) in excess of the standard
items which they replace, not previ-
ously considered in curb weight or
accessory weight, including heavy
duty brakes, ride levelers, roof rack,
heavy duty battery, and special trim.
Recommended Inflation Pressure:
Vehicle manufacturer's recommend-
ed tire inflation pressure and shown
on the tire placard.
Radial Ply Tire: A pneumatic tire in
which the ply cords that extend to the
beads are laid at 90 degrees to the
centerline of the tread.
Rim: A metal support for a tire and
upon which the tire beads are seat-
ed.
Sidewall: The portion of a tire
between the tread and the bead. Speed Rating:
An alphanumeric
code assigned to a tire indicating the
maximum speed at which a tire can
operate.
Traction: The friction between the
tire and the road surface. The
amount of grip provided.
Tread: The portion of a tire that
comes into contact with the road.
Treadwear Indicators: Narrow
bands, sometimes called "wear
bars," that show across the tread of a
tire when only 1/16 inch of tread
remains.
UTQGS: Uniform Tire Quality
Grading Standards, a tire information
system that provides consumers with
ratings for a tire's traction, tempera-
ture and treadwear. Ratings are
determined by tire manufacturers
using government testing proce-
dures. The ratings are molded into
the sidewall of the tire.
Vehicle Capacity Weight: The num-
ber of designated seating positions
multiplied by 150 lbs. (68kg) plus the
rated cargo and luggage load. Vehicle Maximum Load on the
Tire:
Load on an individual tire due
to curb and accessory weight plus
maximum occupant and cargo
weight.
Vehicle Normal Load on the Tire:
Load on an individual tire that is
determined by distributing to each
axle its share of the curb weight,
accessory weight, and normal occu-
pant weight and driving by 2.
Vehicle Placard: A label permanent-
ly attached to a vehicle showing the
original equipment tire size and rec-
ommended inflation pressure.
Page 550 of 607
877
Maintenance
LIGHT BULBS
Bulb replacement precaution
Please keep extra bulbs on hand
with appropriate wattage ratings in
case of emergencies.
Refer to “Bulb Wattage” in chapter 9.
When changing lamps, first turn off
the engine at a safe place, firmly
apply the parking brake and detach
the battery’s negative (-) terminal.
Use only bulbs of the specifiedwattage.✽ ✽ NOTICE
• If the light bulb or lamp connector
is removed while the lamp is still
on, the fuse box's electronic sys-
tem may log it as a malfunction.
Therefore, a lamp malfunction
incident may be recorded as a
Diagnostic Trouble Code (DTC) in
the fuse box.
• It is normal for an operating lamp to flicker momentarily. This is due
to a stabilization function of the
vehicle’s electronic control device.
If the lamp lights up normally
after momentarily blinking, then
it is functioning as normal.
However, if the lamp continues to
flicker several times or turns off
completely, there may be an error
in the vehicle’s electronic control
device. Please have the vehicle
checked by an authorized Kia
dealer immediately.
WARNING- Working on
the lights
Prior to working on the light,
firmly apply the parking brake,
ensure that the ignition switch
is turned to the LOCK position
and turn off the lights to avoid
sudden movement of the vehi-
cle and burning your fingers or
receiving an electric shock.
CAUTION -Light replace-
ment
Be sure to replace the burned- out bulb with one of the samewattage rating. Otherwise, itmay cause damage to the fuseor electric wiring system.
CAUTION -Headlamp
Lens
To prevent damage, do notclean the headlamp lens withchemical solvents or strongdetergents.
Page 565 of 607
Maintenance
92
8
APPEARANCE CARE
Exterior care
Exterior general caution
It is very important to follow the label
directions when using any chemical
cleaner or polish. Read all warning
and caution statements that appear
on the label.
Finish maintenance
Washing
To help protect your vehicle’s finish
from rust and deterioration, wash it
thoroughly and frequently at least
once a month with lukewarm or cold
water.
If you use your vehicle for off-road
driving, you should wash it after each
off-road trip. Pay special attention to
the removal of any accumulation of
salt, dirt, mud, and other foreign mate-
rials. Make sure the drain holes in the
lower edges of the doors and rocker
panels are kept clear and clean.
Insects, tar, tree sap, bird droppings,
industrial pollution and similar
deposits can damage your vehicle’s
finish if not removed immediately.
Even prompt washing with plain water
may not completely remove all these
deposits. A mild soap, safe for use on
painted surfaces, may be used.
After washing, rinse the vehicle thor-
oughly with lukewarm or cold water.
Do not allow soap to dry on the finish. After washing the vehicle, test the
brakes while driving slowly to see if
they have been affected by water. If
braking performance is impaired, dry
the brakes by applying them lightly
while maintaining a slow forward
speed.
Page 568 of 607
895
Maintenance
Do a thorough washing of theundercarriage at the end of the
winter.
Use professional service techni- cians or governmental inspection
stations to annually inspect for cor-
rosion.
Immediately seek an inspection of your vehicle if you become visually
aware of corrosion flaking or scal-
ing or if you become aware of a
change in vehicle performance,
such as soft or spongey brakes,
fluids leaking, impairment of direc-
tional control, suspension noises
or rattling metal straps.Aluminum wheel maintenance
The aluminum wheels are coated
with a clear protective finish.
Do not use any abrasive cleaner,polishing compound, solvent, or
wire brushes on aluminum wheels.
They may scratch the finish.
Clean the wheel when it has cooled.
Use only a mild soap or neutral detergent, and rinse thoroughly
with water. Also, be sure to clean
the wheels after driving on salted
roads. This helps prevent corro-
sion.
Avoid washing the wheels with highspeed vehicle wash brushes.
Do not use any alkaline or acid detergents It may damage and cor-
rode the aluminum wheels coated
with a clear protective finish.
Corrosion protection
Protecting your vehicle from corrosion
By using the most advanced design
and construction practices to combat
corrosion, we produce vehicles of
the excellent quality. However, this is
only part of the job. To achieve the
long-term corrosion resistance your
vehicle can deliver, the owner's
cooperation and assistance is also
required.
Common causes of corrosion
The most common causes of corro-
sion on your vehicle are:
Road salt, dirt and moisture that isallowed to accumulate underneath
the vehicle.
Removal of paint or protective coatings by stones, gravel, abra-
sion or minor scrapes and dents
which leave unprotected metal
exposed to corrosion.