Page 190 of 564

Features of your vehicle
104
4
✽ ✽
NOTICE
If you want to defrost and defog the
front windshield, refer to
“Windshield defrosting and defog-
ging” in this section.
Rear window defrosterThe defroster heats the window to
remove frost, fog and thin ice from
the rear window, while the engine is
running.
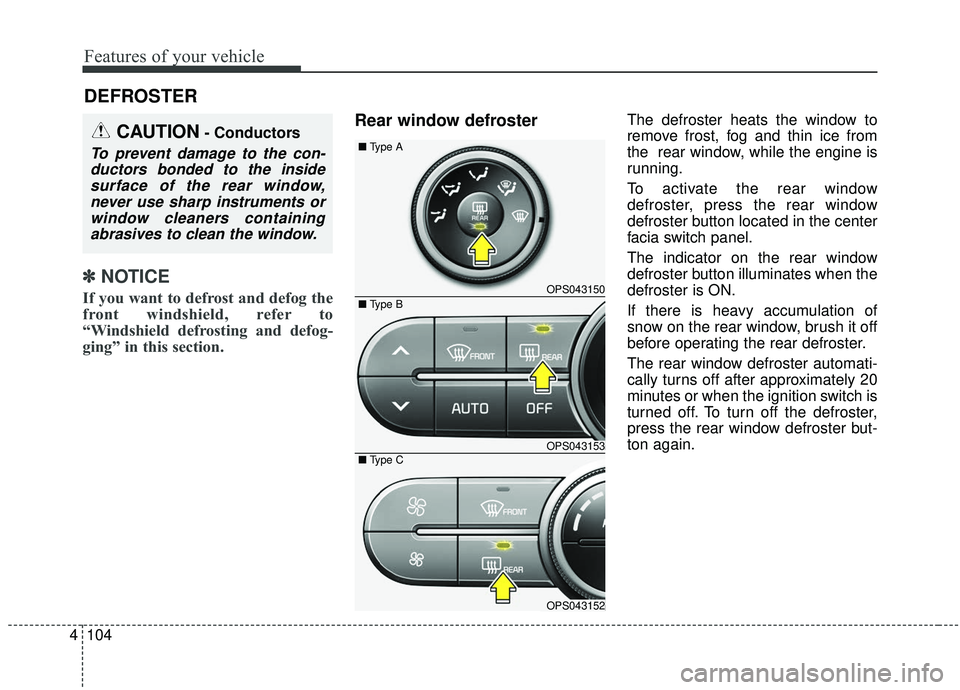
To activate the rear window
defroster, press the rear window
defroster button located in the center
facia switch panel.
The indicator on the rear window
defroster button illuminates when the
defroster is ON.
If there is heavy accumulation of
snow on the rear window, brush it off
before operating the rear defroster.
The rear window defroster automati-
cally turns off after approximately 20
minutes or when the ignition switch is
turned off. To turn off the defroster,
press the rear window defroster but-
ton again.
DEFROSTER
CAUTION- Conductors
To prevent damage to the con-
ductors bonded to the insidesurface of the rear window,never use sharp instruments orwindow cleaners containingabrasives to clean the window.
OPS043150
OPS043153
OPS043152
■
Type A
■ Type C
■ Type B
Page 195 of 564
4109
Features of your vehicle
Instrument panel vents
The outlet vents can be opened or
closed separately using the thumb-
wheel.
Also, you can adjust the direction of
air delivery from these vents using
the vent control lever as shown.
Temperature control
The temperature control knob allows
you to control the temperature of the
air flow from the ventilation system.
To change the air temperature in the
passenger compartment, turn the
knob to the right position for warm air
or left position for cooler air.To operate the MAX A/C, turn the
temperature knob to extreme left. Air
flow is directed toward the upper
body and face.
In this mode, the air conditioning and
the recirculated air position will be
selected automatically.
OPS043059
OPS043156
OPS043159
Page 205 of 564

4119
Features of your vehicle
Never place anything over the sensor
located on the instrument panel to
ensure better control of the heating
and cooling system.
Manual heating and air condi-
tioning
The heating and cooling system can
be controlled manually by pushing
buttons other than the AUTO button.
In this case, the system works
sequentially according to the order of
buttons selected.
When pressing any button (or turning
any knob) except AUTO button while
automatic operation, the functions
not selected will be controlled auto-
matically.
1. Start the engine.
2. Set the mode to the desired posi-tion.
3. Set the temperature control to the desired position.
4. Set the air intake control to the outside (fresh) air position.
5. Set the fan speed control to the desired speed.
6. If air conditioning is desired, turn the air conditioning system on.
Press the AUTO button in order to
convert to full automatic control of
the system.
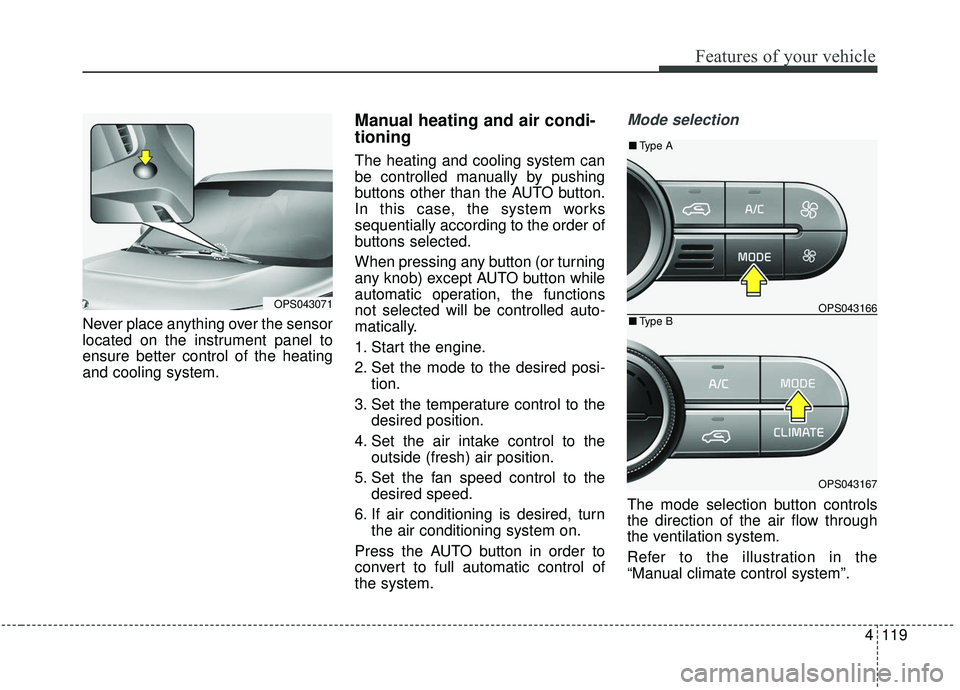
Mode selection
The mode selection button controls
the direction of the air flow through
the ventilation system.
Refer to the illustration in the
“Manual climate control system”.
OPS043071OPS043166
OPS043167
■ Type B
■Type A
Page 207 of 564
4121
Features of your vehicle
Defrost mode (A, D)
Most of the air flow is directed to the
windshield with a small amount of air
directed to the side window defrosters.Instrument panel vents
The outlet port can be opened or
closed separately using the thumb-
wheel.
Also, you can adjust the direction of
air delivered from these vents using
the vent control lever as shown.
Temperature control
A
The temperature will increase to the
maximum (HI) by pushing the button
().
OPS043168
OPS043169
■
Type B
■Type A
OPS043059OPS043170
OPS043171
■Type B
■Type A
Page 559 of 564

I5
Index
Fuses . . . . . . . . . . . . . . . . . . . . . . . . . . . . . . . . . . . . \
. . . 8-62Engine compartment fuse replacement . . . . . . . . . . 8-65
Fuse/Relay panel description . . . . . . . . . . . . . . . . . . 8-67
Inner panel fuse replacement . . . . . . . . . . . . . . . . . . 8-64
Hood . . . . . . . . . . . . . . . . . . . . . . . . . . . . . . . . . . . . \
. . . 4-31 Closing the hood . . . . . . . . . . . . . . . . . . . . . . . . . . . 4-31
Opening the hood . . . . . . . . . . . . . . . . . . . . . . . . . . . 4-31
How to use this manual . . . . . . . . . . . . . . . . . . . . . . . . . 1-2
If the engine overheats . . . . . . . . . . . . . . . . . . . . . . . . . . 7-8
If the engine will not start . . . . . . . . . . . . . . . . . . . . . . . 7-4 If engine doesn't turn over or turns over slowly . . . . 7-4
If engine turns over normally but does not start . . . . 7-4
If you have a flat tire (with Spare Tire) . . . . . . . . . . . . . 7-9 Changing tires . . . . . . . . . . . . . . . . . . . . . . . . . . . . . 7-10
Jack and tools . . . . . . . . . . . . . . . . . . . . . . . . . . . . . . . 7-9
Jack label . . . . . . . . . . . . . . . . . . . . . . . . . . . . . . . . . 7-17
Removing and storing the spare tire . . . . . . . . . . . . 7-10
If you have a flat tire (with Tire Mobility Kit). . . . . . . 7-18 Components of the Tire Mobility Kit . . . . . . . . . . . 7-20
Distributing the sealant . . . . . . . . . . . . . . . . . . . . . . 7-23
Introduction . . . . . . . . . . . . . . . . . . . . . . . . . . . . . . . 7-18 Notes on the suggested use of the Tire Mobility Kit
. 7-19
Using the Tire Mobility Kit . . . . . . . . . . . . . . . . . . . 7-21
Important safety precautions . . . . . . . . . . . . . . . . . . . . . 3-2 Air bag hazards . . . . . . . . . . . . . . . . . . . . . . . . . . . . . 3-2
Always wear your seat belt . . . . . . . . . . . . . . . . . . . . 3-2
Control your speed . . . . . . . . . . . . . . . . . . . . . . . . . . . 3-3
Driver distraction . . . . . . . . . . . . . . . . . . . . . . . . . . . . 3-2
Keep your vehicle in safe condition. . . . . . . . . . . . . . 3-3
Restrain all children . . . . . . . . . . . . . . . . . . . . . . . . . . 3-2
In case of an emergency while driving . . . . . . . . . . . . . . 7-3 If the engine stalls at a crossroad or crossing . . . . . . 7-3
If the engine stalls while driving . . . . . . . . . . . . . . . . 7-3
If you have a flat tire while driving . . . . . . . . . . . . . . 7-3
Instrument cluster . . . . . . . . . . . . . . . . . . . . . . . . . . . . . 4-51 Gauges . . . . . . . . . . . . . . . . . . . . . . . . . . . . . . . . . . . 4-\
53
Instrument cluster control . . . . . . . . . . . . . . . . . . . . 4-52
LCD display control . . . . . . . . . . . . . . . . . . . . . . . . . 4-52
Transaxle Shift Indicator . . . . . . . . . . . . . . . . . . . . . 4-57
Instrument panel overview . . . . . . . . . . . . . . . . . . . . . . . 2-5
Interior features. . . . . . . . . . . . . . . . . . . . . . . . . . . . . . 4-139 Cargo area cover. . . . . . . . . . . . . . . . . . . . . . . . . . . 4-147
Coat hook . . . . . . . . . . . . . . . . . . . . . . . . . . . . . . . . 4-145
Cup holder . . . . . . . . . . . . . . . . . . . . . . . . . . . . . . . 4-139
Floor mat anchor(s) . . . . . . . . . . . . . . . . . . . . . . . . 4-146
Luggage net holder. . . . . . . . . . . . . . . . . . . . . . . . . 4-147
Power outlet . . . . . . . . . . . . . . . . . . . . . . . . . . . . . . 4-144
Rear seat warmer . . . . . . . . . . . . . . . . . . . . . . . . . . 4-143
Seat air ventilation . . . . . . . . . . . . . . . . . . . . . . . . . 4-142
H
I
Page:
< prev 1-8 9-16 17-24