2019 KIA SOUL EV warning lights
[x] Cancel search: warning lightsPage 305 of 455
Driving your vehicle
26
5
✽ ✽
NOTICE
A click sound may be heard in the
motor compartment when the vehi-
cle begins to move after the vehicle is
started. These conditions are normal
and indicate that the Electronic
Stability Control System is function-
ing properly.
✽ ✽NOTICE
For maximum protection, always
wear your seat belt. No system, no
matter how advanced, can compen-
sate for all driver error and/or driv-
ing conditions. Always drive
responsibly.
ESC operation
ESC ON condition
When the POWER buttonis turned ON, ESC and
ESC OFF indicator lights
illuminate for approximately
3 seconds, then ESC is
turned on.
ton for at least half a sec-
ond after turning the igni-
tion ON to turn ESC off.
(ESC OFF indicator will
illuminate). To turn the
ESC on, press the ESC
OFF button (ESC OFF
indicator light will go off).
you may hear a slight tick-
ing sound. This is the ESC
performing an automatic
system self-check and does
not indicate a problem. When operating
When the ESC is in opera-
tion, the ESC indicator light
blinks.
Stability Control is operat-
ing properly, you can feel a
slight pulsation in the vehi-
cle. This is only the effect
of brake control and indi-
cates nothing unusual.
-
WARNING
Electronic stability control (ESC)
will not prevent accidents.
Excessive speed in turns, abrupt
maneuvers and hydroplaning on
wet surfaces can still result in
serious accidents. Only a safe
and attentive driver can prevent
accidents by avoiding maneu-
vers that cause the vehicle to
lose traction. Even with ESC
installed, always follow all the
normal precautions for driving -
including driving at safe speeds
for the conditions.
Page 335 of 455
What to do in an emergency
26
ROAD WARNING
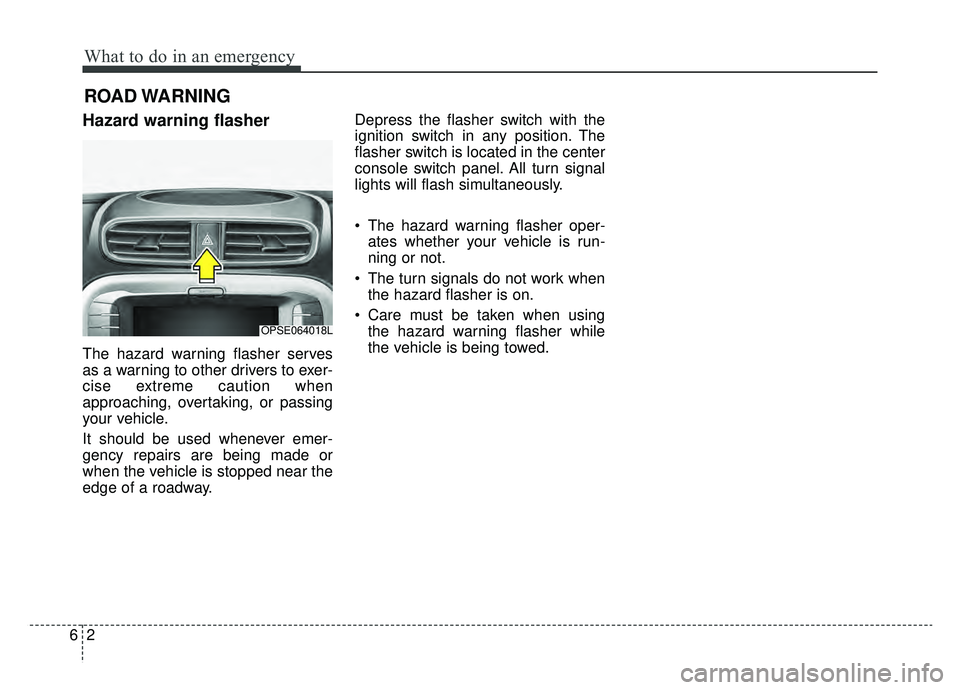
Hazard warning flasher
The hazard warning flasher serves
as a warning to other drivers to exer-
cise extreme caution when
approaching, overtaking, or passing
your vehicle.
It should be used whenever emer-
gency repairs are being made or
when the vehicle is stopped near the
edge of a roadway.Depress the flasher switch with the
ignition switch in any position. The
flasher switch is located in the center
console switch panel. All turn signal
lights will flash simultaneously.
• The hazard warning flasher oper-
ates whether your vehicle is run-
ning or not.
The turn signals do not work when the hazard flasher is on.
Care must be taken when using the hazard warning flasher while
the vehicle is being towed.
OPSE064018L
Page 364 of 455
Maintenance
67
At least monthly:
Check the coolant level in thecoolant reservoir.
Check the operation of all exterior lights, including the stoplights, turn
signals and hazard warning flash-
ers.
Check the inflation pressures of all tires including the spare for tires
that are worn, show uneven wear,
or are damaged.
Check for loose wheel lug nuts.
At least twice a year (i.e., every Spring and Fall):
Check the radiator, heater and air conditioning hoses for leaks or
damage.
Check the windshield washer spray and wiper operation. Clean
the wiper blades with clean cloth
dampened with washer fluid.
Check the headlight alignment.
Check the lap/shoulder belts for wear and function.
At least once a year:
Clean the body and door drainholes.
Lubricate the door hinges and checks, and hood hinges.
Lubricate the door and hood locks and latches.
Lubricate the door rubber weather- strips.
Check the air conditioning system.
Inspect and lubricate the reduction gear linkage and controls.
Clean the battery and terminals.
Check the brake fluid level.
Page 386 of 455
Maintenance
28
7
✽ ✽
NOTICE
If you connect unauthorized elec-
tronic devices to the battery, the bat-
tery may be discharged. Never use
unauthorized devices.
Battery recharging
Your vehicle has a maintenance-free,
calcium-based battery.
If the battery becomes discharged
in a short time (because, for exam-
ple, the headlights or interior lights
were left on while the vehicle was
not in use), recharge it by slow
charging (trickle) for 10 hours.
If the battery gradually discharges because of high electric load while
the vehicle is being used, recharge
it at 20-30A for two hours.WARNING- Risk of elec-
trocution
Never touch the electrical motor
while the vehicle is running.
This system works with high
voltage which can "zap" you.
WARNING- Recharging battery
Never attempt to recharge the
battery when the battery cables
are connected.
WARNING- Battery lead compound
Battery posts, terminals, and
related accessories contain
lead and lead compounds.
Wash hands after handling.
Page 403 of 455
745
Maintenance
FUSES
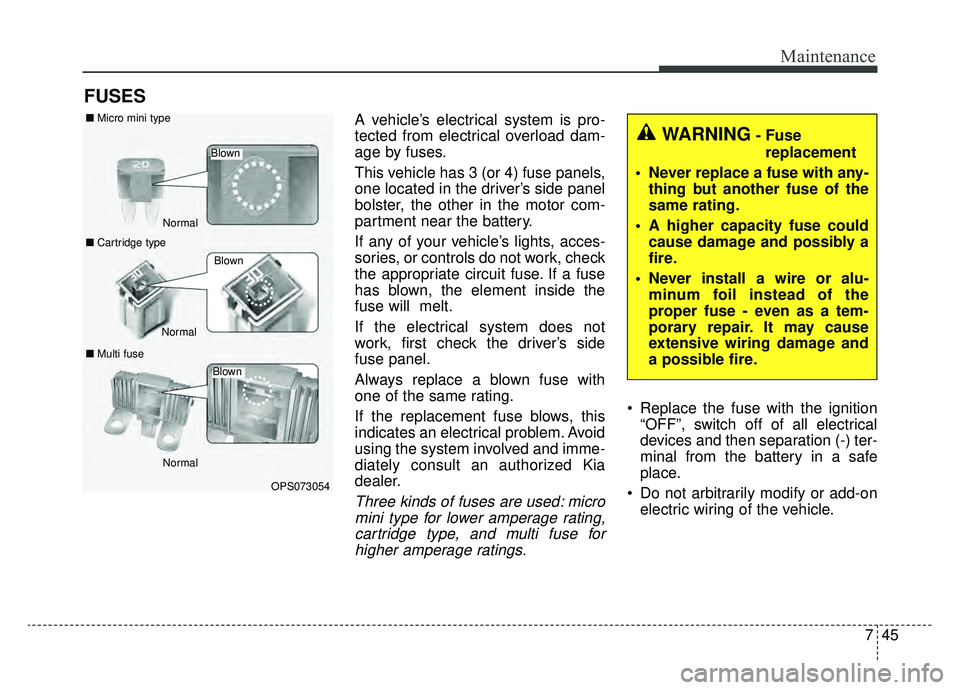
A vehicle’s electrical system is pro-
tected from electrical overload dam-
age by fuses.
This vehicle has 3 (or 4) fuse panels,
one located in the driver’s side panel
bolster, the other in the motor com-
partment near the battery.
If any of your vehicle’s lights, acces-
sories, or controls do not work, check
the appropriate circuit fuse. If a fuse
has blown, the element inside the
fuse will melt.
If the electrical system does not
work, first check the driver’s side
fuse panel.
Always replace a blown fuse with
one of the same rating.
If the replacement fuse blows, this
indicates an electrical problem. Avoid
using the system involved and imme-
diately consult an authorized Kia
dealer.
Three kinds of fuses are used: micromini type for lower amperage rating,cartridge type, and multi fuse forhigher amperage ratings.
Replace the fuse with the ignition “OFF”, switch off of all electrical
devices and then separation (-) ter-
minal from the battery in a safe
place.
Do not arbitrarily modify or add-on electric wiring of the vehicle.
WARNING- Fuse
replacement
Never replace a fuse with any- thing but another fuse of the
same rating.
A higher capacity fuse could cause damage and possibly a
fire.
Never install a wire or alu- minum foil instead of the
proper fuse - even as a tem-
porary repair. It may cause
extensive wiring damage and
a possible fire.
OPS073054
Normal
Normal
■
Micro mini type
■ Cartridge type
■ Multi fuse
Blown
Blown
Normal
Blown
Page 415 of 455
757
Maintenance
LIGHT BULBS
Use only the bulbs of the specifiedwattage.
If you don’t have necessary tools, the correct bulbs and the expertise,
consult an authorized Kia dealer. In
many cases, it is difficult to replace
vehicle light bulbs because other
parts of the vehicle must be
removed before you can get to the
bulb. This is especially true if you
have to remove the headlight
assembly to get to the bulb(s).
Removing/installing the headlight
assembly can result in damage to
the vehicle.
Do not install additional bulb or LED. If you install additional bulbs
or LEDs, the lamps may not oper-
ate properly and there may be
problems in the fuse box or electric
wiring system.
WARNING - Lights
Prior to working on the light,
firmly apply the parking brake,
ensure that the ignition switch
is turned to the LOCK position
and turn off the lights to avoid
sudden movement of the vehi-
cle and burning your fingers or
receiving an electric shock.
CAUTION- Light
replacement
Be sure to replace the burned-out bulb with one of the samewattage rating. Otherwise, itmay cause damage to the fuseor electric wiring system.
Page 424 of 455
Maintenance
66
7
Interior light bulb replacement
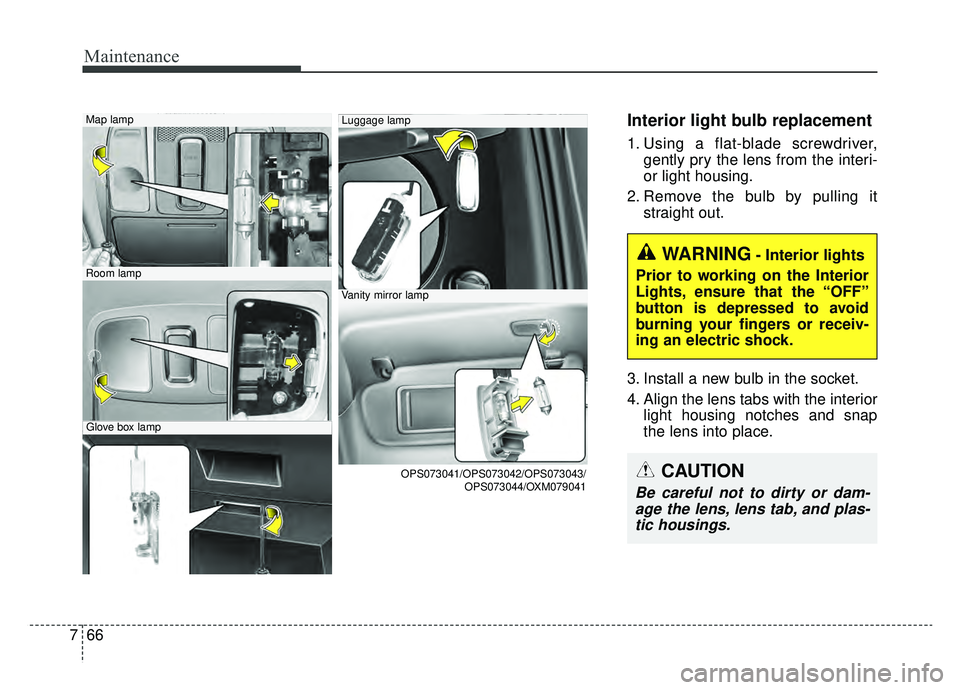
1. Using a flat-blade screwdriver,
gently pry the lens from the interi-
or light housing.
2. Remove the bulb by pulling it straight out.
3. Install a new bulb in the socket.
4. Align the lens tabs with the interior light housing notches and snap
the lens into place.
Map lamp
Room lamp
Glove box lamp
Luggage lamp
Vanity mirror lamp
OPS073041/OPS073042/OPS073043/ OPS073044/OXM079041
WARNING- Interior lights
Prior to working on the Interior
Lights, ensure that the “OFF”
button is depressed to avoid
burning your fingers or receiv-
ing an electric shock.
CAUTION
Be careful not to dirty or dam- age the lens, lens tab, and plas-tic housings.
Page 448 of 455
Index
2I
Active ECO operation. . . . . . . . . . . . . . . . . . . . . . . . . . 5-10
Air bag - advanced supplemental restraint system . . . . 3-34Adding equipment to or modifying your air bag-equipped vehicle . . . . . . . . . . . . . . . . . . . . 3-58
Air bag warning label. . . . . . . . . . . . . . . . . . . . . . . . 3-58
Air bag warning light . . . . . . . . . . . . . . . . . . . . . . . . 3-37
Curtain air bag . . . . . . . . . . . . . . . . . . . . . . . . . . . . . 3-51
Do not installing a child restraint on a front passenger's seat . . . . . . . . . . . . . . . . . . . . . . . . . . . 3-37
Driver's and passenger's front air bag . . . . . . . . . . . 3-46
How does the air bag system operate. . . . . . . . . . . . 3-35
Inflation and non-inflation conditions of the air bag . 3-52
Occupant Detection System (ODS) . . . . . . . . . . . . . 3-41
Side air bag. . . . . . . . . . . . . . . . . . . . . . . . . . . . . . . . 3-49
SRS Care . . . . . . . . . . . . . . . . . . . . . . . . . . . . . . . . . 3-57
SRS components and functions . . . . . . . . . . . . . . . . 3-38
Air conditioner compressor label . . . . . . . . . . . . . . . . . . 8-8
Air conditioning system . . . . . . . . . . . . . . . . . . . . . . . . . 8-3
Appearance care . . . . . . . . . . . . . . . . . . . . . . . . . . . . . . 7-67 Exterior care . . . . . . . . . . . . . . . . . . . . . . . . . . . . . . . 7-67
Interior care . . . . . . . . . . . . . . . . . . . . . . . . . . . . . . . 7-72
Audio system . . . . . . . . . . . . . . . . . . . . . . . . . . . . . . . 4-128 Antenna . . . . . . . . . . . . . . . . . . . . . . . . . . . . . . . . . 4-128
AUX, USB and iPod
®port. . . . . . . . . . . . . . . . . . . 4-129
Bluetooth®Wireless Technology . . . . . . . . . . . . . . 4-137
How vehicle audio works . . . . . . . . . . . . . . . . . . . . 4-131 Speaker lights . . . . . . . . . . . . . . . . . . . . . . . . . . . . . 4-130
Using iPod
®device . . . . . . . . . . . . . . . . . . . . . . . . 4-136
Using the USB device . . . . . . . . . . . . . . . . . . . . . . 4-135
Auto defogging system . . . . . . . . . . . . . . . . . . . . . . . . 4-115
Automatic climate control system . . . . . . . . . . . . . . . . 4-94 Air conditioning refrigerant label . . . . . . . . . . . . . 4-110
Automatic heating and air conditioning. . . . . . . . . . 4-95
Automatic ventilation . . . . . . . . . . . . . . . . . . . . . . . 4-106
Checking the amount of air conditioner refrigerant and compressor lubricant . . . . . . . . . . . . . . . . . . . . . . 4-109
Climate control air filter. . . . . . . . . . . . . . . . . . . . . 4-109
Manual heating and air conditioning . . . . . . . . . . . . 4-96
System operation . . . . . . . . . . . . . . . . . . . . . . . . . . 4-107
Battery. . . . . . . . . . . . . . . . . . . . . . . . . . . . . . . . . . . . \
. . 7-27 Battery recharging . . . . . . . . . . . . . . . . . . . . . . . . . . 7-28
For best battery service . . . . . . . . . . . . . . . . . . . . . . 7-27
Reset items . . . . . . . . . . . . . . . . . . . . . . . . . . . . . . . . 7-29
Before driving . . . . . . . . . . . . . . . . . . . . . . . . . . . . . . . . . 5-3 Before entering vehicle . . . . . . . . . . . . . . . . . . . . . . . 5-3
Before starting . . . . . . . . . . . . . . . . . . . . . . . . . . . . . . 5-3
Necessary inspections . . . . . . . . . . . . . . . . . . . . . . . . 5-3
Brake fluid . . . . . . . . . . . . . . . . . . . . . . . . . . . . . . . . . . 7-18\
Checking the brake fluid level . . . . . . . . . . . . . . . . . 7-18A
B