Page 7 of 455
2
1
Table of contents
3
4
5
6
7
8I
IntroductionVehicle data collection and event data recorders
Electric Vehicle GuideReview of Electric Vehicle / High voltage battery / Charge / Driving Electric Vehicle / Etc.
Your vehicle at a glance
Exterior overview / Interior overview / Instrument panel overview / Moto\
r room compartment
Safety features of your vehicle
Seats / Seat belts / Child restraint system / Air bag
Features of your vehicleSmart key / Door locks / Tailgate / Windows / Steering wheel / Mirrors / Instrument cluster / Lighting / Etc.
Driving your vehicleBefore driving / POWER button / Active ECO system / Reduction gear / Brake system / Etc.
What to do in an emergencyRoad warning / Emergency while driving / Emergency starting / Vehicle overheat / TPMS / Flat tire / Towing / Etc.
MaintenanceMotor room compartment / Maintenance service / Coolant / Brake fluid / Washer fluid / Lights bulbs / Etc.
Specifications, Consumer information and Reporting safety defects
Index
Page 222 of 455

485
Features of your vehicle
Turn signals and lane change
signals
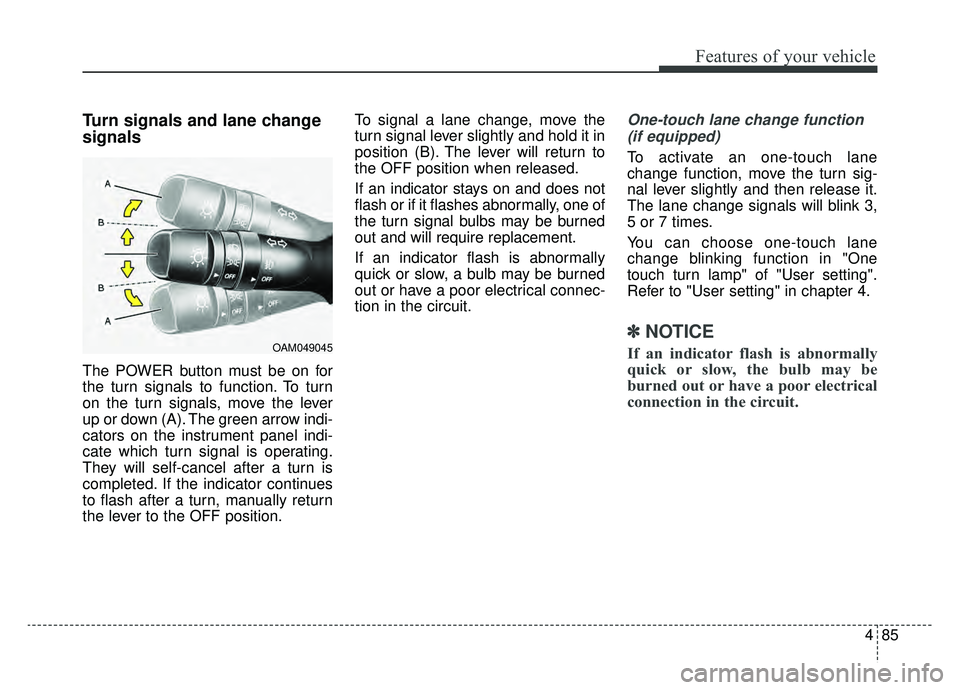
The POWER button must be on for
the turn signals to function. To turn
on the turn signals, move the lever
up or down (A). The green arrow indi-
cators on the instrument panel indi-
cate which turn signal is operating.
They will self-cancel after a turn is
completed. If the indicator continues
to flash after a turn, manually return
the lever to the OFF position.To signal a lane change, move the
turn signal lever slightly and hold it in
position (B). The lever will return to
the OFF position when released.
If an indicator stays on and does not
flash or if it flashes abnormally, one of
the turn signal bulbs may be burned
out and will require replacement.
If an indicator flash is abnormally
quick or slow, a bulb may be burned
out or have a poor electrical connec-
tion in the circuit.
One-touch lane change function
(if equipped)
To activate an one-touch lane
change function, move the turn sig-
nal lever slightly and then release it.
The lane change signals will blink 3,
5 or 7 times.
You can choose one-touch lane
change blinking function in "One
touch turn lamp" of "User setting".
Refer to "User setting" in chapter 4.
✽ ✽ NOTICE
If an indicator flash is abnormally
quick or slow, the bulb may be
burned out or have a poor electrical
connection in the circuit.OAM049045
Page 359 of 455

Maintenance
Motor room compartment. . . . . . . . . . . . . . . . . . . . 7-3
Maintenance services . . . . . . . . . . . . . . . . . . . . . . . . 7-3
• Owner’s responsibility . . . . . . . . . . . . . . . . . . . . . . . . . 7-3
. . . . . . . . . . . . . . . . . 7-4
Owner maintenance . . . . . . . . . . . . . . . . . . . . . . . . . 7-5
Scheduled maintenance service. . . . . . . . . . . . . . . . 7-7
Explanation of scheduled maintenance items . . . 7-13
Coolant . . . . . . . . . . . . . . . . . . . . . . . . . . . . . . . . . . 7-15\
. . . . . . . . . . . . . . . . . . . . . 7-15
. . . . . . . . . . . . . . . . . . . . . . . . . 7-17
Brake fluid . . . . . . . . . . . . . . . . . . . . . . . . . . . . . . . 7-18
. . . . . . . . . . . . . . . . . . 7-18
Washer fluid . . . . . . . . . . . . . . . . . . . . . . . . . . . . . . 7-20
. . . . . . . . . . . . . . . . . 7-20
Climate control air filter . . . . . . . . . . . . . . . . . . . . 7-21
. . . . . . . . . . . . . . . . . . . . . . . . . . . . . . 7-21
. . . . . . . . . . . . . . . . . . . . . . . . . . . . 7-21
Wiper blades . . . . . . . . . . . . . . . . . . . . . . . . . . . . . . 7-23
. . . . . . . . . . . . . . . . . . . . . . . . . . . . . . 7-23
. . . . . . . . . . . . . . . . . . . . . . . . . . . . 7-23
Battery . . . . . . . . . . . . . . . . . . . . . . . . . . . . . . . . . . . 7-\
27
. . . . . . . . . . . . . . . . . . . . . . . 7-27
. . . . . . . . . . . . . . . . . . . . . . . . . . . 7-28
. . . . . . . . . . . . . . . . . . . . . . . . . . . . . . . . . . 7-29\
Tires and wheels . . . . . . . . . . . . . . . . . . . . . . . . . . . 7-30
. . . . . . . . . . . . . . . . . . . . . . . . . . . . . . . . . . . . \
7-30
. . . . . . . 7-30
. . . . . . . . . . . . . . . . . . . . . . . . . . . . . . . . . 7-32
. . . . . . . . . . . . . . . 7-33
. . . . . . . . . . . . . . . . . . . . . . . . . . . . . 7-34
. . . . . . . . . . . . . . . . . . . . . . . . . . . 7-34
. . . . . . . . . . . . . . . . . . . . . . . . . . . . . . . . . 7-35
. . . . . . . . . . . . . . . . . . . . . . . . . . . . . 7-35
. . . . . . . . . . . . . . . . . . . . . . . . . 7-35
Fuses . . . . . . . . . . . . . . . . . . . . . . . . . . . . . . . . . . . . \
7-45
. . . . . . . . . . . . . . . . . . . 7-47
. . . . . . . . . . . 7-48
Light bulbs . . . . . . . . . . . . . . . . . . . . . . . . . . . . . . . 7-57
. . . . . . . . . . . . . . . . . . . . . . . 7-58
. . . . . . . . . . . . 7-62
. . . . . . . . 7-62
. . . . . . . 7-64
. . . . . . . . . . . . . 7-65
. . . . . . . . . . . . . . . . . 7-66
Appearance care . . . . . . . . . . . . . . . . . . . . . . . . . . . 7-67
. . . . . . . . . . . . . . . . . . . . . . . . . . . . . . . . 7-67
. . . . . . . . . . . . . . . . . . . . . . . . . . . . . . . . . 7-72
California perchlorate notice . . . . . . . . . . . . . . . . 7-74
7
Page 415 of 455

757
Maintenance
LIGHT BULBS
Use only the bulbs of the specifiedwattage.
If you don’t have necessary tools, the correct bulbs and the expertise,
consult an authorized Kia dealer. In
many cases, it is difficult to replace
vehicle light bulbs because other
parts of the vehicle must be
removed before you can get to the
bulb. This is especially true if you
have to remove the headlight
assembly to get to the bulb(s).
Removing/installing the headlight
assembly can result in damage to
the vehicle.
Do not install additional bulb or LED. If you install additional bulbs
or LEDs, the lamps may not oper-
ate properly and there may be
problems in the fuse box or electric
wiring system.
WARNING - Lights
Prior to working on the light,
firmly apply the parking brake,
ensure that the ignition switch
is turned to the LOCK position
and turn off the lights to avoid
sudden movement of the vehi-
cle and burning your fingers or
receiving an electric shock.
CAUTION- Light
replacement
Be sure to replace the burned-out bulb with one of the samewattage rating. Otherwise, itmay cause damage to the fuseor electric wiring system.
Page 416 of 455
Maintenance
58
7
Front light replacement
(1) Headlight (High)
(2) Headlight (Low)
(3) Front position light/
Daytime running light
(if equipped)
(4) Front turn signal
(5) Front side marker light
(6) Front fog light (if equipped) If the headlight aiming adjustment is
necessary after the headlight
assembly is reinstalled, consult an
authorized Kia dealer.
OPSE074016
OHD076046
WARNING- Halogen
bulbs
Handle halogen bulbs with care.
Halogen bulbs contain pres- surized gas that will produce
flying pieces of glass if bro-
ken.
Page 417 of 455
759
Maintenance
Always handle them carefully, andavoid scratches and abrasions. If
the bulbs are lit, avoid contact with
liquids. Never touch the glass with
bare hands. Residual oil may
cause the bulb to overheat and
burst when lit. A bulb should be
operated only when installed in a
headlight.
If a bulb becomes damaged or cracked, replace it immediately
and carefully dispose of it.
Wear eye protection when chang- ing a bulb. Allow the bulb to cool
down before handling it. 1. Turn off the vehicle and open the
hood.
2. Disconnect the power connector from the back of the headlight
assembly.
3. Disconnect the negative batterycable.
4. Loosen the retaining bolts.
OPSE074018
OPSE074019
Page 418 of 455
Maintenance
60
7
5. Pull out the end of the front
bumper.
If you can reach the bulb without
removing the headlight assembly,
you do not need to do step 4,5 and 6.
6. Remove the headlight assembly from the body of the vehicle.Headlight bulb (High, Low)
Follow the steps 1 to 6 from the pre-
vious page.
7. Remove the headlight bulb coverby turning it counterclockwise.
8. Disconnect the headlight bulb socket-connector.
9. Unsnap the headlight bulb retain- ing wire by depressing the end
and pushing it upward.
10. Remove the bulb from the head- light assembly. 11. Install a new headlight bulb and
snap the headlight bulb retaining
wire into position by aligning the
wire with the groove on the bulb.
12. Connect the headlight bulb sock- et connector.
13. Install the headlight bulb cover by turning it clockwise.
14. Connect the power connector to the back of the headlight assem-
bly.
15. Reinstall the headlight assembly to the body of the vehicle.
OPSE074031L
High Low
Page 419 of 455
761
Maintenance
Front turn signal / position light /DRL
LED type
If the light bulb is not operating, have
the vehicle checked by an authorized
Kia dealer.
Front side marker
Follow the steps 1 to 6 from the pre-
vious page.
7.Remove the socket from the assembly by turning the socket
counterclockwise until the tabs on
the socket align with the slots on
the assembly.
8.Pull the bulb out of the socket.
9.Insert a new bulb into the socket.
10. Install the socket into the assem- bly by aligning the tabs on the
socket with the slots on the
assembly and turning the socket
clockwise.
Front fog lamp bulbs
(if equipped)
1. Remove the front bumper under cover.
2. Reach your hand into the back of the front bumper.
OPSE074017
Position
light/DRL
Turn signal light
OPSE076035L
OPSE074029L
OPS073025