2019 KIA SOUL EV ECO mode
[x] Cancel search: ECO modePage 19 of 50

17
ELECTRIC VEHICLE (EV) FEATURES
3:00PMElectric Vehicle
ECO DrivingSet timings for
EV Settings
charging/climate
Available Range Nearby StationsEnergy Information124
2.50 80km km%
3:00PM
Range
AnytownAuto
10 mi
20 km
24 km112
3
3:00PM
Nearby Stations(106)
1.2mi
4.5mi
9.8mi
1.0mi
0.6mi
Distance
3:00PM
ECO DrivingDistance
Mar 18, 2014
Mar 12, 2014
Mar 10, 2014
Mar 08, 2014
Mar 06, 2014
1.86 mi
1.93 mi
14.52 mi
0.00 mi
10.56 mi99.9 mi/kWh
99.9 mi/kWh
99.9 mi/kWh
99.9 mi/kWh
99.9 mi/kWh
ECO Level
History
3:00PM
EV Settings
Warning
EV Route Battery Warning LevelRemaining Charge 25%FrequencyEvery minute
Destination Unreachable
WarningOff
The range warning is displaye if the selected navigation destination is further
than the currently available vehicle range
3:00PM
Energy Information
72 mi
80 %
Battery Information Electricity Use
Range
Expected Charging TimeNormal (120V)
Normal (240V) 1 h 53 m
50 mins
11:13
Jun 2
Jun 2Jun 2
Jun 2
Jun 2
Jun 2
Jun 2
AM
3:00PM
ECO Driving
ECO Level
History
ECO Level4
7.2
Energy
Consumptionmi/kWh
Cancel
Select Charging OptionSet Start Time + 100% ChargeSets Charging Start Time for each day of the week. Charging
will be continued until maximum charge (100%) is reached
Set Start Time + Set End TimeSets Charging Start Time and End Time for each day of the
week
Jun 2
3:00PMElectric Vehicle
ECO Driving Set timings for
EV Settings
charging/climate
Available Range Nearby StationsEnergy Information124
2.50 80km km%
3:00PM
Range
AnytownAuto
10 mi
20 km
24 km112
3
3:00PM
Nearby Stations(106)
1.2mi
4.5mi
9.8mi
1.0mi
0.6mi
Distance
3:00PM
ECO DrivingDistance
Mar 18, 2014
Mar 12, 2014
Mar 10, 2014
Mar 08, 2014
Mar 06, 2014
1.86 mi
1.93 mi
14.52 mi
0.00 mi
10.56 mi99.9 mi/kWh
99.9 mi/kWh
99.9 mi/kWh
99.9 mi/kWh
99.9 mi/kWh
ECO Level
History
3:00PM
EV Settings
Warning
EV Route Battery Warning LevelRemaining Charge 25%FrequencyEvery minute
Destination Unreachable
WarningOff
The range warning is displaye if the selected navigation destination is further
than the currently available vehicle range
3:00PM
Energy Information
72 mi
80 %
Battery Information Electricity Use
Range
Expected Charging TimeNormal (120V)
Normal (240V) 1 h 53 m
50 mins
11:13
Jun 2
Jun 2
Jun 2
Jun 2
Jun 2
Jun 2
Jun 2
AM
3:00PM
ECO Driving
ECO Level
History
ECO Level4
7.2
Energy
Consumptionmi/kWh
Cancel
Select Charging OptionSet Start Time + 100% ChargeSets Charging Start Time for each day of the week. Charging
will be continued until maximum charge (100%) is reached
Set Start Time + Set End TimeSets Charging Start Time and End Time for each day of the
week
Jun 2
3:00PMElectric Vehicle
ECO Driving Set timings for
EV Settings
charging/climate
Available Range Nearby StationsEnergy Information124
2.50 80km km%
3:00PM
Range
AnytownAuto
10 mi
20 km
24 km112
3
3:00PM
Nearby Stations(106)
1.2mi
4.5mi
9.8mi
1.0mi
0.6mi
Distance
3:00PM
ECO DrivingDistance
Mar 18, 2014
Mar 12, 2014
Mar 10, 2014
Mar 08, 2014
Mar 06, 2014
1.86 mi
1.93 mi
14.52 mi
0.00 mi
10.56 mi99.9 mi/kWh
99.9 mi/kWh
99.9 mi/kWh
99.9 mi/kWh
99.9 mi/kWh
ECO Level
History
3:00PM
EV Settings
Warning
EV Route Battery Warning LevelRemaining Charge 25%FrequencyEvery minute
Destination Unreachable
WarningOff
The range warning is displaye if the
selected navigation destination is further
than the currently available vehicle range
3:00PM
Energy Information
72 mi
80 %
Battery Information Electricity Use
Range
Expected Charging TimeNormal (120V)
Normal (240V) 1 h 53 m
50 mins
11:13
Jun 2
Jun 2
Jun 2
Jun 2
Jun 2
Jun 2
Jun 2
AM
3:00PM
ECO Driving
ECO Level History
ECO Level4
7.2
Energy
Consumptionmi/kWh
Cancel
Select Charging OptionSet Start Time + 100% ChargeSets Charging Start Time for each day of the week. Charging
will be continued until maximum charge (100%) is reached
Set Start Time + Set End TimeSets Charging Start Time and End Time for each day of the
week
Jun 2
3:00PMElectric Vehicle
ECO Driving Set timings for
EV Settings
charging/climate
Available Range Nearby StationsEnergy Information124
2.50 80km km%
3:00PM
Range
AnytownAuto
10 mi
20 km
24 km112
3
3:00PM
Nearby Stations(106)
1.2mi
4.5mi
9.8mi
1.0mi
0.6mi
Distance
3:00PM
ECO DrivingDistance
Mar 18, 2014
Mar 12, 2014
Mar 10, 2014
Mar 08, 2014
Mar 06, 2014
1.86 mi
1.93 mi
14.52 mi
0.00 mi
10.56 mi99.9 mi/kWh
99.9 mi/kWh
99.9 mi/kWh
99.9 mi/kWh
99.9 mi/kWh
ECO Level
History
3:00PM
EV Settings
Warning
EV Route Battery Warning LevelRemaining Charge 25%FrequencyEvery minute
Destination Unreachable
WarningOff
The range warning is displaye if the selected navigation destination is further
than the currently available vehicle range
3:00PM
Energy Information
72 mi
80 %
Battery Information Electricity Use
Range
Expected Charging TimeNormal (120V)
Normal (240V) 1 h 53 m
50 mins
11:13
Jun 2
Jun 2
Jun 2
Jun 2
Jun 2
Jun 2
Jun 2AM
3:00PM
ECO Driving
ECO Level
History
ECO Level4
7.2
Energy
Consumptionmi/kWh
Cancel
Select Charging OptionSet Start Time + 100% ChargeSets Charging Start Time for each day of the week. Charging
will be continued until maximum charge (100%) is reached
Set Start Time + Set End TimeSets Charging Start Time and End Time for each day of the
week
Jun 2
EV Mode AVN Screen Video
To view a video on your mobile device, snap this QR Code or visit the listed website
Refer to page 2 for more information
www.youtube.com/KiaFeatureVideos
QR CODEEV Mode* - UVO eco with Navigation (Continued)
Energy Information - Displays battery charge
information and electrical power consumption
ECO Driving - Displays ECO level information and
ECO driving history
Set timings for charging/climate - Allows you
to select the time and date you wish to reserve for
automatic charging and automatic climate control
EV Settings - Allows the user to change the EV
warning alarm settings
See Owner’s’ Manual for more detailed information on screens.
These illustrations are for demonstration purposes only. Some items may appear different or vary in illustrations.
Page 22 of 50
STEERING WHEEL CONTROLS
20SOUL EV FEATURES & FUNCTIONS GUIDE*IF EQUIPPED †LEGAL DISCL AIMERS ON BACK INSIDE COVER
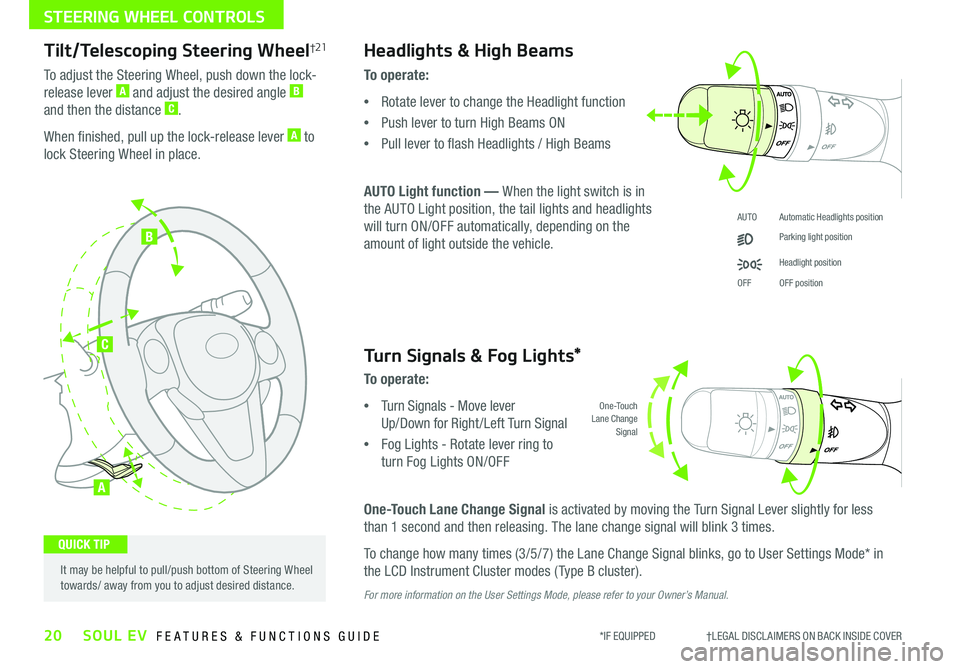
AUTOAutomatic Headlights position
Parking light position
Headlight position
OFFOFF position
O ne -Touch Lane Change Signal
B
C
A
Tilt/Telescoping Steering Wheel†21
To adjust the Steering Wheel, push down the lock-
release lever A and adjust the desired angle B
and then the distance C
When finished, pull up the lock-release lever A to
lock Steering Wheel in place
Headlights & High Beams
To operate:
•Rotate lever to change the Headlight function
•Push lever to turn High Beams ON
•Pull lever to flash Headlights / High Beams
AUTO Light function — When the light switch is in
the AUTO Light position, the tail lights and headlights
will turn ON/OFF automatically, depending on the
amount of light outside the vehicle
Turn Signals & Fog Lights*
To operate:
•Turn Signals - Move lever
Up/Down for Right /Left Turn Signal
•Fog Lights - Rotate lever ring to
turn Fog Lights ON/OFF
One-Touch Lane Change Signal is activated by moving the Turn Signal Lever slightly for less
than 1 second and then releasing The lane change signal will blink 3 times
To change how many times (3/5/7) the Lane Change Signal blinks, go to User Settings Mode* in
the LCD Instrument Cluster modes ( Type B cluster)
For more information on the User Settings Mode, please refer to your Owner’s Manual.
It may be helpful to pull/push bottom of Steering Wheel towards/ away from you to adjust desired distance
QUICK TIP
Page 24 of 50

22SOUL EV FEATURES & FUNCTIONS GUIDE*IF EQUIPPED †LEGAL DISCL AIMERS ON BACK INSIDE COVER
STEERING WHEEL CONTROLS
FlexSteer™ Steering Wheel Mode Video To view a video on your mobile device, snap this QR Code or visit the listed website
Refer to page 2 for more information
www.youtube.com/KiaFeatureVideos
Steering Mode Steering ModeSteering Mode
NORMALSPORTCOMFOR T
SET
CRUISE
RES
CANCELMODE
VOL
VOL
MODEMODEA
(Button located on Steering Wheel)
QR CODEFlexSteer™ Steering Wheel Mode†19
Select the desired steering mode by toggling through the
steering modes
• Press FlexSteer™ Steering Wheel Mode button A to
display the steering mode on the LCD screen
• Then press the button A again within 4 seconds to
switch modes
Your vehicle’s steering wheel buttons may differ from those in the illustrations. See your Owner’s Manual for more details.
These illustrations are for demonstration purposes only. Some items may appear different or vary in illustrations.
Page 25 of 50
23
STEERING WHEEL CONTROLS
ALWAYS CHECK THE OWNER’S MANUAL FOR COMPLETE OPER ATING INFORMATION AND SAFET Y WARNINGS *IF EQUIPPED †LEGAL DISCL AIMERS ON BACK INSIDE COVERALWAYS CHECK THE OWNER’S MANUAL FOR COMPLETE OPER ATING INFORMATION AND SAFET Y WARNINGS *IF EQUIPPED †LEGAL DISCL AIMERS ON BACK INSIDE COVER
For further audio system operations, refer to page 24.
SET
CRUISE
RES
CANCELMODE
VOL
VOL
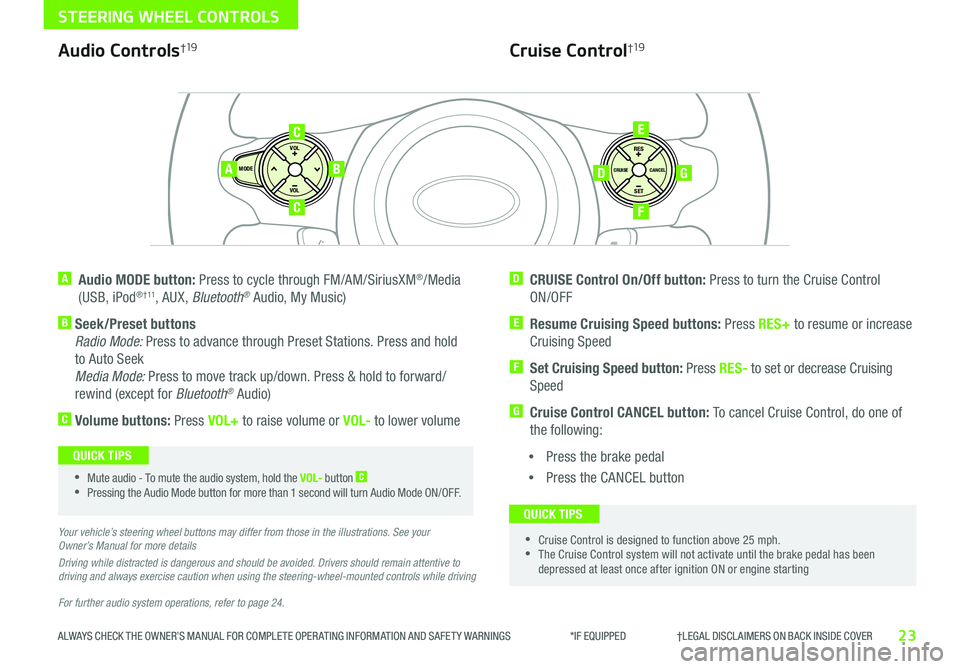
AB
C
E
GD
F
Audio Controls†19
A Audio MODE button: Press to cycle through FM/AM/SiriusXM®/Media
(USB, iPod® † 11, AUX, Bluetooth® Audio, My Music)
B Seek/Preset buttons
Radio Mode: Press to advance through Preset Stations Press and hold
to Auto Seek
Media Mode: Press to move track up/down Press & hold to forward/
rewind (except for Bluetooth® Audio)
C Volume buttons: Press VOL+ to raise volume or VOL- to lower volume
D CRUISE Control On/Off button: Press to turn the Cruise Control
ON/OFF
E Resume Cruising Speed buttons: Press RES+ to resume or increase
Cruising Speed
F
Set Cruising Speed button: Press RES- to set or decrease Cruising
Speed
G Cruise Control CANCEL button: To cancel Cruise Control, do one of
the following:
•Press the brake pedal
•Press the CANCEL button
Cruise Control†19
•Mute audio - To mute the audio system, hold the VOL- button C
•Pressing the Audio Mode button for more than 1 second will turn Audio Mode ON/OFF
QUICK TIPS
•Cruise Control is designed to function above 25 mph •The Cruise Control system will not activate until the brake pedal has been depressed at least once after ignition ON or engine starting
QUICK TIPS
Your vehicle’s steering wheel buttons may differ from those in the illustrations. See your Owner’s Manual for more details
Driving while distracted is dangerous and should be avoided. Drivers should remain attentive to driving and always exercise caution when using the steering-wheel-mounted controls while driving
C
Page 26 of 50
24SOUL EV FEATURES & FUNCTIONS GUIDE
STEERING WHEEL CONTROLS
*IF EQUIPPED †LEGAL DISCL AIMERS ON BACK INSIDE COVER
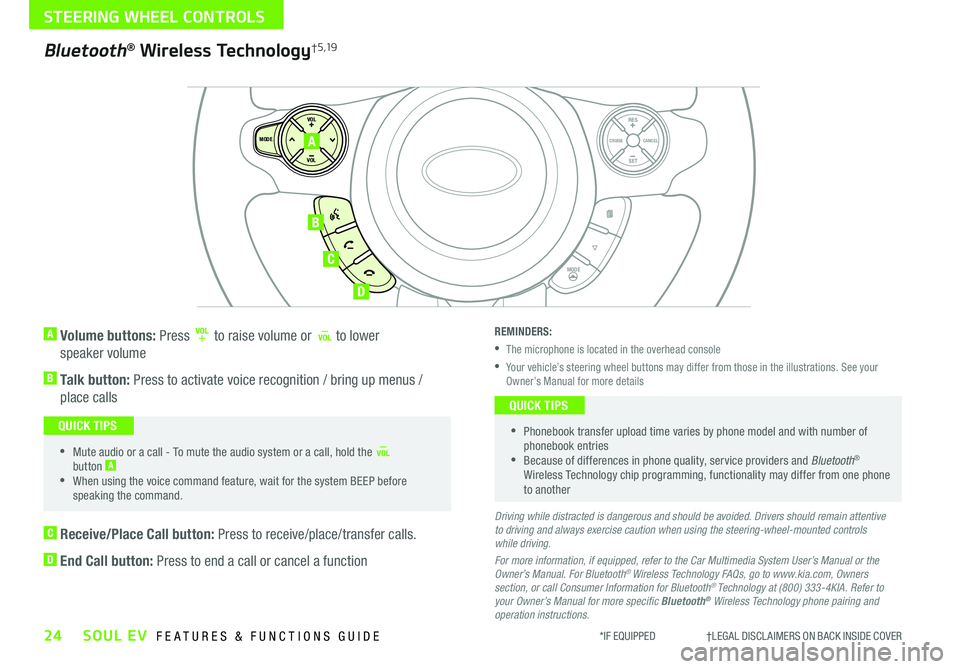
A Volume buttons: Press to raise volume or to lower
speaker volume
B Talk button: Press to activate voice recognition / bring up menus /
place calls
•Mute audio or a call - To mute the audio system or a call, hold the button A
•When using the voice command feature, wait for the system BEEP before speaking the command
QUICK TIPS
SET
CRUISE
RES
CANCELMODE
VOL
VOL
MODE
A
B
C
D
Bluetooth® Wireless Technology† 5 ,19
C Receive/Place Call button: Press to receive/place/transfer calls
D End Call button: Press to end a call or cancel a function
REMINDERS:
•The microphone is located in the overhead console
•
Your vehicle’s steering wheel buttons may differ from those in the illustrations See your Owner’s Manual for more details
•
Phonebook transfer upload time varies by phone model and with number of phonebook entries •Because of differences in phone quality, service providers and Bluetooth® Wireless Technology chip programming, functionality may differ from one phone to another
QUICK TIPS
Driving while distracted is dangerous and should be avoided. Drivers should remain attentive to driving and always exercise caution when using the steering-wheel-mounted controls while driving.
For more information, if equipped, refer to the Car Multimedia System User’s Manual or the Owner’s Manual. For Bluetooth® Wireless Technology FAQs, go to www.kia.com, Owners section, or call Consumer Information for Bluetooth® Technology at (800) 333-4KIA. Refer to your Owner’s Manual for more specific Bluetooth® Wireless Technology phone pairing and operation instructions.
Page 27 of 50
*IF EQUIPPED 25ALWAYS CHECK THE OWNER’S MANUAL FOR COMPLETE OPER ATING INFORMATION AND SAFET Y WARNINGS
STEERING WHEEL CONTROLS
Voice Recognition and Phone Contact Tips
To help optimize the Bluetooth® Wireless
Technology Voice Recognition system, below
are some tips and reminders Improve the
performance by making a few simple changes
to your phone contacts:
•Use full names (first and last names) vs
short or single-syllable names (“John
Smith” vs “Dad," “Smith Residence” vs
“Home”)
•Avoid using special characters, emojis or
hyphenated names (@, &, #, /, -, *, +, etc )
•Avoid using acronyms (“In Case of
Emergency” vs “ICE”) or words with
all capital letters
•Spell words completely, no abbreviations
(“Doctor Smith” vs “Dr Smith”)
The system may have difficulty understanding
some accents or uncommon names Below are
other tips to optimize using the voice recognition
Voice Recognition Tips Video To view a video on your mobile device, snap this QR Code or visit the listed website
Refer to page 2 for more information
www.youtube.com/KiaFeatureVideos
QR CODEBluetooth® Wireless Technology (Continued)
Pairing a Phone
For instructions on how to pair a phone, refer to the audio system’s
user’s guide or your vehicle’s Quick Start Guide
During the pairing process, be sure to accept the connection requests on the phone for phonebook download and to allow acceptance of all future Bluetooth® connection requests
QUICK TIP
How to Place a Call
When using the voice command feature, wait for the system BEEP
before speaking the command
There are two options for placing a call:
• Option 1: Press the Receive/Place Call button C (displays the
phone screen with number keypad or call history)
• Option 2: Press the Talk button B Then say the command
“Call {name}” or “Dial {number}”
•
When placing a call, speak in a natural, moderate tone, with clear pronunciation The system may have trouble recognizing commands if you speak too soft or too loud
• Always wait for the beep before speaking any commands
• Close windows and sunroof and turn off A /C - Open windows, sunroof, weather (wind/rain), or an A /C fan operating at higher speeds can interfere with Voice Recognition
• Press the talk button and say “Help” to get a list of available commands
QUICK TIPS
Page 30 of 50
AUDIO SYSTEMS
28SOUL EV FEATURES & FUNCTIONS GUIDE*IF EQUIPPED †LEGAL DISCL AIMERS ON BACK INSIDE COVER
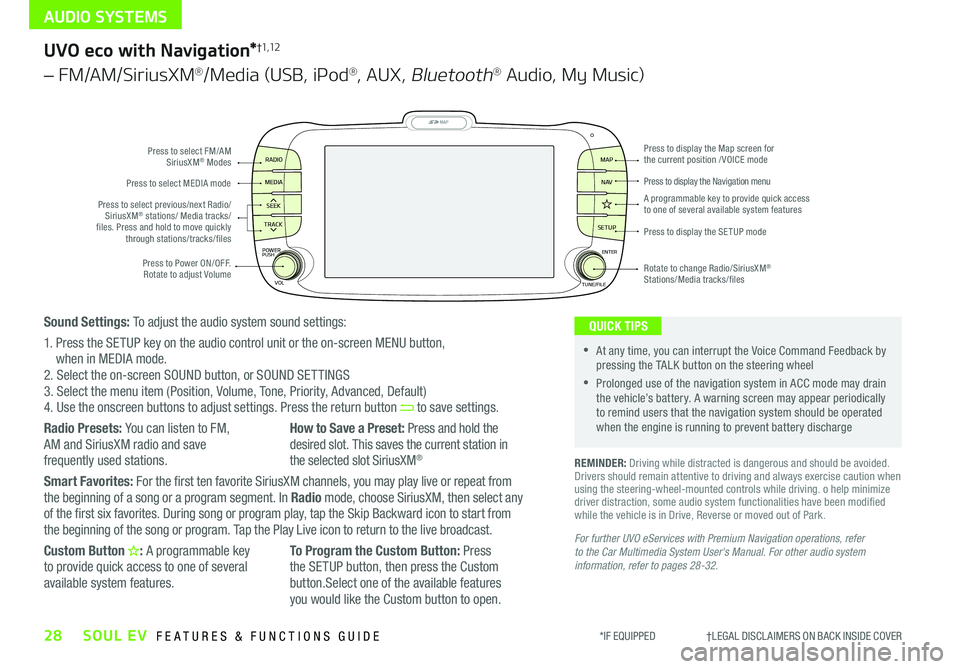
MAP
SEEK
TRACK
RADIO
MEDIA
SETUP
MAP NA V
POWER
VOLENTER
TUNE/FILE
PUSHPress to Power ON/OFF Rotate to adjust Volume
Press to select FM/AM SiriusXM® Modes
Press to select MEDIA mode
Rotate to change Radio/SiriusXM® Stations/Media tracks/files
Press to display the Map screen for the current position / VOICE mode
Press to display the Navigation menu
Press to display the SE TUP mode
A programmable key to provide quick access to one of several available system featuresPress to select previous/next Radio/SiriusXM® stations/ Media tracks/ files Press and hold to move quickly through stations/tracks/files
UVO eco with Navigation*†1,12
– FM/AM/SiriusXM®/Media (USB, iPod®, AUX, Bluetooth® Audio, My Music)
For further UVO eServices with Premium Navigation operations, refer to the Car Multimedia System User's Manual. For other audio system information, refer to pages 28-32.
REMINDER: Driving while distracted is dangerous and should be avoided Drivers should remain attentive to driving and always exercise caution when using the steering-wheel-mounted controls while driving o help minimize driver distraction, some audio system functionalities have been modified while the vehicle is in Drive, Reverse or moved out of Park
•At any time, you can interrupt the Voice Command Feedback by pressing the TALK button on the steering wheel
•Prolonged use of the navigation system in ACC mode may drain the vehicle’s battery A warning screen may appear periodically to remind users that the navigation system should be operated when the engine is running to prevent battery discharge
QUICK TIPSSound Settings: To adjust the audio system sound settings:
1 Press the SETUP key on the audio control unit or the on-screen MENU button, when in MEDIA mode 2 Select the on-screen SOUND button, or SOUND SET TINGS3 Select the menu item (Position, Volume, Tone, Priority, Advanced, Default)4 Use the onscreen buttons to adjust settings Press the return button to save settings
Radio Presets: You can listen to FM, AM and SiriusXM radio and save
frequently used stations
How to Save a Preset: Press and hold the desired slot This saves the current station in
the selected slot SiriusXM®
Smart Favorites: For the first ten favorite SiriusXM channels, you may play live or repeat from the beginning of a song or a program segment In Radio mode, choose SiriusXM, then select any of the first six favorites During song or program play, tap the Skip Backward icon to start from the beginning of the song or program Tap the Play Live icon to return to the live broadcast
Custom Button : A programmable key to provide quick access to one of several available system features
To Program the Custom Button: Press the SETUP button, then press the Custom button Select one of the available features you would like the Custom button to open
Page 32 of 50
30*IF EQUIPPED SOUL EV FEATURES & FUNCTIONS GUIDE
CENTER PANEL
EV A /C and Driver Only Ventilation Video To view a video on your mobile device, snap this QR Code or visit the listed website
Refer to page 2 for more information
www.youtube.com/KiaFeatureVideos
QR CODES
AUTO
OFF
FRONT
DRIVER
EV
HEAT
REAR
ONLY
A/C MODE
CLIMATE
P
A SSE NGE R
A IR BA G
DRIVER
EV
ONLYPA SSE NGE R
A IR BA G
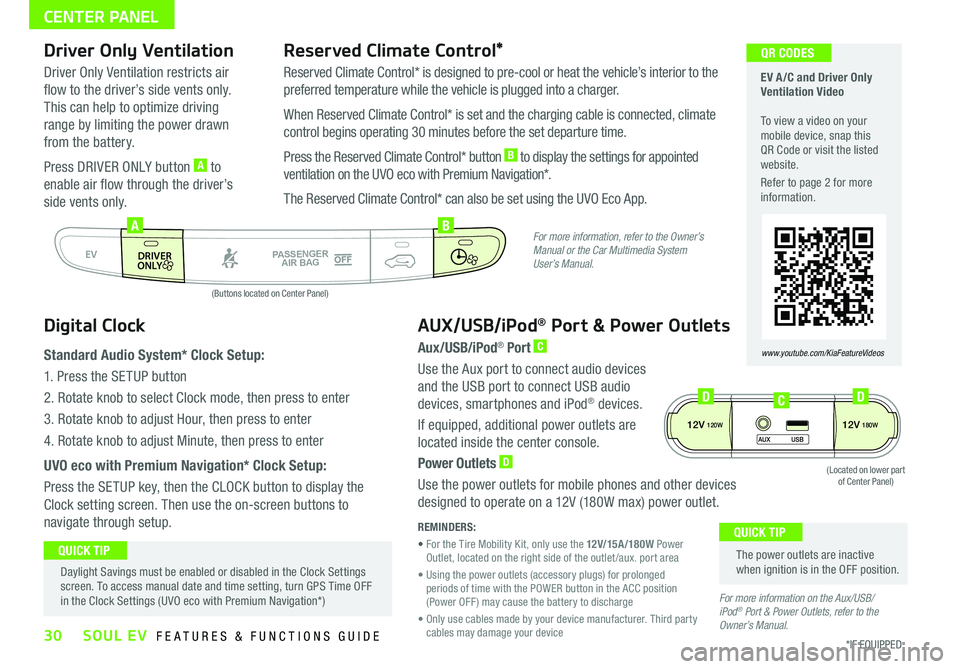
AB
(Buttons located on Center Panel)
Driver Only Ventilation
Driver Only Ventilation restricts air
flow to the driver’s side vents only
This can help to optimize driving
range by limiting the power drawn
from the battery
Press DRIVER ONLY button A to
enable air flow through the driver’s
side vents only
Reserved Climate Control*
Reserved Climate Control* is designed to pre-cool or heat the vehicle’s interior to the
preferred temperature while the vehicle is plugged into a charger
When Reserved Climate Control* is set and the charging cable is connected, climate
control begins operating 30 minutes before the set departure time
Press the Reserved Climate Control* button B to display the settings for appointed
ventilation on the UVO eco with Premium Navigation*
The Reserved Climate Control* can also be set using the UVO Eco App
Digital Clock
Standard Audio System* Clock Setup:
1 Press the SETUP button
2 Rotate knob to select Clock mode, then press to enter
3 Rotate knob to adjust Hour, then press to enter
4 Rotate knob to adjust Minute, then press to enter
UVO eco with Premium Navigation* Clock Setup:
Press the SETUP key, then the CLOCK button to display the
Clock setting screen Then use the on-screen buttons to
navigate through setup
AUX/USB/iPod® Port & Power Outlets
Aux/USB/iPod® Port C
Use the Aux port to connect audio devices
and the USB port to connect USB audio
devices, smartphones and iPod® devices
If equipped, additional power outlets are
located inside the center console
Power Outlets D
Use the power outlets for mobile phones and other devices
designed to operate on a 12V (180W max) power outlet
REMINDERS:
• For the Tire Mobility Kit, only use the 12V/15A/180W Power Outlet, located on the right side of the outlet /aux port area
• Using the power outlets (accessory plugs) for prolonged periods of time with the POWER button in the ACC position (Power OFF ) may cause the battery to discharge
• Only use cables made by your device manufacturer Third party cables may damage your device
The power outlets are inactive when ignition is in the OFF position
QUICK TIP Daylight Savings must be enabled or disabled in the Clock Settings screen To access manual date and time setting, turn GPS Time OFF in the Clock Settings (UVO eco with Premium Navigation*)
QUICK TIP
For more information, refer to the Owner’s Manual or the Car Multimedia System User’s Manual.
For more information on the Aux/USB/ iPod® Port & Power Outlets, refer to the Owner’s Manual.
12V120W12V180W
AUX USB
(Located on lower part of Center Panel)
DDC