2019 KIA SORENTO display
[x] Cancel search: displayPage 90 of 573

• Tilting the sunroof . . . . . . . . . . . . . . . . . . . . . . . . . . . 4-55
• Closing the sunroof . . . . . . . . . . . . . . . . . . . . . . . . . . . 4-55
• Resetting the sunroof . . . . . . . . . . . . . . . . . . . . . . . . . 4-56
Steering wheel . . . . . . . . . . . . . . . . . . . . . . . . . . . . . 4-57
• Electric Power Steering (EPS) . . . . . . . . . . . . . . . . . . 4-57
• Tilt and telescopic steering . . . . . . . . . . . . . . . . . . . . . 4-58
• Heated steering wheel . . . . . . . . . . . . . . . . . . . . . . . . . 4-59
• Horn . . . . . . . . . . . . . . . . . . . . . . . . . . . . . . . . . . . . \
. . . 4-60
Mirrors . . . . . . . . . . . . . . . . . . . . . . . . . . . . . . . . . . 4-61\
• Inside rearview mirror . . . . . . . . . . . . . . . . . . . . . . . . 4-61
• Outside rearview mirror. . . . . . . . . . . . . . . . . . . . . . . 4-71
Instrument cluster . . . . . . . . . . . . . . . . . . . . . . . . . 4-75
• Instrument cluster control . . . . . . . . . . . . . . . . . . . . . 4-76
• LCD display control . . . . . . . . . . . . . . . . . . . . . . . . . . 4-76
• Gauges . . . . . . . . . . . . . . . . . . . . . . . . . . . . . . . . . . . . \
. 4-77
• Transmission shift indicator . . . . . . . . . . . . . . . . . . . . 4-80
LCD display . . . . . . . . . . . . . . . . . . . . . . . . . . . . . . 4-82
• LCD modes. . . . . . . . . . . . . . . . . . . . . . . . . . . . . . . . . . 4-82\
Trip modes (Trip computer) . . . . . . . . . . . . . . . . . 4-83
• Trip modes . . . . . . . . . . . . . . . . . . . . . . . . . . . . . . . . . . 4-83\
• Fuel economy . . . . . . . . . . . . . . . . . . . . . . . . . . . . . . . . 4-83
• Accumulated driving information mode . . . . . . . . . . 4-85
• One time driving information mode . . . . . . . . . . . . . 4-85
• Digital speedometer . . . . . . . . . . . . . . . . . . . . . . . . . . . 4-86
• Smart shift . . . . . . . . . . . . . . . . . . . . . . . . . . . . . . . . . . 4-86\
• Turn by turn mode . . . . . . . . . . . . . . . . . . . . . . . . . . . 4-86
• Assist mode . . . . . . . . . . . . . . . . . . . . . . . . . . . . . . . . . . 4-87\
• Distance to empty . . . . . . . . . . . . . . . . . . . . . . . . . . . . 4-89
• User settings mode. . . . . . . . . . . . . . . . . . . . . . . . . . . . 4-89
• Warning messages . . . . . . . . . . . . . . . . . . . . . . . . . . . . 4-94
Warning and indicator lights . . . . . . . . . . . . . . . . 4-99
• Warning lights . . . . . . . . . . . . . . . . . . . . . . . . . . . . . . . 4-99
• Indicator lights. . . . . . . . . . . . . . . . . . . . . . . . . . . . . . 4-106
Rear parking assist system . . . . . . . . . . . . . . . . . 4-111
• Operation of the rear parking assist system . . . . . . 4-111
• Non-operational conditions of rear parking assist
system . . . . . . . . . . . . . . . . . . . . . . . . . . . . . . . . . . . . \
4-112
• Rear parking assist system precautions . . . . . . . . . 4-113
Parking assist system . . . . . . . . . . . . . . . . . . . . . . 4-115
• Operation of the parking assist system . . . . . . . . . . 4-115
• Non-operational conditions of parking assist system . . . . . . . . . . . . . . . . . . . . . . . . . . . . . . . . . . . . \
4-117
Rearview camera . . . . . . . . . . . . . . . . . . . . . . . . . 4-120
360° camera monitoring system . . . . . . . . . . . . . 4-121
• Automatic car wash entry support guidelines . . . . 4-122
Lighting . . . . . . . . . . . . . . . . . . . . . . . . . . . . . . . . . 4-123
• Battery saver function. . . . . . . . . . . . . . . . . . . . . . . . 4-123
• Daytime running light . . . . . . . . . . . . . . . . . . . . . . . . 4-123
• Lighting control . . . . . . . . . . . . . . . . . . . . . . . . . . . . . 4-123
• High beam operation. . . . . . . . . . . . . . . . . . . . . . . . . 4-125
4
Page 123 of 573
435
Features of your vehicle
1. Setting
To activate the Smart Power Liftgate,
go to User Settings Mode and select
Smart Power Liftgate on the LCD
display.❈ ❈
For more information, refer to
the “LCD Display” section in
this chapter.
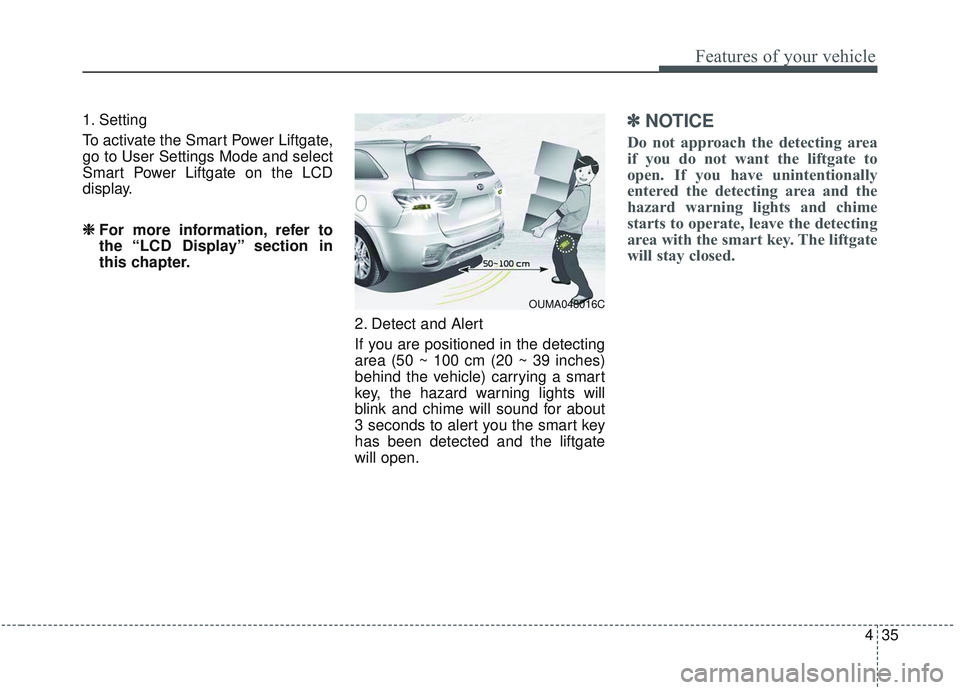
2. Detect and Alert
If you are positioned in the detecting
area (50 ~ 100 cm (20 ~ 39 inches)
behind the vehicle) carrying a smart
key, the hazard warning lights will
blink and chime will sound for about
3 seconds to alert you the smart key
has been detected and the liftgate
will open.✽ ✽NOTICE
Do not approach the detecting area
if you do not want the liftgate to
open. If you have unintentionally
entered the detecting area and the
hazard warning lights and chime
starts to operate, leave the detecting
area with the smart key. The liftgate
will stay closed.
OUMA048016C
Page 133 of 573
445
Features of your vehicle
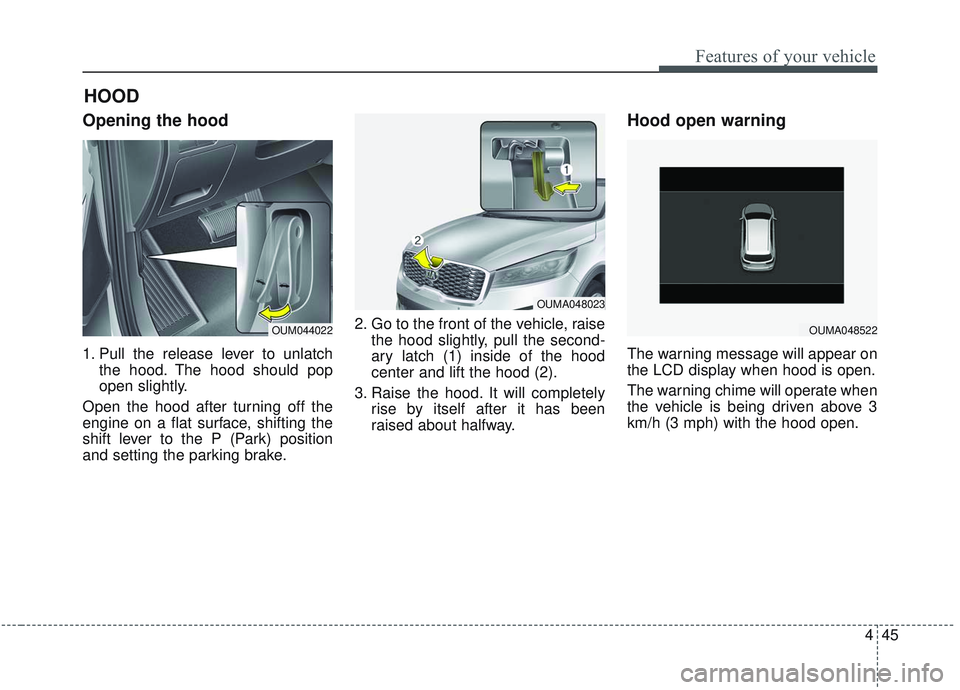
Opening the hood
1. Pull the release lever to unlatchthe hood. The hood should pop
open slightly.
Open the hood after turning off the
engine on a flat surface, shifting the
shift lever to the P (Park) position
and setting the parking brake. 2. Go to the front of the vehicle, raise
the hood slightly, pull the second-
ary latch (1) inside of the hood
center and lift the hood (2).
3. Raise the hood. It will completely rise by itself after it has been
raised about halfway.
Hood open warning
The warning message will appear on
the LCD display when hood is open.
The warning chime will operate when
the vehicle is being driven above 3
km/h (3 mph) with the hood open.
HOOD
OUM044022
OUMA048023
OUMA048522
Page 140 of 573
Features of your vehicle
52
4
Sunroof open warning
(if equipped)
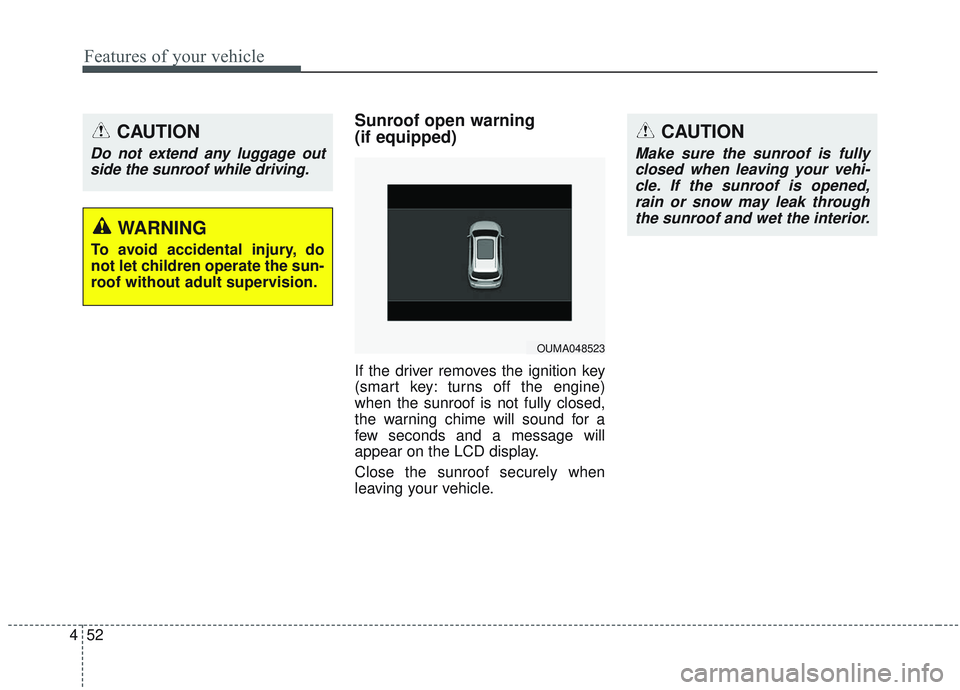
If the driver removes the ignition key
(smart key: turns off the engine)
when the sunroof is not fully closed,
the warning chime will sound for a
few seconds and a message will
appear on the LCD display.
Close the sunroof securely when
leaving your vehicle.
CAUTION
Do not extend any luggage out
side the sunroof while driving.
OUMA048523
CAUTION
Make sure the sunroof is fullyclosed when leaving your vehi-cle. If the sunroof is opened,rain or snow may leak throughthe sunroof and wet the interior.
WARNING
To avoid accidental injury, do
not let children operate the sun-
roof without adult supervision.
Page 151 of 573

463
Features of your vehicle
And telematics buttons are on the
mirror.
(1) Roadside Assist
(2) AVN : UVO Voice Local SearchD-AUDIO, UVO AUDIO : Phone
Projection Map
(3) SOS
(4) Rear light sensorElectric chromic mirror (ECM) with HomeLink®system and com-
pass (if equipped)
Your vehicle may be equipped with a
Gentex Automatic-Dimming Mirror
with a Z-Nav
®Electronic Compass
Display and an Integrated HomeLink®
Wireless Control System.
During nighttime driving, this feature
will automatically detect and reduce
rearview mirror glare while the com-
pass indicates the direction the vehi-
cle is pointed. The HomeLink
®
Universal Transceiver allows you to
activate your garage door(s), electric
gate, home lighting, etc. (1) Roadside Assist button
(2) AVN : UVO Voice Local Search
button
D-AUDIO, UVO AUDIO : Phone
Projection Map button
(3) SOS button
(4) Dimming ON/OFF button
(5) Status indicator LED
(6) Channel 1 button
(7) Channel 2 button
(8) Channel 3 button
(9) Compass display
(10) Rear light sensor
OCK047066C
Page 152 of 573

Features of your vehicle
64
4
Automatic-Dimming Night Vision
Safety™ (NVS®) Mirror
The NVS
®Mirror in your vehicle is
the most advanced way to reduce
annoying glare in the rearview mirror
during any driving situation. For more
information regarding NVS
®mirrors
and other applications, please refer
to the Gentex website:
www.gentex.com
❈ Night Vision Safety™ is a registered
trademark of Gentex Corporation.
Automatic-dimming function
Your mirror will automatically dim
upon detecting glare from the vehi-
cles traveling behind you. The auto-
dimming function can be controlled
by the Dimming ON/OFF Button:
1. Pressing the button turns the auto-dimming function OFF which
is indicated by the green Status
Indicator LED turning off.
2. Pressing the button again turns the auto-dimming function ON
which is indicated by the green
Status Indicator LED turning on.
✽ ✽NOTICE
The mirror defaults to the ON posi-
tion each time the vehicle is started.
Z-Nav™ Compass Display
The NVS
®Mirror in your vehicle is
also equipped with a Z-NAV™
Compass that shows the vehicle
Compass heading in the Display
Window using the 8 basic cardinal
headings (N, NE, E, SE, etc.).
❈ Z-Nav™ is a registered trademark
of Gentex Corporation.
Compass function
The Compass can be turned ON and
OFF and will remember the last state
when the ignition is cycled. To turn
the display feature ON/OFF:
1. Press and release the button to
turn the display feature OFF.
2. Press and release the button
again to turn the display back ON.
Additional options can be set with
press and hold sequences of the
button and are detailed below.
There is a difference between mag-
netic north and true north. The com-
pass in the mirror can compensate
for this difference when it knows the
Magnetic Zone in which it is operat-
ing. This is set either by the dealer or
by the user. The operating Zone
Numbers for North America are
shown in the figure on the following
section.
CAUTION
The NVS®Mirror automatically
reduces glare during driving conditions based upon light lev-els monitored in front of thevehicle and from the rear of thevehicle. These light sensors arevisible through openings in thefront and rear of the mirror case.Any object that obstructs eitherlight sensor will degrade theautomatic dimming control fea-ture.
Page 153 of 573
465
Features of your vehicle
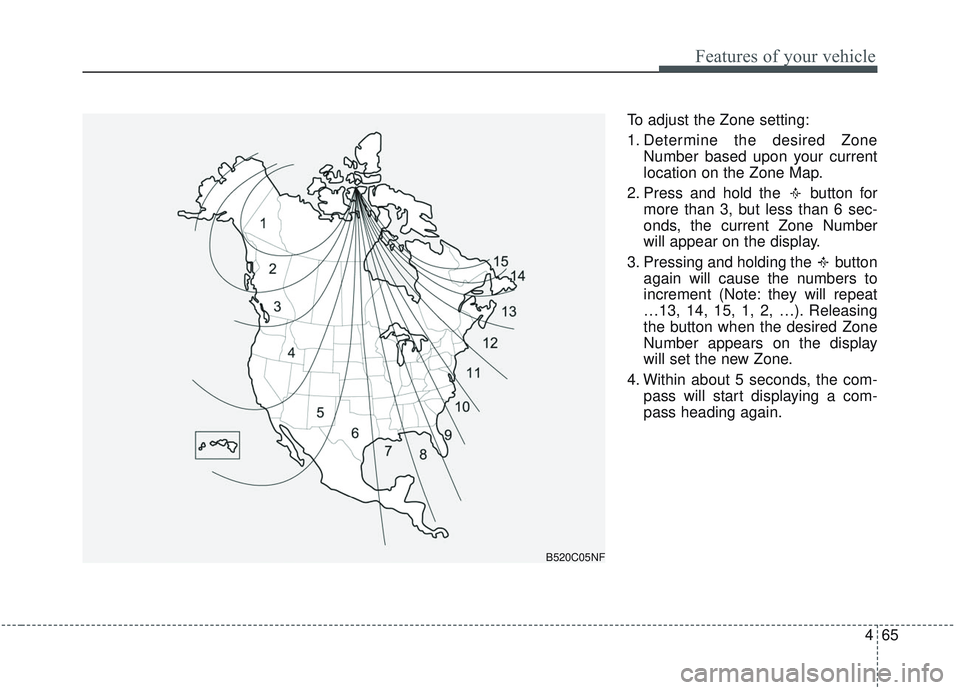
To adjust the Zone setting:
1. Determine the desired ZoneNumber based upon your current
location on the Zone Map.
2. Press and hold the button for more than 3, but less than 6 sec-
onds, the current Zone Number
will appear on the display.
3. Pressing and holding the button again will cause the numbers to
increment (Note: they will repeat
…13, 14, 15, 1, 2, …). Releasing
the button when the desired Zone
Number appears on the display
will set the new Zone.
4. Within about 5 seconds, the com- pass will start displaying a com-
pass heading again.
B520C05NF
Page 154 of 573
Features of your vehicle
66
4
There are some conditions that can
cause changes to the vehicle mag-
nets, such as installing a ski rack or
a CB antenna. Body repair work on
the vehicle can also cause changes
to the vehicle's magnetic field. In
these situations, the compass will
need to be re-calibrated to quickly
correct for these changes. To re-cali-
brate the compass:
1. Press and hold the button for
more than 6 seconds. When the
compass memory is cleared, a "C"
will appear in the display.
2. To calibrate the compass, drive the vehicle in 2 complete circles at
less than 8 km/h (5 mph). Integrated HomeLink®Wireless
Control System
The HomeLink
®Wireless Control
System provides a convenient way to
replace up to three hand-held radio-
frequency (RF) transmitters with a
single built-in device. This innovative
feature will learn the radio frequency
codes of most current transmitters to
operate devices such as gate opera-
tors, garage door openers, entry
door locks, security systems, even
home lighting. Both standard and
rolling code-equipped transmitters
can be programmed by following the
outlined procedures. Additional
HomeLink
®information can be found
at: www.homelink.com or by calling
1-800-355-3515.
❈ HomeLink
®is a registered trade-
mark of Johnson Controls, Inc. Retain the original transmitter of the
RF device you are programming for
use in other vehicles as well as for
future HomeLink
®programming. It is
also suggested that upon the sale of
the vehicle, the programmed
HomeLink
®buttons be erased for
security purposes.