2019 KIA SORENTO warning
[x] Cancel search: warningPage 529 of 573
Maintenance
86
7
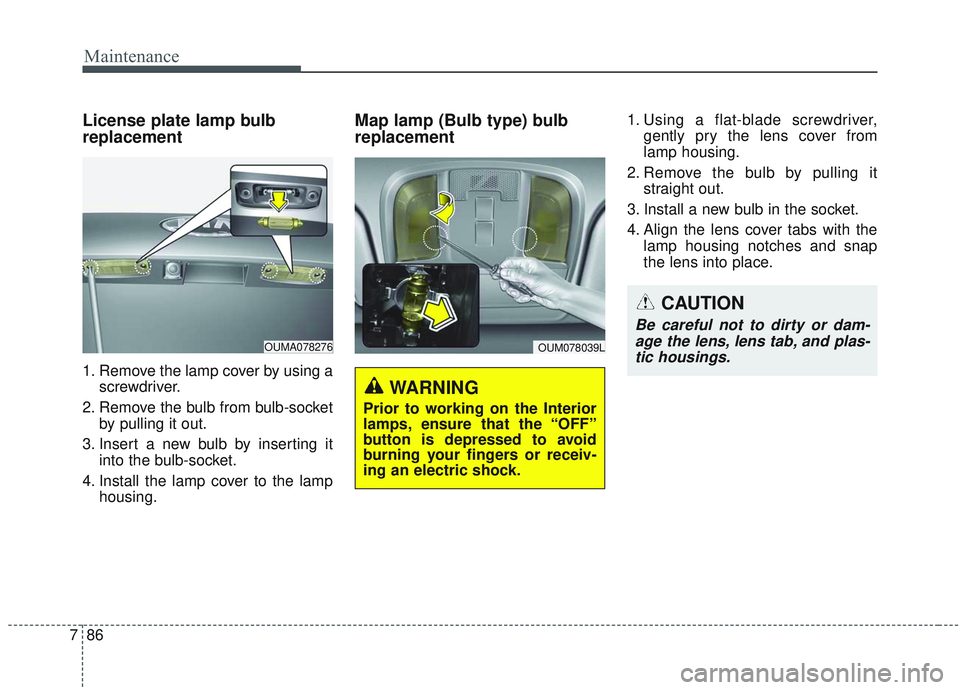
License plate lamp bulb
replacement
1. Remove the lamp cover by using a
screwdriver.
2. Remove the bulb from bulb-socket by pulling it out.
3. Insert a new bulb by inserting it into the bulb-socket.
4. Install the lamp cover to the lamp housing.
Map lamp (Bulb type) bulb
replacement1. Using a flat-blade screwdriver,gently pry the lens cover from
lamp housing.
2. Remove the bulb by pulling it straight out.
3. Install a new bulb in the socket.
4. Align the lens cover tabs with the lamp housing notches and snap
the lens into place.
OUMA078276
CAUTION
Be careful not to dirty or dam-age the lens, lens tab, and plas-tic housings.
OUM078039L
WARNING
Prior to working on the Interior
lamps, ensure that the “OFF”
button is depressed to avoid
burning your fingers or receiv-
ing an electric shock.
Page 530 of 573
787
Maintenance
OUM074040
WARNING
Prior to working on the Interior
lamps, ensure that the “OFF”
button is depressed to avoid
burning your fingers or receiv-
ing an electric shock.
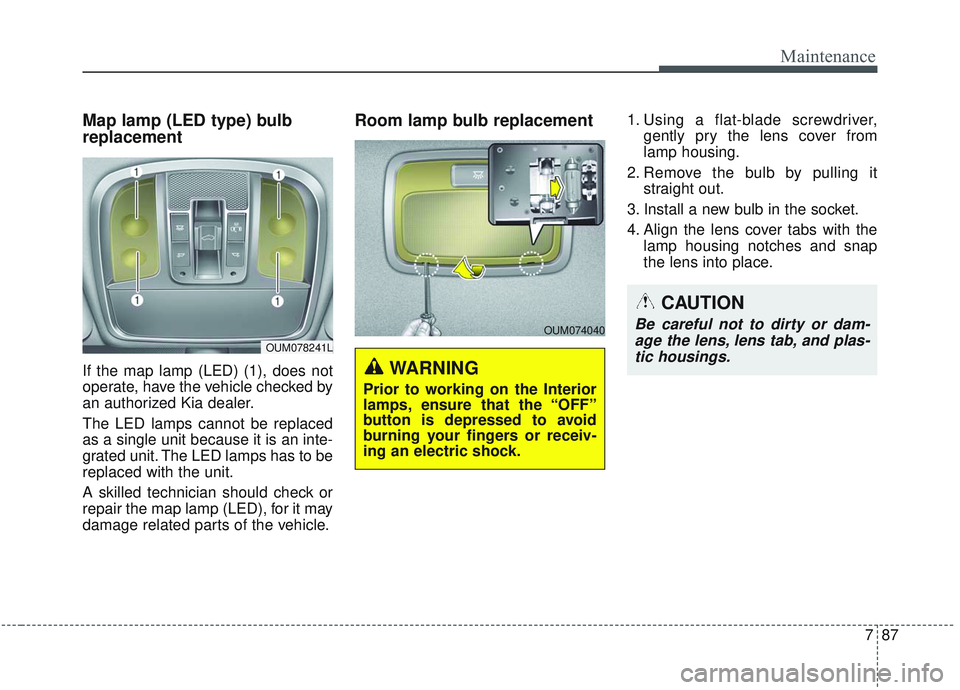
Map lamp (LED type) bulb
replacement
If the map lamp (LED) (1), does not
operate, have the vehicle checked by
an authorized Kia dealer.
The LED lamps cannot be replaced
as a single unit because it is an inte-
grated unit. The LED lamps has to be
replaced with the unit.
A skilled technician should check or
repair the map lamp (LED), for it may
damage related parts of the vehicle.
Room lamp bulb replacement1. Using a flat-blade screwdriver,gently pry the lens cover from
lamp housing.
2. Remove the bulb by pulling it straight out.
3. Install a new bulb in the socket.
4. Align the lens cover tabs with the lamp housing notches and snap
the lens into place.
OUM078241L
CAUTION
Be careful not to dirty or dam-age the lens, lens tab, and plas-tic housings.
Page 532 of 573
789
Maintenance
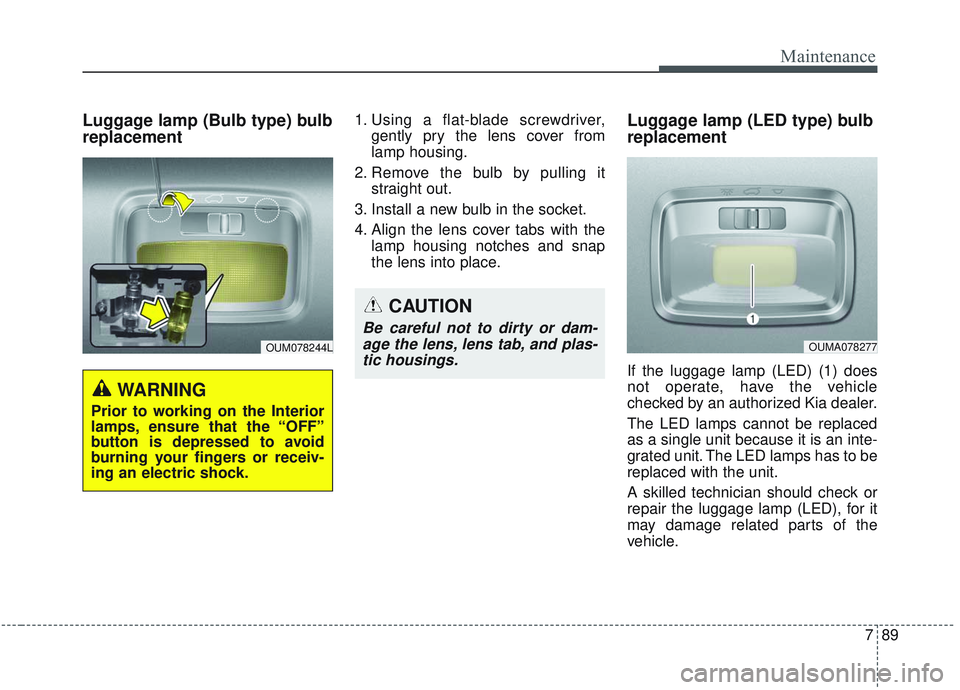
Luggage lamp (Bulb type) bulb
replacement1. Using a flat-blade screwdriver,gently pry the lens cover from
lamp housing.
2. Remove the bulb by pulling it straight out.
3. Install a new bulb in the socket.
4. Align the lens cover tabs with the lamp housing notches and snap
the lens into place.Luggage lamp (LED type) bulb
replacement
If the luggage lamp (LED) (1) does
not operate, have the vehicle
checked by an authorized Kia dealer.
The LED lamps cannot be replaced
as a single unit because it is an inte-
grated unit. The LED lamps has to be
replaced with the unit.
A skilled technician should check or
repair the luggage lamp (LED), for it
may damage related parts of the
vehicle.
WARNING
Prior to working on the Interior
lamps, ensure that the “OFF”
button is depressed to avoid
burning your fingers or receiv-
ing an electric shock.
OUM078244L
CAUTION
Be careful not to dirty or dam-age the lens, lens tab, and plas-tic housings.
OUMA078277
Page 533 of 573
Maintenance
90
7
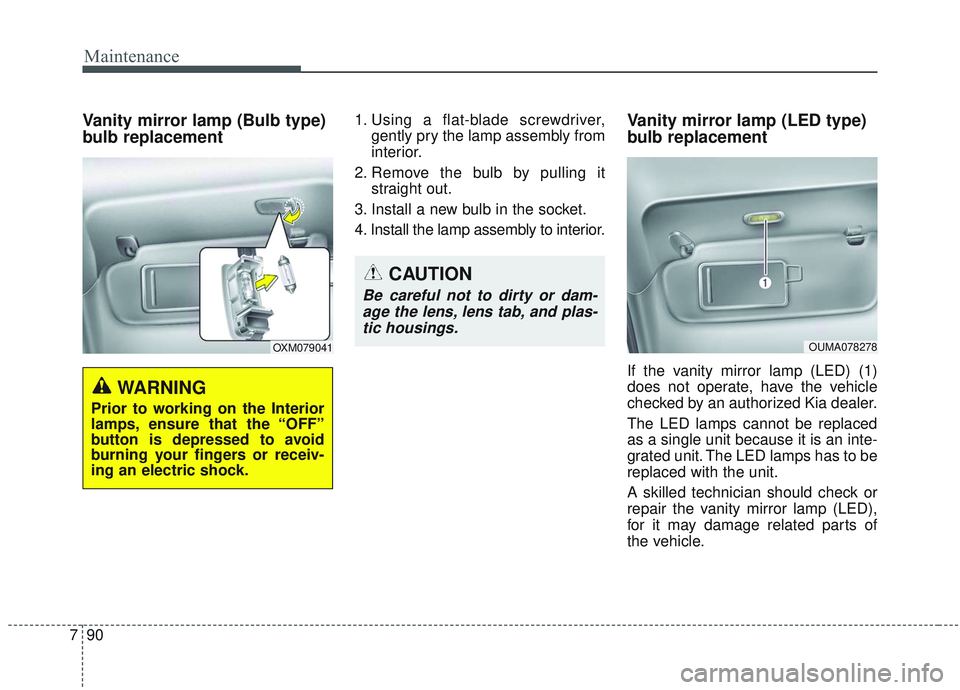
Vanity mirror lamp (Bulb type)
bulb replacement1. Using a flat-blade screwdriver,
gently pry the lamp assembly from
interior.
2. Remove the bulb by pulling it straight out.
3. Install a new bulb in the socket.
4. Install the lamp assembly to interior.Vanity mirror lamp (LED type)
bulb replacement
If the vanity mirror lamp (LED) (1)
does not operate, have the vehicle
checked by an authorized Kia dealer.
The LED lamps cannot be replaced
as a single unit because it is an inte-
grated unit. The LED lamps has to be
replaced with the unit.
A skilled technician should check or
repair the vanity mirror lamp (LED),
for it may damage related parts of
the vehicle.
OXM079041
WARNING
Prior to working on the Interior
lamps, ensure that the “OFF”
button is depressed to avoid
burning your fingers or receiv-
ing an electric shock.
CAUTION
Be careful not to dirty or dam- age the lens, lens tab, and plas-tic housings.
OUMA078278
Page 534 of 573
791
Maintenance
APPEARANCE CARE
Exterior care
Exterior general caution
It is very important to follow the label
directions when using any chemical
cleaner or polish. Read all warning
and caution statements that appear
on the label.
Finish maintenance
Washing
To help protect your vehicle’s finish
from rust and deterioration, wash it
thoroughly and frequently at least
once a month with lukewarm or cold
water.
If you use your vehicle for off-road
driving, you should wash it after each
off-road trip. Pay special attention to
the removal of any accumulation of
salt, dirt, mud, and other foreign mate-
rials. Make sure the drain holes in the
lower edges of the doors and rocker
panels are kept clear and clean.
Insects, tar, tree sap, bird droppings,
industrial pollution and similar
deposits can damage your vehicle’s
finish if not removed immediately.
Even prompt washing with plain water
may not completely remove all these
deposits. A mild soap, safe for use on
painted surfaces, may be used.
After washing, rinse the vehicle thor-
oughly with lukewarm or cold water.
Do not allow soap to dry on the finish.After washing the vehicle, test the
brakes while driving slowly to see if
they have been affected by water. If
braking performance is impaired, dry
the brakes by applying them lightly
while maintaining a slow forward
speed.
CAUTION - Headlight Lens
To prevent damage, do not
clean headlight lens with chem-ical solvents or strong deter-gents.
Page 544 of 573
7101
Maintenance
Canister
Fuel vapors generated inside the fuel
tank are absorbed and stored in the
onboard canister. When the engine is
running, the fuel vapors absorbed in
the canister are drawn into the surge
tank through the purge control sole-
noid valve.
Purge Control Solenoid Valve(PCSV)
The purge control solenoid valve is
controlled by the Engine Control
Module (ECM); when the engine
coolant temperature is low during
idling, the PCSV closes so that evap-
orated fuel is not taken into the
engine. After the engine warms up
during ordinary driving, the PCSV
opens to introduce evaporated fuel to
the engine.
3. Exhaust emission control system
The Exhaust Emission Control
System is a highly effective system
which controls exhaust emissions
while maintaining good vehicle per-
formance.
Vehicle modifications
This vehicle should not be modified.
Modification of your vehicle could
affect its performance, safety or
durability and may even violate gov-
ernmental safety and emissions reg-
ulations.
In addition, damage or performance
problems resulting from any modifi-
cation may not be covered under
warranty.
If you use unauthorized electronic
devices, it may cause the vehicle to
operate abnormally, wire damage,
battery discharge and fire. For your
safety, do not use unauthorized
electronic devices.
Engine exhaust gas precautions
(carbon monoxide)
Carbon monoxide can be present with other exhaust fumes.
Therefore, if you smell exhaust
fumes of any kind inside your vehi-
cle, have it inspected and repaired
immediately. If you ever suspect
exhaust fumes are coming into
your vehicle, drive it only with all
the windows fully open. Have your
vehicle checked and repaired
immediately.
WARNING - Exhaust
Engine exhaust gases contain
carbon monoxide (CO). Though
colorless and odorless, it is
dangerous and could be lethal if
inhaled. Follow the instructions
on this page to avoid CO poi-
soning.
Page 545 of 573
Maintenance
102
7
Do not operate the engine in con-
fined or closed areas (such as
garages) any more than what is
necessary to move the vehicle in or
out of the area.
When the vehicle is stopped in an open area for more than a short
time with the engine running,
adjust the ventilation system (as
needed) to draw outside air into the
vehicle.
Never sit in a parked or stopped vehicle for any extended time with
the engine running.
When the engine stalls or fails to start, excessive attempts to restart
the engine may cause damage to
the emission control system.Operating precautions for catalyt-
ic converters (if equipped)
WARNING- Catalytic converter
Keep away from the catalytic
converter and exhaust system
while the vehicle is running or
immediately thereafter. The
exhaust and catalytic systems
are very hot and may burn you.
WARNING- Fire
Do not park, idle or drive the vehicle over or near flamma-
ble objects, such as grass,
vegetation, paper, leaves, etc.
A hot exhaust system can
ignite flammable items under
your vehicle.
Also, do not remove the heat sink around the exhaust sys-
tem, do not seal the bottom of
the vehicle or do not coat the
vehicle for corrosion control.
It may present a fire risk under
certain conditions.
Page 559 of 573
Index
2I
AC inverter . . . . . . . . . . . . . . . . . . . . . . . . . . . . . . . . . 4-176
Accumulated driving information mode . . . . . . . . . . . 4-85
Adding equipment to or modifying your air bag-equipped vehicle . . . . . . . . . . . . . . . . . . . . . . . . . . . . . . . . . . . 3-\
71
Air bag inflation conditions . . . . . . . . . . . . . . . . . . . . . 3-66
Air bag non-inflation conditions . . . . . . . . . . . . . . . . . 3-68
Air bag warning label . . . . . . . . . . . . . . . . . . . . . . . . . . 3-71
Air bag warning light . . . . . . . . . . . . . . . . . . . . . . . . . . 3-49
Air bags. . . . . . . . . . . . . . . . . . . . . . . . . . . . . . . . . . . . \
. 3-46 Operation . . . . . . . . . . . . . . . . . . . . . . . . . . . . . . . . . 3-47
Air bag warning light . . . . . . . . . . . . . . . . . . . . . . . . 3-49
SRS components and functions . . . . . . . . . . . . . . . . 3-50
Occupant detection system. . . . . . . . . . . . . . . . . . . . 3-53
Driver's and passenger's front air bag . . . . . . . . . . . 3-59
Side air bag. . . . . . . . . . . . . . . . . . . . . . . . . . . . . . . . 3-61
Curtain air bag . . . . . . . . . . . . . . . . . . . . . . . . . . . . . 3-63
Air bag inflation conditions . . . . . . . . . . . . . . . . . . . 3-66
Air bag non-inflation conditions . . . . . . . . . . . . . . . 3-68
SRS Care . . . . . . . . . . . . . . . . . . . . . . . . . . . . . . . . . 3-70
Adding equipment to or modifying your air bag-equipped vehicle . . . . . . . . . . . . . . . . . . . . 3-71
Air bag warning label. . . . . . . . . . . . . . . . . . . . . . . . 3-71
Air cleaner . . . . . . . . . . . . . . . . . . . . . . . . . . . . . . . . . . 7-27\
Filter replacement. . . . . . . . . . . . . . . . . . . . . . . . . . . 7-27
Air conditioning system lubricants. . . . . . . . . . . . . . . . . 8-6 All Wheel Drive (AWD). . . . . . . . . . . . . . . . . . . . . . . . 5-21
All Wheel Drive (AWD) transfer mode selection . . 5-22
For safe all wheel drive operation . . . . . . . . . . . . . . 5-23
Antenna . . . . . . . . . . . . . . . . . . . . . . . . . . . . . . . . . . . . \
4-186
Anti-lock Brake System (ABS) . . . . . . . . . . . . . . . . . . 5-39
Appearance care . . . . . . . . . . . . . . . . . . . . . . . . . . . . . . 7-91 Exterior care . . . . . . . . . . . . . . . . . . . . . . . . . . . . . . . 7-91
Interior care . . . . . . . . . . . . . . . . . . . . . . . . . . . . . . . 7-96
Assist mode. . . . . . . . . . . . . . . . . . . . . . . . . . . . . . . . . . 4-86\
Audio system . . . . . . . . . . . . . . . . . . . . . . . . . . . . . . . 4-186 Antenna . . . . . . . . . . . . . . . . . . . . . . . . . . . . . . . . . 4-186
Steering wheel remote controller . . . . . . . . . . . . . . 4-187
AUX, USB port . . . . . . . . . . . . . . . . . . . . . . . . . . . 4-188
Auto defogging system . . . . . . . . . . . . . . . . . . . . . . . . 4-168
Auto hold . . . . . . . . . . . . . . . . . . . . . . . . . . . . . . . . . . . 5-\
36
Auto light . . . . . . . . . . . . . . . . . . . . . . . . . . . . . . . . . . 4-12\
4
Automatic car wash entry support guidelines . . . . . . 4-122
Automatic climate control system . . . . . . . . . . . . . . . 4-152 Automatic heating and air conditioning. . . . . . . . . 4-153
Manual heating and air conditioning . . . . . . . . . . . 4-154
To cancel or reset the automatic ventilation . . . . . 4-159
Climate control air filter. . . . . . . . . . . . . . . . . . . . . 4-162
Checking the amount of air conditioner refrigerant and compressor lubricant . . . . . . . . . . . . . . . . . . . . . . 4-163
Automatic heating and air conditioning . . . . . . . . . . . 4-153
A