Page 494 of 573

751
Maintenance
FUSES
A vehicle’s electrical system is pro-
tected from electrical overload dam-
age by fuses.
This vehicle has 2 fuse panels, one
located in the driver’s side panel bol-
ster, the other in the engine compart-
ment near the battery.
If any of your vehicle’s lights, acces-
sories, or controls do not work, check
the appropriate circuit fuse. If a fuse
has blown, the element inside the
fuse will melt.
If the electrical system does not
work, first check the driver’s side
fuse panel.
Always replace a blown fuse with
one of the same rating.
If the replacement fuse blows, this
indicates an electrical problem. Avoid
using the system involved and imme-
diately consult an authorized Kia
dealer.
Three kinds of fuses are used: bladetype for lower amperage rating, car-tridge type, and multi fuse for higheramperage ratings.
OUM074043L
Normal
■
Blade type
■ Cartridge type
■ Multi fuse Blown
N N
N N
o o
o o
r r
r r
m m
m m
a a
a a
l l
l l B B
B B
l l
l l
o o
o o
w w
w w
n n
n n
Normal Blo
wn
■
BFT N N
N N
o o
o o
r r
r r
m m
m m
a a
a a
l l
l l B B
B B
l l
l l
o o
o o
w w
w w
n n
n n
WARNING- Fuse replace-
ment
Never replace a fuse with any- thing but another fuse of the
same rating.
A higher capacity fuse could cause damage and possibly a
fire.
Never install a wire or alu- minum foil instead of the
proper fuse - even as a tempo-
rary repair. It may cause
extensive wiring damage and
a possible fire.
Do not arbitrarily modify or add-on electric wiring to the
vehicle.
CAUTION
Do not use a screwdriver or anyother metal object to removefuses because it may cause ashort circuit and damage thesystem.
Page 495 of 573

Maintenance
52
7
✽ ✽
NOTICE
• When replacing fuse, a turn the
ignition “OFF” and turn off
switches of all electrical devices
then remove battery (-) terminal.
• The actual fuse/relay panel label may differ from equipped items.
WARNING- Electrical Fire
Always ensure replacements
fuses and relays are securely
fastened when installed. Failure
to do so can result in a vehicle
fire.
CAUTION
When replacing a blown fuse or relay, make sure the newfuse or relay fits tightly intothe clips. Failure to tightlyinstall the fuse or relay maycause damage to the wiringand electric systems.
Do not remove fuses, relays and terminals fastened withbolts or nuts. The fuses, relaysand terminals may not be fas-tened correctly which maycause vehicle damage.
CAUTION
Do not input any other objects except fuses or relays intofuse/relay terminals such as ascrewdriver or wiring. It maycause contact failure and sys-tem malfunction.
Do not plug in screwdrivers or aftermarket wiring into the ter-minal originally designed forfuse and relays only. The elec-trical system and wiring of thevehicle interior may be dam-aged or burned due to contactfailure.
If you directly connect the wire on the taillight or replacethe bulb which is over the reg-ulated capacity to install trail-ers etc., the inner junctionblock can get burned.
Page 496 of 573

753
Maintenance
✽ ✽NOTICE- Remodeling
Prohibited
Do not rewire your vehicle in any
way as doing so may affect the per-
formance of several safety features
in your vehicle. Rewiring your vehi-
cle may also void your warranty and
cause you to be responsible for any
subsequent vehicle damage which
may result.
✽ ✽ NOTICE- Window tinting pre-
caution
Window tint (especially metallic
film) might cause communication
errors or poor radio reception, and
malfunctioning automatic lighting
system due to reflections from the
mirror tint inside the vehicle. The
solution used might also leak into
the electronic components, causing
malfunctions or damage.
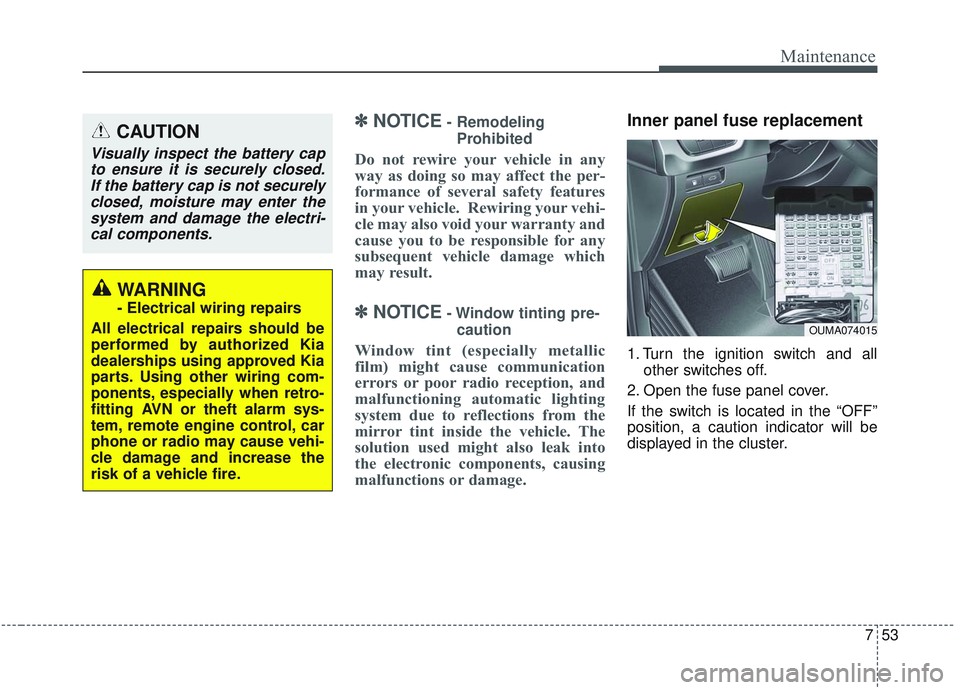
Inner panel fuse replacement
1. Turn the ignition switch and all other switches off.
2. Open the fuse panel cover.
If the switch is located in the “OFF”
position, a caution indicator will be
displayed in the cluster.
CAUTION
Visually inspect the battery cap to ensure it is securely closed.If the battery cap is not securelyclosed, moisture may enter thesystem and damage the electri-cal components.
WARNING
- Electrical wiring repairs
All electrical repairs should be
performed by authorized Kia
dealerships using approved Kia
parts. Using other wiring com-
ponents, especially when retro-
fitting AVN or theft alarm sys-
tem, remote engine control, car
phone or radio may cause vehi-
cle damage and increase the
risk of a vehicle fire.
OUMA074015
Page 502 of 573

759
Maintenance
DescriptionFuse ratingProtected component
AIR BAG IND.10ACluster, A/C Control Module
A/CON 3 30ABlower Motor
A/CON 2 7.5AA/C Control Module (Auto)
START 7.5AE/R Junction Block (Start Relay), Transmission Range Switch
AIR BAG 15ASRS Control Module, Passenger Occupant Detection Sensor
MODULE 2 10A
Crash Pad Switch, Tire Pressure Monitoring Module, 4WD ECM, Lane Departure Warning Module, Console
Switch, Rear Parking Assist Sensor LH/RH, Rear Parking Assist Buzzer, Rear Parking Assist Sensor LH/RH
(Center), Blind Spot Detection Radar LH/RH, Electronic Parking Brake Module, Front Parking Assist Sensor
LH/RH, Front Parking Assist Sensor LH/RH
ACC 10APower Outlet Relay, BCM, Audio, A/V & Navigation Head Unit, Surround View Monitoring Unit, Smart Key
Control Module, AMP, USB Charger, Phone Wireless Charger
MODULE 4 10AHead Lamp Leveling Device Actuator LH/RH, MUT
BRAKE SWITCH 7.5ASmart Key Control Module, Stop Lamp Switch
MODULE 3 10AA/C Control Module, A/V & Navigation Head Unit, Electro Chromic Mirror, Driver IMS Control Module, ATM
Shift Lever Indicator, Rear Seat Warmer LH, Front Air Ventilation Control Module, Front Seat Warmer
Control Module, Dynamic Bending Light Unit
MODULE 1 10ABCM, Stop Lamp Switch, Driver/Passenger Doormodule, Sport Mode Switch
MODULE 815ASmart Key Control Module, Immobilizer Module
Page 504 of 573

761
Maintenance
DescriptionFuse ratingProtected component
HEATED
STEERING 15ABCM
WIPER (RR) 15ARear Wiper Relay, Rear Wiper Motor
A/CON 1 7.5AA/C Control Module, E/R Junction Block (Blower Relay), ICM Relay Box (Rear Blower Motor Relay)
HEATED MIRROR 10AA/C Control Module, Driver/Passenger Power Outside Mirror
MODULE 5 10ABCM, Smart Key Control Module
MODULE 6 7.5ASurround View Monitoring Unit, Rear A/C Control Module, Rear Seat Warmer LH, Front Air Ventilation
Control Module, Front Seat Warmer Control Module, AC Inverter Module, Crash Pad Switch
S/HEATER (RR) 15ARear Seat Warmer LH
S/HEATER (FRT) 20AFront Air Ventilation Control Module, Front Seat Warmer Control Module
P/WINDOW (RH) 25ARear Safety Power Window RH, Rear Power Window Switch RH, Passenger Safety Power Window Module,
Passenger Door Module, Passenger Power Window Switch
AMP 1 25AAMP
MODULE 7 7.5AGateway (MCU B+), Key Solenoid, Tire Pressure Monitoring Module, MUT
INTERIOR LAMP 10AGlove Box Lamp, Ignition Key Ill. & Door Warning Switch, Driver Foot Lamp, Vanity Lamp LH/RH Switch,
Cargo Lamp, Center Room Lamp, Overhead Console Lamp, Rear Personal Lamp LH/RH
FUEL LID 10AFuel Filler & Tail Gate Switch
Page 512 of 573

769
Maintenance
LIGHT BULBS
Bulb replacement precaution
Please keep extra bulbs on hand
with appropriate wattage ratings in
case of emergencies.
Refer to “Bulb Wattage” in chapter 8.
When changing lamps, first turn off
the engine at a safe place, firmly
apply the parking brake and detach
the battery’s negative (-) terminal.
Use only bulbs of the specifiedwattage. net-work failure
The headlamp, taillight, and fog light
may light up when the head lamp
switch is turned ON, and not light up
when the taillight or for light switch is
turned ON. This may be cause by
network failure or vehicle electrical
control system malfunction. If there is
a problem, we recommend the sys-
tem be serviced by an authorized Kia
dealer.
trical control system stabilization
A normally functioning lamp may
flicker momentarily. This momentary
occurrence is due to stabilization
function of the vehicle's electrical on
control system. If the lamp soon
returns to normal, the vehicle does
not require service.
However, if the lamp goes out after
the momentary flickering, or the flick-
ering continues, we recommend the
system be serviced by an authorized
Kia dealer.
WARNING- Working on the lights
Prior to working on the light,
firmly apply the parking brake,
ensure that the ignition switch
is turned to the LOCK position
and turn off the lights to avoid
sudden movement of the vehi-
cle and burning your fingers or
receiving an electric shock.
CAUTION -Light replace-
ment
Be sure to replace the burned- out bulb with one of the samewattage rating. Otherwise, itmay cause damage to the fuseor electric wiring system.
CAUTION -Headlamp
Lens
To prevent damage, do notclean the headlamp lens withchemical solvents or strongdetergents.
Page 517 of 573

Maintenance
74
7
Headlamp bulb Never touch the glass with bare
hands. Residual oil may cause the
bulb to overheat and burst when lit.
A bulb should be operated only
when installed in a headlight.
If a bulb becomes damaged or cracked, replace it immediately
and carefully dispose of it.
Wear eye protection when chang- ing a bulb. Allow the bulb to cool
down before handling it.Headlamp (High beam) bulb
replacement
(Headlamp Type A)
1. Open the hood.
2. Remove the headlamp bulb cover by turning it counterclockwise.
3. Disconnect the headlamp bulb socket-connector.
4. Remove the bulb-socket from the headlamp assembly by turning the
bulb-socket counterclockwise until
the tabs on the bulb-socket align
with the slots on the headlamp
assembly.
WARNING- Halogen
bulbs
Halogen bulbs contain pres- surized gas that will produce
flying pieces of glass if broken.
Always handle them carefully, and avoid scratches and abra-
sions. If the bulbs are lit, avoid
contact with liquids.
OHD076046
OUMA078227
Page 518 of 573
775
Maintenance
5. Install a new bulb-socket assem-bly in the headlamp assembly by
aligning the tabs on the bulb-sock-
et with the slots in the headlamp
assembly. Push the bulb-socket
into the headlamp assembly and
turn the bulb-socket clockwise.
6. Install the headlamp bulb cover by turning it clockwise.Headlamp bulb Never touch the glass with barehands. Residual oil may cause the
bulb to overheat and burst when lit.
A bulb should be operated only
when installed in a headlight.
If a bulb becomes damaged or cracked, replace it immediately
and carefully dispose of it.
Wear eye protection when chang- ing a bulb. Allow the bulb to cool
down before handling it.
WARNING- Halogen
bulbs
Halogen bulbs contain pres- surized gas that will produce
flying pieces of glass if broken.
Always handle them carefully, and avoid scratches and abra-
sions. If the bulbs are lit, avoid
contact with liquids.
OQL075058