2019 KIA SORENTO ac control
[x] Cancel search: ac controlPage 409 of 573
Driving your vehicle
132
5
If you do decide to pull a trailer
Here are some important points if
you decide to pull a trailer:
Consider using a sway control. You
can ask a hitch dealer about sway
control.
Do not do any towing with your vehicle during its first 2,000 km
(1,200 miles) in order to allow the
engine to properly break in. Failure
to heed this caution may result in
serious engine or transmission
damage.
When towing a trailer, be sure to consult an authorized Kia dealer
for further information on additional
requirements such as a towing kit,
etc.
Always drive your vehicle at a mod- erate speed (less than 100 km/h
(60 mph)).
On a long uphill grade, do not exceed 70 km/h (45 mph) or the
posted towing speed limit,
whichever is lower.
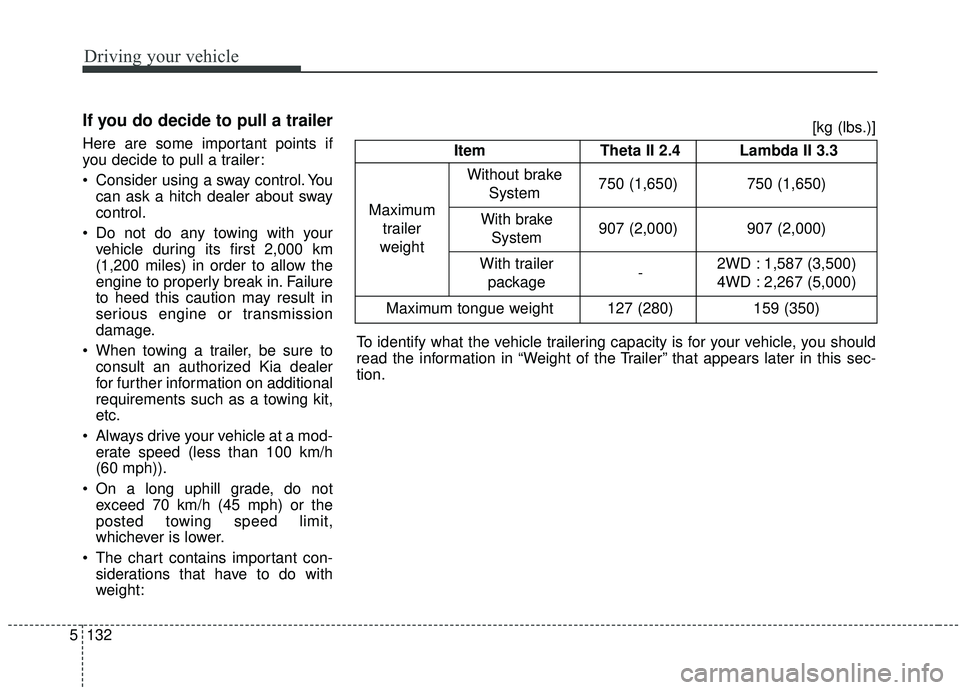
The chart contains important con- siderations that have to do with
weight: Item Theta II 2.4 Lambda II 3.3
Maximum trailer
weight Without brake
System 750 (1,650) 750 (1,650)
With brake
System907 (2,000) 907 (2,000)
With trailer package -2WD : 1,587 (3,500)
4WD : 2,267 (5,000)
Maximum tongue weight 127 (280) 159 (350)
To identify what the vehicle trailering capacity is for your vehicle, you should
read the information in “Weight of the Trailer” that appears later in this sec-
tion. [kg (lbs.)]
Page 428 of 573

What to do in an emergency
12
6
When you drive your vehicle from a
warm area to a cold area or from a
cold area to a warm area, or the out-
side temperature is greatly higher or
lower, you should check the tire infla-
tion pressure and adjust the tires to
the recommended tire inflation pres-
sure.
When filling tires with more air, con-
ditions to turn off the low tire pres-
sure telltale may not be met. This is
because a tire inflator has a margin
of error in performance. The low tire
pressure telltale will be turned off if
the tire pressure is above the recom-
mended tire inflation pressure.TPMS (Tire Pressure
Monitoring System)malfunction indicator
The low tire pressure telltale will illu-
minate after it blinks for approximate-
ly one minute when there is a prob-
lem with the Tire Pressure
Monitoring System. If the system is
able to correctly detect an underinfla-
tion warning at the same time as sys-
tem failure then it will illuminate both
the TPMS malfunction and low tire
pressure position telltales e.g. if
Front Left sensor fails, the TPMS
malfunction indicator illuminates, but
if the Front Right, Rear Left, or Rear
Right tire is under-inflated, the low
tire pressure position telltales may
illuminate together with the TPMS
malfunction indicator.
Have the system checked by an
authorized Kia dealer as soon as
possible to determine the cause of
the problem. The TPMS malfunction indicator
may be illuminated if the vehicle is
moving around electric power sup-
ply cables or radios transmitters
such as at police stations, govern-
ment and public offices, broadcast-
ing stations, military installations,
airports, or transmitting towers,
etc. This can interfere with normal
operation of the Tire Pressure
Monitoring System (TPMS).
The TPMS malfunction indicator may be illuminated if snow chains
are used or some separate elec-
tronic devices such as notebook
computer, mobile charger, remote
starter or navigation etc., are used
in the vehicle. This can interfere
with normal operation of the Tire
Pressure Monitoring System
(TPMS).
WARNING- Low pressure
damage
Do not drive on low pressure
tires. Significantly low tire pres-
sure can cause the tires to over-
heat and fail making the vehicle
unstable resulting in increased
braking distances and a loss of
vehicle control.
Page 437 of 573
621
What to do in an emergency
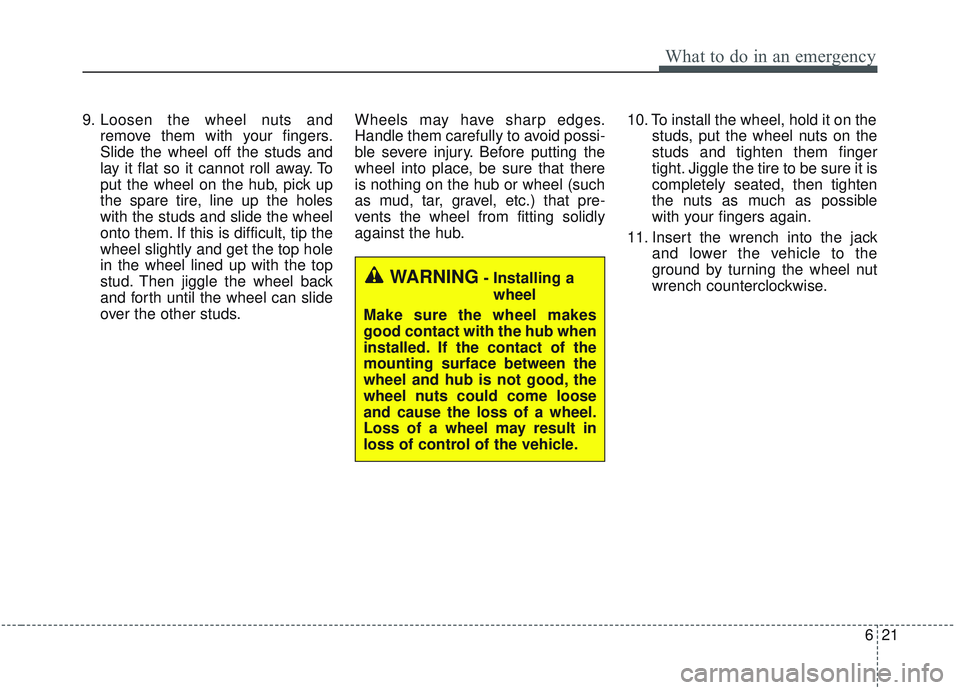
9. Loosen the wheel nuts andremove them with your fingers.
Slide the wheel off the studs and
lay it flat so it cannot roll away. To
put the wheel on the hub, pick up
the spare tire, line up the holes
with the studs and slide the wheel
onto them. If this is difficult, tip the
wheel slightly and get the top hole
in the wheel lined up with the top
stud. Then jiggle the wheel back
and forth until the wheel can slide
over the other studs. Wheels may have sharp edges.
Handle them carefully to avoid possi-
ble severe injury. Before putting the
wheel into place, be sure that there
is nothing on the hub or wheel (such
as mud, tar, gravel, etc.) that pre-
vents the wheel from fitting solidly
against the hub.
10. To install the wheel, hold it on the
studs, put the wheel nuts on the
studs and tighten them finger
tight. Jiggle the tire to be sure it is
completely seated, then tighten
the nuts as much as possible
with your fingers again.
11. Insert the wrench into the jack and lower the vehicle to the
ground by turning the wheel nut
wrench counterclockwise.
WARNING- Installing a
wheel
Make sure the wheel makes
good contact with the hub when
installed. If the contact of the
mounting surface between the
wheel and hub is not good, the
wheel nuts could come loose
and cause the loss of a wheel.
Loss of a wheel may result in
loss of control of the vehicle.
Page 440 of 573
What to do in an emergency
24
6
When using a compact spare tire,
observe the following precautions:
Under no circumstances should
you exceed 80 km/h (50 mph); a
higher speed could damage the
tire.
Ensure that you drive slow enough for the road conditions to avoid all
hazards. Any road hazard, such as
a pothole or debris, could serious-
ly damage the compact spare.
Any continuous road use of this tire could result in tire failure, loss of
vehicle control, and possible per-
sonal injury.
Do not exceed the vehicle’s maxi- mum load rating or the load-carry-
ing capacity shown on the sidewall
of the compact spare tire.
Avoid driving over obstacles. The compact spare tire diameter is
smaller than the diameter of a con-
ventional tire and reduces the
ground clearance approximately
25 mm (1 inch), which could result
in damage to the vehicle. Do not take this vehicle through an
automatic carwash while the com-
pact spare tire is installed.
Do not use the compact spare tire on any other vehicle because this
tire has been designed especially
for your vehicle.
The compact spare tire’s tread life is shorter than a regular tire. Inspect
your compact spare tire regularly
and replace worn compact spare
tires with the same size and design,
mounted on the same wheel.
The compact spare tire should not be used on any other wheels, nor
should standard tires, snow tires,
wheel covers or trim rings be used
with the compact spare wheel. If
such use is attempted, damage to
these items or other vehicle com-
ponents may occur.
Do not use more than one compact spare tire at a time.
Do not tow a trailer while the com- pact spare tire is installed.
Page 444 of 573

Maintenance
Engine compartment . . . . . . . . . . . . . . . . . . . . . . . . 7-3
Maintenance services . . . . . . . . . . . . . . . . . . . . . . . . 7-5
• Owner’s responsibility . . . . . . . . . . . . . . . . . . . . . . . . . 7-5
• Owner maintenance precautions . . . . . . . . . . . . . . . . . 7-6
Owner maintenance . . . . . . . . . . . . . . . . . . . . . . . . . 7-8
• Owner maintenance schedule . . . . . . . . . . . . . . . . . . . 7-8
Scheduled maintenance service. . . . . . . . . . . . . . . . 7-9
Explanation of scheduled maintenance items . . . 7-15
Checking fluid levels . . . . . . . . . . . . . . . . . . . . . . . 7-18
Engine oil. . . . . . . . . . . . . . . . . . . . . . . . . . . . . . . . . 7-19
• Checking the engine oil level . . . . . . . . . . . . . . . . . . . 7-19
• Changing the engine oil and filter . . . . . . . . . . . . . . . 7-20
Engine coolant . . . . . . . . . . . . . . . . . . . . . . . . . . . . 7-21
• Checking the coolant level . . . . . . . . . . . . . . . . . . . . . 7-21
• Changing the coolant . . . . . . . . . . . . . . . . . . . . . . . . . 7-23
Brake fluid . . . . . . . . . . . . . . . . . . . . . . . . . . . . . . . 7-24
• Checking the brake fluid level . . . . . . . . . . . . . . . . . . 7-24
Washer fluid . . . . . . . . . . . . . . . . . . . . . . . . . . . . . . 7-25
• Checking the washer fluid level . . . . . . . . . . . . . . . . . 7-25
Parking brake . . . . . . . . . . . . . . . . . . . . . . . . . . . . . 7-26
• Checking the parking brake. . . . . . . . . . . . . . . . . . . . 7-26
Air cleaner. . . . . . . . . . . . . . . . . . . . . . . . . . . . . . . . 7-27
• Filter replacement . . . . . . . . . . . . . . . . . . . . . . . . . . . . 7-27
Climate control air filter . . . . . . . . . . . . . . . . . . . . 7-29
• Filter inspection . . . . . . . . . . . . . . . . . . . . . . . . . . . . . . 7-29
Wiper blades . . . . . . . . . . . . . . . . . . . . . . . . . . . . . . 7-31
• Blade inspection . . . . . . . . . . . . . . . . . . . . . . . . . . . . . . 7-31
• Blade replacement . . . . . . . . . . . . . . . . . . . . . . . . . . . . 7-31
Battery . . . . . . . . . . . . . . . . . . . . . . . . . . . . . . . . . . . 7-\
34
• For best battery service . . . . . . . . . . . . . . . . . . . . . . . 7-34
• Battery recharging . . . . . . . . . . . . . . . . . . . . . . . . . . . 7-35
• Recharging battery . . . . . . . . . . . . . . . . . . . . . . . . . . . 7-35
• Reset items . . . . . . . . . . . . . . . . . . . . . . . . . . . . . . . . . . 7-36\
Tires and wheels . . . . . . . . . . . . . . . . . . . . . . . . . . . 7-37
• Tire care . . . . . . . . . . . . . . . . . . . . . . . . . . . . . . . . . . . 7-\
37
• Recommended cold tire inflation pressures . . . . . . . 7-37
• Tire pressure . . . . . . . . . . . . . . . . . . . . . . . . . . . . . . . . 7-38
• Checking tire inflation pressure. . . . . . . . . . . . . . . . . 7-38
• Tire rotation . . . . . . . . . . . . . . . . . . . . . . . . . . . . . . . . . 7-39
• Wheel alignment and tire balance . . . . . . . . . . . . . . . 7-40
• Tire replacement . . . . . . . . . . . . . . . . . . . . . . . . . . . . . 7-41
• Wheel replacement . . . . . . . . . . . . . . . . . . . . . . . . . . . 7-42
• Tire traction . . . . . . . . . . . . . . . . . . . . . . . . . . . . . . . . . 7-42
• Tire maintenance . . . . . . . . . . . . . . . . . . . . . . . . . . . . . 7-42
• Tire sidewall labeling . . . . . . . . . . . . . . . . . . . . . . . . . 7-42
• All season tires . . . . . . . . . . . . . . . . . . . . . . . . . . . . . . . 7-49
• Summer tires . . . . . . . . . . . . . . . . . . . . . . . . . . . . . . . . 7-49
• Snow tires . . . . . . . . . . . . . . . . . . . . . . . . . . . . . . . . . . . 7-\
49
• Radial-ply tires . . . . . . . . . . . . . . . . . . . . . . . . . . . . . . 7-49
7
Page 445 of 573

Fuses . . . . . . . . . . . . . . . . . . . . . . . . . . . . . . . . . . . . \
7-51
• Inner panel fuse replacement . . . . . . . . . . . . . . . . . . . 7-53
• Engine compartment fuse replacement. . . . . . . . . . . 7-55
• Fuse/relay panel description. . . . . . . . . . . . . . . . . . . . 7-58
Light bulbs . . . . . . . . . . . . . . . . . . . . . . . . . . . . . . . 7-69
• Bulb replacement precaution . . . . . . . . . . . . . . . . . . 7-69
• Light bulb position (Front). . . . . . . . . . . . . . . . . . . . . 7-71
• Light bulb position (Rear) . . . . . . . . . . . . . . . . . . . . . 7-72
• Light bulb position (Side) . . . . . . . . . . . . . . . . . . . . . . 7-73
• Headlamp (Low beam) bulb replacement(Headlamp Type A) . . . . . . . . . . . . . . . . . . . . . . . . . . 7-73
• Headlamp (High beam) bulb replacement (Headlamp Type A) . . . . . . . . . . . . . . . . . . . . . . . . . . 7-74
• Front turn signal lamp bulb replacement (Headlamp Type A) . . . . . . . . . . . . . . . . . . . . . . . . . . 7-76
• Position lamp (LED type) replacement (Headlamp Type A) . . . . . . . . . . . . . . . . . . . . . . . . . . 7-76
• Side marker (front) (LED type) bulb replacement . . 7-77
• Headlamp (LED type) replacement (Headlamp Type B) . . . . . . . . . . . . . . . . . . . . . . . . . . 7-77
• Side repeater lamp (LED type) bulb replacement . . 7-78
• Front fog lamp bulb replacement . . . . . . . . . . . . . . . 7-78
• Stop and tail lamp (Bulb type) bulb replacement . . 7-79
• Rear turn signal lamp (Bulb type) bulb replacement . . 7-80
• Side marker (rear) (Bulb type) bulb replacement . . 7-82 • Side marker (rear) (LED type) bulb replacement . . 7-83
• Tail lamp (inside) (Bulb type) bulb replacement . . . 7-83
• Back up lamp (Bulb type) bulb replacement . . . . . . 7-84
• Stop and tail lamp (LED type) bulb replacement . . 7-85
• High mounted stop lamp (LED type) bulb
replacement . . . . . . . . . . . . . . . . . . . . . . . . . . . . . . . . 7-85
• License plate lamp bulb replacement . . . . . . . . . . . . 7-86
• Map lamp (Bulb type) bulb replacement . . . . . . . . . 7-86
• Map lamp (LED type) bulb replacement . . . . . . . . . 7-87
• Room lamp bulb replacement . . . . . . . . . . . . . . . . . . 7-87
• Personal lamp (LED type) bulb replacement . . . . . . 7-88
• Glove box lamp replacement . . . . . . . . . . . . . . . . . . . 7-88
• Luggage lamp (Bulb type) bulb replacement . . . . . . 7-89
• Luggage lamp (LED type) bulb replacement . . . . . . 7-89
• Vanity mirror lamp (Bulb type) bulb replacement . . 7-90
• Vanity mirror lamp (LED type) bulb replacement . . 7-90
Appearance care . . . . . . . . . . . . . . . . . . . . . . . . . . . 7-91
• Exterior care . . . . . . . . . . . . . . . . . . . . . . . . . . . . . . . . 7-91
• Interior care . . . . . . . . . . . . . . . . . . . . . . . . . . . . . . . . . 7-96
Emission control system . . . . . . . . . . . . . . . . . . . 7-100
• Crankcase emission control system . . . . . . . . . . . . . 7-100
• Evaporative emission control (including ORVR: Onboard Refueling Vapor Recovery) system . . . . 7-100
• Exhaust emission control system . . . . . . . . . . . . . . . 7-101
7
Page 453 of 573
Maintenance
10
7
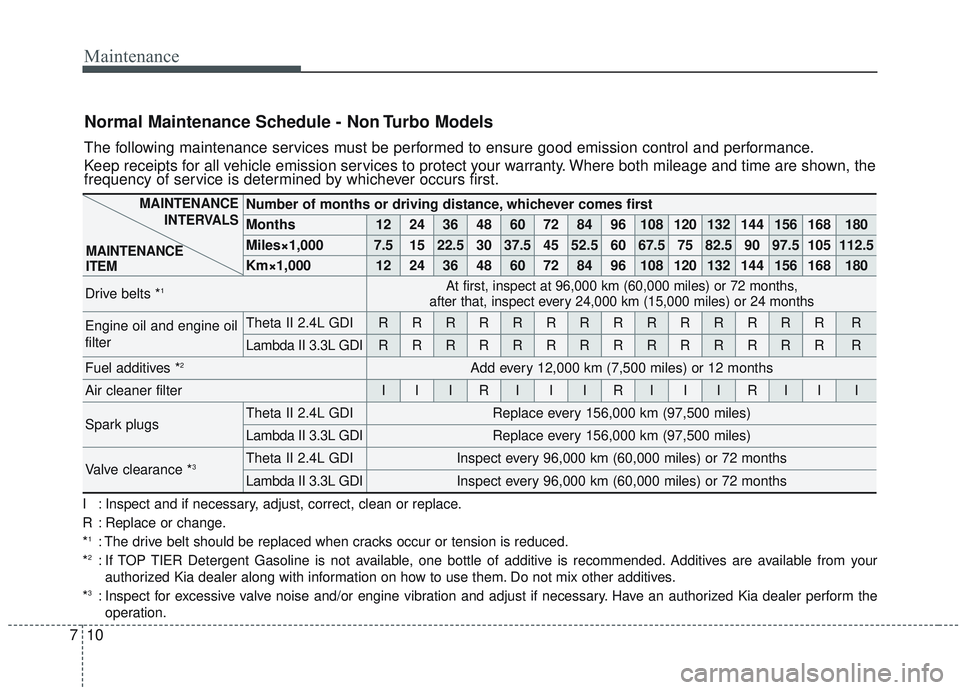
Normal Maintenance Schedule - Non Turbo Models
The following maintenance services must be performed to ensure good emission control and performance.
Keep receipts for all vehicle emission services to protect your warranty. Where both mileage and time are shown, the
frequency of service is determined by whichever occurs first.
Number of months or driving distance, whichever comes first
Months1224364860728496108120132144156168180
Miles×1,0007.51522.530 37.5 45 52.5 60 67.5 75 82.5 90 97.5 105 112.5
Km×1,00012 24 36 48 60 72 84 96 108 120 132 144 156 168 180
Drive belts *1At first, inspect at 96,000 km (60,000 miles) or 72 months,
after that, inspect every 24,000 km (15,000 miles) or 24 months
Engine oil and engine oil
filterTheta II 2.4L GDIRRRRRRRRRRRRRRR
Lambda II 3.3L GDIRRRRRRRRRRRRRRR
Fuel additives *2Add every 12,000 km (7,500 miles) or 12 months
Air cleaner filterIIIRIIIRIIIRIII
Spark plugsTheta II 2.4L GDIReplace every 156,000 km (97,500 miles)
Lambda II 3.3L GDIReplace every 156,000 km (97,500 miles)
Valve clearance *3Theta II 2.4L GDIInspect every 96,000 km (60,000 miles) or 72 months
Lambda II 3.3L GDIInspect every 96,000 km (60,000 miles) or 72 months
MAINTENANCE
INTERVALS
MAINTENANCE
ITEM
I : Inspect and if necessary, adjust, correct, clean or replace.
R : Replace or change.
*
1: The drive belt should be replaced when cracks occur or tension is reduced.
*2: If TOP TIER Detergent Gasoline is not available, one bottle of additive is recommended. Additives are available from your authorized Kia dealer along with information on how to use them. Do not mix other additives.
*
3: Inspect for excessive valve noise and/or engine vibration and adjust if necessary. Have an authorized Kia dealer perform the operation.
Page 454 of 573
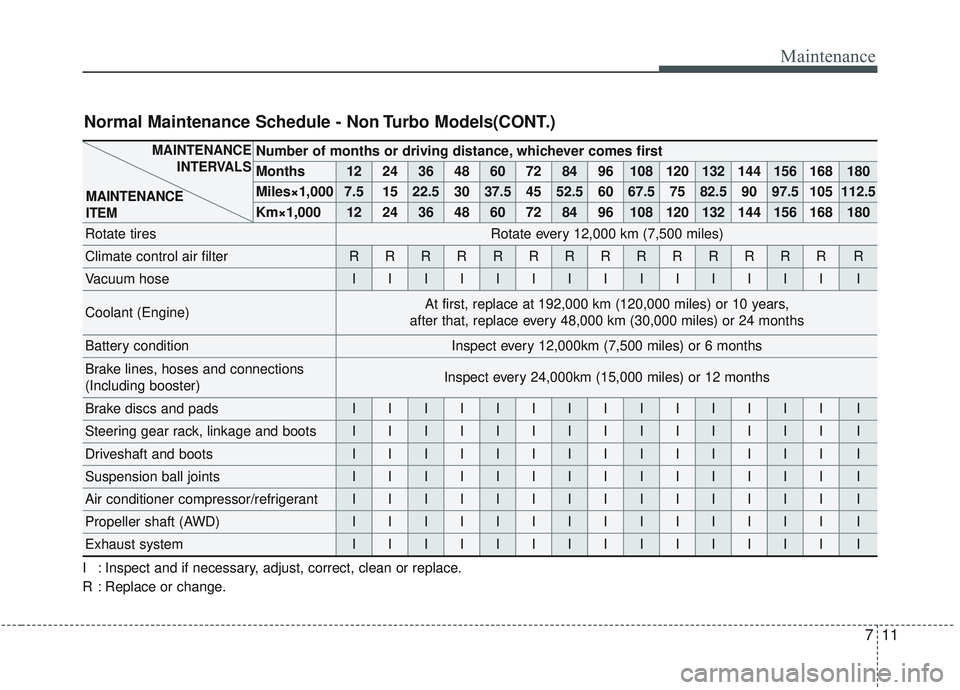
711
Maintenance
Number of months or driving distance, whichever comes first
Months1224364860728496108120132144156168180
Miles×1,0007.51522.530 37.5 45 52.5 60 67.5 75 82.5 90 97.5 105 112.5
Km×1,00012 24 36 48 60 72 84 96 108 120 132 144 156 168 180
Rotate tiresRotate every 12,000 km (7,500 miles)
Climate control air filterRRRRRRRRRRRRRRR
Vacuum hoseIIIIIIIIIIIIIII
Coolant (Engine)At first, replace at 192,000 km (120,000 miles) or 10 years,
after that, replace every 48,000 km (30,000 miles) or 24 months
Battery conditionInspect every 12,000km (7,500 miles) or 6 months
Brake lines, hoses and connections
(Including booster)Inspect every 24,000km (15,000 miles) or 12 months
Brake discs and padsIIIIIIIIIIIIIII
Steering gear rack, linkage and bootsIIIIIIIIIIIIIII
Driveshaft and bootsIIIIIIIIIIIIIII
Suspension ball jointsIIIIIIIIIIIIIII
Air conditioner compressor/refrigerantIIIIIIIIIIIIIII
Propeller shaft (AWD)IIIIIIIIIIIIIII
Exhaust systemIIIIIIIIIIIIIII
MAINTENANCE INTERVALS
MAINTENANCE
ITEM
Normal Maintenance Schedule - Non Turbo Models(CONT.)
I : Inspect and if necessary, adjust, correct, clean or replace.
R : Replace or change.