2019 KIA SEDONA sliding
[x] Cancel search: slidingPage 13 of 593
23
Your vehicle at a glance
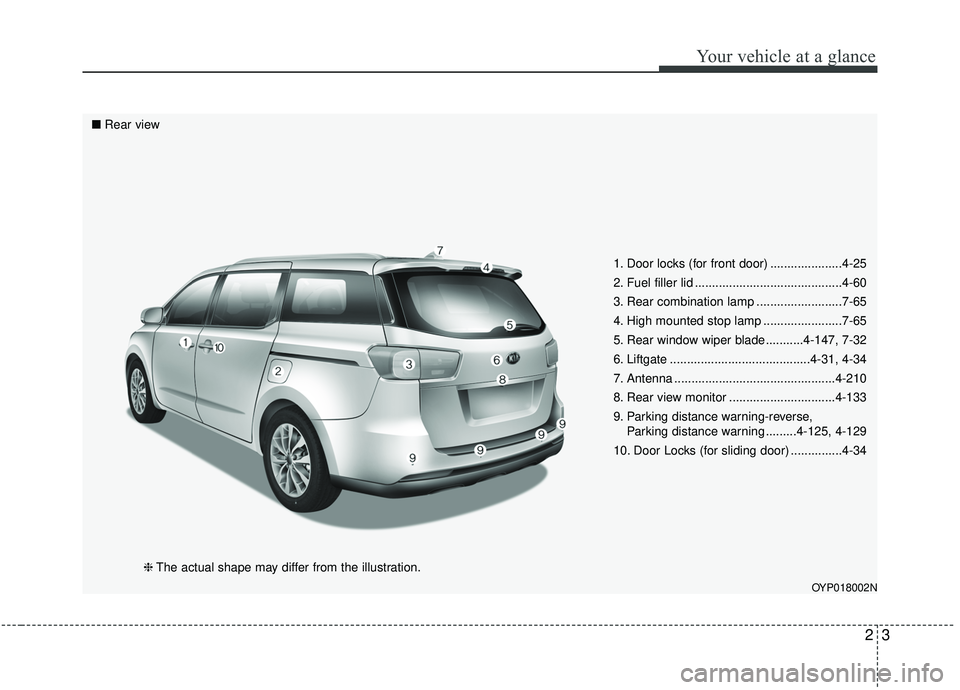
1. Door locks (for front door) .....................4-25
2. Fuel filler lid ...........................................4-60
3. Rear combination lamp .........................7-65
4. High mounted stop lamp .......................7-65
5. Rear window wiper blade ...........4-147, 7-32
6. Liftgate .........................................4-31, 4-34
7. Antenna ...............................................4-210
8. Rear view monitor ...............................4-133
9. Parking distance warning-reverse, Parking distance warning .........4-125, 4-129
10. Door Locks (for sliding door) ...............4-34
OYP018002N
■ Rear view
❈The actual shape may differ from the illustration.
Page 36 of 593
Safety features of your vehicle
20
3
1.Lift the armrest up , lower the head-
rests to the lowest position and
slide the seat inside. (if necessary).
2.Pull the walk-in strap (1) or recline lever (2) on the 2nd row seat when
the passenger gets in or out of the
3rd row seat.
3.Push the 2nd row seat to forward. After getting out, push the 2nd row
seat to the original position until it
clicks into place.
Make sure that the seat is locked in
place. In the walk-in position, the
front and back sliding function is
not fixed.Leg support (2nd row seat for SXL package)
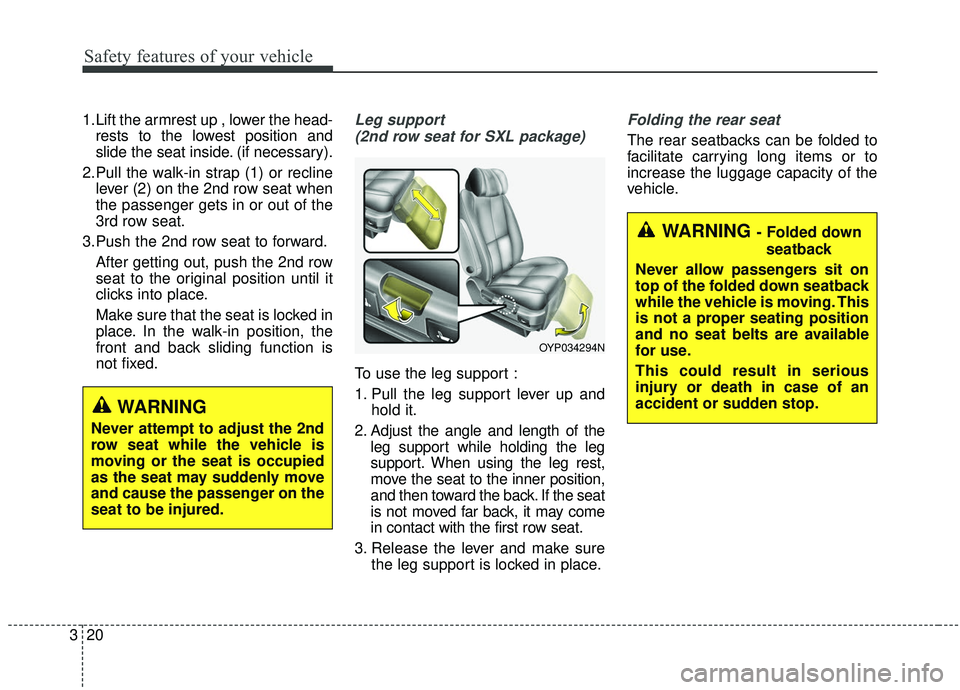
To use the leg support :
1. Pull the leg support lever up and hold it.
2. Adjust the angle and length of the leg support while holding the leg
support. When using the leg rest,
move the seat to the inner position,
and then toward the back. If the seat
is not moved far back, it may come
in contact with the first row seat.
3. Release the lever and make sure the leg support is locked in place.
Folding the rear seat
The rear seatbacks can be folded to
facilitate carrying long items or to
increase the luggage capacity of the
vehicle.
OYP034294N
WARNING
Never attempt to adjust the 2nd
row seat while the vehicle is
moving or the seat is occupied
as the seat may suddenly move
and cause the passenger on the
seat to be injured.
WARNING - Folded down
seatback
Never allow passengers sit on
top of the folded down seatback
while the vehicle is moving. This
is not a proper seating position
and no seat belts are available
for use.
This could result in serious
injury or death in case of an
accident or sudden stop.
Page 55 of 593
339
Safety features of your vehicle
✽ ✽NOTICE
If you are not able to pull out the
seat belt from the retractor, firmly
pull the belt out and release it. Then
you will be able to pull the belt out
smoothly.
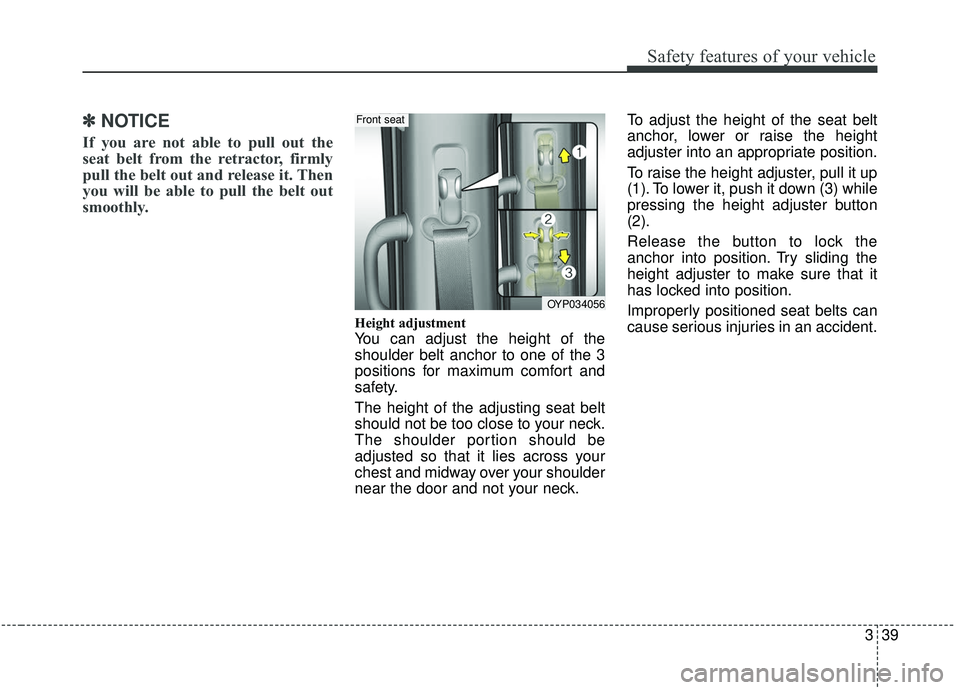
Height adjustment
You can adjust the height of the
shoulder belt anchor to one of the 3
positions for maximum comfort and
safety.
The height of the adjusting seat belt
should not be too close to your neck.
The shoulder portion should be
adjusted so that it lies across your
chest and midway over your shoulder
near the door and not your neck. To adjust the height of the seat belt
anchor, lower or raise the height
adjuster into an appropriate position.
To raise the height adjuster, pull it up
(1). To lower it, push it down (3) while
pressing the height adjuster button
(2).
Release the button to lock the
anchor into position. Try sliding the
height adjuster to make sure that it
has locked into position.
Improperly positioned seat belts can
cause serious injuries in an accident.
OYP034056
Front seat
Page 105 of 593
Features of your vehicle
Folding key . . . . . . . . . . . . . . . . . . . . . . . . . . . . . . . . 4-5
• Record your key number . . . . . . . . . . . . . . . . . . . . . . . 4-5
• Key operations . . . . . . . . . . . . . . . . . . . . . . . . . . . . . . . . 4-5
• Transmitter precautions . . . . . . . . . . . . . . . . . . . . . . . . 4-9
• Battery replacement . . . . . . . . . . . . . . . . . . . . . . . . . . 4-10
• Immobilizer system . . . . . . . . . . . . . . . . . . . . . . . . . . . 4-11
• Limp home (override) procedure. . . . . . . . . . . . . . . . 4-13
Smart key . . . . . . . . . . . . . . . . . . . . . . . . . . . . . . . . 4-14
• Record your key number . . . . . . . . . . . . . . . . . . . . . . 4-14
• Smart key function . . . . . . . . . . . . . . . . . . . . . . . . . . . 4-14
• Loss of the smart key . . . . . . . . . . . . . . . . . . . . . . . . . 4-18
• Smart key precautions . . . . . . . . . . . . . . . . . . . . . . . . 4-19
• Battery replacement . . . . . . . . . . . . . . . . . . . . . . . . . . 4-20
• Smart key immobilizer system . . . . . . . . . . . . . . . . . . 4-21
Theft-alarm system . . . . . . . . . . . . . . . . . . . . . . . . 4-22
• Armed stage . . . . . . . . . . . . . . . . . . . . . . . . . . . . . . . . . 4-22
• Theft-alarm stage . . . . . . . . . . . . . . . . . . . . . . . . . . . . 4-23
• Disarmed stage. . . . . . . . . . . . . . . . . . . . . . . . . . . . . . . 4-23
Door locks . . . . . . . . . . . . . . . . . . . . . . . . . . . . . . . . 4-25
• Operating door locks from outside the vehicle. . . . . 4-25
• Operating door locks from inside the vehicle . . . . . . 4-27
• Impact sensing door unlock system . . . . . . . . . . . . . . 4-30
• Automatic door lock system . . . . . . . . . . . . . . . . . . . . 4-30
• Child-protector rear door lock. . . . . . . . . . . . . . . . . . 4-30
Liftgate (for manual liftgate) . . . . . . . . . . . . . . . . 4-31
• Opening the liftgate . . . . . . . . . . . . . . . . . . . . . . . . . . . 4-31
• Closing the liftgate. . . . . . . . . . . . . . . . . . . . . . . . . . . . 4-32
• Emergency liftgate safety release. . . . . . . . . . . . . . . . 4-33
Power sliding door and power liftgate . . . . . . . . . 4-34
• Automatic stop and reversal . . . . . . . . . . . . . . . . . . . 4-36
• How to reset the power sliding door and power liftgate . . . . . . . . . . . . . . . . . . . . . . . . . . . . . . . 4-37
• Power door ON/OFF button. . . . . . . . . . . . . . . . . . . . 4-38
• Power sliding door operation . . . . . . . . . . . . . . . . . . . 4-39
• Power liftgate operation . . . . . . . . . . . . . . . . . . . . . . . 4-42
• Power liftgate non-opening conditions . . . . . . . . . . . 4-45
• Power liftgate opening height user setting . . . . . . . . 4-45
• Emergency liftgate safety release. . . . . . . . . . . . . . . . 4-46
• Smart liftgate . . . . . . . . . . . . . . . . . . . . . . . . . . . . . . . . 4-46
Windows . . . . . . . . . . . . . . . . . . . . . . . . . . . . . . . . . 4-52
• Power windows . . . . . . . . . . . . . . . . . . . . . . . . . . . . . . 4-53
Hood. . . . . . . . . . . . . . . . . . . . . . . . . . . . . . . . . . . . \
. 4-57
• Opening the hood . . . . . . . . . . . . . . . . . . . . . . . . . . . . 4-57
• Hood open warning . . . . . . . . . . . . . . . . . . . . . . . . . . . 4-58
• Closing the hood . . . . . . . . . . . . . . . . . . . . . . . . . . . . . 4-58
4
Page 106 of 593

Fuel filler lid . . . . . . . . . . . . . . . . . . . . . . . . . . . . . . 4-60
• Opening the fuel filler lid . . . . . . . . . . . . . . . . . . . . . . 4-60
• Closing the fuel filler lid . . . . . . . . . . . . . . . . . . . . . . . 4-60
• Emergency fuel filler lid release . . . . . . . . . . . . . . . . 4-63
Sunroof . . . . . . . . . . . . . . . . . . . . . . . . . . . . . . . . . . 4-64\
• Sliding the sunroof . . . . . . . . . . . . . . . . . . . . . . . . . . . 4-65
• Tilting the sunroof (for front sunroof) . . . . . . . . . . . 4-67
• Sunshade. . . . . . . . . . . . . . . . . . . . . . . . . . . . . . . . \
. . . . 4-67
• Resetting the sunroof . . . . . . . . . . . . . . . . . . . . . . . . . 4-68
• Rear sunroof lock . . . . . . . . . . . . . . . . . . . . . . . . . . . . 4-68
• Sunroof open warning. . . . . . . . . . . . . . . . . . . . . . . . . 4-69
Steering wheel . . . . . . . . . . . . . . . . . . . . . . . . . . . . . 4-70
• Power steering . . . . . . . . . . . . . . . . . . . . . . . . . . . . . . . 4-70
• Electric power steering . . . . . . . . . . . . . . . . . . . . . . . . 4-70
• Tilt and telescopic steering . . . . . . . . . . . . . . . . . . . . . 4-71
• Heated steering wheel . . . . . . . . . . . . . . . . . . . . . . . . . 4-72
• Horn . . . . . . . . . . . . . . . . . . . . . . . . . . . . . . . . . . . . \
. . . 4-73
Mirrors . . . . . . . . . . . . . . . . . . . . . . . . . . . . . . . . . . 4-74\
• Inside rearview mirror . . . . . . . . . . . . . . . . . . . . . . . . 4-74
• Outside rearview mirror. . . . . . . . . . . . . . . . . . . . . . . 4-84
Instrument cluster . . . . . . . . . . . . . . . . . . . . . . . . . 4-89
• Instrument cluster control . . . . . . . . . . . . . . . . . . . . . 4-90
• LCD display control . . . . . . . . . . . . . . . . . . . . . . . . . . 4-90
• Gauges . . . . . . . . . . . . . . . . . . . . . . . . . . . . . . . . . . . . \
. 4-91
• Transaxle Shift Indicator . . . . . . . . . . . . . . . . . . . . . . 4-94
LCD display . . . . . . . . . . . . . . . . . . . . . . . . . . . . . . 4-95
• LCD modes. . . . . . . . . . . . . . . . . . . . . . . . . . . . . . . . . . 4-95\
Trip modes (Trip computer) . . . . . . . . . . . . . . . . . 4-96
• Trip modes . . . . . . . . . . . . . . . . . . . . . . . . . . . . . . . . . . 4-96\
• Fuel economy . . . . . . . . . . . . . . . . . . . . . . . . . . . . . . . . 4-96
• Accumulated driving information mode . . . . . . . . . . 4-98
• One time driving information mode . . . . . . . . . . . . . 4-98
• Digital speedometer . . . . . . . . . . . . . . . . . . . . . . . . . . . 4-99
• Smart shift . . . . . . . . . . . . . . . . . . . . . . . . . . . . . . . . . . 4-99\
• Turn by turn mode . . . . . . . . . . . . . . . . . . . . . . . . . . . 4-99
• Assist mode. . . . . . . . . . . . . . . . . . . . . . . . . . . . . . . . . 4-100
• Distance to empty . . . . . . . . . . . . . . . . . . . . . . . . . . . 4-102
• User settings mode. . . . . . . . . . . . . . . . . . . . . . . . . . . 4-103
• Warning messages . . . . . . . . . . . . . . . . . . . . . . . . . . . 4-107
Warning and indicator lights . . . . . . . . . . . . . . . 4-113
• Warning lights . . . . . . . . . . . . . . . . . . . . . . . . . . . . . . 4-113
• Indicator lights. . . . . . . . . . . . . . . . . . . . . . . . . . . . . . 4-120
Parking distance warning-reverse . . . . . . . . . . . 4-125
• Operation of the parking distance warning-reverse . 4-125
• Non-operational conditions of the parking distance
warning-reverse . . . . . . . . . . . . . . . . . . . . . . . . . . . . 4-126
• Parking distance warning-reverse precautions . . . 4-127
• Self-diagnosis . . . . . . . . . . . . . . . . . . . . . . . . . . . . . . . 4-128
4
Page 111 of 593
47
Features of your vehicle
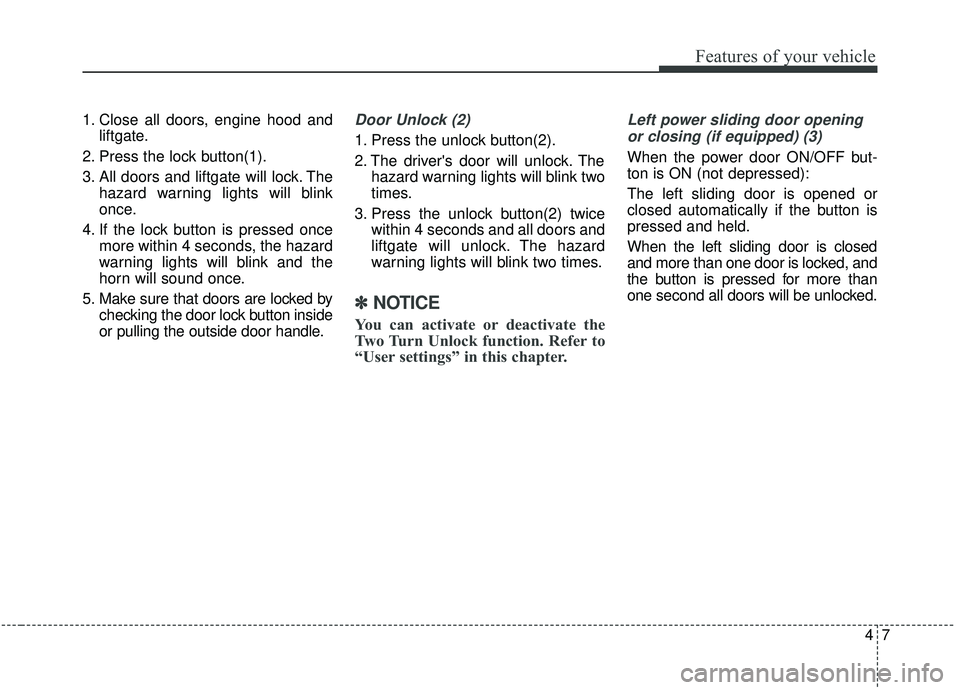
1. Close all doors, engine hood andliftgate.
2. Press the lock button(1).
3. All doors and liftgate will lock. The hazard warning lights will blink
once.
4. If the lock button is pressed once more within 4 seconds, the hazard
warning lights will blink and the
horn will sound once.
5. Make sure that doors are locked by checking the door lock button inside
or pulling the outside door handle.Door Unlock (2)
1. Press the unlock button(2).
2. The driver's door will unlock. Thehazard warning lights will blink two
times.
3. Press the unlock button(2) twice within 4 seconds and all doors and
liftgate will unlock. The hazard
warning lights will blink two times.
✽ ✽NOTICE
You can activate or deactivate the
Two Turn Unlock function. Refer to
“User settings” in this chapter.
Left power sliding door opening
or closing (if equipped) (3)
When the power door ON/OFF but-
ton is ON (not depressed):
The left sliding door is opened or
closed automatically if the button is
pressed and held.
When the left sliding door is closed
and more than one door is locked, and
the button is pressed for more than
one second all doors will be unlocked.
Page 112 of 593
Features of your vehicle
84
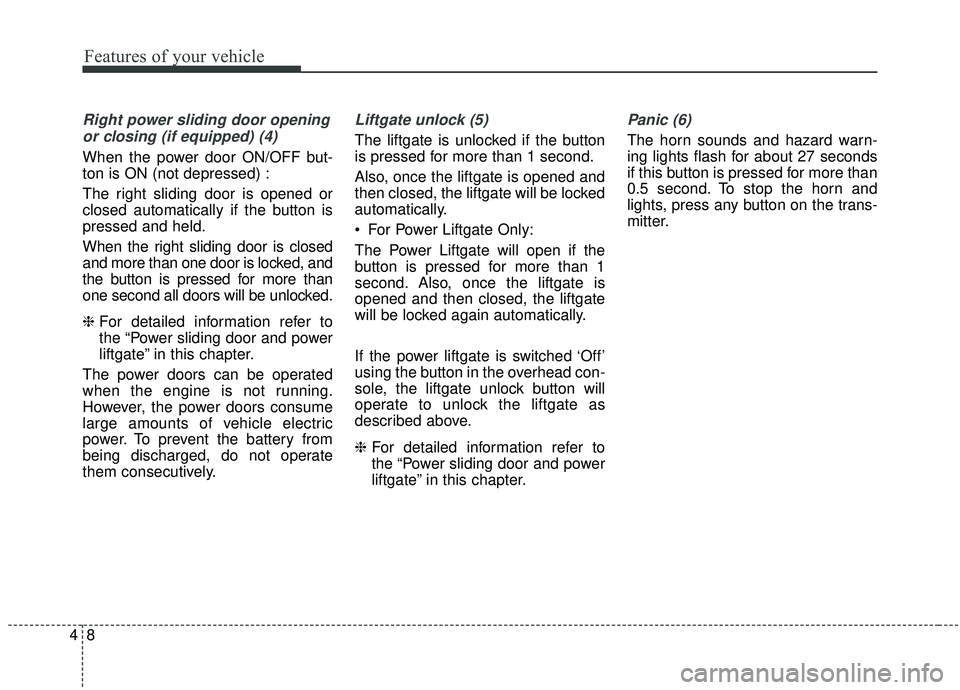
Right power sliding door openingor closing (if equipped) (4)
When the power door ON/OFF but-
ton is ON (not depressed) :
The right sliding door is opened or
closed automatically if the button is
pressed and held.
When the right sliding door is closed
and more than one door is locked, and
the button is pressed for more than
one second all doors will be unlocked.
❈ For detailed information refer to
the “Power sliding door and power
liftgate” in this chapter.
The power doors can be operated
when the engine is not running.
However, the power doors consume
large amounts of vehicle electric
power. To prevent the battery from
being discharged, do not operate
them consecutively.
Liftgate unlock (5)
The liftgate is unlocked if the button
is pressed for more than 1 second.
Also, once the liftgate is opened and
then closed, the liftgate will be locked
automatically.
For Power Liftgate Only:
The Power Liftgate will open if the
button is pressed for more than 1
second. Also, once the liftgate is
opened and then closed, the liftgate
will be locked again automatically.
If the power liftgate is switched ‘Off’
using the button in the overhead con-
sole, the liftgate unlock button will
operate to unlock the liftgate as
described above.
❈ For detailed information refer to
the “Power sliding door and power
liftgate” in this chapter.
Panic (6)
The horn sounds and hazard warn-
ing lights flash for about 27 seconds
if this button is pressed for more than
0.5 second. To stop the horn and
lights, press any button on the trans-
mitter.
Page 121 of 593
417
Features of your vehicle
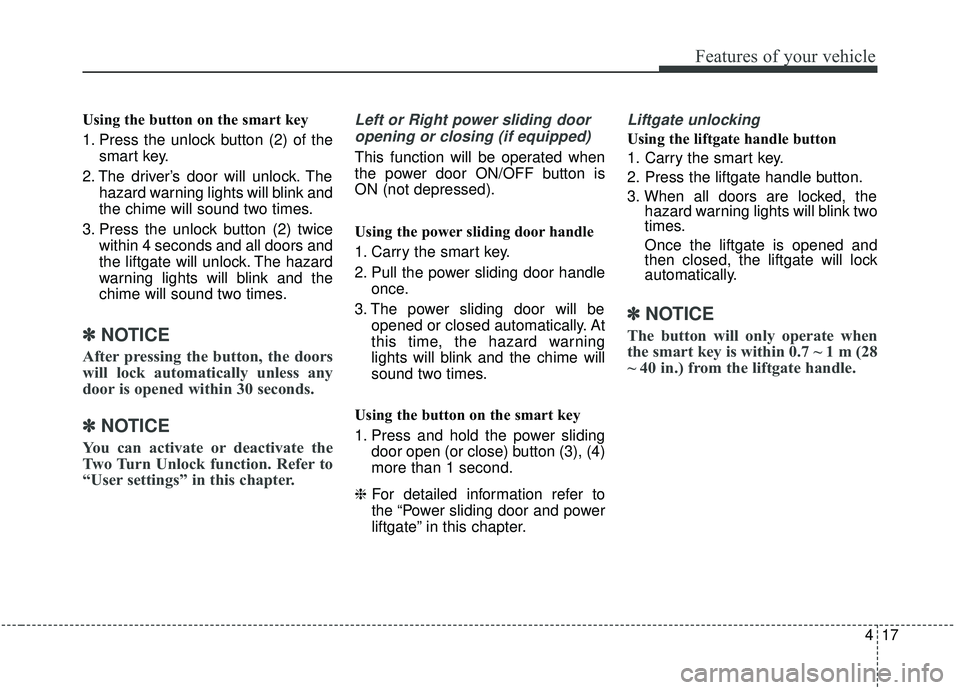
Using the button on the smart key
1. Press the unlock button (2) of thesmart key.
2. The driver’s door will unlock. The hazard warning lights will blink and
the chime will sound two times.
3. Press the unlock button (2) twice within 4 seconds and all doors and
the liftgate will unlock. The hazard
warning lights will blink and the
chime will sound two times.
✽ ✽NOTICE
After pressing the button, the doors
will lock automatically unless any
door is opened within 30 seconds.
✽ ✽NOTICE
You can activate or deactivate the
Two Turn Unlock function. Refer to
“User settings” in this chapter.
Left or Right power sliding door
opening or closing (if equipped)
This function will be operated when
the power door ON/OFF button is
ON (not depressed).
Using the power sliding door handle
1. Carry the smart key.
2. Pull the power sliding door handle once.
3. The power sliding door will be opened or closed automatically. At
this time, the hazard warning
lights will blink and the chime will
sound two times.
Using the button on the smart key
1. Press and hold the power sliding door open (or close) button (3), (4)
more than 1 second.
❈ For detailed information refer to
the “Power sliding door and power
liftgate” in this chapter.
Liftgate unlocking
Using the liftgate handle button
1. Carry the smart key.
2. Press the liftgate handle button.
3. When all doors are locked, the
hazard warning lights will blink two
times.
Once the liftgate is opened and
then closed, the liftgate will lock
automatically.
✽ ✽NOTICE
The button will only operate when
the smart key is within 0.7 ~ 1 m (28
~ 40 in.) from the liftgate handle.