2019 KIA SEDONA change wheel
[x] Cancel search: change wheelPage 412 of 593
Driving your vehicle
98
5
LANE DEPARTURE WARNING (LDW) SYSTEM (IF EQUIPPED)
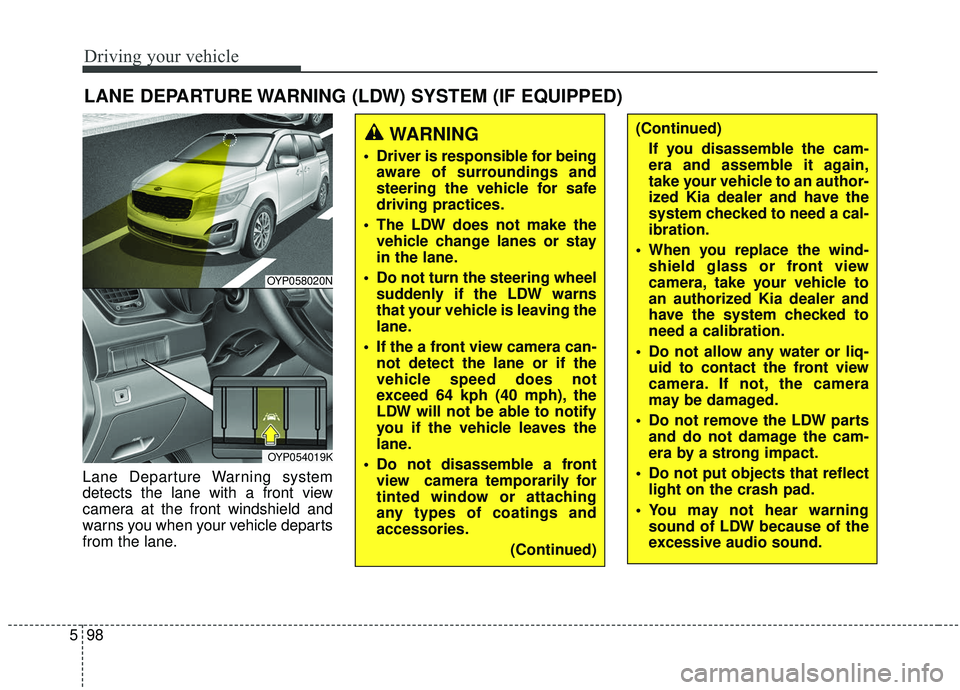
Lane Departure Warning system
detects the lane with a front view
camera at the front windshield and
warns you when your vehicle departs
from the lane.
WARNING
Driver is responsible for being
aware of surroundings and
steering the vehicle for safe
driving practices.
The LDW does not make the vehicle change lanes or stay
in the lane.
Do not turn the steering wheel suddenly if the LDW warns
that your vehicle is leaving the
lane.
If the a front view camera can- not detect the lane or if the
vehicle speed does not
exceed 64 kph (40 mph), the
LDW will not be able to notify
you if the vehicle leaves the
lane.
Do not disassemble a front view camera temporarily for
tinted window or attaching
any types of coatings and
accessories.
(Continued)
(Continued)If you disassemble the cam-
era and assemble it again,
take your vehicle to an author-
ized Kia dealer and have the
system checked to need a cal-
ibration.
When you replace the wind- shield glass or front view
camera, take your vehicle to
an authorized Kia dealer and
have the system checked to
need a calibration.
Do not allow any water or liq- uid to contact the front view
camera. If not, the camera
may be damaged.
Do not remove the LDW parts and do not damage the cam-
era by a strong impact.
Do not put objects that reflect light on the crash pad.
You may not hear warning sound of LDW because of the
excessive audio sound.
OYP058020N
OYP054019K
Page 417 of 593
5103
Driving your vehicle
Your vehicle's fuel economy depends
mainly on your style of driving, where
you drive and when you drive.
Each of these factors affects how
many miles (kilometers) you can get
from a gallon (liter) of fuel. To operate
your vehicle as economically as pos-
sible, use the following driving sug-
gestions to help save money in both
fuel and repairs:
Drive smoothly. Accelerate at amoderate rate. Don't make "jack-
rabbit" starts or full-throttle shifts
and maintain a steady cruising
speed. Don't race between stop-
lights. Try to adjust your speed to
the traffic so you don't have to
change speeds unnecessarily.
Avoid heavy traffic whenever pos-
sible. Always maintain a safe dis-
tance from other vehicles so you
can avoid unnecessary braking.
This also reduces brake wear.
Drive at a moderate speed. The faster you drive, the more fuel your
vehicle uses. Driving at a moderate
speed, especially on the highway,
is one of the most effective ways to
reduce fuel consumption. Don't "ride" the brake pedal. This
can increase fuel consumption and
also increase wear on these com-
ponents. In addition, driving with
your foot resting on the brake pedal
may cause the brakes to overheat,
which reduces their effectiveness
and may lead to more serious con-
sequences.
Take care of your tires. Keep them inflated to the recommended pres-
sure. Incorrect inflation, either too
much or too little, results in unnec-
essary tire wear. Check the tire
pressures at least once a month.
Be sure that the wheels are aligned correctly. Improper align-
ment can result from hitting curbs
or driving too fast over irregular
surfaces. Poor alignment causes
faster tire wear and may also result
in other problems as well as
greater fuel consumption. Keep your vehicle in good condi-
tion. For better fuel economy and
reduced maintenance costs, main-
tain your vehicle in accordance
with the maintenance schedule in
section 7. If you drive your vehicle
in severe conditions, more frequent
maintenance is required (see sec-
tion 7 for details).
Keep your vehicle clean. For maxi- mum service, your vehicle should
be kept clean and free of corrosive
materials. It is especially important
that mud, dirt, ice, etc. not be
allowed to accumulate on the
underside of the vehicle. This extra
weight can result in increased fuel
consumption and also contribute to
corrosion.
Travel lightly. Don't carry unneces- sary weight in your vehicle. Weight
reduces fuel economy.
Don't let the engine idle longer than necessary. If you are waiting
(and not in traffic), turn off your
engine and restart only when
you're ready to go.
ECONOMICAL OPERATION
Page 419 of 593
5105
Driving your vehicle
Hazardous driving conditions
When hazardous driving conditions
are encountered such as water,
snow, ice, mud, sand, or similar haz-
ards, follow these suggestions:
Drive cautiously and allow extradistance for braking.
Avoid sudden braking or steering.
When braking with non-ABS brakes pump the brake pedal with
a light up-and-down motion until
the vehicle is stopped.
Do not pump the brake pedal on a
vehicle equipped with ABS. If stalled in snow, mud, or sand,
use second gear. Accelerate slow-
ly to avoid spinning the drive
wheels.
Use sand, rock salt, or other non- slip material under the drive
wheels to provide traction when
stalled in ice, snow, or mud.
Reducing the risk of a rollover
This multi-purpose passenger vehi-
cle is defined as a Crossover Utility
Vehicle (CUV). CUV’s have higher
ground clearance and a narrower
track to make them capable of per-
forming in a wide variety of off-road
applications. Specific design charac-
teristics give them a higher center of
gravity than ordinary vehicles. An
advantage of the higher ground
clearance is a better view of the
road, which allows you to anticipate
problems. They are not designed for
cornering at the same speeds as
conventional passenger vehicles,
any more than low-slung sports vehi-
cles are designed to perform satis-
factorily in off-road conditions. Due to
this risk, driver and passengers are
strongly recommended to buckle
their seat belts. In a rollover crash,
an unbelted person is more likely to
die than a person wearing a seat
belt. There are steps that a driver can
make to reduce the risk of a rollover.
SPECIAL DRIVING CONDITIONS
WARNING- Downshifting
Do not downshift with an auto-
matic transaxle while driving on
slippery surfaces. The sudden
change in tire speed could
cause the tires to skid and
result in an accident.
Page 429 of 593
5115
Driving your vehicle
Remember that trailering is different
than just driving your vehicle by itself.
Trailering means changes in han-
dling, durability, and fuel economy.
Successful, safe trailering requires
correct equipment, and it has to be
used properly.
This section contains many time-test-
ed, important trailering tips and safe-
ty rules. Many of these are important
for your safety and that of your pas-
sengers. Please read this section
carefully before you pull a trailer.
Load-pulling components such as
the engine, transaxle, wheel assem-
blies, and tires are forced to work
harder against the load of the added
weight. The engine is required to
operate at relatively higher speeds
and under greater loads. This addi-
tional burden generates extra heat.
The trailer also adds considerably to
wind resistance, increasing the
pulling requirements.Hitches
It's important to have the correct
hitch equipment. Crosswinds, large
trucks going by, and rough roads are
a few reasons why you’ll need the
right hitch. Here are some rules to
follow:
Will you have to make any holes inthe body of your vehicle when you
install a trailer hitch? If you do, then
be sure to seal the holes later
when you remove the hitch.
If you don’t seal them, deadly car-
bon monoxide (CO) from your
exhaust can get into your vehicle,
as well as dirt and water.
The bumpers on your vehicle are not intended for hitches. Do not
attach rental hitches or other
bumper-type hitches to them. Use
only a frame-mounted hitch that
does not attach to the bumper.
Kia trailer hitch accessory is avail- able at an authorized Kia dealer.
Safety chains
You should always attach chains
between your vehicle and your trail-
er. Cross the safety chains under the
tongue of the trailer so that the
tongue will not drop to the road if it
becomes separated from the hitch.
Instructions about safety chains may
be provided by the hitch manufactur-
er or by the trailer manufacturer.
Follow the manufacturer’s recom-
mendation for attaching safety
chains. Always leave just enough
slack so you can turn with your trail-
er. And, never allow safety chains to
drag on the ground.
Page 431 of 593
5117
Driving your vehicle
Following distance
Stay at least twice as far behind the
vehicle ahead as you would when
driving your vehicle without a trailer.
This can help you avoid situations
that require heavy braking and sud-
den turns.
Passing
You’ll need more passing distance
up ahead when you’re towing a trail-
er. And, because of the increased
vehicle length, you’ll need to go
much farther beyond the passed
vehicle before you can return to your
lane. Due to the added load to the
engine when going uphill the vehicle
may also take longer to pass than it
would on flat ground.
Backing up
Hold the bottom of the steering
wheel with one hand. Then, to move
the trailer to the left, just move your
hand to the left. To move the trailer to
the right, move your hand to the
right. Always back up slowly and, if
possible, have someone guide you.
Making turns
When you’re turning with a trailer,
make wider turns than normal. Do
this so your trailer won’t strike soft
shoulders, curbs, road signs, trees,
or other objects near the edge of the
road. Avoid jerky or sudden maneu-
vers. Signal well in advance before
turning or lane changes.
Turn signals when towing a trailer
When you tow a trailer, your vehicle
has to have a different turn signal
flasher and extra wiring. The green
arrows on your instrument panel will
flash whenever you signal a turn or
lane change. Properly connected,
the trailer lights will also flash to alert
other drivers you’re about to turn,
change lanes, or stop.
When towing a trailer, the green
arrows on your instrument panel will
flash for turns even if the bulbs on the
trailer are burned out. Thus, you may
think drivers behind you are seeing
your signals when, in fact, they are
not. It’s important to check occasion-
ally to be sure the trailer bulbs are still
working. You must also check the
lights every time you disconnect and
then reconnect the wires.
Do not connect a trailer lighting sys-
tem directly to your vehicle’s lighting
system. Use only an approved trailer
wiring harness.
An authorized Kia dealer can assist
you in installing the wiring harness.
Page 452 of 593

69
What to do in an emergency
IF YOU HAVE A FLAT TIRE
Jack and tools
The jack and wheel lug nut wrench
are stored in the luggage compart-
ment.
Remove the panel indicated in the
illustration.
(1) Jack
(2) Wheel lug nut wrench(Jack handle)
Jacking instructions
The jack is provided for emergency
tire changing only.
To prevent the jack from “rattling”
while the vehicle is in motion, store it
properly.
Follow jacking instructions to reduce
the possibility of personal injury. Always move the vehicle complete-
ly off the road and onto the shoul-
der before trying to change a tire.
The jack should be used on a firm
level ground. If you cannot find a
firm, level place off the road, call a
towing service company for assis-
tance.
Be sure to use the correct front and rear jacking positions on the vehi-
cle; never use the bumpers or any
other part of the vehicle for jack
support.
Do not allow anyone to remain in the vehicle while it is on the jack.
Make sure any children present are in a secure place away from
the road and from the vehicle to be
raised with the jack.
WARNING- Changing tires
Never attempt vehicle repairs in
the traffic lanes of a public road
or highway.
OYP064029N
WARNING- Tire Jack
Do not place any portion of your
body under a vehicle that is only
supported by a jack since the
vehicle can easily roll off the
jack. Use vehicle support stands.
Page 458 of 593

615
What to do in an emergency
To prevent vehicle movement whilechanging a tire, always set the
parking brake fully, and always
block the wheel diagonally oppo-
site the wheel being changed.
We recommend that the wheels of the vehicle be blocked, and that no
person remain in a vehicle that is
being jacked.
6.Loosen the wheel lug nuts counter-clockwise one turn each, but do
not remove any nut until the tire
has been raised off the ground.
7.Place the jack at the front (1) orrear (2) jacking position closest to
the tire you are changing. Place the
jack at the designated locations
under the frame. The jacking posi-
tions are plates welded to the
frame with two tabs and a raised
dot to index with the jack.
OYP068028N
OYP064023N/Q
OYP064022N
Page 460 of 593
617
What to do in an emergency
10. To install the wheel, hold it on thestuds, put the wheel nuts on the
studs and tighten them finger
tight. Jiggle the tire to be sure it is
completely seated, then tighten
the nuts as much as possible
with your fingers again.
11. Insert the wrench into the jack and lower the vehicle to the
ground by turning the wheel nut
wrench counterclockwise.
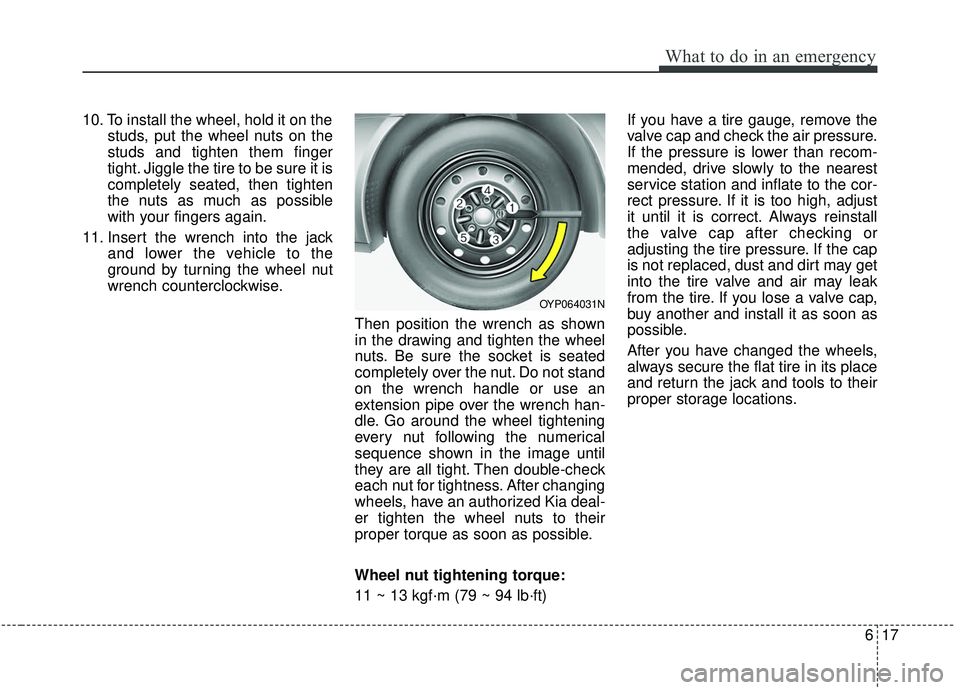
Then position the wrench as shown
in the drawing and tighten the wheel
nuts. Be sure the socket is seated
completely over the nut. Do not stand
on the wrench handle or use an
extension pipe over the wrench han-
dle. Go around the wheel tightening
every nut following the numerical
sequence shown in the image until
they are all tight. Then double-check
each nut for tightness. After changing
wheels, have an authorized Kia deal-
er tighten the wheel nuts to their
proper torque as soon as possible.
Wheel nut tightening torque:
11 ~ 13 kgf·m (79 ~ 94 lb·ft) If you have a tire gauge, remove the
valve cap and check the air pressure.
If the pressure is lower than recom-
mended, drive slowly to the nearest
service station and inflate to the cor-
rect pressure. If it is too high, adjust
it until it is correct. Always reinstall
the valve cap after checking or
adjusting the tire pressure. If the cap
is not replaced, dust and dirt may get
into the tire valve and air may leak
from the tire. If you lose a valve cap,
buy another and install it as soon as
possible.
After you have changed the wheels,
always secure the flat tire in its place
and return the jack and tools to their
proper storage locations.
OYP064031N