2019 KIA RIO tires
[x] Cancel search: tiresPage 361 of 503
What to do in an emergency
28
7
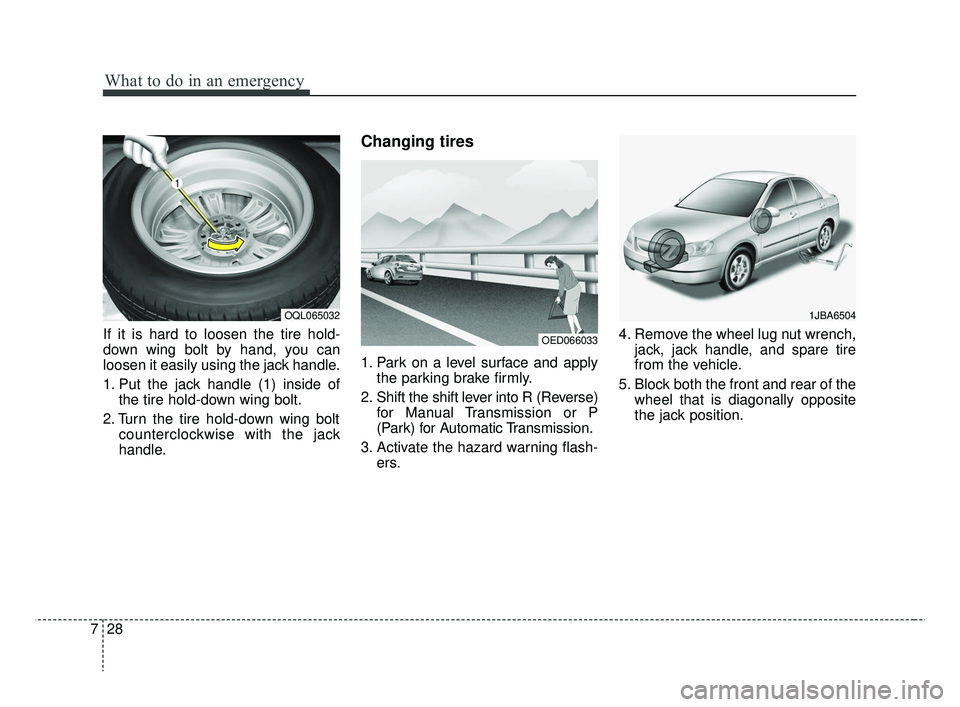
If it is hard to loosen the tire hold-
down wing bolt by hand, you can
loosen it easily using the jack handle.
1. Put the jack handle (1) inside of
the tire hold-down wing bolt.
2. Turn the tire hold-down wing bolt counterclockwise with the jack
handle.
Changing tires
1. Park on a level surface and applythe parking brake firmly.
2. Shift the shift lever into R (Reverse) for Manual Transmission or P
(Park) for Automatic Transmission.
3. Activate the hazard warning flash- ers. 4. Remove the wheel lug nut wrench,
jack, jack handle, and spare tire
from the vehicle.
5. Block both the front and rear of the wheel that is diagonally opposite
the jack position.
OED066033
1JBA6504OQL065032
SC CAN (ENG) 7.qxp 7/18/2018 5:39 PM Page 28
Page 364 of 503
731
What to do in an emergency
10. To install the wheel, hold it on thestuds, put the wheel nuts on the
studs and tighten them finger
tight. Jiggle the tire to be sure it is
completely seated, then tighten
the nuts as much as possible
with your fingers again.
11. Lower the vehicle to the ground by turning the wheel nut wrench
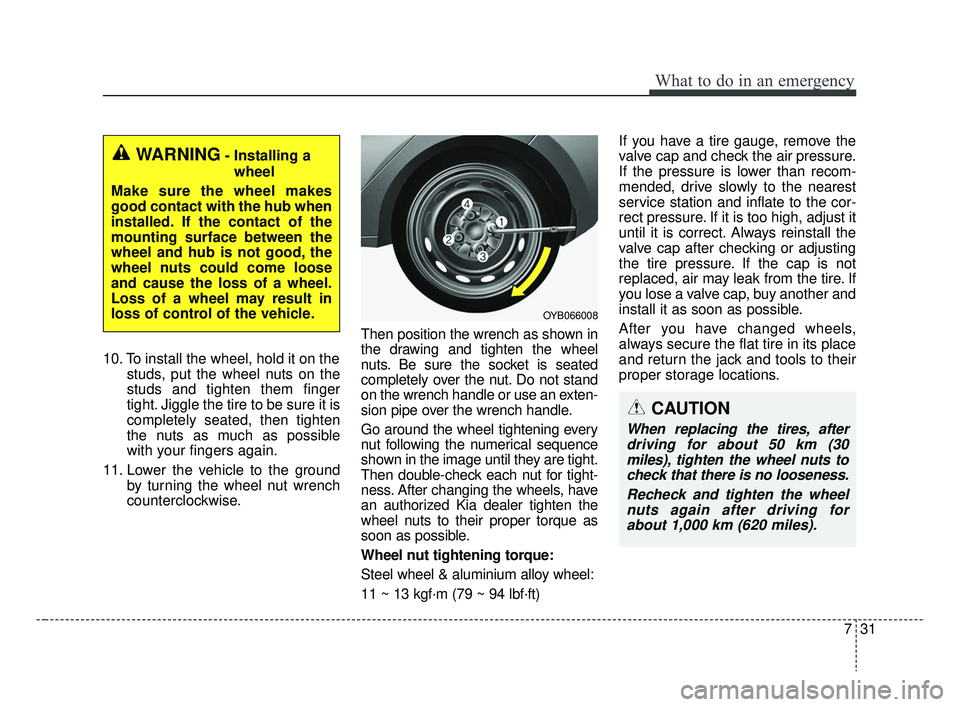
counterclockwise. Then position the wrench as shown in
the drawing and tighten the wheel
nuts. Be sure the socket is seated
completely over the nut. Do not stand
on the wrench handle or use an exten-
sion pipe over the wrench handle.
Go around the wheel tightening every
nut following the numerical sequence
shown in the image until they are tight.
Then double-check each nut for tight-
ness. After changing the wheels, have
an authorized Kia dealer tighten the
wheel nuts to their proper torque as
soon as possible.
Wheel nut tightening torque:
Steel wheel & aluminium alloy wheel:
11 ~ 13 kgf·m (79 ~ 94 lbf·ft) If you have a tire gauge, remove the
valve cap and check the air pressure.
If the pressure is lower than recom-
mended, drive slowly to the nearest
service station and inflate to the cor-
rect pressure. If it is too high, adjust it
until it is correct. Always reinstall the
valve cap after checking or adjusting
the tire pressure. If the cap is not
replaced, air may leak from the tire. If
you lose a valve cap, buy another and
install it as soon as possible.
After you have changed wheels,
always secure the flat tire in its place
and return the jack and tools to their
proper storage locations.
WARNING- Installing a
wheel
Make sure the wheel makes
good contact with the hub when
installed. If the contact of the
mounting surface between the
wheel and hub is not good, the
wheel nuts could come loose
and cause the loss of a wheel.
Loss of a wheel may result in
loss of control of the vehicle.
OYB066008
CAUTION
When replacing the tires, after driving for about 50 km (30miles), tighten the wheel nuts tocheck that there is no looseness.
Recheck and tighten the wheelnuts again after driving forabout 1,000 km (620 miles).
SC CAN (ENG) 7.qxp 7/18/2018 5:39 PM Page 31
Page 365 of 503
What to do in an emergency
32
7
Note that most lug nuts do not have
metric threads. Be sure to use
extreme care in checking for thread
style before installing aftermarket lug
nuts or wheels. If in doubt, consult an
authorized Kia dealer. To prevent the jack, jack handle,
wheel lug nut wrench and spare tire
from rattling while the vehicle is in
motion, store them properly.
Check the inflation pressures as
soon as possible after installing the
spare tire. Adjust it to the specified
pressure, if necessary. Refer to
“Tires and wheels” in section 8.
Important - use of compact spare
tire (if equipped)
Your vehicle is equipped with a com-
pact spare tire. This compact spare
tire takes up less space than a regu-
lar-size tire. This tire is smaller than a
conventional tire and is designed for
temporary use only.
You should drive carefully when the
compact spare is in use. The com-
pact spare should be replaced by the
proper conventional tire and rim at
the first opportunity.
The operation of this vehicle is not
recommended with more than one
compact spare tire in use at the
same time.
CAUTION- Replacing lug nuts
Make certain during wheelremoval that the same nuts thatwere removed are reinstalled -or, if replaced, that nuts withmetric threads and the samechamfer configuration are used.Your vehicle has metric threadson the wheel studs and nuts.Installation of a non-metricthread nut on a metric stud willnot secure the wheel to the hubproperly and will damage thestud so that it must be replaced.
WARNING- Wheel studs
Do not drive your vehicle with
damaged wheel studs. If the
studs are damaged, they may
lose their ability to retain the
wheel. This could lead to the
loss of the wheel and a collision.
SC CAN (ENG) 7.qxp 7/18/2018 5:39 PM Page 32
Page 367 of 503
What to do in an emergency
34
7
Do not use the compact spare tire
on any other vehicle because this
tire has been designed especially
for your vehicle.
The compact spare tire’s tread life is shorter than a regular tire.
Inspect your compact spare tire
regularly and replace worn com-
pact spare tires with the same size
and design, mounted on the same
wheel.
The compact spare tire should not be used on any other wheels, nor
should standard tires, snow tires,
wheel covers or trim rings be used
with the compact spare wheel. If
such use is attempted, damage to
these items or other car compo-
nents may occur.
Do not use more than one compact spare tire at a time.
Do not tow a trailer while the com- pact spare tire is installed.
SC CAN (ENG) 7.qxp 7/18/2018 5:39 PM Page 34
Page 373 of 503
Maintenance
Engine compartment . . . . . . . . . . . . . . . . . . . . . . . . 8-4
Maintenance services . . . . . . . . . . . . . . . . . . . . . . . . 8-5
• Owner’s responsibility . . . . . . . . . . . . . . . . . . . . . . . . . 8-5
• Owner maintenance precautions . . . . . . . . . . . . . . . . . 8-6
Owner maintenance . . . . . . . . . . . . . . . . . . . . . . . . . 8-7
• Owner maintenance schedule. . . . . . . . . . . . . . . . . . . . 8-7
Scheduled maintenance service. . . . . . . . . . . . . . . 8-10
• Scheduled maintenance service precaution . . . . . . . 8-10
Explanation of scheduled maintenance items . . . 8-16
Checking fluid levels . . . . . . . . . . . . . . . . . . . . . . . 8-20
Engine oil. . . . . . . . . . . . . . . . . . . . . . . . . . . . . . . . . 8-21
• Checking the engine oil level . . . . . . . . . . . . . . . . . . . 8-21
• Changing the engine oil and filter . . . . . . . . . . . . . . . 8-22
Engine coolant . . . . . . . . . . . . . . . . . . . . . . . . . . . . 8-23
• Checking the coolant level . . . . . . . . . . . . . . . . . . . . . 8-23
• Changing the coolant . . . . . . . . . . . . . . . . . . . . . . . . . 8-25
Brake/clutch fluid . . . . . . . . . . . . . . . . . . . . . . . . . . 8-26
• Checking the brake/clutch fluid level . . . . . . . . . . . . 8-26
Washer fluid . . . . . . . . . . . . . . . . . . . . . . . . . . . . . . 8-27
• Checking the washer fluid level . . . . . . . . . . . . . . . . . 8-27
Parking brake . . . . . . . . . . . . . . . . . . . . . . . . . . . . . 8-28
• Checking the parking brake. . . . . . . . . . . . . . . . . . . . 8-28
Air cleaner. . . . . . . . . . . . . . . . . . . . . . . . . . . . . . . . 8-29
• Filter replacement . . . . . . . . . . . . . . . . . . . . . . . . . . . . 8-29
Climate control air filter . . . . . . . . . . . . . . . . . . . . 8-31
• Filter inspection . . . . . . . . . . . . . . . . . . . . . . . . . . . . . . 8-31
Wiper blades . . . . . . . . . . . . . . . . . . . . . . . . . . . . . . 8-33
• Blade inspection . . . . . . . . . . . . . . . . . . . . . . . . . . . . . . 8-33
• Blade replacement . . . . . . . . . . . . . . . . . . . . . . . . . . . . 8-33
Battery . . . . . . . . . . . . . . . . . . . . . . . . . . . . . . . . . . . 8-\
37
• For best battery service . . . . . . . . . . . . . . . . . . . . . . . 8-37
• Recharging the battery . . . . . . . . . . . . . . . . . . . . . . . . 8-38
• Reset items . . . . . . . . . . . . . . . . . . . . . . . . . . . . . . . . . . 8-39\
Tires and wheels . . . . . . . . . . . . . . . . . . . . . . . . . . . 8-40
• Tire care . . . . . . . . . . . . . . . . . . . . . . . . . . . . . . . . . . . . \
8-40
• Recommended cold tire inflation pressures . . . . . . . 8-40
• Tire pressure . . . . . . . . . . . . . . . . . . . . . . . . . . . . . . . . 8-41
• Checking tire inflation pressure. . . . . . . . . . . . . . . . . 8-41
• Tire rotation . . . . . . . . . . . . . . . . . . . . . . . . . . . . . . . . . 8-42
• Wheel alignment and tire balance . . . . . . . . . . . . . . . 8-43
• Tire replacement . . . . . . . . . . . . . . . . . . . . . . . . . . . . . 8-44
• Wheel replacement . . . . . . . . . . . . . . . . . . . . . . . . . . . 8-45
• Tire traction . . . . . . . . . . . . . . . . . . . . . . . . . . . . . . . . . 8-45
• Tire maintenance . . . . . . . . . . . . . . . . . . . . . . . . . . . . . 8-45
• Tire sidewall labeling . . . . . . . . . . . . . . . . . . . . . . . . . 8-45
• All season tires . . . . . . . . . . . . . . . . . . . . . . . . . . . . . . . 8-52
• Summer tires . . . . . . . . . . . . . . . . . . . . . . . . . . . . . . . . 8-52
• Snow tires . . . . . . . . . . . . . . . . . . . . . . . . . . . . . . . . . . . 8-\
53
8
SC CAN (ENG) 8.qxp 7/18/2018 5:32 PM Page 1
Page 374 of 503

• Radial-ply tires . . . . . . . . . . . . . . . . . . . . . . . . . . . . . . 8-53
• Low aspect ratio tire . . . . . . . . . . . . . . . . . . . . . . . . . . 8-54
Fuses . . . . . . . . . . . . . . . . . . . . . . . . . . . . . . . . . . . . \
8-55
• Inner panel fuse replacement . . . . . . . . . . . . . . . . . . . 8-57
• Memory fuse . . . . . . . . . . . . . . . . . . . . . . . . . . . . . . . . 8-58
• Engine compartment fuse replacement. . . . . . . . . . . 8-59
• Fuse/relay panel description. . . . . . . . . . . . . . . . . . . . 8-61
Light bulbs . . . . . . . . . . . . . . . . . . . . . . . . . . . . . . . 8-70
• Bulb replacement precaution . . . . . . . . . . . . . . . . . . 8-70
• Light bulb position (front) . . . . . . . . . . . . . . . . . . . . . 8-72
• Light bulb position (rear) (5 door) . . . . . . . . . . . . . . 8-73
• Light bulb position (rear) (4 door) . . . . . . . . . . . . . . 8-74
• Light bulb position (side) . . . . . . . . . . . . . . . . . . . . . . 8-75
• Headlamp (Low/High beam) (Bulb type) bulb replacement (Headlamp Type A) . . . . . . . . . . . . . . . 8-75
• Side marker (front) (Bulb type) bulb replacement (Headlamp Type A) . . . . . . . . . . . . . . . . . . . . . . . . . . 8-76
• Front turn signal lamp bulb replacement (Headlamp Type A) . . . . . . . . . . . . . . . . . . . . . . . . . . 8-77
• Headlamp (Low/High beam) (Bulb type) bulb replacement (Headlamp Type B) . . . . . . . . . . . . . . . 8-78
• Headlamp (Low/High beam) (LED type) bulb replacement (Headlamp Type B) . . . . . . . . . . . . . . . 8-79
• Front turn signal lamp bulb replacement (Headlamp Type B) . . . . . . . . . . . . . . . . . . . . . . . . . . 8-79 • Side marker (front) (LED type) bulb replacement
(Headlamp Type B) . . . . . . . . . . . . . . . . . . . . . . . . . . 8-80
• Front fog lamp bulb replacement . . . . . . . . . . . . . . . 8-80
• Position lamp + DRL (LED type) bulb r eplacement . 8-81
• Daytime running lamp (Bulb type) bulb replacement . . . . . . . . . . . . . . . . . . . . . . . . . . . . . . . . 8-81
• Side repeater lamp (LED type) bulb Replacement . 8-82
• Side repeater lamp (bulb type) bulb Replacement . 8-82
• Stop and tail lamp bulb replacement (for 5 door) . . 8-83
• Rear turn signal lamp bulb replacement (for 5 door) . . . . . . . . . . . . . . . . . . . . . . . . . . . . . . . . . 8-84
• Stop and tail lamp (LED type) bulb replacement (for 5 door) . . . . . . . . . . . . . . . . . . . . . . . . . . . . . . . . . 8-85
• Back-up lamp bulb replacement (for 5 door) . . . . . . 8-86
• Tail lamp (inside) bulb replacement (for 5 door) . . . 8-86
• Side marker (rear) (Bulb type) bulb replacement (Rear combination lamp Type A) (for 5 door) . . . . 8-87
• Side marker (rear) (LED type) bulb replacement (Rear combination lamp Type B) (for 5 door) . . . . 8-88
• High mounted stop lamp bulb replacement (for 5 door) . . . . . . . . . . . . . . . . . . . . . . . . . . . . . . . . . 8-89
• License plate lamp bulb replacement . . . . . . . . . . . . 8-89
• Rear turn signal lamp bulb replacement (for 4 door) . . . . . . . . . . . . . . . . . . . . . . . . . . . . . . . . . 8-90
• Stop and tail lamp / Side marker (Bulb type) replacement (for 4 door) . . . . . . . . . . . . . . . . . . . . . . 8-91
8
SC CAN (ENG) 8.qxp 7/18/2018 5:32 PM Page 2
Page 379 of 503
87
Maintenance
OWNER MAINTENANCE
The following lists are vehicle checks
and inspections that should be per-
formed by the owner or an author-
ized Kia dealer at the frequencies
indicated to help ensure safe,
dependable operation of your vehi-
cle.
Any adverse conditions should be
brought to the attention of your deal-
er as soon as possible.
These Owner Maintenance Checks
are generally not covered by war-
ranties and you may be charged for
labor, parts and lubricants used.Owner maintenance schedule
When you stop for fuel:
Check the engine oil level.
Check the coolant level in coolantreservoir.
Check the windshield washer fluid level.
Look for low or under-inflated tires.
While operating your vehicle:
Note any changes in the sound of the exhaust or any smell of
exhaust fumes in the vehicle.
Check for vibrations in the steering wheel. Notice any increased steer-
ing effort or looseness in the steer-
ing wheel, or change in its straight-
ahead position.
Notice if your vehicle constantly turns slightly or “pulls” to one side
when traveling on smooth, level
road.
When stopping, listen and check for unusual sounds, pulling to one
side, increased brake pedal travel
or “hard-to-push” brake pedal.
WARNING- Hot coolant
Be careful when checking your
engine coolant level when the
engine is hot. Scalding hot
coolant and steam may blow
out under pressure.
SC CAN (ENG) 8.qxp 7/18/2018 5:32 PM Page 7
Page 380 of 503
Maintenance
88
If any slipping or changes in theoperation of your transmission
occurs, check the transmission
fluid level.
Check manual transmission opera- tion, including clutch operation.
Check the automatic transmission P (Park) function.
Check the parking brake.
Check for fluid leaks under your vehicle (water dripping from the air
conditioning system during or after
use is normal).At least monthly:
Check the coolant level in theengine coolant reservoir.
Check the operation of all exterior lights, including the stoplights, turn
signals and hazard warning flash-
ers.
Check the inflation pressures of all tires including the spare for tires
that are worn, show uneven wear,
or are damaged.
Check for loose wheel lug nuts.
At least twice a year (i.e., every Spring and Fall) :
Check the radiator, heater and air conditioning hoses for leaks or
damage.
Check the windshield washer spray and wiper operation. Clean
the wiper blades with clean cloth
dampened with washer fluid.
Check the headlight alignment.
Check the muffler, exhaust pipes, shields and clamps.
Check the lap/shoulder belts for wear and function.
SC CAN (ENG) 8.qxp 7/18/2018 5:32 PM Page 8