Page 463 of 503
891
Maintenance
Stop and tail lamp / Side mark-
er (Bulb type) replacement
(for 4 door)
1. Open the trunk lid.
2. Remove the service cover bypulling out the service cover. 3. Remove the socket from the
assembly by turning the socket
counterclockwise until the tabs on
the socket align with the slots on
the assembly.
4. Remove the bulb from the socket by pressing it in and rotating it
counterclockwise until the tabs on
the bulb align with the slots in the
socket. Pull the bulb out of the
socket.
5. Insert a new bulb by inserting it into the socket and rotating it until
it locks into place. 6. Install the socket in the assembly
by aligning the tabs on the socket
with the slots in the assembly.
Push the socket into the assembly
and turn the socket clockwise.
7. Install the service cover.
OSC077030N
OSC077032N
SC CAN (ENG) 8.qxp 7/18/2018 5:36 PM Page 91
Page 464 of 503

Maintenance
92
8
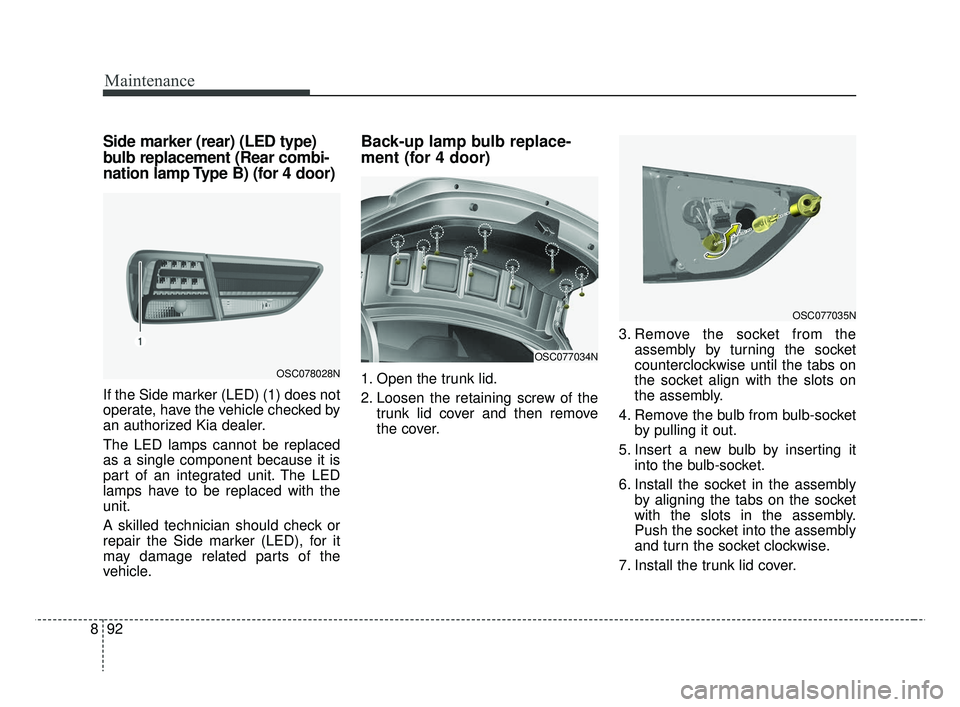
Side marker (rear) (LED type)
bulb replacement (Rear combi-
nation lamp Type B) (for 4 door)
If the Side marker (LED) (1) does not
operate, have the vehicle checked by
an authorized Kia dealer.
The LED lamps cannot be replaced
as a single component because it is
part of an integrated unit. The LED
lamps have to be replaced with the
unit.
A skilled technician should check or
repair the Side marker (LED), for it
may damage related parts of the
vehicle.
Back-up lamp bulb replace-
ment (for 4 door)
1. Open the trunk lid.
2. Loosen the retaining screw of the
trunk lid cover and then remove
the cover. 3. Remove the socket from the
assembly by turning the socket
counterclockwise until the tabs on
the socket align with the slots on
the assembly.
4. Remove the bulb from bulb-socket by pulling it out.
5. Insert a new bulb by inserting it into the bulb-socket.
6. Install the socket in the assembly by aligning the tabs on the socket
with the slots in the assembly.
Push the socket into the assembly
and turn the socket clockwise.
7. Install the trunk lid cover.
OSC077034N
OSC077035N
OSC078028N
SC CAN (ENG) 8.qxp 7/18/2018 5:37 PM Page 92
Page 465 of 503
893
Maintenance
Tail lamp (Bulb type) bulb
replacement (for 4 door)
1. Open the trunk lid.
2. Loosen the retaining screw of thetrunk lid cover and then remove
the cover. 3. Remove the socket from the
assembly by turning the socket
counterclockwise until the tabs on
the socket align with the slots on
the assembly.
4. Remove the bulb from the socket by pressing it in and rotating it
counterclockwise until the tabs on
the bulb align with the slots in the
socket. Pull the bulb out of the
socket.
5. Insert a new bulb by inserting it into the socket and rotating it until
it locks into place. 6. Install the socket in the assembly
by aligning the tabs on the socket
with the slots in the assembly.
Push the socket into the assembly
and turn the socket clockwise.
7. Install the trunk lid cover.
OSC077036N
OSC077034N
SC CAN (ENG) 8.qxp 7/18/2018 5:37 PM Page 93
Page 466 of 503

Maintenance
94
8
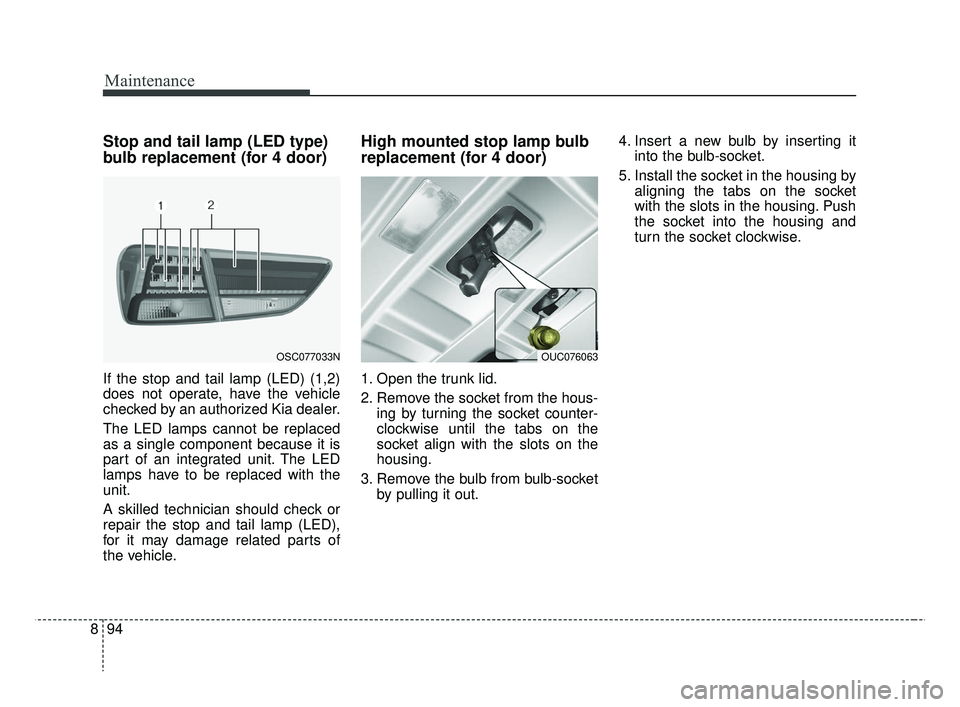
Stop and tail lamp (LED type)
bulb replacement (for 4 door)
If the stop and tail lamp (LED) (1,2)
does not operate, have the vehicle
checked by an authorized Kia dealer.
The LED lamps cannot be replaced
as a single component because it is
part of an integrated unit. The LED
lamps have to be replaced with the
unit.
A skilled technician should check or
repair the stop and tail lamp (LED),
for it may damage related parts of
the vehicle.
High mounted stop lamp bulb
replacement (for 4 door)
1. Open the trunk lid.
2. Remove the socket from the hous-
ing by turning the socket counter-
clockwise until the tabs on the
socket align with the slots on the
housing.
3. Remove the bulb from bulb-socket by pulling it out. 4. Insert a new bulb by inserting it
into the bulb-socket.
5. Install the socket in the housing by aligning the tabs on the socket
with the slots in the housing. Push
the socket into the housing and
turn the socket clockwise.
OUC076063OSC077033N
SC CAN (ENG) 8.qxp 7/18/2018 5:37 PM Page 94
Page 467 of 503
895
Maintenance
Trunk lamp bulb replacement
(for 4 door)
1. Using a flat-blade screwdriver,gently pry the lens cover from
lamp housing.
2. Remove the bulb by pulling it straight out.
3. Install a new bulb in the socket.
4. Align the lens cover tabs with the lamp housing notches and snap
the lens into place.
Map lamp bulb replacement
OYB076070
WARNING- Interior lamps
Prior to working on the Interior
lamps, ensure that the “OFF”
button is depressed to avoid
burning your fingers or receiv-
ing an electric shock.
OUC076061
CAUTION
Be careful not to dirty or dam- age the lens, lens tab, and plas-tic housings.
SC CAN (ENG) 8.qxp 7/18/2018 5:37 PM Page 95
Page 469 of 503
897
Maintenance
Room lamp bulb replacement 1. Using a flat-blade screwdriver,gently pry the lens cover from
lamp housing.
2. Remove the bulb by pulling it straight out.
3. Install a new bulb in the socket.
4. Align the lens cover tabs with the lamp housing notches and snap
the lens into place.Glove box lamp bulb
replacement
1. Using a flat-blade screwdriver,gently pry the lamp assembly from
interior.
2. Remove the bulb by pulling it straight out.
3. Install a new bulb in the socket.
4. Install the lamp assembly to interior.
OYB076072
WARNING- Interior lamps
Prior to working on the Interior
lamps, ensure that the “OFF”
button is depressed to avoid
burning your fingers or receiv-
ing an electric shock.
OYB076071
CAUTION
Be careful not to dirty or dam- age the lens, lens tab, and plas-tic housings.
SC CAN (ENG) 8.qxp 7/18/2018 5:37 PM Page 97
Page 470 of 503
Maintenance
98
8
Tailgate room lamp bulb
replacement (for 5 door)
1. Using a flat-blade screwdriver,
gently pry the lens cover from
lamp housing.
2. Remove the bulb by pulling it straight out.
3. Install a new bulb in the socket.
4. Align the lens cover tabs with the lamp housing notches and snap
the lens into place.
CAUTION
Be careful not to dirty or dam-age the lens, lens tab, and plas-tic housings.
OYB076073
CAUTION
Be careful not to dirty or dam-age the lens, lens tab, and plas-tic housings.
SC CAN (ENG) 8.qxp 7/18/2018 5:37 PM Page 98
Page 478 of 503

Maintenance
106
8
CAUTION - Leather
When cleaning leather products
(steering wheel, seats etc.), useneutral detergents or low alco-hol content solutions. If you usehigh alcohol content solutionsor acid/alkaline detergents, thecolor of the leather may fade orthe surface may get stripped off.
Cleaning the leather seats
Remove all contaminations instant- ly. Refer to instructions below for
removal of each contaminant.
Cosmetic products(sunscreen, foundation, etc.)
- Apply cleansing cream on a clothand wipe the contaminated point.
Wipe off the cream with a wet cloth
and remove water with a dry cloth.
Beverages(coffee, soft drink, etc.) - Apply a small amount of neutraldetergent and wipe until contami-
nations do not smear.
Oil - Remove oil instantly withabsorbable cloth and wipe with
stain remover for natural leather
only.
Chewing gum - Harden the gum with ice andremove gradually.
Fabric seat cover using precau-
tions (If equipped)
Please clean the fabric seats regu-
larly with a vacuum cleaner in con-
sideration of fabric material charac-
teristics. If they are heavily soiled
with beverage stains, etc., use a suit-
able interior cleaner. To prevent dam-
age to seat covers, wipe off the seat
covers down to the seams with a
large wiping motion and moderate
pressure using a soft sponge or
microfiber cloth.
Velcro closures on clothing or sharp
objects may cause snagging or
scratches on the surface of the seats.
Make sure not to rub such objects
against the surface.
SC CAN (ENG) 8.qxp 7/18/2018 5:37 PM Page 106